
'63 Falcon project


Thread Starter
|
Second Generation Moderator
Feb 2010 ROTM winner
Jan 2013 ROTM winner
Feb 2010 ROTM winner
Jan 2013 ROTM winner
Joined: Aug 2008
Posts: 9,097
From: Portland, Or
ROTM Winner's Club
Hi Vall,
Just saw a 1965 Mustang Gasser go through Barrett Jackson for $110,000.00 with an injected SOC 427. They said the motor was worth more than the coast of the car at $70.000.
Is it typical gasser style to have the rear tires stick out from the fenders a couple of inches? This Mustang did and I see both of yours do.
Wish I was closer to your end of the country so I could drop by for a visit.
The Exploder rear would have been easy and cheap to narrow, but I wanted to leave it wider than stock to also have the tires outside a couple inches.
Thread Starter
|
Second Generation Moderator
Feb 2010 ROTM winner
Jan 2013 ROTM winner
Feb 2010 ROTM winner
Jan 2013 ROTM winner
Joined: Aug 2008
Posts: 9,097
From: Portland, Or
ROTM Winner's Club
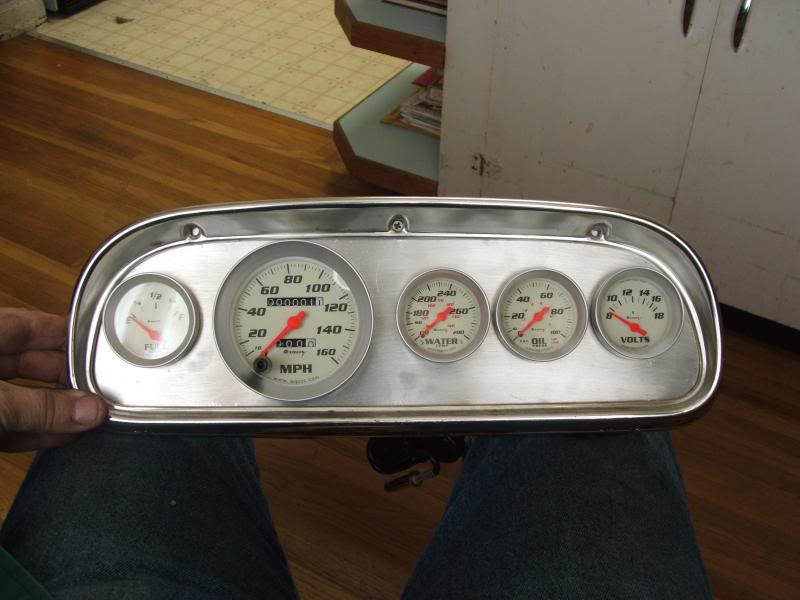
Went to the scrapyard today and got a piece of 16ga aluminum to build my dash insert. Not sure if I'll just scotchbrite it, do something fancy, or cover it in some material. Still have to wire all the lamps together and make my harness, but the holes are cut and it's mounted.

Last edited by 1971BB427; Apr 14, 2013 at 11:08 PM.

Thread Starter
|
Second Generation Moderator
Feb 2010 ROTM winner
Jan 2013 ROTM winner
Feb 2010 ROTM winner
Jan 2013 ROTM winner
Joined: Aug 2008
Posts: 9,097
From: Portland, Or
ROTM Winner's Club
Wasn't going to work on the Austin after church this morning, but then some friends stopped by to see the progress, and the next thing I knew I was cutting and fabbing. Got the pivot pieces fabbed to make the frontend move forward 6", and then I cut up more EMT and tacked in braces to the upper framework, and one out to each side to keep things centered. The old bumper bracket bolts made a good place to attach without having to make any new threaded holes!
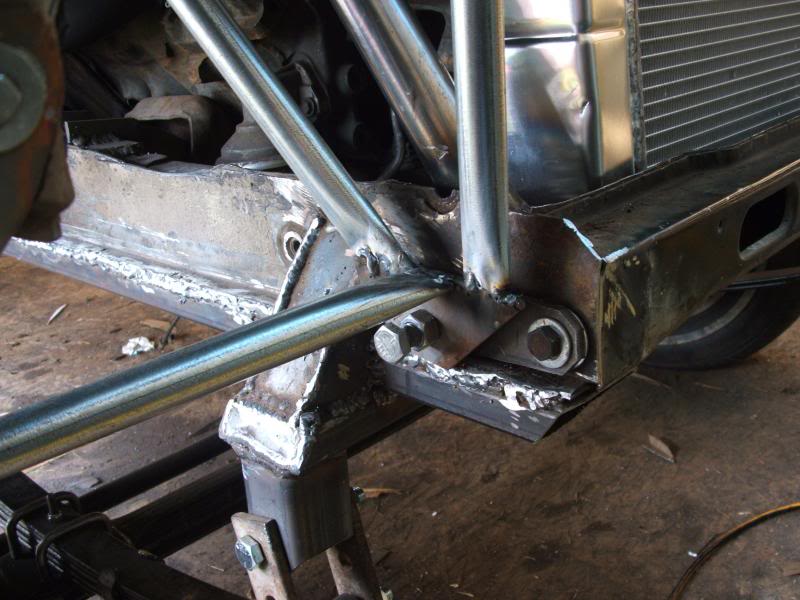
Once I test the function to ensure it tilts, I'll see if I need cables to restrict the forward motion as I did on the Austin. Looks like the pivot bars may go against the frame and stop it, but if not I'll grab more cables from a station wagon tailgate. I kinda lifted, but not sure if I'll be able to have a place to grab and open this by myself, or if I'll need assistance. Didn't want to try it until I have help, as the tacks I made are pretty small and may not hold if it gets away from me. Once it's tested and I pull it back off I'll go over all the joints with the welder and make them permanent.

Once I test the function to ensure it tilts, I'll see if I need cables to restrict the forward motion as I did on the Austin. Looks like the pivot bars may go against the frame and stop it, but if not I'll grab more cables from a station wagon tailgate. I kinda lifted, but not sure if I'll be able to have a place to grab and open this by myself, or if I'll need assistance. Didn't want to try it until I have help, as the tacks I made are pretty small and may not hold if it gets away from me. Once it's tested and I pull it back off I'll go over all the joints with the welder and make them permanent.
Thread Starter
|
Second Generation Moderator
Feb 2010 ROTM winner
Jan 2013 ROTM winner
Feb 2010 ROTM winner
Jan 2013 ROTM winner
Joined: Aug 2008
Posts: 9,097
From: Portland, Or
ROTM Winner's Club
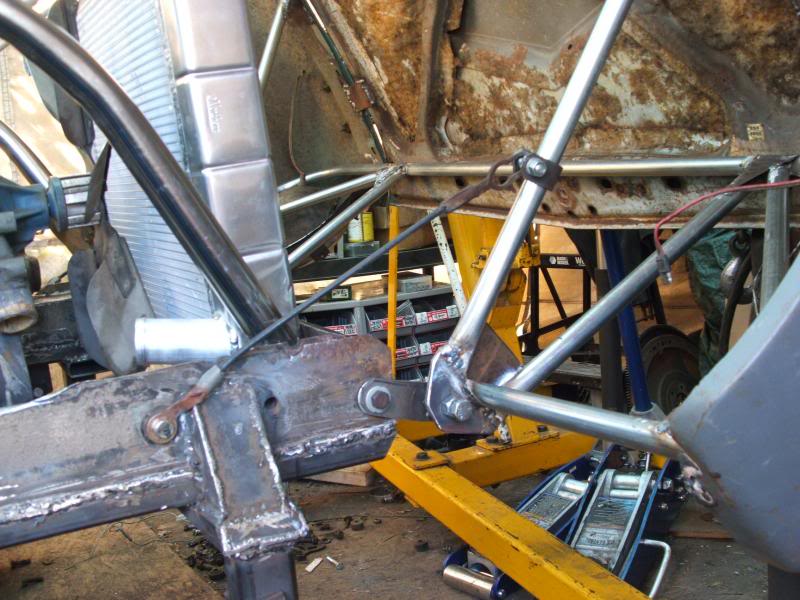
I laid the frontend upside down today and welded up the tube braces. Then I cut up a bunch of 20ga thin sheet and welded that in all the corners and junctions to make things strong. When I finished I can actually flip the frontend over end for end and it stays ridgid with no flexing at all!
My 2nd project was welding rear shock mounts on the axle, so I made use of the old Explorer mounts and turned them sideways, plus welded a gusset on the back to help brace them. I finished them up, and went to work on the pivot ball and Z bar. Put the pivot ***** in my drill motor and spun them on the belt sander to turn them down and get an exact fit in the modified Z bar. I also made up my heim adjuster from the pedal to the Z bar.
Last thing was to gut the wiring under the dash. I saved things like the wiper motor wiring. Previous owner said it was vacuum wipers, but he must have a bad memory, as it's an electric motor! I also saved the run back to the rear bumper, so I can splice into it and not run new wiring. I'll ring it all out to make sure it's not shorted, or open, but it looks good under the rocker plate, so I think it will be fine.
Didn't get any pics today, as I was beat. 9 hrs. working on the car, with a break to go get a refill on my argon mix when I ran out!


Thread Starter
|
Second Generation Moderator
Feb 2010 ROTM winner
Jan 2013 ROTM winner
Feb 2010 ROTM winner
Jan 2013 ROTM winner
Joined: Aug 2008
Posts: 9,097
From: Portland, Or
ROTM Winner's Club
Thanks Scooch! I liked the way the aluminum panel fit in with the aluminum factory edge trim.
Thread Starter
|
Second Generation Moderator
Feb 2010 ROTM winner
Jan 2013 ROTM winner
Feb 2010 ROTM winner
Jan 2013 ROTM winner
Joined: Aug 2008
Posts: 9,097
From: Portland, Or
ROTM Winner's Club
Picked up my newly built driveline today, and slid it in. Perfect fit! (as it should be!) Then we headed to the wrecking yard to get the cables, and found a pair of nice ones on a little Ranger truck. I also saw a Taurus SHO with a nice leather backseat that folds down in two sections, so grabbed that to replace the shabby and tattered Falcon backseat. At least I'll only have to get the buckets recovered, and not front and back seats!
Got back home and had my friend Mike help me lift the frontend back on the car again. We tied it with old scrap wiring at the place I wanted it to stop, and then I fabbed up a pair of straps to clamp the tube brace. Used a bumper hole in the frame for the other end, and bolted the cables in place. Once I cut the temp wiring it sits great!
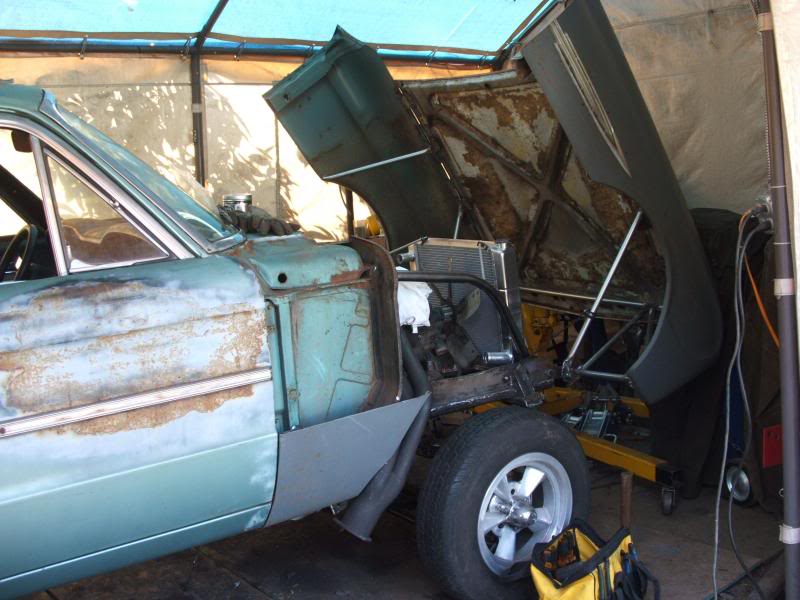
The straps that connect the cable to the tube can be adjusted by loosening the throughbolt and sliding the strap up or down to vary how far the frontend opens when the cable stops it.
Got back home and had my friend Mike help me lift the frontend back on the car again. We tied it with old scrap wiring at the place I wanted it to stop, and then I fabbed up a pair of straps to clamp the tube brace. Used a bumper hole in the frame for the other end, and bolted the cables in place. Once I cut the temp wiring it sits great!


The straps that connect the cable to the tube can be adjusted by loosening the throughbolt and sliding the strap up or down to vary how far the frontend opens when the cable stops it.


