The "Slow but Steady" '78 Project Build
#591
 10-16-2013, 11:54 PM


Join Date: Jul 2011
Location: Northern Michigan
Posts: 992
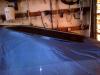
AND with the clear applied. Turned out pretty good I believe. Apologies for the pic overkill, it's so nice to see it in paint after working for so long with that wire wheel. Now to start a little assembly....


#594
10-17-2013, 09:07 AM

Join Date: Aug 2008
Location: Portland, Or
Posts: 9,097
A 20a circuit breaker to feed the entire fuse block? I'd doubt that I'd use anything smaller than a 60a. and probably go 80a myself. You cam find lots of breakers cheaper than what I listed, but not in that size. This is the feed to the fuse block isn't it, or am I missing what you're referring to?
#595
10-17-2013, 01:46 PM
Join Date: Jul 2011
Location: Northern Michigan
Posts: 992
Appreciate the comments guys, thank you. Chuck, I used automotive paint in the cans to do the firewall and underside. I kept track of cost doing it this way and knew the end result would be that I should've just bought a bigger compressor and gun. I will be buying that stuff this winter. Turned out decent though, for what will actually be seen.
Vall, the pic I posted was of a 20a, should've been the 30a as that's what's on there now. It's the small breaker for the power windows/locks that mounts on the firewall "by" the fuse block. Has the orange wire feeding it through the firewall (you can see it in the last pic above) and the red batt. feed wire. Mine is fine, just ugly and I wanted to get a new one is all. I ordered one yesterday.
I might get a chance to get the brake booster mounted soon, can someone give me a reminder of what position I should be using for power brakes on the rod? Would appreciate that very much. I know it was mentioned earlier but I don't feel like digging through posts to find it. I'm lazy.
Lastly, does anyone need 10' of 1/2" Teflon lined braided stainless hose? Wish I would've noticed closer to when I bought it, was supposed to be 3/8 and now it's too late to return it. Now I have to buy MORE fuel line! Let me know if you could use this stuff, a good deal to be had!
#596
10-18-2013, 10:31 AM
Join Date: Aug 2008
Location: Portland, Or
Posts: 9,097
The operating rod should be in the hole farthest from the pivot point when used with power brakes. This gives less leverage and makes the brakes less touchy. Closest to the pivot point increases leverage for manual brakes.
#597
10-18-2013, 12:27 PM
Join Date: Jul 2011
Location: Northern Michigan
Posts: 992
Got it, appreciate that. My goal today is to get the last of the bump stop brackets and rear sway bar brackets/bolts cleaned, painted and installed. Then I have to figure out how to make this wiper motor look good and install that. Guess I need to post a pic and figure out if I can remove the canister-looking thing on the bottom of the wiper motor, is that the actual pump? Can't really see how they come apart if so. Already removed the wiring for the pump from the car. Then, I'll get the booster installed. Tomorrow the frame and rear end/springs are going in with the sfc's! Just letting the paint dry on those now. Can't wait to see this thing start going back together.
#598
10-20-2013, 03:38 PM
Join Date: Jul 2011
Location: Northern Michigan
Posts: 992
Made some progress, not as much as hoped but it's proving to be a little more difficult to install all the rear end/springs and front subframe by myself. I'll get it though, forgot I hadn't gotten the bushings installed in the springs and rear swaybar links yet so that took some time. I now have the shackles in, rear end in place and lifted and front sub frame as far over toward the front of the car as I can by myself. Springs are ready to go in. I did get the wiper motor cleaned and painted and installed along with the brake booster. A little progress anyway!
#600
10-20-2013, 09:34 PM
Join Date: Jul 2011
Location: Northern Michigan
Posts: 992
Thanks very much for that Vall, I really appreciate it sir. There is a method to my madness with the colors, as it comes together things will certainly make more sense to others that might not understand what I'm going for. It really looks good in person, the metallic really stands out, even underneath LOL! It is a bit bizarre seeing the bottom looking so nice and the actual body still looking like trash. In due time, have to keep reminding myself of that. If my buddy would've stopped over today like planned I could've gotten the frame and rear end in. Really just needed some help shimmying the front end over in the tight space the Camaro is currently sitting in the garage. With the SFC's I have to have the sub frame somewhat in place in order to get the leafs bolted up on the perches. That's all that's holding me up at this point. Did not enjoy installing the bushings into the rear sway bar link ends (the little ones) but I got 'em done at least. New J-clips installed for the perches and rear end is in place waiting, hopefully tomorrow I can get it all bolted down. Need to make myself a note or something to remember to get gear lube still! Probably would've been easier to do with the rear end sitting right in front of me. That would've been entirely too easy though. Thanks again for the comments, very much appreciated. More pics coming soon!