
'63 Falcon project


In the Staging Lanes
Joined: Mar 2013
Posts: 47
Got a lead on a 454 from a friend today. His dad has two running 454's and one short block. So going to see what kind of deal I can make on the best one and swap the Edelbrocks/tunnel ram on it.
Found a Super T10 also, but not sure I want to spring yet, as I'd still like a T56 for the overdrive gear..
Found a Super T10 also, but not sure I want to spring yet, as I'd still like a T56 for the overdrive gear..
Uncle BoB
New member just getting myself set-up
Got myself logged in, now to set up my profile

Thread Starter
|
Second Generation Moderator
Feb 2010 ROTM winner
Jan 2013 ROTM winner
Feb 2010 ROTM winner
Jan 2013 ROTM winner
Joined: Aug 2008
Posts: 9,097
From: Portland, Or
ROTM Winner's Club
If you are planning on driving the Falcon on the road and want good gas mileage, then I'd look for a 6 speed like we have in the 2010 & up Camaros. The 2 overdrives will give you a big increase in Gas mileage
Uncle BoB
New member just getting myself set-up
Got myself logged in, now to set up my profile
Uncle BoB
New member just getting myself set-up
Got myself logged in, now to set up my profile
Thread Starter
|
Second Generation Moderator
Feb 2010 ROTM winner
Jan 2013 ROTM winner
Feb 2010 ROTM winner
Jan 2013 ROTM winner
Joined: Aug 2008
Posts: 9,097
From: Portland, Or
ROTM Winner's Club
Back on the Falcon today, after 4 days of goofing off at the show!
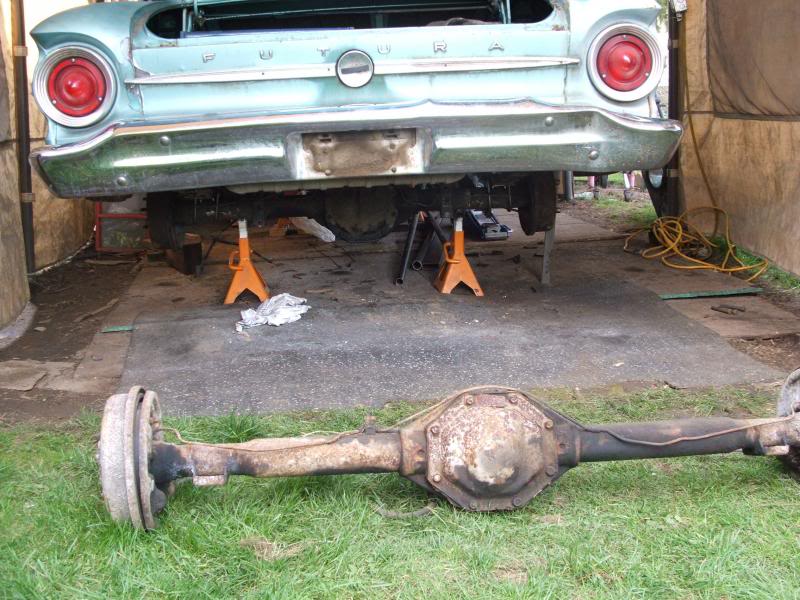
Today I got the torches out and cut the shackle bolts and U bolts off to pull the stock axle. Boy is that thing wimpy! It has tiny little axle tubes that neck down to even tinier size at the ends! Got it out quickly, but messed up my cutting tip, so need to go get a new one tomorrow.
After all my measuring, and reading specs on both axles, the new 8.8" Explorer is only 2" wider than the Falcon at 58" to mounting surfaces. It took forever to get the stock perches off with a cutoff wheel. I had to cut down the aftermarket shackles and shorten them. Made them 4" centers on the holes instead of the 11" that was on there. The remaining shackle pieces will become my front shackles, as I don't like the looks of the wimpy Speedway shackles. They are 1.75" eye to eye, and don't allow much swing. The replacements I'll build will be 3" eye to eye, and heavier too.
Here's the old out, and the new just sitting on the perches, but not setup yet. U bolts are just slipped over the axle. I need to go back to the wrecking yard and get the Explorer spring plates, and driveline.
I left the swaybar brackets on, as I might decide to use a swaybar if it shakes it's rear too much!
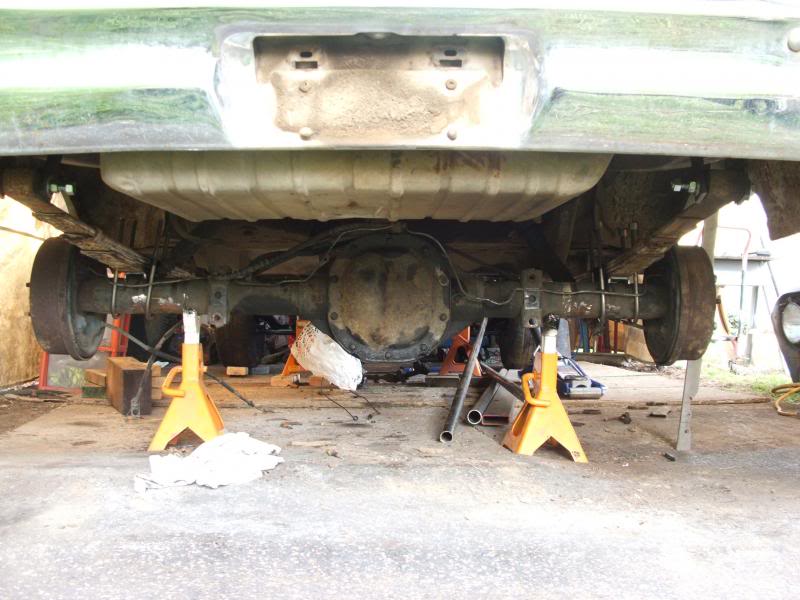
With the axle supported at 15" center to simulate a 30" tall tire, this is the stance. Front is sitting on the ground, but will raise slightly with the taller shackles. It will also settle with the engine weight, so hope it's back at this height.
I have 6.5" from the mounting surface to the springs inside, and 4.5" to the outter edge of the wheelwell. If I use a 10" wheel with 4.75" std. BS, it will give me a couple inches of tire and wheel hanging outside the fender. If I use an 8" wheel, they're usually 3.25" BS, and will still give me a couple inches hanging outside with a 10" cheater slick. So it looks like I have the option of either 8" or 10" depending on the BS of the wheel.
The axle center is 19" from the side chrome, so the radius will end up about halfway between the side trim and the lower body line. That's pretty much where I wanted it to be, but I need the tires and wheels to be on the axle before any cutting begins.
Today I got the torches out and cut the shackle bolts and U bolts off to pull the stock axle. Boy is that thing wimpy! It has tiny little axle tubes that neck down to even tinier size at the ends! Got it out quickly, but messed up my cutting tip, so need to go get a new one tomorrow.
After all my measuring, and reading specs on both axles, the new 8.8" Explorer is only 2" wider than the Falcon at 58" to mounting surfaces. It took forever to get the stock perches off with a cutoff wheel. I had to cut down the aftermarket shackles and shorten them. Made them 4" centers on the holes instead of the 11" that was on there. The remaining shackle pieces will become my front shackles, as I don't like the looks of the wimpy Speedway shackles. They are 1.75" eye to eye, and don't allow much swing. The replacements I'll build will be 3" eye to eye, and heavier too.
Here's the old out, and the new just sitting on the perches, but not setup yet. U bolts are just slipped over the axle. I need to go back to the wrecking yard and get the Explorer spring plates, and driveline.
I left the swaybar brackets on, as I might decide to use a swaybar if it shakes it's rear too much!
With the axle supported at 15" center to simulate a 30" tall tire, this is the stance. Front is sitting on the ground, but will raise slightly with the taller shackles. It will also settle with the engine weight, so hope it's back at this height.
I have 6.5" from the mounting surface to the springs inside, and 4.5" to the outter edge of the wheelwell. If I use a 10" wheel with 4.75" std. BS, it will give me a couple inches of tire and wheel hanging outside the fender. If I use an 8" wheel, they're usually 3.25" BS, and will still give me a couple inches hanging outside with a 10" cheater slick. So it looks like I have the option of either 8" or 10" depending on the BS of the wheel.
The axle center is 19" from the side chrome, so the radius will end up about halfway between the side trim and the lower body line. That's pretty much where I wanted it to be, but I need the tires and wheels to be on the axle before any cutting begins.
Thread Starter
|
Second Generation Moderator
Feb 2010 ROTM winner
Jan 2013 ROTM winner
Feb 2010 ROTM winner
Jan 2013 ROTM winner
Joined: Aug 2008
Posts: 9,097
From: Portland, Or
ROTM Winner's Club
Got the spring plates installed, so the only thing needed to finish the rear axle is to get the engine in, and set pinion angle, then weld the perches in place. Also moved the front axle back about 1.5" to just .5"-.75" ahead of stock location.
After that I drug out the 1.25" round tubing and cut up all 20 ft. to build my ladder bars. Almost got them finished, but still need to weld plugs on the end of the tubes and cut a 3.25" half round out of the box tubing rear brace so I can attach them to the rear axle. They're just over 4 ft. long, and any longer I'd have to buy more tubing to finish them!

After that I drug out the 1.25" round tubing and cut up all 20 ft. to build my ladder bars. Almost got them finished, but still need to weld plugs on the end of the tubes and cut a 3.25" half round out of the box tubing rear brace so I can attach them to the rear axle. They're just over 4 ft. long, and any longer I'd have to buy more tubing to finish them!


Thread Starter
|
Second Generation Moderator
Feb 2010 ROTM winner
Jan 2013 ROTM winner
Feb 2010 ROTM winner
Jan 2013 ROTM winner
Joined: Aug 2008
Posts: 9,097
From: Portland, Or
ROTM Winner's Club
Thanks! They should help get the 454 hooked to the ground! I'll be running Hurst 10" pie crust slicks, so need the ladder bars to get them planted.
Thread Starter
|
Second Generation Moderator
Feb 2010 ROTM winner
Jan 2013 ROTM winner
Feb 2010 ROTM winner
Jan 2013 ROTM winner
Joined: Aug 2008
Posts: 9,097
From: Portland, Or
ROTM Winner's Club
Got the rear brackets built for the ladder bar today. I made them to fit the stock swaybar brackets as they were there, and positioned right. I have the rears of the ladder bars bolted up, but I'll need to take them off again and weld another brace to the front, as there's some flex I don't want in the brackets.
Once the brace is welded in I can drill the 2nd mounting hole on the rear box tubing of the ladder bar. This will let me use a single point mount for the street to allow more travel with one bolt, and then put the 2nd bolt in to lock them up and limit travel. I've never done this before, but I think it will work.
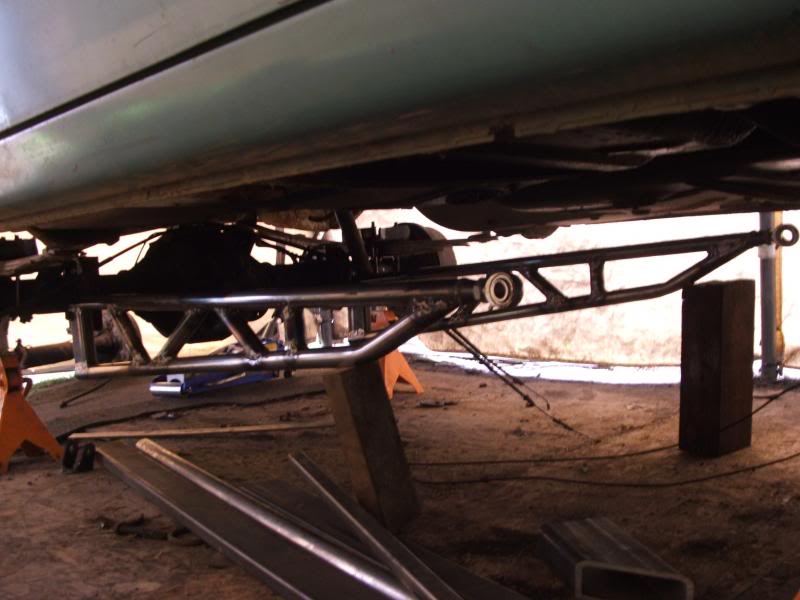
There's only one bolt in now, as I can't drill the 2nd bolt until I have the front crossmember in, and the front heim located. After that I'll drill a pilot hole for the 2nd bolt and then drill them out for the larger 1/2" bolts.
Once the brace is welded in I can drill the 2nd mounting hole on the rear box tubing of the ladder bar. This will let me use a single point mount for the street to allow more travel with one bolt, and then put the 2nd bolt in to lock them up and limit travel. I've never done this before, but I think it will work.
There's only one bolt in now, as I can't drill the 2nd bolt until I have the front crossmember in, and the front heim located. After that I'll drill a pilot hole for the 2nd bolt and then drill them out for the larger 1/2" bolts.
 lookin good man.