
The "Slow but Steady" '78 Project Build
#361
 05-09-2013, 09:48 AM


Join Date: Jul 2011
Location: Northern Michigan
Posts: 992
Oh yeah, I remember the Flitz commercials from when I was a kid. Also used it a few times when I did detailing on exotics when I lived in the Detroit area. It works, but like you pointed out Damon, they're all very similar. Elbow grease is key. Don't think I would even try to put a shine on something with just 180 grit sanding done. I have a bunch of 240 and 320 left over that I can use to prep first. The water pump looks like it was prepped well, just not polished very well. Like you stated before, I would have to assume that whoever does the "polishing" part has each item done in less than a few minutes, then on to the next. The Dremel will still probably work the best, especially on the pump. I have one of the "Mouse" sanders with the finger attachment somewhere in the garage that will probably rock and roll on the intake. Looks like I'll have time this weekend to give it a go as the weather is NOT looking good at all, SNOW on Sunday. So hot one day you don't even want to wear drawers and the next you're in a snowsuit!
#362
05-09-2013, 10:13 AM

Join Date: Aug 2008
Location: Portland, Or
Posts: 9,097
As Damon mentioned, lots of good products to polish aluinum that is very smooth already. I love Flitz, but it's spendy for such a small tube. I like Mother's cream wheel polish, and pretty cheap for the size you get. I used it on my aluminum tube covers for my tierod and drag link, and it took dull aluminum to a high sheen in seconds. I also use it with a buffing wheel on my die grinder to polish the intake on my Austin with great results.
Most the polishes for aluminum will turn dark gray as you polish, and it can be heck to remove. I found that when I'm all done polishing I use Turtle Wax foaming mag wheel cleaner spray. Spray it on, let it sit, brush it, and hose it off. Comes out sparkling clean and shiny!
Most the polishes for aluminum will turn dark gray as you polish, and it can be heck to remove. I found that when I'm all done polishing I use Turtle Wax foaming mag wheel cleaner spray. Spray it on, let it sit, brush it, and hose it off. Comes out sparkling clean and shiny!
#363
05-09-2013, 12:48 PM


Join Date: Oct 2007
Location: The 'Burbs of Chicago
Posts: 18,306
I bought the Flitz in a can, not the more expensive little tubes, and split half with my brother. This was between 8-10 years ago, and I still have a lot left. A little bit goes a long way.

#365
05-10-2013, 09:02 AM
Join Date: Aug 2008
Location: Portland, Or
Posts: 9,097
Haven't ever seen Flitz in a can! Guess I'll have to check that out! Corn starch huh? Do you just rub it with a rag, or use another polishing wheel?
#366
05-10-2013, 09:46 AM
Join Date: Oct 2007
Location: The 'Burbs of Chicago
Posts: 18,306
You can get it in a 2 lb can (the one I have), 1 gallon, or even a 5.5 gallon container.
Could be stores don't sell the bulk stuff, I got mine at a show.
Could be stores don't sell the bulk stuff, I got mine at a show.
#367
05-10-2013, 04:54 PM
Get a pair of jersey gloves on and pour a small amount in your hand. Then get both gloves loaded and wipe the parts down using your fingers to get the left over compound off. Then a final shot of air will get the dust off.
#368
05-12-2013, 12:47 PM
Join Date: Jul 2011
Location: Northern Michigan
Posts: 992
Working on the water pump and intake today as the snow accumulates outside. So far, so good. I'll get some pics up tonight to show the before and after.
Got the Gilmer belt drive/pulley kit yesterday and it came without mounting hardware. Just wondering if I'll need different sized bolts to mount these pulleys? Too darn cold to go out there and try the original bolts! I heard some people use allen head bolts to mount them but never heard if they need to be longer than the stock ones. Not a fan of the allen head bolts myself.
Got the Gilmer belt drive/pulley kit yesterday and it came without mounting hardware. Just wondering if I'll need different sized bolts to mount these pulleys? Too darn cold to go out there and try the original bolts! I heard some people use allen head bolts to mount them but never heard if they need to be longer than the stock ones. Not a fan of the allen head bolts myself.
#369
05-12-2013, 01:40 PM
As long as the bolts you use have 1.5 the diameter of thread engagment your fine. They may need SHCS's (allen heads) though. Most billet parts have a counter bore for the bolts to fit in that is too small for a hex head. I work with caps screws all day long so its not a big deal for me but I dont like them none the less.
I love when a guy at work pops his hood to show me all the bolts he stole from work to dress his engine. two weeks later they are all rusty and the paint is flaking off everywhere.
I have more allen wrenches than I care to count. Let me know if you need any. I'm sure I could build a pack from my pile. I have the plastic packs piled up too!
#370
05-12-2013, 04:41 PM
Join Date: Aug 2008
Location: Portland, Or
Posts: 9,097
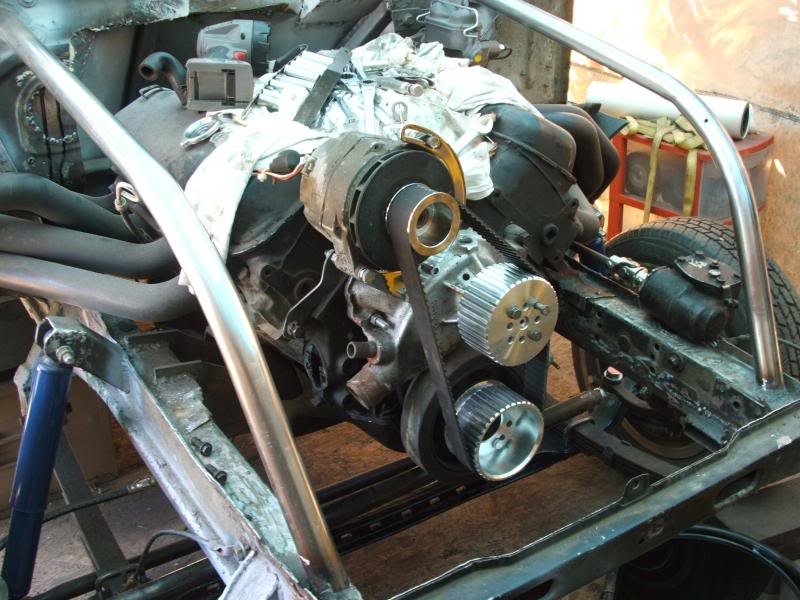
Just went through mockup of a gilmer belt system on my Falcon gasser's 454, and I hope your's goes better than mine! No bolts came with mine either. Also no instructions, and not much that was a simple bolt on beyond the lower crank pulley!
I found the alternator pulley was too thick, so once I pulled the old pulley off and dropped the new gilmer pulley on, the threads didn't extend far enough to even start a nut! It's also not designed for older alternators with a keyway, and tapered shaft. It's designed for newer style that have a straight shaft, and a nut holds it on. I had to carefully cut the shank off the new pulley in the back side to allow it to sit far enough on for the nut to get full threads.
Then I put the pulley on the water pump, only to find it sat a full 1" back from the crank pulley. Had to purchase a 1" spacer and install it under the water pump pulley to line the two up.
Finally the 40" belt length required I mount the alternator very close in towards the water pump, so the length would work. I used a close alternator mount, and adapted it to fit my engine by replacing the upper water pump bolt with a piece of 3/8" running thread about 6" long to make the pivot. Then I built two brackets to support the alternator bracket and keep it solid.
It took a couple hours just to mock it all up, but it does look good, and will be even better once I paint up my braces and reassemble later. In this picture I had one brace on, but had to put a 2nd brace on the front pivot point to really lock it up solid:
