
My 1970 Camaro w/ 572 Build


#72
 08-18-2011, 10:34 AM

I would guess 1000 psi. But it is a guess. I know the teflon lined can be used. Its the same used for brake lines, those are around 1500 psi.
I suggested -6 because it will hold more fluid.
I suggested -6 because it will hold more fluid.
#73
09-05-2011, 11:37 PM
Did a little bit of research and it looks like the lines are normally only around 30psi but have spikes in operation to a little over 200psi. This will work for the braided stainless lines.
I also got a little bit of work done on the car.
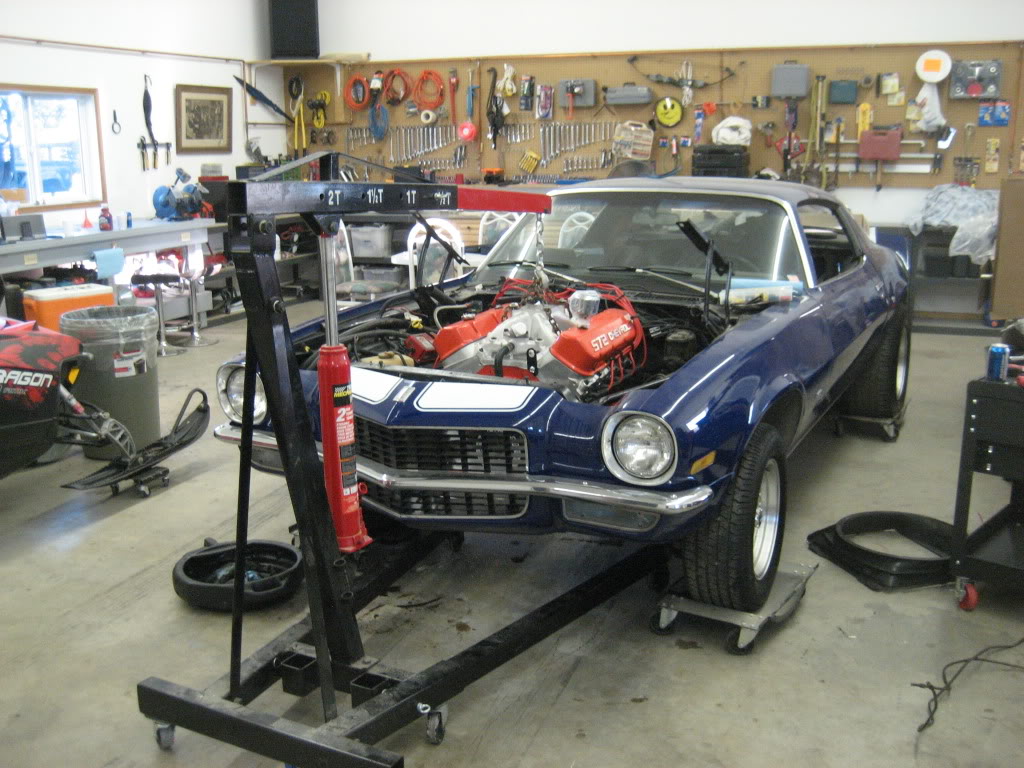
Engine went it good, had a slight fight with the engine mounts but ended up getting them to line up after about an hour of fighting.
I ordered a billet March pulley and mount set as well. I tried to install this but the power steering pump mount doesnt fit as it should. I have to take one peice to a machine shop for some slight modification to clear the timing chain cover. I could do this with a carbide burr but after spending the money on a nice set i dont want to hack it together. I also have the March billet power steering pump.
I also ordered the Be Cool 1000HP Show N Go rad. It is supposed to come in at the end of september.
The Lemons headers arrived on Friday but i havent had a chance to look in the box yet to see how they look.
There is a bunch of other items to post on here but i am really short on time here, will update again when i can.
I also got a little bit of work done on the car.
Engine went it good, had a slight fight with the engine mounts but ended up getting them to line up after about an hour of fighting.
I ordered a billet March pulley and mount set as well. I tried to install this but the power steering pump mount doesnt fit as it should. I have to take one peice to a machine shop for some slight modification to clear the timing chain cover. I could do this with a carbide burr but after spending the money on a nice set i dont want to hack it together. I also have the March billet power steering pump.
I also ordered the Be Cool 1000HP Show N Go rad. It is supposed to come in at the end of september.
The Lemons headers arrived on Friday but i havent had a chance to look in the box yet to see how they look.
There is a bunch of other items to post on here but i am really short on time here, will update again when i can.
#74
09-06-2011, 09:14 AM

Join Date: Aug 2008
Location: Portland, Or
Posts: 9,097
That looks great to see the big block sitting in it's home! Probably should have opened those headers up though, as often you have to lift the engine or at least situate them in the engine bay prior to dropping the motor onto it's mounts. The large tube primaries may create an issue where you have to pull the mount bolts again and lift the engine to get them in place.
Seems like none of the pulley systems work without some mods. I'm not sure why they can't get them right, but none of the complete kits I've seen didn't have an issue of some sort, regardless of price range.
Seems like none of the pulley systems work without some mods. I'm not sure why they can't get them right, but none of the complete kits I've seen didn't have an issue of some sort, regardless of price range.
#75
09-14-2011, 09:44 PM
Alright i have completed some more work on my Camaro. I got the 4L80 up in its new home and the new G force cross member installed. Install was a breeze and fit right up there. It would have gone a little easier had i been using a real transmission jack and not an ATV jack but oh well. Got all of the bolts snugged up, just need to do the torque converter and it is complete. I will wait until by buddy who’s a tranny guy to come over just to double check my work. The cross member bolted into the stock locations, the only difference is i had to drill out the existing holes to 1/2". The energy suspension motor mount didn’t quite fit onto the transmission so i had to die grind out those holes as well.
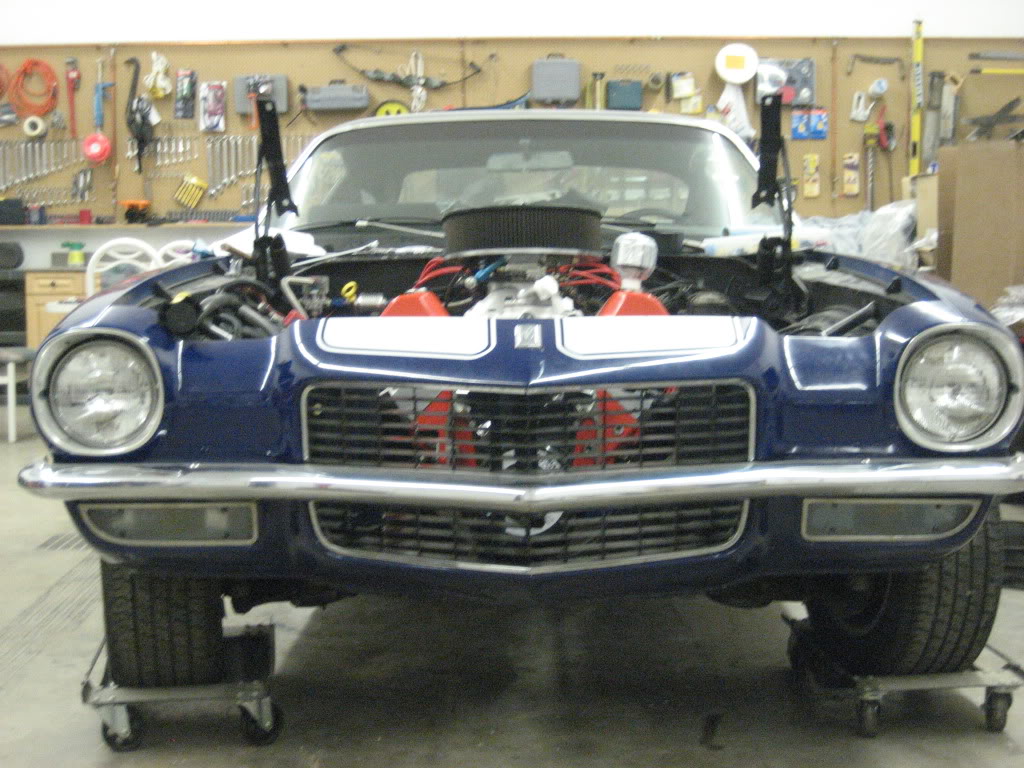
I also got back to to March pulley and bracket kit. As you can see in the picture i got the new power steering pump installed with the new brackets. I had mentioned before that i needed to get a piece machined but with a little patience and an aluminum carbide burr i got it to fit very nicely. The alternator side will be put as soon as i get a rear support piece that was back ordered.
1971BB427 i still haven’t looked through that header box but from what they tell me the engine does not need to be moved for the installation of them. I am sure i will find out how true this is shortly.
I do have some significant issues and i hope someone on here has an answer for.
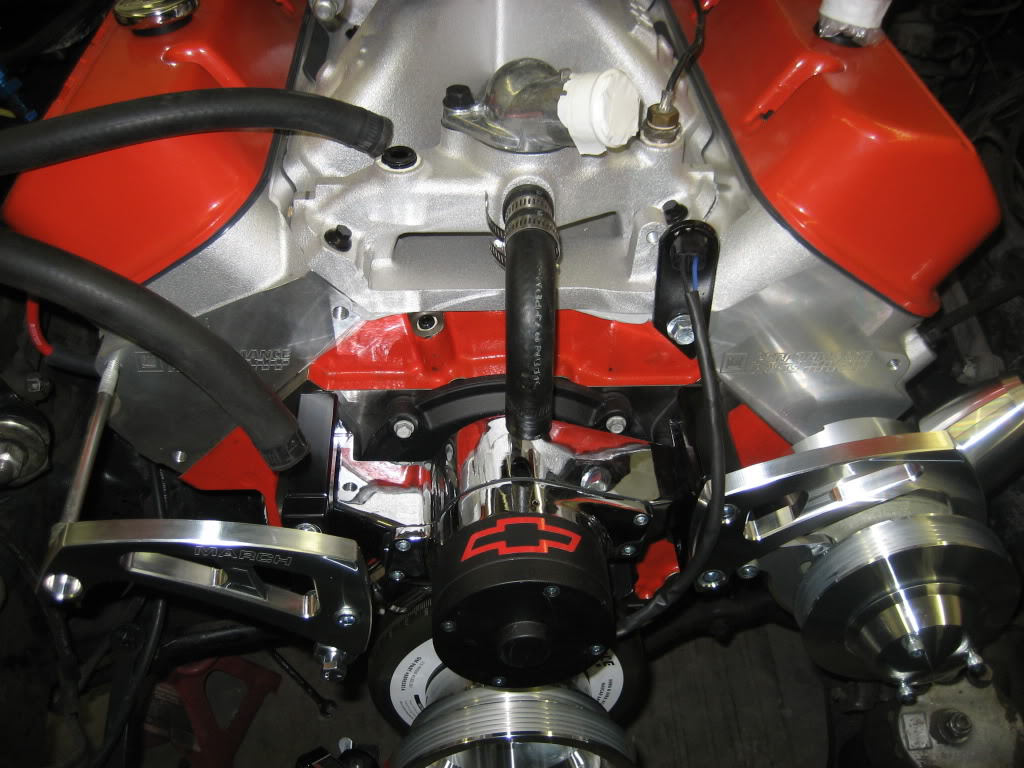
I am confused as to how to hook up the coolant system, more importantly the heater system. The new electric water pump doesn’t have a port on the top of the water pump. As you can see in the picture the intake manifold has a hose going from the thermostat housing to the top of the water pump. It may look like it is installed but it is just resting on top of the electric water pump as there is no port for it to go.
I guess this means I have a couple questions.
1. Will the coolant system run properly if I plug the middle port in the intake manifold where that hose currently is plumbed into?
2. I have been told by someone that if you run an electric water pump you can not have a heater. I refuse to believe this. I know someone knows how or has already hooked up their heater system with an electric water pump. The stock water pump had another ~3/4” port above the lower rad hose connection. This is where the heater plumbed in before. Again the electric water pump does not have this port so I have to find a pressure line for my heater feed, I believe I can return to the port on the left side of the thermostat housing on the intake manifold.
I apologize for being all over the map on this. If anyone could offer some advice it would be great!
Thanks
#76
09-14-2011, 09:58 PM
Oh yeah and i almost forgot...
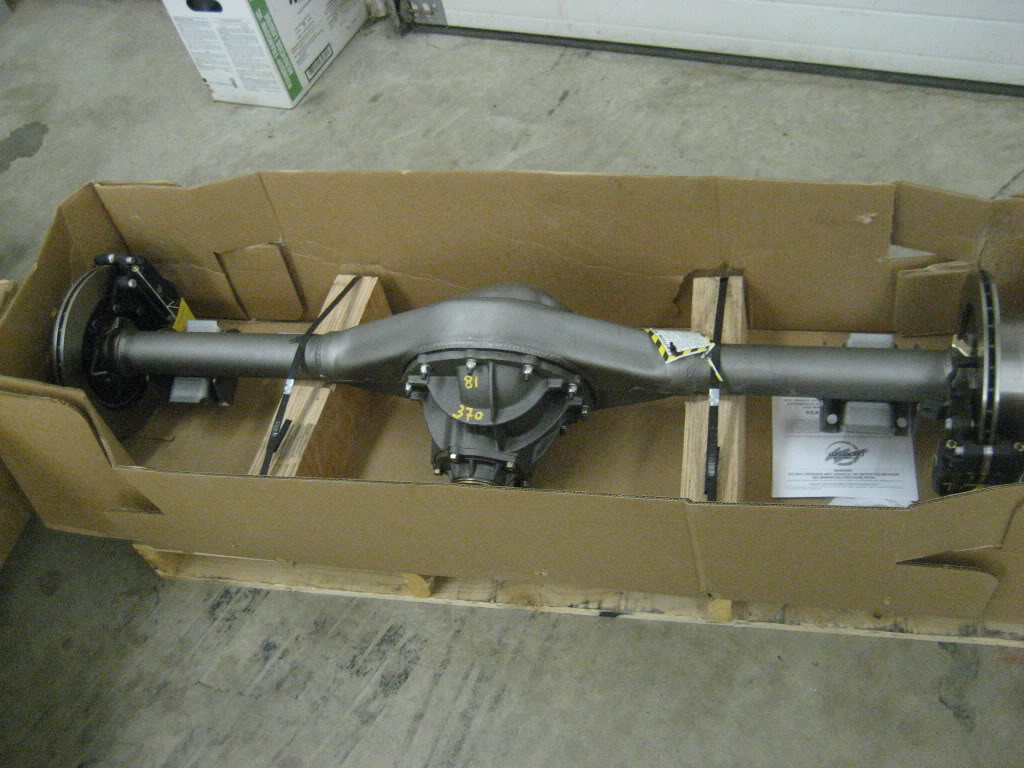
The new rear end cam in today. I posted about it tomorrow but its built by Currie, has 3.73s with a Detroit Tru Track LSD. Those are Wilwood dynalite??? disc brakes.
I have two questions about this rear end.
1. Does it seem normal to have one caliper mounted on the front of the brake and one mounted on the back.
2. Are you supposed to use two U bolts per side when installing a rear end? It seems to me that this would make sense but if you look below at my current setup there is only one U bolt on the outside of the spring mount. I beleive it would work perfectly fine but im just unsure.
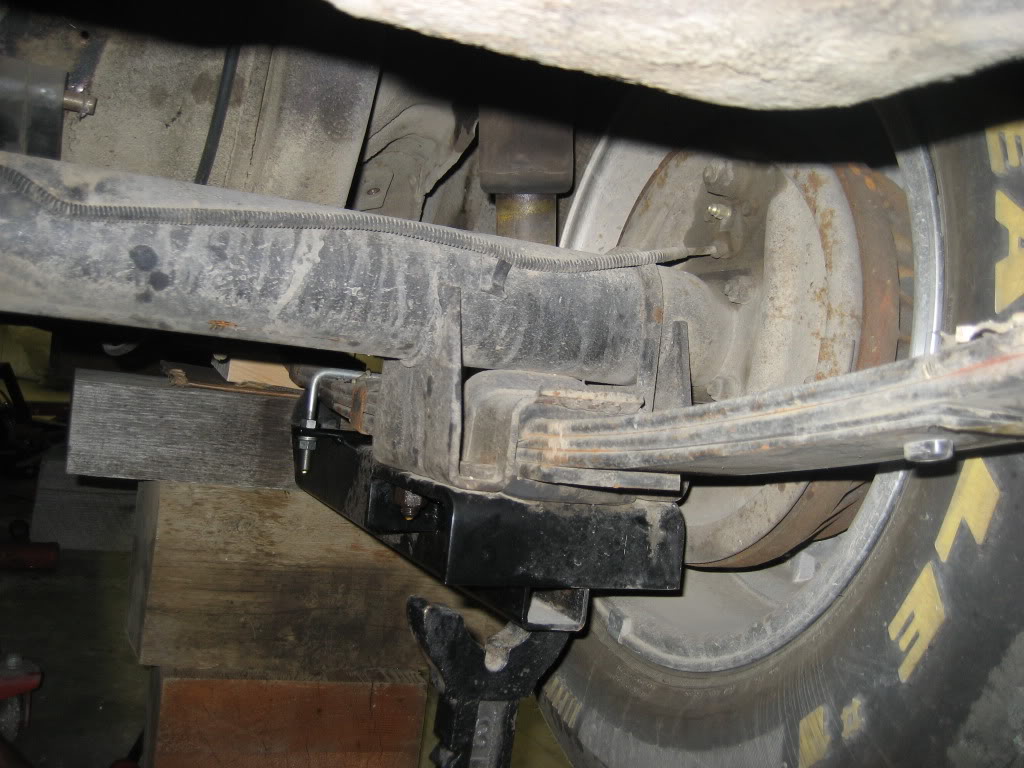
Thanks again!
The new rear end cam in today. I posted about it tomorrow but its built by Currie, has 3.73s with a Detroit Tru Track LSD. Those are Wilwood dynalite??? disc brakes.
I have two questions about this rear end.
1. Does it seem normal to have one caliper mounted on the front of the brake and one mounted on the back.
2. Are you supposed to use two U bolts per side when installing a rear end? It seems to me that this would make sense but if you look below at my current setup there is only one U bolt on the outside of the spring mount. I beleive it would work perfectly fine but im just unsure.
Thanks again!
#77
09-15-2011, 12:00 AM
Ok I'll start at the bottom and work up. The one U bolt is stock. the other side gets a T bolt. Mine have 2 1/2" U bolts. You simply drill the plte out so they fit. The tab for the brake line got in my way so it went Bye Bye. You really need to do this mod. Cheap insurance.
The brakes. Yes Currie did that on purpose. The shocks are staggered on our cars and the caliper hits the shock on the passenger side unless its flipped. I'm hung up on that right now with mine.
I have a buddy at work with a 67' Camaro w/ a 502. He has an electric pump, I'll ask him if he has heat.
I beleive the Lemons headers are two piece units that have two primaries on each half then bolt to the collector. I am kind of talking out my **** on that but I've seen high end headers like that. Lemons are high end for sure.
I may be putting detail into my car but you are literally putting my wildest dreams into yours. It would take me ten years of tax returns to have what you got going on. Every part you have bought I have looked at and wanted at some point. You will really have a stout machine when your done.
#78
09-15-2011, 12:26 AM
Ok I'll start at the bottom and work up. The one U bolt is stock. the other side gets a T bolt. Mine have 2 1/2" U bolts. You simply drill the plte out so they fit. The tab for the brake line got in my way so it went Bye Bye. You really need to do this mod. Cheap insurance.
.
.
As for the lemons headers i believe that they are more then two peices, i am literally scared to start un packing the box as there are a huge amount of pieces to have to sort through, i will worry about this when the time comes. I really am hoping that this car turns out exactly how i picture it in my head, if it doesnt it will really p*ss me off. This build has gone the way of many other peoples builds. It started with a mild big block then moved to the 572 and then basically from there out all of the parts that needed to be purchased to make it work were. I am looking to have a car when this is completed that i can go and beat up on over the weekends and not have to spend the next month turning wrenches on it. In most cases there is something more wild and probably better that i could have got but i think when everything is matched together it should work.
If you could ask your buddy about the pump that would be amazing, i have spent the last two or three hours searching to no avail. There have been alot of people asking about it but it is usually met with people going "why do you think you need an electric pump" as if they were asking for permission to use on

Anyways thanks alot for the help, without the help from members like you and others on here i would never be able to get this thing together. Its also through reading other peoples posts that help me stay motivated.
I would say that this thing will be rolling again in the next couple days but once the rear end is in i have to find new rims to fit over the brakes on the back as my 15"ers arent going to cut it any more.
#79
09-15-2011, 09:29 AM
Join Date: Aug 2008
Location: Portland, Or
Posts: 9,097
Electric pumps don't have a port for the heater because they're designed for offroad use, and nobody uses a heater for drag racing. Electric pumps also have a shorter lifespan, and aren't designed for daily driving, or they'll fail sooner than a mechanical pump.
All that said, there are a fair number of people using them on the street in a situation much like your car, and they just live with the shorter lifespan and extra draw on the alternator and electrical system.
You can't interrupt the hose that goes between the intake and the pump or you'll create cooling issues with your engine. You should buy or fabricate a hose connector that can go into your lower radiator hose to accommodate a heater hose, and connect to that point instead. The other hose can go into the plugged hole in the intake manifold that is designed for the heater inlet. A piece of 1.75" tubing with a 1/2" outlet should work great to provide a complete bypass for the heater, and not affect your engine's cooling.
Something like this, only 1.75" with a 1/2" outlet:
http://www.summitracing.com/parts/BCI-72065/
Last edited by 1971BB427; 09-15-2011 at 09:32 AM.