79 Camaro Project
#181
 04-21-2010, 08:19 PM


ATM, that's coming along nice! , I don't even have my front end apart yet...too many irons in the fire. I gotta get my b-hind in gear.
Not to jump in on your post, but...
Nomad, are you going to post the pics of your subframe connectors here? I saw a set several months ago, that somebody fabricated, and haven't been able to find it since. I'm looking for Ideas, and would really appreciate the help.
Thanks
Not to jump in on your post, but...
Nomad, are you going to post the pics of your subframe connectors here? I saw a set several months ago, that somebody fabricated, and haven't been able to find it since. I'm looking for Ideas, and would really appreciate the help.
Thanks
#182
04-21-2010, 09:32 PM
ATM, that's coming along nice! , I don't even have my front end apart yet...too many irons in the fire. I gotta get my b-hind in gear.
Not to jump in on your post, but...
Nomad, are you going to post the pics of your subframe connectors here? I saw a set several months ago, that somebody fabricated, and haven't been able to find it since. I'm looking for Ideas, and would really appreciate the help.
Thanks
Not to jump in on your post, but...
Nomad, are you going to post the pics of your subframe connectors here? I saw a set several months ago, that somebody fabricated, and haven't been able to find it since. I'm looking for Ideas, and would really appreciate the help.
Thanks
#183
04-21-2010, 09:34 PM
I thought about ditchin Michigan several times, but I can't live without Lake Michigan. I"ve never lived anywhere that wasn't close to a large body of water. I'm 2 miles from the beach.
P.S. You guys can keep the Asian Carp. LOL And I agree on the boat deal. Every one who owns one knows that joke.
P.S. You guys can keep the Asian Carp. LOL And I agree on the boat deal. Every one who owns one knows that joke.
#184
04-21-2010, 09:45 PM

Join Date: Aug 2008
Location: Portland, Or
Posts: 9,097

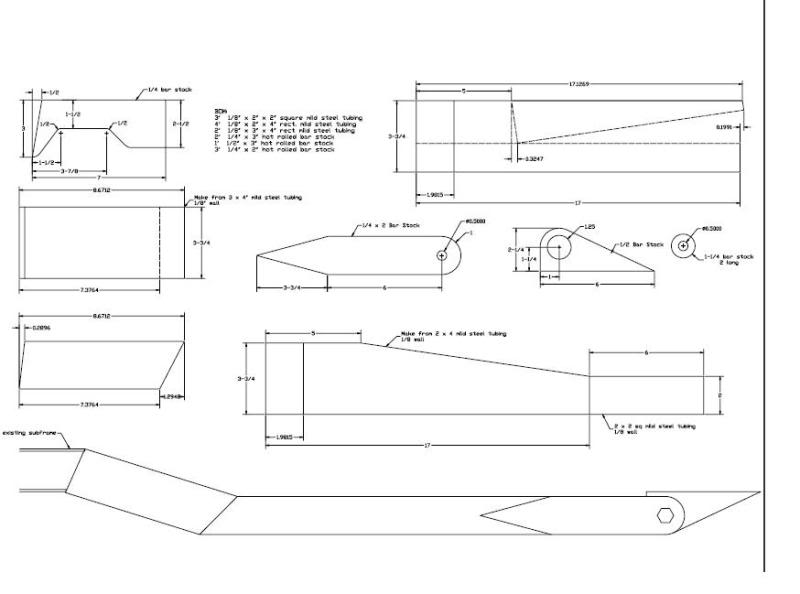
I bought box tubing for my subframe connectors. Found heavy bopx that just slips inside the front subframe, as I want them to bolt in. I am fabbing them up, but not done yet.
I'll slide the tubing inside the front subframe and it will use the same body bolt that holds the rear of the factory subframe. Then I will contour it to the floor by either sectioning the box tubing, or relieving around the interior pan supports. In the back I'll make a plate that bolts to the front spring perches using factory holes and longer bolts.
I've marked all the dimensions and clearances on a template, so I can cut my tubing to match the cardboard, then just weld it and bolt it in.
#185
04-21-2010, 09:54 PM
Well that looks like subframe connectors, and I think that may be the plate that hooks to the front rear spring perch. I see no holes in it, so it may be a weld in connector?
I bought box tubing for my subframe connectors. Found heavy bopx that just slips inside the front subframe, as I want them to bolt in. I am fabbing them up, but not done yet.
I'll slide the tubing inside the front subframe and it will use the same body bolt that holds the rear of the factory subframe. Then I will contour it to the floor by either sectioning the box tubing, or relieving around the interior pan supports. In the back I'll make a plate that bolts to the front spring perches using factory holes and longer bolts.
I've marked all the dimensions and clearances on a template, so I can cut my tubing to match the cardboard, then just weld it and bolt it in.
#186
04-21-2010, 09:59 PM
Join Date: Aug 2008
Location: Portland, Or
Posts: 9,097
They're pretty simple to make. I just held a piece of cardboard on edge from the front subframe to the rear spring perch. Then I used a pair of calipers with a felt pen taped to one side and traced the floor pan. The felt pen copied the shape onto the cardboard and I cut it out to overlay on the box tubing.
#187
04-22-2010, 06:54 AM

I printed the instructions for the Art Rasmussen style from the nasty site. They look really easy to do, but you have to cut a hole to access the rear frame rail. The box tube fits inside of the frame in the rear and welds to the end of the front subframe. I didn't want to weld mine in because I know that I can't leave well enough alone and will pull the front off sometime in the future just to repaint and check its condition. As for the Alston/Pro touring f-body bolt ins. I will post detailed pics for you guys, no problem. I will even figure out the angle there bent at. ATM I'll trace them when I can find a something long enough to do it on. The only problem I can see is mailing it. I do have an idea though. I will get out to my dads sometime this weekend. The dude at ptfb said they will ship my control arms this week, so I'm pretty geeked about finally getting this this together.
#188
04-22-2010, 05:17 PM
I have a 3rd grade band concert to go to tonight, so I figured I would get the tires back on the car and put the sway bar on. I had some issues getting the sway bar on and I decided to try to use some molylube on the bushings, and it went alot smoother. I had to get some longer bolts, and when I was tightening them up whatever they screwed into broke, so I will need to somehow get a nut in there and use it to back it up. Another issue I had were on the endlinks the complete rubbers could not get assembled, I believe because the engine is not in the car and the sway bar is slightly tipped out of level. I may try a large C-Clamp and see if I can compress it enough to finish it tomorrow. This weekends goal is to finish sandblasting and start to clean the mess up.
#189
04-22-2010, 05:22 PM
I printed the instructions for the Art Rasmussen style from the nasty site. They look really easy to do, but you have to cut a hole to access the rear frame rail. The box tube fits inside of the frame in the rear and welds to the end of the front subframe. I didn't want to weld mine in because I know that I can't leave well enough alone and will pull the front off sometime in the future just to repaint and check its condition. As for the Alston/Pro touring f-body bolt ins. I will post detailed pics for you guys, no problem. I will even figure out the angle there bent at. ATM I'll trace them when I can find a something long enough to do it on. The only problem I can see is mailing it. I do have an idea though. I will get out to my dads sometime this weekend. The dude at ptfb said they will ship my control arms this week, so I'm pretty geeked about finally getting this this together.
#190
04-22-2010, 07:01 PM
The dude is pretty cool about makin deals. vHe said that the cowl brace probably wouldn't work with my MSD distributer because the cap is too tall. I wanted one anyhow. I firgure I can make it work somehow. But he threw it in with my order for free. He also ate all the shipping costs. As far as the bushings go, everyone on the other site swears up and down you have to run a solid bushing with connectors. Dave at PTFB also says this. But its really your call.