
1971 Camaro continuing project


Overdrive Member
Joined: Nov 2009
Posts: 4,848
From: off the grid
My suspension is done. Just offering support here. I got a rust free semi barn find with the bottom of the car already blasted and painted. I am past mock up and now painting before final assembly.

Thread Starter
|
Second Generation Moderator
Feb 2010 ROTM winner
Jan 2013 ROTM winner
Feb 2010 ROTM winner
Jan 2013 ROTM winner
Joined: Aug 2008
Posts: 9,097
From: Portland, Or
ROTM Winner's Club
On those Milwaukie Torch blades; the best thing about them is they're twice as thick as other blades, so you can abuse them and not bend them like regular blades. They're also blunt ends, and about 6-7" long, so easy to get to places that need more length. Not cheap, but they last well.
Thread Starter
|
Second Generation Moderator
Feb 2010 ROTM winner
Jan 2013 ROTM winner
Feb 2010 ROTM winner
Jan 2013 ROTM winner
Joined: Aug 2008
Posts: 9,097
From: Portland, Or
ROTM Winner's Club
Well it's completed today! Got the last of the rear suspension assembled, and after a lot of modification I got the Lakewood ladder bars on, WITH the swaybar too! If anyone is contemplating using the Lakewood ladder bars on a 2nd Gen Camaro, be aware they are far from a bolt in installation!
After remvoing two of the front spring perch mounting bolts I held the front brackets up and quickly realised they wont clear the various fuel and brake lines running down the inside of the frame rails. I also realised the brackets wont sit tight against the perch, so some mods were required.
I started by cutting the inside of the Lakewood brackets off and spacing them out an inch, then welded them back on. This gave plenty of clearance for the lines. Then I had to cut up some 1/4" square washers that are 1.5" square, and put them between the brackets and the perch, so there wouldn't be a gap, which I felt would be a weak point.
After that I was able to loosely bolt up the front bracket, and then slip the eye on the ladder bar into the bracket. There's two holes to choose from; one for stock height springs, and one for lowering springs. Since I have lowering springs I went with the lower hole. This left a lot of bracket hanging below, so I took them both off again and cut the excess bracket off per the instructions. That keeps the odds of hitting speed bumps down, which could do major damage!
Put the brackets back on, and then hooked up the ladder bar eye again. Went to the U bolt rears and slipped the U bolts on, and after looking over the mounting, I pulled the bars again, and got the sawzall out. Measured and cut the lower bracket to make clearance for the swaybar, then ground it smooth and repainted them. Reinstalled them again, and put the swaybar back on.
Got everything bolted up, adjusted the air in the shocks, and called it a day. Have to wait until tomorrow to see how she handles and drives now. About 6 hrs. of work today to get the shackles back on the springs, and modify/install the ladder bar system. Not exactly what I thought when I bought them, and had I known I probably would have sprung for the Cal Tracs even thought they're a lot more money.

 I want to determine if I want to use them, will they work with my adjustable aftermarket bar.
Thread Starter
|
Second Generation Moderator
Feb 2010 ROTM winner
Jan 2013 ROTM winner
Feb 2010 ROTM winner
Jan 2013 ROTM winner
Joined: Aug 2008
Posts: 9,097
From: Portland, Or
ROTM Winner's Club
Well I wish I could give you pics, but I'm terrrible about taking before and after pics! I simply cut the brackets off the side of the ladder bars at the rear where they attach to the spring plate. That allowed the bars to move inward and align with the front brackets, plus it allowed me to mount the ladder bars at the exact angle to attach to the upper front bracket hole, and then remove the lower part of the bracket.
I did feel I needed to weld the U bolt bracket to the rear axle tube once it was set up, but I'll test drive it first, and if it works out, then I'll tack the brackets to the axle tube.
As for the front spacer, you can look at your spring perch pockets and see the two lower bolts. The 3rd is up inside the pocket, and it's not used. The others set in a slight recess, and the Lakewoods are a flat bracket, so they sit ontop the recess plate. Not a good scenario in my opinion, so I got a 1/4" square washer, and cut it to fit in the recess, which made the Lakewood bracket sit against something instead of just resting on the edge of the recessed plate.
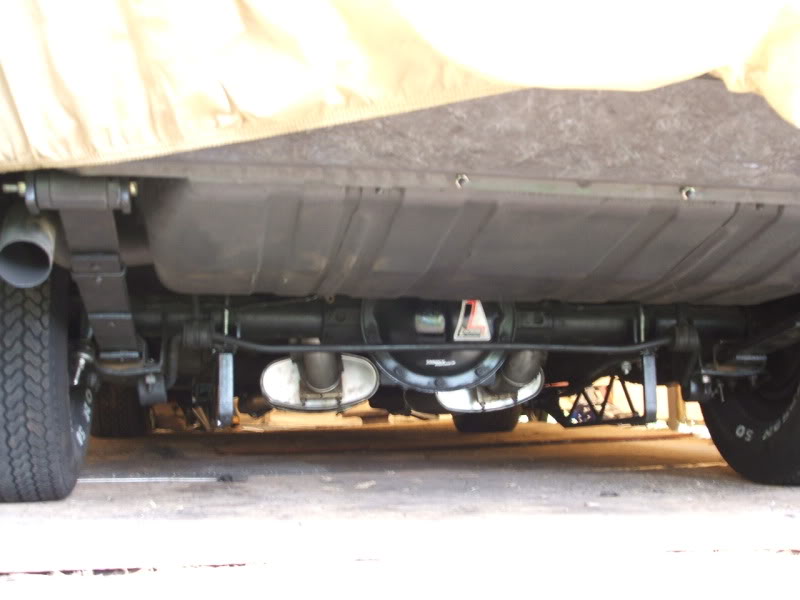
As you can see in the picture below, there's the two supports to the spring plate, and the front bracket that drops down along the frame and then flat against the rear floors under the seat. That front plate that bends to bolt through the pan didn't clear the various factory lines on the frame. Had to cut it off and move it 1" inward (extended) to give clearance for the stock lines.
The rear supports to the spring plate I just cut off. Could have left the top one closest to the axle bracket, but since I'm going to weld the brackets to the tube, it's not needed, and I wanted my swaybar for sure!

I did feel I needed to weld the U bolt bracket to the rear axle tube once it was set up, but I'll test drive it first, and if it works out, then I'll tack the brackets to the axle tube.
As for the front spacer, you can look at your spring perch pockets and see the two lower bolts. The 3rd is up inside the pocket, and it's not used. The others set in a slight recess, and the Lakewoods are a flat bracket, so they sit ontop the recess plate. Not a good scenario in my opinion, so I got a 1/4" square washer, and cut it to fit in the recess, which made the Lakewood bracket sit against something instead of just resting on the edge of the recessed plate.
As you can see in the picture below, there's the two supports to the spring plate, and the front bracket that drops down along the frame and then flat against the rear floors under the seat. That front plate that bends to bolt through the pan didn't clear the various factory lines on the frame. Had to cut it off and move it 1" inward (extended) to give clearance for the stock lines.
The rear supports to the spring plate I just cut off. Could have left the top one closest to the axle bracket, but since I'm going to weld the brackets to the tube, it's not needed, and I wanted my swaybar for sure!
Thread Starter
|
Second Generation Moderator
Feb 2010 ROTM winner
Jan 2013 ROTM winner
Feb 2010 ROTM winner
Jan 2013 ROTM winner
Joined: Aug 2008
Posts: 9,097
From: Portland, Or
ROTM Winner's Club
Another note here; I noticed my axle occasionally has hit the exhaust system under full travel! With the lowering springs it might happen a bit more often, so I'll have to stiffen up the rear by using a bit more air in the air shocks now. I normally run about 25-30 lbs, but I'll bump it 10 lbs. and see if that keeps from beating up the exhaust system.
Thread Starter
|
Second Generation Moderator
Feb 2010 ROTM winner
Jan 2013 ROTM winner
Feb 2010 ROTM winner
Jan 2013 ROTM winner
Joined: Aug 2008
Posts: 9,097
From: Portland, Or
ROTM Winner's Club
They are a slightly different design than the stock springs. Same 4 leafs, but the shortest leaf on the stock spring only went forward, while the shortest on the lowering set is equal amount forward and rearward.