
1971 Camaro continuing project


Thread Starter
|
Second Generation Moderator
Feb 2010 ROTM winner
Jan 2013 ROTM winner
Feb 2010 ROTM winner
Jan 2013 ROTM winner
Joined: Aug 2008
Posts: 9,097
From: Portland, Or
ROTM Winner's Club
Not much done today. Just some cleanup and went to Oreggon Spring and special ordered my front coils. They were cheaper than any of the online places at $84 a pair in my hands.
I ordered the springs for a small block with A/C. The springs I was running were SBC Camaro that I put in the car back in 1975 to get the nose down and get good lift when racing. After putting it back to street trim in 2000 I had to put a couple screw in spacers in to get the ride height correct.
I figured the BBC Camaro springs would get it too high, and SBC would be too low, so went with the SBC A/C springs. Hope my guess is right, and it sits like I want!
Thread Starter
|
Second Generation Moderator
Feb 2010 ROTM winner
Jan 2013 ROTM winner
Feb 2010 ROTM winner
Jan 2013 ROTM winner
Joined: Aug 2008
Posts: 9,097
From: Portland, Or
ROTM Winner's Club
Got my control arms back from my friend's shop today with the new bushings and the lower ball joints pressed in. He said the uppers went fine, but the lowers were a bit of a bugger as they seemed tighter in the opening than they should be. Lots of bracing etc. to keep them spaced and not collapse the arms he said. Glad I had them do it and not mess with trying with my press.
Here they are painted up, but can't finish until Tuesday when the new coils arrive. Until then I'll just be doing cleaning and maintenance.


Thread Starter
|
Second Generation Moderator
Feb 2010 ROTM winner
Jan 2013 ROTM winner
Feb 2010 ROTM winner
Jan 2013 ROTM winner
Joined: Aug 2008
Posts: 9,097
From: Portland, Or
ROTM Winner's Club
I'm not a patient person. Waiting on the rest the parts to arrive isn't my idea of fun. Not much to do until I get the new coil springs, so just ran around in the gasser Sat., and I'll do the same today. Figured I'll drive it to church this morning and shake things up a little there. Should be fun.
Thread Starter
|
Second Generation Moderator
Feb 2010 ROTM winner
Jan 2013 ROTM winner
Feb 2010 ROTM winner
Jan 2013 ROTM winner
Joined: Aug 2008
Posts: 9,097
From: Portland, Or
ROTM Winner's Club
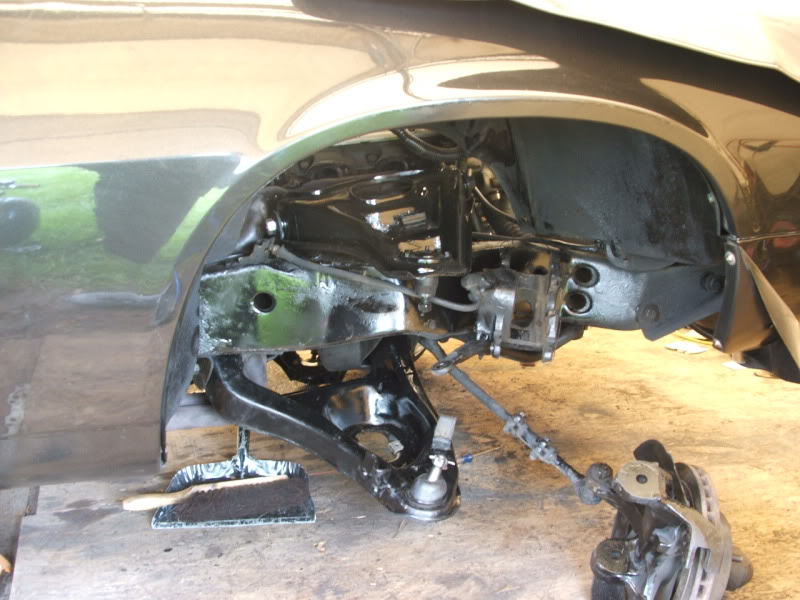
Back on the cleaning and painting. Some of this old undercoating just isn't coming off, so it's going to stay there. Got the other set of control arms back today, so got them painted too. Then assembled the upper and lowers on both sides.
Not much else to do until tomorrow when I get my coils. Hopefully they'll come in before noon so I might get the front finished!
Here's where I'm at after a day's work on it:
Not much else to do until tomorrow when I get my coils. Hopefully they'll come in before noon so I might get the front finished!
Here's where I'm at after a day's work on it:

Overdrive Member
Joined: Nov 2009
Posts: 4,848
From: off the grid
I know the feeling about that under coating. I'm still picking at the stuff inside my car. I been torching it, then scraping, then using Goof Off. Seems to be working but nasty, thats why I haven't got it done. As for waiting, we have been waiting over two weeks for the C-notch for my buddies Ram. We had to roll without it on Power Tour. The darn axle just bounces off the frame in a bad way. LOL
Lowers just slid in then?
Lowers just slid in then?
Last edited by 77nomad; Jun 13, 2011 at 09:03 PM.
Thread Starter
|
Second Generation Moderator
Feb 2010 ROTM winner
Jan 2013 ROTM winner
Feb 2010 ROTM winner
Jan 2013 ROTM winner
Joined: Aug 2008
Posts: 9,097
From: Portland, Or
ROTM Winner's Club
Well I figure it's gonna get dirty, and nobody can see it anyway, so I just painted over what wouldn't come off.
Lowers slide in??? I wish they did! Man what a battle to get them in and line them up with the holes. Probably spent an hour on each one just getting them to the point of lining up so I could get the bolt in.
Fortunately I had an 8 oz. cup of that suspension grease that looks like vaseline, only sticky. I smeared it inside the lower subframe brackets, and then pushed the arms in. After that I took a big prybar, and the floor jack to use as a pivot point, then just worked them around until I could get a small screwdriver in the hole. Wiggled and worked some more with the screwdriver in the hole until I could get a larger 3/8" rod in, then finally got it centered and the bolts went in.
The uppers fell on, but the nut that's below the master cylinder is going to be a pain to torque! I can see there's no way to get a torque wrench on it, as the only thing that fits it is a box end wrench, so I'll have to torque it by guessing. Hopefully I'll get close enough.
I put a major amount of that gooey suspension grease on the upper ends also, so I wont have to deal with squeaks anytime soon!

Thread Starter
|
Second Generation Moderator
Feb 2010 ROTM winner
Jan 2013 ROTM winner
Feb 2010 ROTM winner
Jan 2013 ROTM winner
Joined: Aug 2008
Posts: 9,097
From: Portland, Or
ROTM Winner's Club
Got the new coils today, so started in around noon putting them in and buttoning up the control arms. What a nightmare! Those friggin coil springs kicked my butt!
They don't like to seat up top in the pockets, and then bend to fit into the lower control arm pocket. In order to get the springs to go into the lower control arms I had to set them in the top, and then put them on the lower arm right behind the ball joints. Then begin to raise the lower arm with my floor jack and start with a large prybar to push them into the pocket.
They fought me all the way, and had to occasionally kick them with the heel of my boot as I raised the arm keeping tension on them. Eventually the spring popped into place almost, and at that point I could raise the control arm almost all the way, and gave the spring a hard hit with a sledgehammer, and it seated. The repro springs are good quality American made, but weren't cut flat on the ends like the Moroso trick springs I took out.
The driver's side gave me extra fits when the blunt square cut end of the spring tried to go into the opening in the control arm for the shock! Took a lot of wrestling, and prying with the big bar to get it to pop out and back into the pocket.
Finished getting the springs, spindles, and brakes reassembled, then replaced the bushings in the front swaybar and reattached it. When I set it down it sat about an inch lower than it did with the old springs, so it should clear the tires in the inner fenders without any issues. About 4.5 hrs. to do both springs and button it all up, and that was really busting my hump.
Wont be test driving it until I finish the rear, and I'm planning a day of rest before going back to begin the rear suspension mods. Fromt a quick look under the rear, I'm not sure I can use the rear swaybar with the Lakewood ladder bar system. If I have to choose one or the other, I'll take traction over cornering, so the swaybar may go, or get modified to fit with the ladder bars.

Former Sponsor
Joined: Feb 2011
Posts: 78

No, no no. The lowers. The two tabs one each side the the lower arm mounts to. The pivot if you will. When the factory installed the arm and tightened the bolt it pinched, compressing the rubber bushing. No big deal really until someone pulls it apart and cant figure out wht the new one won't slide in.
went back and found the pic for you. LOL before I knew how to resize pics.
77Nomad � That�s a great way to spread the frame a little. Very industrious of you. Those lower control arms can be a bear to get back into place.