
New old project-1946 Austin gasser


Thread Starter
|
Second Generation Moderator
Feb 2010 ROTM winner
Jan 2013 ROTM winner
Feb 2010 ROTM winner
Jan 2013 ROTM winner
Joined: Aug 2008
Posts: 9,097
From: Portland, Or
ROTM Winner's Club
Ya gonna go roller Val?
The guy set my springs up too soft on purpose because he thought I was running a flat tappet. I was so pissed when he told me and then defended it with saying. You can just put a +.050 lock in it to get the pressure close. The cam card I gave him said roller on it. The card also called for 110# seat pressure and he set them up at 90#.
The guy set my springs up too soft on purpose because he thought I was running a flat tappet. I was so pissed when he told me and then defended it with saying. You can just put a +.050 lock in it to get the pressure close. The cam card I gave him said roller on it. The card also called for 110# seat pressure and he set them up at 90#.
I've got a couple more months of driving the Austin before I tear it down for upgrades this fall, so time is on my side. I'll make the decision soon.

Overdrive Member
Joined: Nov 2009
Posts: 4,848
From: off the grid
I know the cam your talking about, not sure on the specs though.
My two pennies on it are it probably won't be optimal. I don't think you trying to squeeze every pony out your combo anyhow. A solid roller would be nice but 500 bucks for a set of lifters that you can trust on the street is probably not an option. Hydraulic rollers in a high winding motor don't play nice either. AFR does have a REV kit for thier heads. It is basically springs pushing the lifters back down on the cam, facing opposite the valve springs.
I can see why your on the fence. Better just sell them to me for what you paid, then I'll send you my heads that are already set up for rollers.
Thread Starter
|
Second Generation Moderator
Feb 2010 ROTM winner
Jan 2013 ROTM winner
Feb 2010 ROTM winner
Jan 2013 ROTM winner
Joined: Aug 2008
Posts: 9,097
From: Portland, Or
ROTM Winner's Club
Here's the cam that Comp calls their nostalgia 30-30, close to the Duntov. Around .500" lift, and 284/291 duration. It's actually got decent bottom end, and runs out around 7,000 rpm's.
COMP Cams CL12-673-4 - COMP Cams Nostalgia Plus Cam and Lifter Kits - Overview - SummitRacing.com
COMP Cams CL12-673-4 - COMP Cams Nostalgia Plus Cam and Lifter Kits - Overview - SummitRacing.com
Thread Starter
|
Second Generation Moderator
Feb 2010 ROTM winner
Jan 2013 ROTM winner
Feb 2010 ROTM winner
Jan 2013 ROTM winner
Joined: Aug 2008
Posts: 9,097
From: Portland, Or
ROTM Winner's Club
Finally pulled the trigger and ordered the cam, plus a bunch of other parts for the engine. Went with a hydraulic flat tappet, but a grind extremely close to the old 30-30 solid lifter cam. Just figured I'd not mess with adjusting lifters, even on a car that probably wont need it more than once a year.
The cam I ordered is 292/292 duration, .488/.488 lift, and I'm going to roller tip 1.6 rockers, so the lift should end up around .500 total.
I'm changing the exhaust system out with the new heads and cam, as it's 2.25" with glasspacks there now, and I'll change to 2.5" with crossflow mufflers. I'll need a better flowing system once I have better heads and cam.
Got some 5 degree carb spacers to level the carbs out, and I also plan on doing some reworking on my Hilborn style scoop to get it up out of the hood a bit and into more fresh air.
Should be a short winter project, but hopefully it will really make a big change in the way the car performs. I'm changing the rear tires out also, so I'll have something that hooks up better. Probably some old pie crust Hurst slicks.
Last edited by 1971BB427; Aug 21, 2011 at 08:35 PM.

Thread Starter
|
Second Generation Moderator
Feb 2010 ROTM winner
Jan 2013 ROTM winner
Feb 2010 ROTM winner
Jan 2013 ROTM winner
Joined: Aug 2008
Posts: 9,097
From: Portland, Or
ROTM Winner's Club
No, they're too round on the corners. I want something more old school and squared off. They also don't have a large enough diameter to fill my wheelwells. The Hurst slicks are 29" diameter, and 8.75" width. With my 8.5" rims I'll actually have more rubber on the ground than I have now. The 11" wide tread on my MT's is pulled in too much on the 8.5" wheels and I only have about 7.5" on the ground. (maybe less as tire speed increases!)
Thread Starter
|
Second Generation Moderator
Feb 2010 ROTM winner
Jan 2013 ROTM winner
Feb 2010 ROTM winner
Jan 2013 ROTM winner
Joined: Aug 2008
Posts: 9,097
From: Portland, Or
ROTM Winner's Club
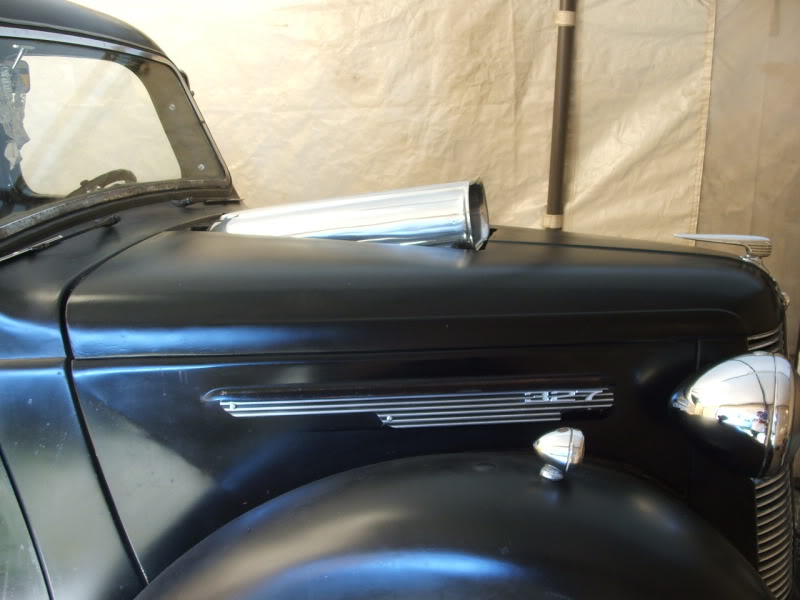
Back on the Austin to begin some changes. Got some 1.5" spacers from Richies Scoops and installed them between the carbs and the scoop to get it up farther through the hood. I will also have my 5 degree carb spacers later this week, which will bring the rear up another 1/4". I want it to still be uphill angle, just further through the hood, and less angle.
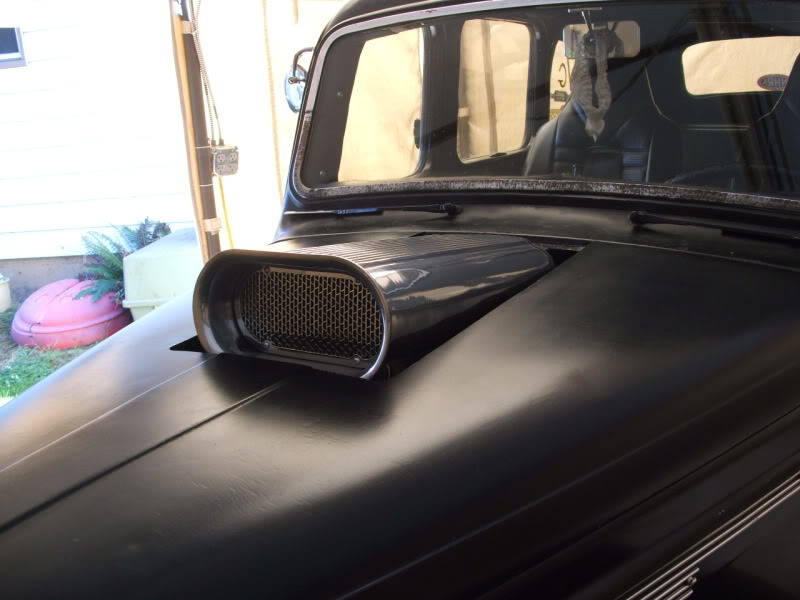
Pulled the scoop and was also able to do some chopping on the scoop itself. Due to engine setback my scoop sat under the cowl in back. By removing about an inch of the cast metal on the underside of the scoop I could slide it forward. Then I removed most of the sheetmetal base from the back and left just enough for the air cleaner to seal. The end result was the scoop slid forward over 2" and now just barely cleared the cowl. I did have to notch the lip that the hood rests on to match the scoop contour, but it goes on easily.
Before:

After:
The next part is to get some 1/4" round stock and bend it around the hood opening to fit about 1" away from the scoop. Then I'll weld it to the hood and that should leave a nice rounded raised area at the edge of the opening. The thin sheetmetal doesn't support much, and easy to get cut on when cleaning or wiping the scoop off. I'll wait to do that until I have the wedges installed, as it may change things a bit.
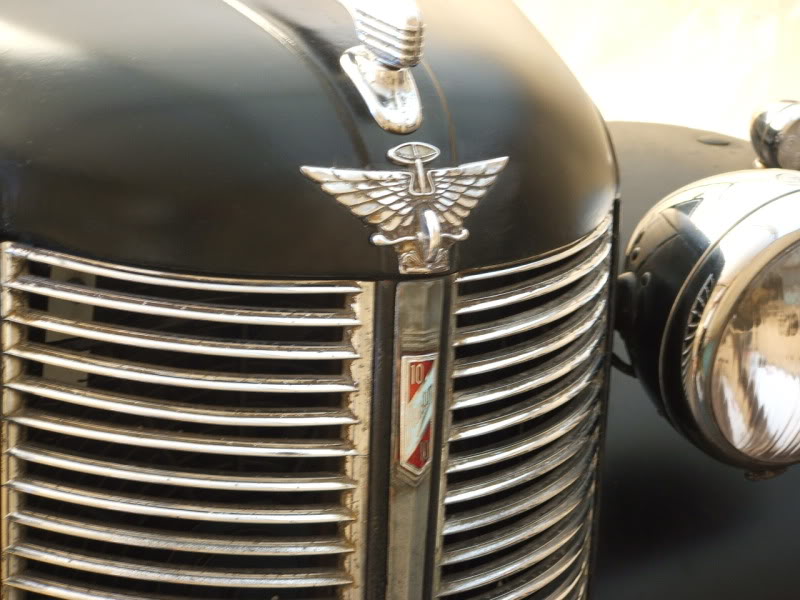
Got the grille "Austin 10" badge from England also, so finally something on the front to identify what it is:
My rocker arms, cam, and the rest of my recent order should arrive later this week, so I'll assemble the arms on the heads and have it all ready after the good weather is over and I can tear it down again.
Pulled the scoop and was also able to do some chopping on the scoop itself. Due to engine setback my scoop sat under the cowl in back. By removing about an inch of the cast metal on the underside of the scoop I could slide it forward. Then I removed most of the sheetmetal base from the back and left just enough for the air cleaner to seal. The end result was the scoop slid forward over 2" and now just barely cleared the cowl. I did have to notch the lip that the hood rests on to match the scoop contour, but it goes on easily.
Before:
After:
The next part is to get some 1/4" round stock and bend it around the hood opening to fit about 1" away from the scoop. Then I'll weld it to the hood and that should leave a nice rounded raised area at the edge of the opening. The thin sheetmetal doesn't support much, and easy to get cut on when cleaning or wiping the scoop off. I'll wait to do that until I have the wedges installed, as it may change things a bit.
Got the grille "Austin 10" badge from England also, so finally something on the front to identify what it is:
My rocker arms, cam, and the rest of my recent order should arrive later this week, so I'll assemble the arms on the heads and have it all ready after the good weather is over and I can tear it down again.
Last edited by 1971BB427; Aug 24, 2011 at 12:16 PM.

Thread Starter
|
Second Generation Moderator
Feb 2010 ROTM winner
Jan 2013 ROTM winner
Feb 2010 ROTM winner
Jan 2013 ROTM winner
Joined: Aug 2008
Posts: 9,097
From: Portland, Or
ROTM Winner's Club
I went from 6 quater inch bolts to 4 to hold the scoop on, but still plenty strong.

