
My 1970 Camaro w/ 572 Build
#261
 10-05-2012, 12:27 PM


So, like, I literally just spent 3 days on and off (due to school/work) reading this thread from start to this post and even with my vast vocabulary, I can not think of any words that can accurately define how amazingly awesome this build is.
Major props to you Sudstoy and your hard work. And I'm digging the power coat. It's what I planned to do to my suspension when I get all the parts, except red. Haha. I can not even imagine how anxious you must be to want to start her up and just listen to her idle!
Major props to you Sudstoy and your hard work. And I'm digging the power coat. It's what I planned to do to my suspension when I get all the parts, except red. Haha. I can not even imagine how anxious you must be to want to start her up and just listen to her idle!
#262
10-06-2012, 12:26 AM

MKC you are the reason I went to work on the car today. I wasn't going to do anything as the couch was feeling pretty nice but then I read your post and decided I should go do something.
Today I got the rear spring isolator pads in and made sure that the rear spring shackles weren't binding the suspension and it wasn't. The ride height that I posted in the pictures before is going to be the final ride height.
Then I decided to tackle the braking system.
I am at a loss on what to do... Under the brake master cylinder there are two blocks, the bottom one is the distribution block but there is another block above that I don't know what do do with. It comes out of the master, then goes into this other block, the to the front brakes. I will post some pictures with some questions tomorrow.
I was also going to install the subframe connectors and decided against it because I don't have a hood yet.
Then I went on to the Be Cool rad. Haha there are waaaay to many parts and pieces to tackle that so I gave up.
I'm done working on the car for the weekend, that means I have next week until Friday and I'm done for over a month. Heading down to Arizona next sat then back to work. Looking forward to 40 degree celcious weather compared to 40 degree Fahrenheit that we've been having!
#263
10-06-2012, 11:59 AM

Join Date: Aug 2008
Location: Portland, Or
Posts: 9,097
One of those blocks under the master will be the proportioning valve. If you are running disc/drum it needs to remain in the system, or be replaced with an adjustable prop valve. The 2nd is a splitter that directs the lines to each front wheel.

#265
10-06-2012, 03:48 PM
Join Date: Aug 2008
Location: Portland, Or
Posts: 9,097

#266
10-06-2012, 07:52 PM
Well, I am glad I could help. It really is an awesome build and I can't wait to see it finished.
#267
10-07-2012, 10:40 AM
#268
10-07-2012, 02:55 PM
Join Date: Aug 2008
Location: Portland, Or
Posts: 9,097
Your right I forgot about wiring. Is that a pickle jar with your pushrods in it? I ask because it brings back a memory from my last motor build. I soaked my lifters in a freshly used pickle jar. One of the deli style pickles with garlic and such floating in the jar. Man that think stunk so bad. The rest of my build had a garlic stench to it.
#269
10-08-2012, 03:10 AM
Ok so i finally got a chance to upload a couple pictures on my computer, and as i stated before i have several questions.
In the picture below it shows all of the braking components that were underneath the master cylinder. As you can see there is one line coming out of the master cylinder, then going into the rear portion of the distribution block. This is the rear brakes i assume. (i will have another question about the rear brakes in a minute)
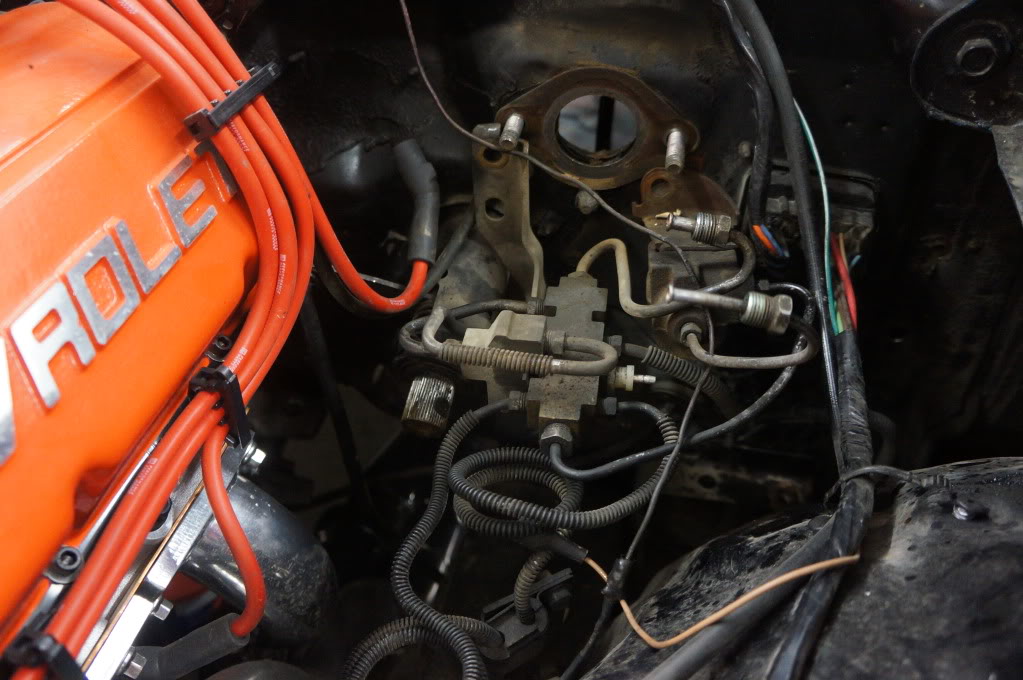
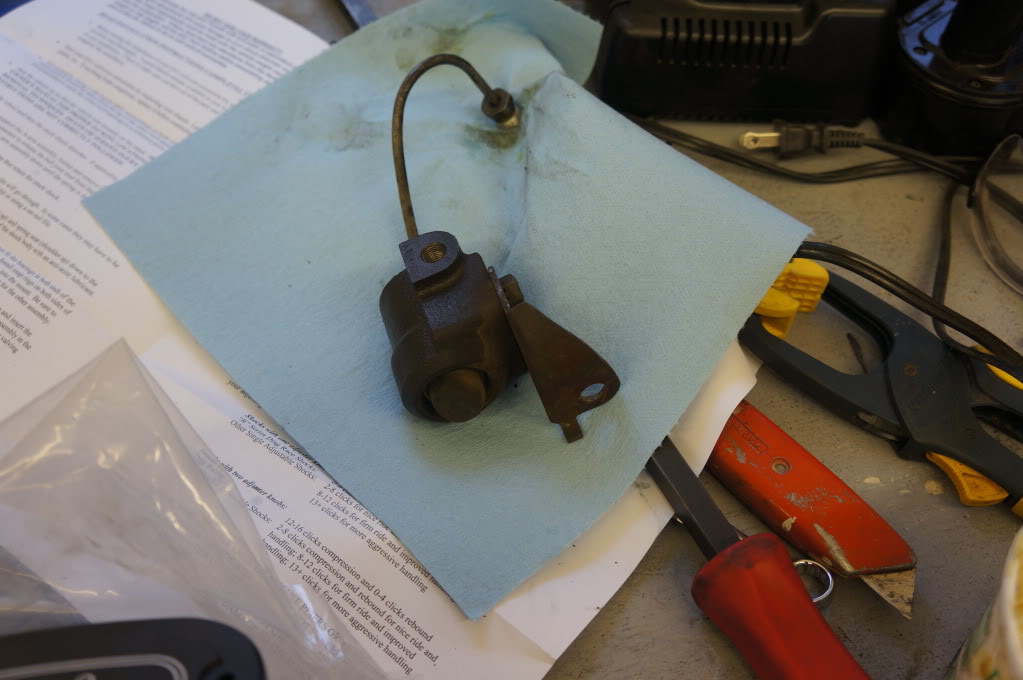
The second (front) line goes from the master cylinder into the small block first, and then into the distribution block. Please see the next picture for the small block i am talking about. It seems to have a button on one end that is covered by rubber. I am assuming this is a stock proportioning valve?
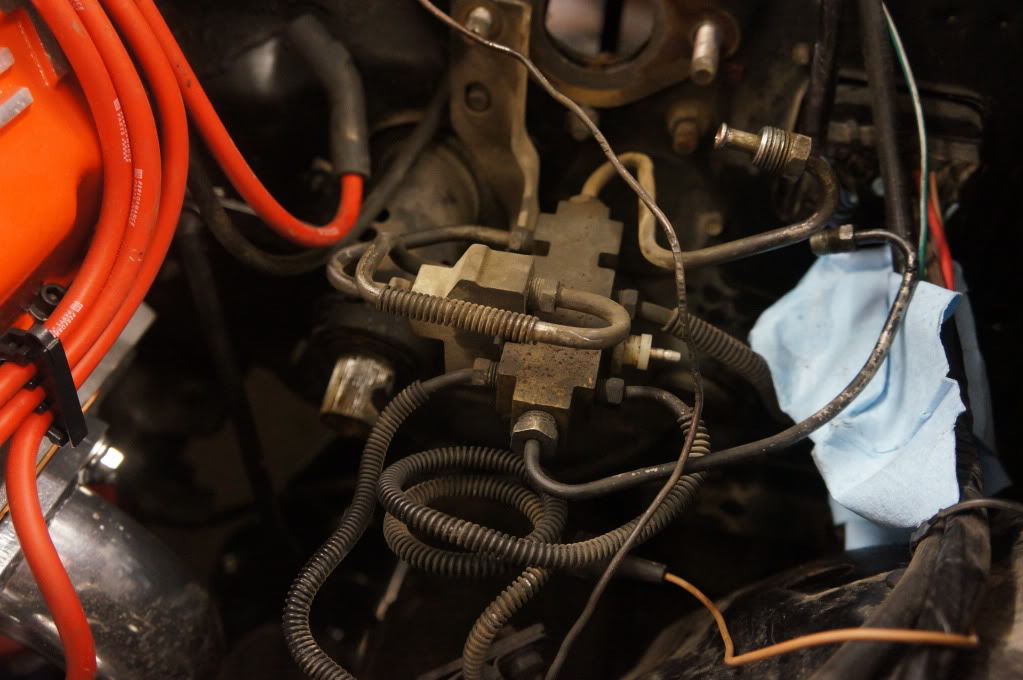
In this third picture you can see another block that is mounted to what i assume is the rear portion of the distribution block. It is mounted on the left hand side of the distribution block and kind of looks like a sideways two pronged fork.
Now my questions
1. What is the block that i show in the separate picture in with the button on it that is covered in rubber? It is the picture by itself on the work bench.
2. What is the two pronged fork shaped object attached to the distribution block?
3. Which items do i need to keep? I am assuming do not reinstall that one block i removed all ready and then run my proportioning valve after the master cylinder. Master-new proportioning valve-distribution block.
If my guess is correct then the last thing i am wondering what it is, is that fork shaped block on the distribution block. I believe it is some sort of device to increase line pressure becuase this car came with drum brakes on the *** end.
Any and all advice or help you guys have is greatly appreciated! I only have 5 days left to work on the car and i was really hoping to get the brake components installed.
In the picture below it shows all of the braking components that were underneath the master cylinder. As you can see there is one line coming out of the master cylinder, then going into the rear portion of the distribution block. This is the rear brakes i assume. (i will have another question about the rear brakes in a minute)
The second (front) line goes from the master cylinder into the small block first, and then into the distribution block. Please see the next picture for the small block i am talking about. It seems to have a button on one end that is covered by rubber. I am assuming this is a stock proportioning valve?
In this third picture you can see another block that is mounted to what i assume is the rear portion of the distribution block. It is mounted on the left hand side of the distribution block and kind of looks like a sideways two pronged fork.
Now my questions
1. What is the block that i show in the separate picture in with the button on it that is covered in rubber? It is the picture by itself on the work bench.
2. What is the two pronged fork shaped object attached to the distribution block?
3. Which items do i need to keep? I am assuming do not reinstall that one block i removed all ready and then run my proportioning valve after the master cylinder. Master-new proportioning valve-distribution block.
If my guess is correct then the last thing i am wondering what it is, is that fork shaped block on the distribution block. I believe it is some sort of device to increase line pressure becuase this car came with drum brakes on the *** end.
Any and all advice or help you guys have is greatly appreciated! I only have 5 days left to work on the car and i was really hoping to get the brake components installed.
#270
10-08-2012, 09:42 AM
Join Date: Aug 2008
Location: Portland, Or
Posts: 9,097
The large block with the "fork" shaped distribution block is your proportioning valve. You should keep all that. Not sure what the smaller block with the rubber on it is. I don't have one of those. Might be a residual valve.