What did you do to your camaro today
#171
 10-10-2010, 09:13 PM


Wow, you gonna hear it run before me. Crap. I know you can wire it in your sleep.
As for my car I took the prop valve and booster off the 78 and got a little more tubing ran. I'm losing sleep over the fuel pump and filter mounting. I cannot find a spot to place this stuff that wont through me off in another spot. Mocked up the new rad, I need to fab some brackets its a tad shorter than stock. Fixed the garage door ar my dads today too, its been broken for ten years. Lost two little brake lines for an hour before I found them on the trunk of the 78. Then shut it down so I could hit the bowling alley for couples leagues, I suck.
As for my car I took the prop valve and booster off the 78 and got a little more tubing ran. I'm losing sleep over the fuel pump and filter mounting. I cannot find a spot to place this stuff that wont through me off in another spot. Mocked up the new rad, I need to fab some brackets its a tad shorter than stock. Fixed the garage door ar my dads today too, its been broken for ten years. Lost two little brake lines for an hour before I found them on the trunk of the 78. Then shut it down so I could hit the bowling alley for couples leagues, I suck.
#172
10-11-2010, 05:33 PM

Join Date: Aug 2008
Location: Portland, Or
Posts: 9,097
[QUOTE=77nomad;463557]Wow, you gonna hear it run before me. Crap. I know you can wire it in your sleep.
Actually thinking of firing it up soon, just to hear the engine! I'll sit a battery beside it and wire the necessities, then a pushbutton across the starter to fire it. We've got a boat tank that we can use as a gas source so I wont need the fuel pump to hear it run. Can't run it long with no radiator, but I'm dying to hear what the cam sounds like before I do the gear drive so I know if I need more cam or not.
Swapped out that big HEI distributor today for my new Pertronix unit. Anybody need a like new HEI cheap?
#173
10-11-2010, 07:41 PM

I wanted to beat the heck outta it with a bat from frustration lol but instead I changed the tranny fluid, changed the garbage passenger door panel for a slightly less garbage one I got from my donar z28 and I cleaned about 4 cups of dirt and debres out of the bottom of the door no wonder the thing is rusting out with that much crap plugging the drain holes, and I drove it to find that nothing has changed in how it's running.
#175
10-11-2010, 10:55 PM
Time to get back to basics James. Is the dizzy in correct? are the plug wires on in the correct order? Is the float level and idle mixture set right on the carb. Pull a plug and see if its wet or white or black. I don't think you had it running long enough to get a good read on the a/f ratio so start by just seeing whats happening inside the engine. Do one from the four corners and post us up some really clear pics and we can help.
#176
10-17-2010, 11:18 PM
Join Date: Aug 2008
Location: Portland, Or
Posts: 9,097
Thanks James!
Spent the day today figuring out my rear suspension. I decided to leave the axle situated under the stock leaf springs while I mocked up the ladder bar/coil over shocks.
By doing it this way I could tack weld the brackets for the ladder bar and crossmember, then pull it all out and weld it in the open where I could get the strongest welds. Then once it was done bolt it all together.
I also need to set the axle back about 1.5", so I used forward brackets with 3 holes spaced 1.5" on center, and assembled it all at the forward most hole. Once I have it all tacked I'll move it to the center hole to build the shock mounts and it will sit right where I want the finished axle to sit.
Started out building a new crossmember to stiffen up the chassis, and give a mounting point for the front of the ladder bars:
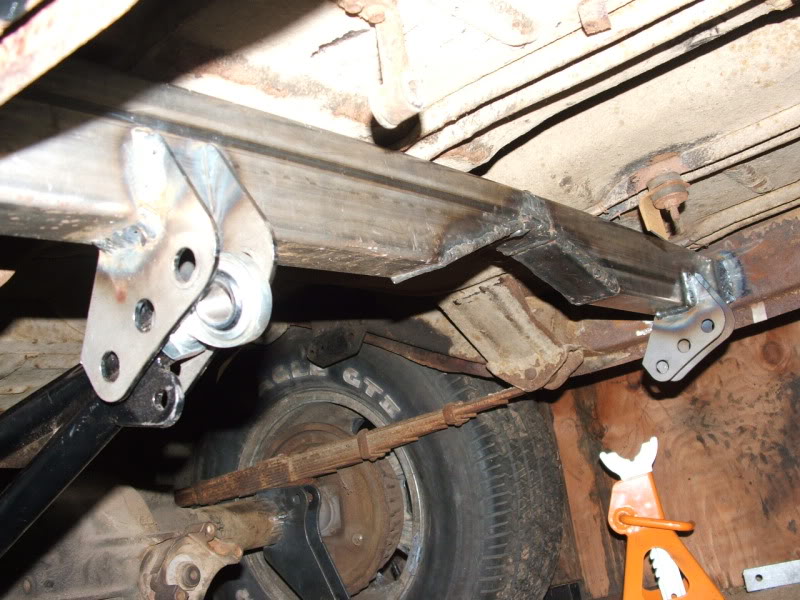
Then I clamped the ladder bar brackets to the axle housing, bolted the ladder bars to the brackets, and tack welded it all. After that I removed the ladder bars and did the finish welds on the crossmember to the frame.
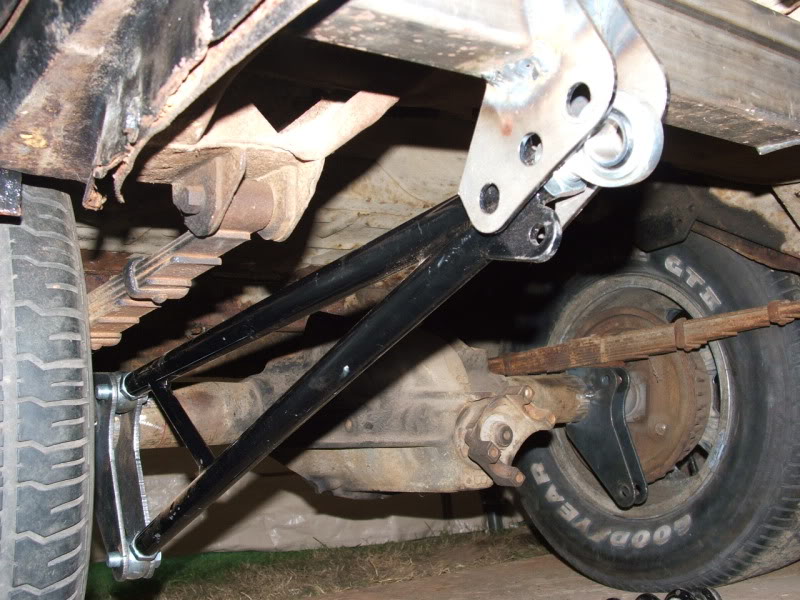
Once the springs are removed I'll install the used Jaguar coilover shocks and determine ride height. Then I'll weld up the top shock mounts and pull the rear axle to finish the brackets for the panhard bar, and final welds on other brackets.
Got my 115 gph electric fuel pump, and the new valve covers today. Sometime soon I hope to hear the 327 make a little noise out of thsoe fenderwell headers!

Spent the day today figuring out my rear suspension. I decided to leave the axle situated under the stock leaf springs while I mocked up the ladder bar/coil over shocks.
By doing it this way I could tack weld the brackets for the ladder bar and crossmember, then pull it all out and weld it in the open where I could get the strongest welds. Then once it was done bolt it all together.
I also need to set the axle back about 1.5", so I used forward brackets with 3 holes spaced 1.5" on center, and assembled it all at the forward most hole. Once I have it all tacked I'll move it to the center hole to build the shock mounts and it will sit right where I want the finished axle to sit.
Started out building a new crossmember to stiffen up the chassis, and give a mounting point for the front of the ladder bars:
Then I clamped the ladder bar brackets to the axle housing, bolted the ladder bars to the brackets, and tack welded it all. After that I removed the ladder bars and did the finish welds on the crossmember to the frame.
Once the springs are removed I'll install the used Jaguar coilover shocks and determine ride height. Then I'll weld up the top shock mounts and pull the rear axle to finish the brackets for the panhard bar, and final welds on other brackets.
Got my 115 gph electric fuel pump, and the new valve covers today. Sometime soon I hope to hear the 327 make a little noise out of thsoe fenderwell headers!
#177
10-18-2010, 12:10 AM

Join Date: May 2010
Location: Missouri
Posts: 3,402
Today I kicked my Camaro's tire, slammed it's door and hood, and gave it a few choice names after it left me stranded halfway between Branson, MO and West Plains, MO. I had to wait 2 hours for a f***ing tow truck!

#179
10-18-2010, 08:40 PM
Join Date: Aug 2008
Location: Portland, Or
Posts: 9,097
Gave my cheap Harbor Freight welder to my son in law and bought a nice Millermatic Autoset 140. Love this welder! It's so easy to do good welds, even vertical and overhead!
I got my suspension welding done today and got the shocks bolted up. Man those Jag shocks use huge bolts! (5/8" top and bottom!) I still need to weld up the brackets for the panhard bar to keep the rear centered, but it's getting closer:

The multi hole front bracket made centering the wheels easy!:

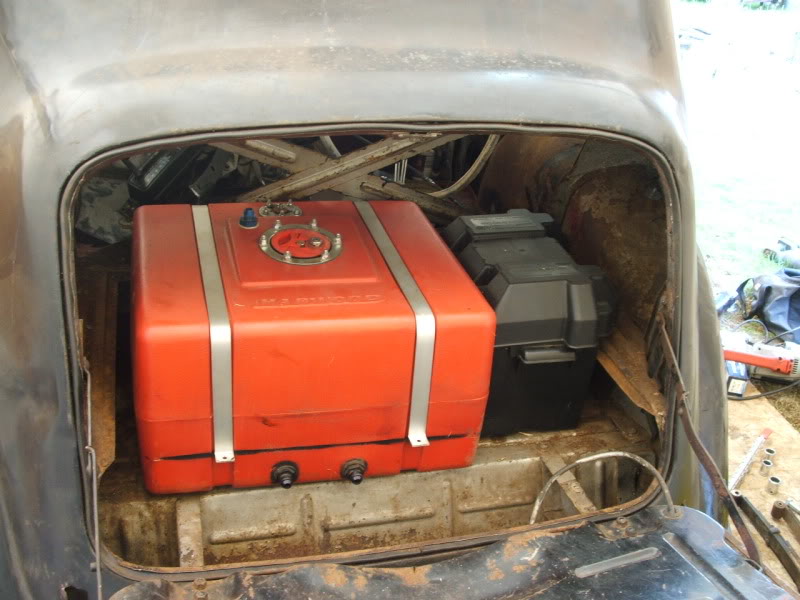
Put the fuel cell and the battery box in the trunk to see if there was enough room. Just barely enough room! Wont be using the trunk much for anything but fueling the car!:
I got my suspension welding done today and got the shocks bolted up. Man those Jag shocks use huge bolts! (5/8" top and bottom!) I still need to weld up the brackets for the panhard bar to keep the rear centered, but it's getting closer:
The multi hole front bracket made centering the wheels easy!:
Put the fuel cell and the battery box in the trunk to see if there was enough room. Just barely enough room! Wont be using the trunk much for anything but fueling the car!:
#180
10-18-2010, 08:54 PM

Join Date: Oct 2007
Location: The 'Burbs of Chicago
Posts: 18,306
Thanks, that's the welder info I was looking for. I have a 90 amp Mig zapper, which is fine for thinner metal, and I don't like using my stick welder nearly as much. A better Mig is on my list, but wanted to find out just how better it needed to be. Have you met it's limits for material thickness yet? You are doing some pretty thick shhhtuff though.