When you click on links to various merchants on this site and make a purchase, this can result in this site earning a commission. Affiliate programs and affiliations include, but are not limited to, the eBay Partner Network.
I began this thread on October 19, 2021, intending to provide a view into the process of breathing life into a used and abused 1968 SS 396 Camaro named ‘Ricky Camaro’. What follows then is somewhat of an annual report, summarizing the entire process needed to take a rusted-out Camaro, over 50 years old, to an immaculate vehicle “fully equipped with a complete line of extras designed with your mind in mind”.
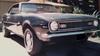
I didn’t realize at the time that this would turn into a near-novel, but the process has been unbelievably involved. I started by sitting down with the two owners of B&R Auto to establish a philosophy of the restoration, and from there, we developed a game plan of tasks, dependencies, and parts acquisitions. The philosophy we followed was to create a Camaro that in almost every respect could be mistaken for a vehicle coming off the dealer’s showroom floor. Only better. The color and vinyl roof reflect that.
Primarily, the only departure visually is in wheels/tires, amount of chrome, and striping. Also, a view under the hood might not look quite original. Nevertheless, the 396 is a 396, and the horsepower is fairly close to original. True, the Hurst shifter didn’t come along until the next year, but I grew up loving Hurst shifters, so hey! It’s my toy, and my sandbox. In other words, I was willing to depart slightly from perfect mirroring of the way he started out. The Centerline mags would not have gone on until I got him home… Nevertheless, most of my changes were invisible and safety-oriented, or meant to improve his ability to age gracefully.
A year later, he is nearing completion! However, when the thread began, the restoration had been underway for some time, commencing in December of 2020. Initial tear-down of the vehicle revealed extensive damage to the front end, as well as rust to the pan and rear inner passenger fender that would require their replacement. We already knew the rear quarters and pan would need to be replaced, but now we were also seeing a need for both front fenders, inner skirts, rear trunk lid and spoiler, as well as a replacement sub-frame and all control arms. Wow! Those parts were not part of the original scope. Finally, the tear-down revealed that the firewall was perforated in several places, including a hole over 2” across in the area that would be occupied by the accelerator pedal inside the cabin. OUCH! Analysis of this hole revealed that the ‘spear’ came from approximately the right front fender, and therefore would have arrived after traveling through the engine block.
I began my posts to the forums last October 15 in the “General” forum, “New Members Area”, and first moved to the 1st Gen Pics sticky, then came here. At that time, the engine (396 big block) had been fully rebuilt and installed on a new sub-frame, along with restored bell-housing, new flywheel (dynamically balanced), pressure plate and clutch, and restored Muncie 4-speed with new Hurst shifter. The sub-frame had new control arms, new springs and shocks, new disc brakes, a Redhead power steering box, all steering components restored and powder coated, and front wheels temporarily installed. The engine was ready to fire, with new HEI distributor, new alternator, new pistons, new intake manifold and carburetor, fully rebuilt heads (including roller rockers), new Engine Pro stage 4 cam, new oil pump, water pump and fuel pump, new Hooker headers, new valve covers, and new flywheel. Also, the 396 was fully balanced internally, and included a fluid harmonic balancer at the front.
Along with the sub-frame and engine, Ricky Camaro had received a LOT of body work! This included replacing both rear quarters, the passenger-side rear inner fender, the entire floor pan from front of trunk to bottom of firewall, new inner seat supports welded to this floor pan, all seams sealed, extensive work repairing the front and rear window channels, and of course, MAJOR work on the firewall, plus a dish in it to allow clearance for the HEI distributor. Additionally, the entire bottom of the car was coated with truck bed-liner, and the vehicle from firewall back was coated inside and out with a layer of Ospho rust converter wherever metal had been taken to bare shine, two coats of acid-etch primer everywhere, and enough coats of high-solids direct-to-metal (“DTM”) primer to create a surface with all imperfections removed, ready for sealer and paint. The roof was taken a step further, with two coats of sealer over the DTM primer, to prepare for the application of black vinyl.
Basically, when I started this thread, the car was a bare steel cabin shell with primer, and separately, a fully populated sub-frame with engine and transmission. Since then, the team has been turning that bare shell back into a finished car. While this seems a ‘slow go’, I didn’t completely understand a year ago just how complex that process would be. The project timeline has also been impacted by the need for this small shop to perform work on a number of other vehicles, since the charges I have incurred on this restoration certainly would not support their cash requirements of wages, site costs, and an understandable desire for profit on the part of the ownership. Additionally, I had stressed to them that my retirement leaves me in no hurry and I am much more concerned that they do it right than that they do it fast. As my Daddy used to say, “A job worth doing is worth doing right”. They had made a “not to exceed” quotation for this restoration, and without a doubt, this job has left them without profit, but with a huge dose of pride as they view the quality of their efforts. And of course, I offer my highest recommendation for them to assist any owners of classic or custom cars requiring complex work!!!
So, understanding the huge amount of work that was already complete prior to thread start, here is a list of the tasks accomplished this past year to bring us to our present status:
The exterior paint was completed to the cabin, after receiving two coats of sealer over the DTM primer. Paint included black semi-gloss between the rear tail-light assemblies, duplicating the original paint job revealed during the preparation by the body shop. Paint consisted of 4 coats of base followed by 4 coats of clear. For various reasons dealing with painting in winter in a less-than-ideal shop (at the time), this process had to be completed three time to finally achieve the "perfect" paint job. Ricky has LOTS of paint on the cabin!
The interior was coated with three layers of Lizard Skin, three coats per layer. This product, only applied to the non-visible areas of the interior, deadens vibration of the sheet metal with the first layer, insulates from heat penetrating from the outside air into the cabin with the second, and the third, outer layer provides a tough surface similar to truck bedliner, to protect the sound-deadening and insulative layers.
After Lizard Skin was applied to non-visible areas of the interior, the visible areas were primered and painted black. Areas included dash, door tops, and some floor areas.
The front sub-frame was re-united with the cabin. As part of this process, frame extensions were installed, requiring a cutout of the floor pan, and welding the extensions to the rear sub-frame, the floor pan, and fish-plated to the front sub-frame. The fish plates are only tack-welded for now, as that process will not be completed until after the 100-mile break-in run has settled the chassis to a contented stance.
The rear end was restored. This included new backing plates and brakes, new ring and pinion (3.42 ratio), new Eaton ‘Detroit Truetrac’ limited slip differential, and new paint.
The rear end was reinstalled, along with new springs and new shocks, finally making Ricky a “roller”. Ancillary tasks in this effort included restoring and installing the driveline, coating and installing a new fuel tank, plumbing the new tank to the engine with new fuel lines, and finalizing the brake system with the installation of a new master cylinder and booster, new proportioning valve, new lines front and rear, and new fluids.
The new inner front skirts were installed, along with the restored front core support. This allowed the new Champion 3-core radiator to be installed and plumbed into the engine.
A complete new wiring kit was purchased, installed and validated. This even included a headlight dimmer switch on the floorboards under the emergency brake. Along with this effort, #4 AWG fine-wire power cables were run, with the ‘ + battery’ cable terminated on a fuse block on the fender skirt, and the ‘battery return’ cable terminated at the “common” engine bolt in front of the fuel pump. This power cable pair is labelled and coiled in the trunk, to support a future battery that will someday power amplifiers for an audio system.
A new dash pad was installed, and the dash was populated with the original speedometer and a new Tik-Tok-Tach behind new bezels for tach and speedometer, and all new switches (ignition, lights, lighter) and heater controls. Also, a new ‘Astro Ventilation’ vent system was installed. A new speedometer cable was attached and run to the transmission, with the middle of five supplied gears used at the tranny end for now. The correct gear will be determined by trial and error during the break-in run discussed below. The heater core and fan system were also installed at this time, attached to the control panel and plumbed into the engine. This included the under-hood portion that required weather seal between heater parts and firewall.
All pedals were installed and connected as required, including clutch components, accelerator pedal, brake pedal, and emergency brake pedal. As part of this process, the emergency brake operation was adjusted and confirmed at the rear wheels, and the entire brake system was purged of air. Also, accelerator pedal to carburetor functionality was confirmed.
The steering column was restored in full (all new components inside the original column housing) by a specialist sub-contractor, and was installed and connected to the Redhead steering box. All wiring to support turn signals was then connected, tested and confirmed to operate. Once all under-dash work was complete, a new steering wheel was installed.
A new headliner was installed, with front seat belt mounting bolt locations noted and marked, but not yet populated with the ‘Morris Classic Concept LLC’ 3-point new seat belts. At that time, new lighted sail boards were installed on both sides, and a new dome light installed.
New headlights were installed on the front core support, and new taillight assemblies were installed. Note that ALL lights (even including tach and speedometer lights) throughout the car are LED. When installed, all lights were tested and confirmed for correct operation.
A new center console was installed and temporarily bolted in place. When the carpets are finally installed, the console will be permanently anchored. All gauges (fuel, volt, temp, oil pressure) were connected and verified. Note that the oil pressure gauge was plumbed to the engine using copper tubing, rather than the plastic tube that was provided in the kit. Also, we elected to replace the ammeter gauge with a voltage gauge.
The new vinyl roof cover was installed, when the Interior Sub-contractor stopped by to install headliner and sail boards, and pick up the passenger front seat and rear seat top and bottom. The seats will be taken to his shop to be restored, but the driver seat was retained and temporarily mounted to aid in first fire of the engine and subsequent body work.
Immediately after the 4th of July, the car was wheeled partially forward to place the front end outside the shop, and the engine was fired for the first time for an initial break-in run of 26 minutes, following a procedure specified by the engine builder. It started within a revolution, and performed perfectly.
Final tasks in the restoration shop included installation of front windshield, rear window, and the custom radio system in the dash. At that point, the car was driven around the parking lot to confirm functionality of brakes, proper shifting, and the four speeds and reverse of the transmission. Ricky was then driven to the body shop, to be handed over to that team for next steps.
In the body shop, there were several cars undergoing various stages of work, and only two members of the staff to do it, so Ricky’s progress has been slow but steady. Initially, doors, front fenders with fender extensions, front grill header, windshield cowl, hood and trunk/spoiler components were installed to set gaps. An issue with the gap between hood and front fenders was resolved by shortening the front grille header, as the factory grille header was too long and resulted in a widening gap between hood and fenders on each side. The hood and grille panel are original to the car, so permission to scratch head, granted.
Once this was resolved, all panels (except doors) were removed for final finish through clear coat, and this is now well along. The two fenders are painted and wet sanded, and the driver-side is buffed, while the passenger side is partly done. The hood is painted and wet sanded, ready to be buffed, and note that the underside of the hood was coated with Lizard Skin’s 3 layers. The grille header was complete, but an attempt to mount the Camaro emblem revealed that the new emblems use the rear deck spacing, and so (gnashing of teeth) holes had to be welded shut and re-drilled, and that panel is now being refinished, and is ready to be repainted. The windshield cowl vent grille and the lower valence are complete, and the bottom side of the rear deck lid is painted, wet sanded, and partly buffed. This next week should see the remaining panels finished and the doors will then be removed, painted and finished. They need to be reinstalled before the rest of the panels, as the fenders cover their bolts somewhat, and this sequence minimizes risk to the finish. Finally, all remaining sheet metal panels will attach to the car, and Ricky will look like Ricky should look.
At that point, the car will be “drivable”, hopefully before the end of October. A number of minor tasks will still need to be completed, such as wheels restored, tires replaced, bumpers and license plates installed, side windows and weather seals installed, front end aligned, and exhaust installed. Also badging, glove box, ash tray, external mirrors, chrome strips, along with other minor items will need to be completed.
The final sub-contractor will involve a visit to the upholstery shop where the interior will be completed, with restored seats installed, new jute underlayment and carpet placed, center console finalized, seat belts installed, door panels and other minor items finished, etc. Note that I have elected to keep the paint job the same as it was, without ‘Camaro stripes’ in front and rear, and with minimal chrome strips. “Plain Jane” works for me. I always thought he looked a bit sinister…
The next step will be for Riley, the other owner of B&R Auto, to perform an in-depth QC inspection of the car. The theory is that he will bring fresh eyes to the inspection, uncolored by attachment to the process. Once Riley’s deficiency notations (if any) are addressed, Ricky will be taken on local drives for approximately 100 miles. During that drive period, the correct speedometer gear will be selected via trial and error.
The final task will be to complete welding the inner and outer fish-plates. joining the frame extensions to the front sub-frame, followed by application of new finish over those bare-metal areas. Once that is done, I will provide final payment and the car will be turned over to me for an initial 1000-mile run. When I have put 1000 miles or so on Ricky, I will return for a total vehicle inspection, my feedback, and replacement of ALL liquids. And then, we fly!
Stay tuned, sports fans…
Last edited by 1st Gen; Oct 17, 2022 at 05:09 PM.
Reason: Forgot to include exterior paint and interior paint
You have come a long way and I congratulate you on the work. Must be very exciting to be so close to final completion. Quite a novel you got and also great to know that these forums are also great for record keeping. Sharing these posts with friends, family and even insurance companies can be a great way to make a long story short and easy to tell. Pics are worth the thousand & one words. Great work and I have been able take some good advise from your work and apply to my own. Look forward to final pics and even your adventures to future car shows, cause you got to go just for fun.
You have come a long way and I congratulate you on the work. Must be very exciting to be so close to final completion. Quite a novel you got and also great to know that these forums are also great for record keeping. Sharing these posts with friends, family and even insurance companies can be a great way to make a long story short and easy to tell. Pics are worth the thousand & one words. Great work and I have been able take some good advise from your work and apply to my own. Look forward to final pics and even your adventures to future car shows, cause you got to go just for fun.
I do hope this long exposition has been worthwhile for some of those who have read bits and pieces of it. If nothing else, it should have provided reactions ranging from �wow� to �boy, that is really strange�.
Anyway, thanks for your kind words. And I cannot wait to see your Blue Baby become complete as well! Have you come up with a name yet?
It seems we�ve entered another month today, and I�m praying for Ricky to be a Christmas present extraordinaire! All panels are now painted and some few are undergoing wet sand and buff, while most are already there. Next step will be to glue it all together, and start putting small items in place. Here is an example of the paint job to date: driver-side fender and fender extension
I'll post pics of the full car as soon as I get them. They've been focusing on other jobs to keep their light on, as well as getting all this painting done, but we continue to move in a forwardly direction.
Well winter is upon us here in the NW so I guess there's no rush,I'm sure you're not going to be taking that beauty out in the rain and snow.
I'll keep following this thread,usually I'm to busy to post much working long hours often 6 days a week but right now I'm on week two of being down with Covid.
Not the vacation I needed especially now that I've used up my PTO and have to start dipping into my savings.
Well winter is upon us here in the NW so I guess there's no rush,I'm sure you're not going to be taking that beauty out in the rain and snow.
Bummer about the Covid crap. Hope all is well now! I see you commenting here and there, so suppose so. Concerning taking Ricky out for a spin, I would point out that it doesn't rain or snow EVERY day here. Several days this last week were blue sky, for instance, and dry ground. Although, today started at 19 degrees and snow mini-flakes, and wind chill that was unkind, courtesy of the Fraser River Valley. That's just wrong when you live 51 feet above sea level. Still, Ricky will have a brand new heater, so what the hey?Anyway, checking in again on this journey to joy! Everything went relatively quiet for a while at the Body Shop as some projects came through that had due dates, while my only due date is that I get the car while I can still handle the horsepower� Ricky did NOT go dead in the water though, as all remaining body panels have been painted, doors are finalized and on, cowl vent grille is done and mounted, grille header panel, lower valance are done and ready to mount, passenger fender is color sanded and ready to buff, and driver-side fender has two small dings that need tended to, then it will be ready to sand and buff. Rear deck lid, spoiler, and driver-side fender should be complete by end of next week and then Ricky can be glued together and finally look like most of a car. As it is, it looks pretty cool with the doors on and finished, along with a sanded and buffed cabin.
Jerry said whenever he has to start Ricky up, let him come up to operating temp, and move him to rearrange the shop floor, �people from around the property come to see what�s going on�� That big block with open headers does generate some sound pressure levels!
For those who just want to go �ooh� and �ahh�, here:
So, progress continues, but sometimes, it continues strangely. While color-sanding and buffing, Jerry determined that two small dents in the driver-side front fender needed to be fixed. Also, he determined that the hood, which was fully painted, was not sufficiently flat. Jerry stated that the hood is not only the first thing that gets viewed at shows (why he wanted the hood-to-fender gaps corrected), but is also what I view as I drive, so he wants it �perfect�. Therefore, he did a scuff on the existing new paint, sprayed a coat or more of high-solids primer with appropriate sanding, and a new application of sealer, base, and clear coat paint. Also, apparently there were issues with the spoiler. The passenger-side front fender, cowl vent grille, front grill header, and lower valence panel are now on the car, and look like this:
Meanwhile, the last pics I had of the hood and driver-side fender look like this:
Last week, James installed all regulators and side windows (door and quarter), felts, and seals, and adjusted for proper glass to seal fit. These are the most current views I have:
So now, the only things missing on the sides are the chrome strip above the doors, and the chrome strip at the bottom of the vinyl. When we first started this project, I said I did not want the chrome strip often found beneath the door.
Hopefully, the new paint will be sufficiently cured to color-sand and buff this week, and the car can become complete for body panels. Boy, that would be a Christmas present!
So, as we crept into the new year, extreme cold (for SW Washington) made it difficult to heat the shop enough to paint, so patience obtained, as we used to say. Finally, hood and driver’s-side fender made it through paint and color sand/buff, and found their way onto the car a couple weeks ago, leaving us here:
Note that the trunk lid is still not on at this point, and fenders and hood needed substantial tuning to get the gaps right. More time was consumed performing this dance of adjustments, but finally, this last Friday, we got there. All panels were happy and made permanent, bumpers installed, headlights and front radiator grill installed, all marker lights and running lights installed and wired, hood placed and its false vents and hood locks made permanent, and Ricky now looks like a complete auto. Friday evening, the guys sent me these two ‘art’ prints:
Oh man, too cool for school!!!
We are now working on relatively low-level tasks, such as wheel restoration, new BF Goodrich Radial TA tires, speakers, chrome strips along roofline, badging, AM/FM antenna and cable, ash tray, and glove box/door. There will then come a point where Ricky will be driven to Muffler Shop for install of 3” pipe, X or H cross-tube, Magnaflow mufflers, then to the alignment shop, and finally, the interior/upholstery sub-contractor. Once all known tasks are finished, Ricky will go through a Quality Assessment by independent and knowledgeable eyes, and any deficiencies will be corrected. Following that, the owners will put in around 100 miles of break-in, which will include calibrating speedometer. Ricky will go on a lift to finalize the fishplate connection between the front sub-frame and the frame extenders, and that area will be re-coated with bed-liner. It currently looks like this:
Jerry wants the chassis to “marry” with 100 miles of use before he makes this attachment permanent.
Once all this is done, we will settle accounts and they will hand me the keys. I will then put 500-1000 miles on Ricky and we will return for a re-torque of all critical attachment points, change-out of all fluids, and I can go play. And a good time will be had by all...
When I was younger, so much younger than today, the Beatles sang �It�s getting better all the time� and for this project, that is very true. Just don�t pay attention to John singing �It can�t get much worse� in the background.
In this last month, a lot of nuts and bolts found their home! For instance, body panels found that �perfect gap�, bumpers were added, passenger rear view mirror added, hood ornamentation and locks installed (the hood locks work perfectly!), and the list goes on and on.
Ricky Camaro gained exhaust this week and it came out very well:
Wow, even the oil pan looks good! And oh, those steel-tube headers� The muffler-man was even able to use X-pipe cross links rather than a simple H-pipe. Way cool!
Ricky was driven to and from the muffler shop. I�m thinking on the way there, people probably noticed, with the big block�s exhaust just dumping out the collectors of the Hooker headers. Bryson reports that the clutch feels smooth and strong, and the Muncie was flawless. We unfortunately had to exit the mufflers with 2 �� tube, which therefore adds some impedance to full flow of exhaust. If it turns out to be noticeable, I have a plan to fix that, by fabricating 2X4 box tubing from muffler outlet, up and over the axle and down between the spring and body panel. For now, that last section looks like this:
Right now, the carburetor and distributor are undergoing adjustment to bring the engine into tune. In the immediate future, the Centerlines get buffed out, BF Goodrich TA�s installed, and wheels aligned. Somewhere in there, a hundred miles or so of driving occurs for a shakedown cruise. Then he goes to the Upholstery shop where the inside becomes as fine as the outside. Those guys did the vinyl roof some time ago, and did not want to use the plastic clips that came with the kit that hold the bottom trim, leaving the vinyl project unfinished. They ordered in stainless steel versions, so they will install the trim at that time. When Ricky comes back from interior being finalized, he will revisit the body shop where any damage to the paint will be fixed, and the frame connectors will be final-welded to the front sub-frame and coated with bedliner. Somewhere along about there, I will trade a few more dollars for a set of keys.
Man, I am getting so jazzed!!! What a great way this will once again be, to get from Point A to Point B in style�
Headers look great,look to be stainless steel? What make?
I spent large on mine (American Racing) ,they're stainless as is the whole system.
6 years later they still look like new.