
Project Frankenbird


Thread Starter
|
In the Staging Lanes
Joined: Jan 2012
Posts: 40
Basecoat of POR-15 completely applied to car. Next step is to bondo around the t-tops where needed and in the engine bay to fill some small holes that welder couldn't get. After that, POR-15 Chassis Coat will be applied to the bottom of the car, and POR-15 Top Coat (gloss finish) will be applied to the roll bars and the engine bay.


yea, thats lookin awesome. thats EXACTLY what my Camaro needs. tear it down, clean it up, paint everything... I even have POR-15 that I bought way back when! Keep up the good work man! 
Thread Starter
|
In the Staging Lanes
Joined: Jan 2012
Posts: 40
Wow...been awhile since I updated this thread...give me a little bit and I'll catch everyone up.
Started tearing apart my T/A back in September:


Cutting out the subframe connectors...no big deal :lol:

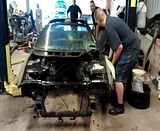
Video of the flipping...this is why you have big friends:
Started tearing apart my T/A back in September:
Cutting out the subframe connectors...no big deal :lol:
Video of the flipping...this is why you have big friends:
Thread Starter
|
In the Staging Lanes
Joined: Jan 2012
Posts: 40
Well, helllllllooooooo there 

Next to my current 1.75" Headers...can't wait to get these on. FAST102 is getting ported too.

Parts everywhere...and that's not all of them....I have some at my house and in the Suburban too.


Next to my current 1.75" Headers...can't wait to get these on. FAST102 is getting ported too.
Parts everywhere...and that's not all of them....I have some at my house and in the Suburban too.
Thread Starter
|
In the Staging Lanes
Joined: Jan 2012
Posts: 40
First part bolted in...new drag shocks and adjustable spring mounts:


Lower shock mount on my Moser 9":

Pedals, Brake Booster, Clutch Master Cylinder, Steering Wheel, Wiring and Dash in...I should have taken a picture of the rats nest that was the wiring once I fed it through the firewall :brick:


And for reference, here is how much space is left over after the HVAC is removed from behind the dash:


Lower shock mount on my Moser 9":
Pedals, Brake Booster, Clutch Master Cylinder, Steering Wheel, Wiring and Dash in...I should have taken a picture of the rats nest that was the wiring once I fed it through the firewall :brick:
And for reference, here is how much space is left over after the HVAC is removed from behind the dash:
Thread Starter
|
In the Staging Lanes
Joined: Jan 2012
Posts: 40
Fuel Cell:


Replacing the Torque Arm Bracket that was damaged when we were moving it around the lot:


Upgrading from 1.75" headers to 2" (non-stepped) headers:


Hey look...rear is on the ground supported by its own suspension:

K-member bolted up:

And down:

Learned something...LS1 and LT1 cars are different. My LS1 T56 crossmember didn't line up with the body mounts. I ended up buying a LT1 T56 crossmember.

Replacing the Torque Arm Bracket that was damaged when we were moving it around the lot:
Upgrading from 1.75" headers to 2" (non-stepped) headers:
Hey look...rear is on the ground supported by its own suspension:
K-member bolted up:
And down:
Learned something...LS1 and LT1 cars are different. My LS1 T56 crossmember didn't line up with the body mounts. I ended up buying a LT1 T56 crossmember.


Thread Starter
|
In the Staging Lanes
Joined: Jan 2012
Posts: 40
Mostly got the interior together...carpet, seats, harnesses, etc:


Switched out my stock crank pulley for a ATI Super Damper with A/C Delete (haven't had A/C since I bought it in 2007):

Installation tool...never use the bolt to pull the pulley on. You run the chance of stripping the threads from the crank and then you're really F'd. This tool threads all the way into the crank and pulls the pulley on properly.


Lots and lots of Loctite...I've had my crank pulley come off because the bolt backed out. Never again.

Also, replaced both tie rods which were damaged in the accident.

Switched out my stock crank pulley for a ATI Super Damper with A/C Delete (haven't had A/C since I bought it in 2007):
Installation tool...never use the bolt to pull the pulley on. You run the chance of stripping the threads from the crank and then you're really F'd. This tool threads all the way into the crank and pulls the pulley on properly.
Lots and lots of Loctite...I've had my crank pulley come off because the bolt backed out. Never again.
Also, replaced both tie rods which were damaged in the accident.
Thread Starter
|
In the Staging Lanes
Joined: Jan 2012
Posts: 40
Since my old brake lines were rusted and I was adding a ABS delete, I decided to redo all of my brake lines using blanks from the auto parts store.

Here is my line lock for the front brakes and the proportioning valve for the rear brakes. The proportioning valve is there to regulate how much brake pressure is applied to the rear since it should be receiving less pressure than the fronts which get the full power of the pedal. For the most part I was OCD about the bends...under the hood I used a tube bender, but when it came time to connect to the calipers, I just hand bent them to where I needed them to go.


Here is my line lock for the front brakes and the proportioning valve for the rear brakes. The proportioning valve is there to regulate how much brake pressure is applied to the rear since it should be receiving less pressure than the fronts which get the full power of the pedal. For the most part I was OCD about the bends...under the hood I used a tube bender, but when it came time to connect to the calipers, I just hand bent them to where I needed them to go.