
1977 Camaro Restoration


Thread Starter
|
Newbie
Joined: Apr 2012
Posts: 28
From: Arizona
I'm going to be pulling the sub-frame tomorrow and possibly the axle as well. How does everyone support the body shell once everything is removed? Jackstands? Rotisserie? I have 4 sturdy metal sawhorses, but I work alone and don't really have any help so I'm not sure how I'd get the body on top of them.
Thanks
Curt
Thanks
Curt

Overdrive Member
Joined: Nov 2009
Posts: 4,848
From: off the grid
When I pull my sub, and I've had it off three times in the last two years. I set the front on stands. There is a strudy spot where the bottom fender mount is. Thats with the rear in it. Without the rear I put two more stands on the frame rails. Remember balance here. I have seen our cars hung by the rear bumper mounts and the door hinges, 8f in the air. I have seen them on four 55g drums. And the best was a guy who rolled the shell on its side landing on old tires. Beleive it or not it worked perfect.
I'm me and I will send pics of my set up. I'm at work right now.
I'm me and I will send pics of my set up. I'm at work right now.

Second Generation Moderator
Feb 2010 ROTM winner
Jan 2013 ROTM winner
Feb 2010 ROTM winner
Jan 2013 ROTM winner
Joined: Aug 2008
Posts: 9,097
From: Portland, Or
ROTM Winner's Club
An engine hoist (cherry picker) will help get the shell up high enough and allow you to get stands under it. To make it easier I'd get it up high as you can and still safely work on it.
Thread Starter
|
Newbie
Joined: Apr 2012
Posts: 28
From: Arizona
$#&!, while removing the sub-frame bolts the captive nut on the right rear mount started spinning freely. Best I can tell there is no access to without peeling open a section of the floorpan from inside.
Any ideas?
Thanks
Any ideas?
Thanks
Overdrive Member
Joined: Nov 2009
Posts: 4,848
From: off the grid
You used an impact didn't you? Sorry I should have warned you. And yes you will have to cut a hole. This has been beat to death on Nasty. There are a few threads with steps to get it apart.
One way is a 4x4 with a couple casters.
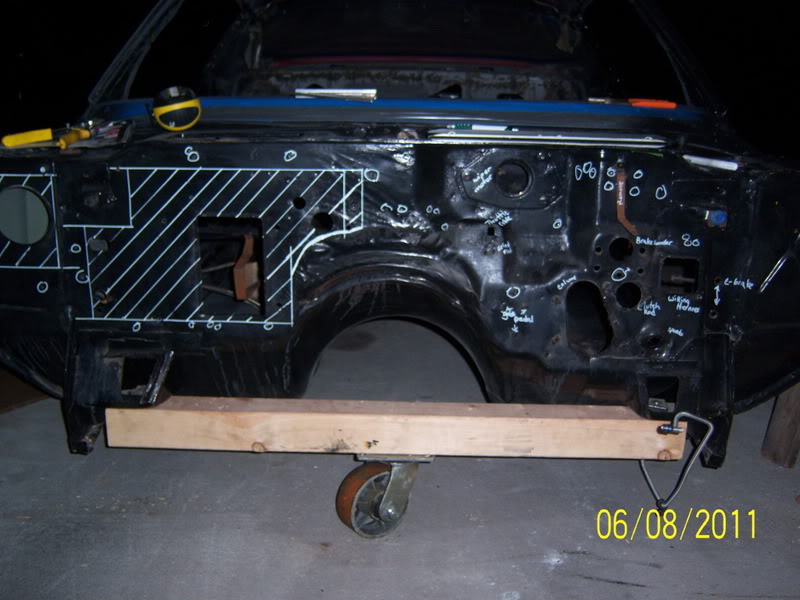
Another is jack stands
I dont have a good pic right now though.
One way is a 4x4 with a couple casters.
Another is jack stands
I dont have a good pic right now though.
Thread Starter
|
Newbie
Joined: Apr 2012
Posts: 28
From: Arizona
As a matter of fact yes I did use an impact wrench.
Looking at the front mounts I see there is a cover over the captive nut. If I cut a hole in the floor am I also going to have to cut off that cover?
Looking at the front mounts I see there is a cover over the captive nut. If I cut a hole in the floor am I also going to have to cut off that cover?
Second Generation Moderator
Feb 2010 ROTM winner
Jan 2013 ROTM winner
Feb 2010 ROTM winner
Jan 2013 ROTM winner
Joined: Aug 2008
Posts: 9,097
From: Portland, Or
ROTM Winner's Club
Not necessarily. You may be able to grasp the cage and squeeze it with vice grips to hold it while you break the bolt loose. It will also allow you to spray the bolt/nut before attempting another try at it.

2nd Gear member
Joined: Jan 2012
Posts: 378
From: lake of ozarks, Mo
Thread Starter
|
Newbie
Joined: Apr 2012
Posts: 28
From: Arizona
Thanks for the suggestions. I decided to use a dremel because I can cut it on 3 sides, providing for easier re-attachment.
As you can see from the 2nd pic the nut totally blew out the side of the cage. Three cheers for my 1/2" IR impact gun!
I'll soak the nut for a couple days before I decide how to proceed. Ideally I'd like to find a way to compress the cage so that I don't have to cut it out also. The left rear side has already loosened without breaking the cage so I'm good there. I haven't touched the front ones yet but I'll be dumping gallons of PB Blaster on them before I do.
If I had it to do over I think I'd drill a small hole in the floor above each nut to aid in quenching it.
I haven't decided yet if I want to pay the $25 for the exact reproduction cage & nut. If I do then I'll weld the flap back up when everything is back together. But I'm thinking at this point of just getting a proper grade nut from the hardware store and be done with it. In that case I would just tack the flap back in place and cover it with seam sealer. Has anyone done that before?