
Help with a Holley Avenger rebuild


Joined: Nov 2007
Posts: 10,560
From: Eastern PA,
ROTM Winner's Club
I am rebuilding my Holley, I have not messed with one for almost 30 years. The Holley 670 Avenger worked great right out of the box. It is getting rebuild due to the accelerator pump failure. My question is on the power valve. The valve I removed from the Avenger had no markings. The Trick kit I bought came with 3 market 2.5,,,6.5 and 10.5. Anyone know where I should start? A way to gage my old un-market power valve.
Thanks in advance.
Thanks in advance.

1st Gear Member
Joined: Feb 2018
Posts: 251
On your old power valve there are 3 places the inches of vacuum are printed or stamped. On the small brass spring retainer, on the sheet metal diaphragm retainer, on the hex nut flats. The new one sounds like a 3 stage. Can you post close ups of both? Do you know your idle vacuum for your engine?
1st Gear Member
Joined: Feb 2018
Posts: 251
The newer holleys don't blow power valves on a back fire like the old ones (pre 1990 I think). I like to run a p/v that is about 1 1/2 iov lower than the idle vacuum. On my ZL1 I have to run a 4.5 valve because of 6 in. at idle (aggressive cam profile).
.
.
Joined: Nov 2007
Posts: 10,560
From: Eastern PA,
ROTM Winner's Club
I did not check the vacuum before pulling it a part and the last time I checked it was so long ago I am not sure. I set the idle in 07 and have not done anything to it since. I read up on the power valve on Holley's website. I went with the 6.5 for now until I can check the vacuum. The cam is not a stock one but its not radical either.
1st Gear Member
Joined: Feb 2018
Posts: 251
6.5 is a good starting point. Most factory and out of the box Holleys came with that valve. When you check the vacuum at idle, use the vacuum gauge to set your idle mixture screws also (set at highest vacuum reading when adjusting mixture screw). I was looking at my can of p/valves last night, all 14 of them!
Joined: Nov 2007
Posts: 10,560
From: Eastern PA,
ROTM Winner's Club
It looks like the original was 6.5, Under magnification it looks like an E, a 6 then a 5. Its tuff to see. I started the car and she fired right up, Accelerator pump seems to be work fine. I just need some Anti freeze and I can test drive it.
Old power valve
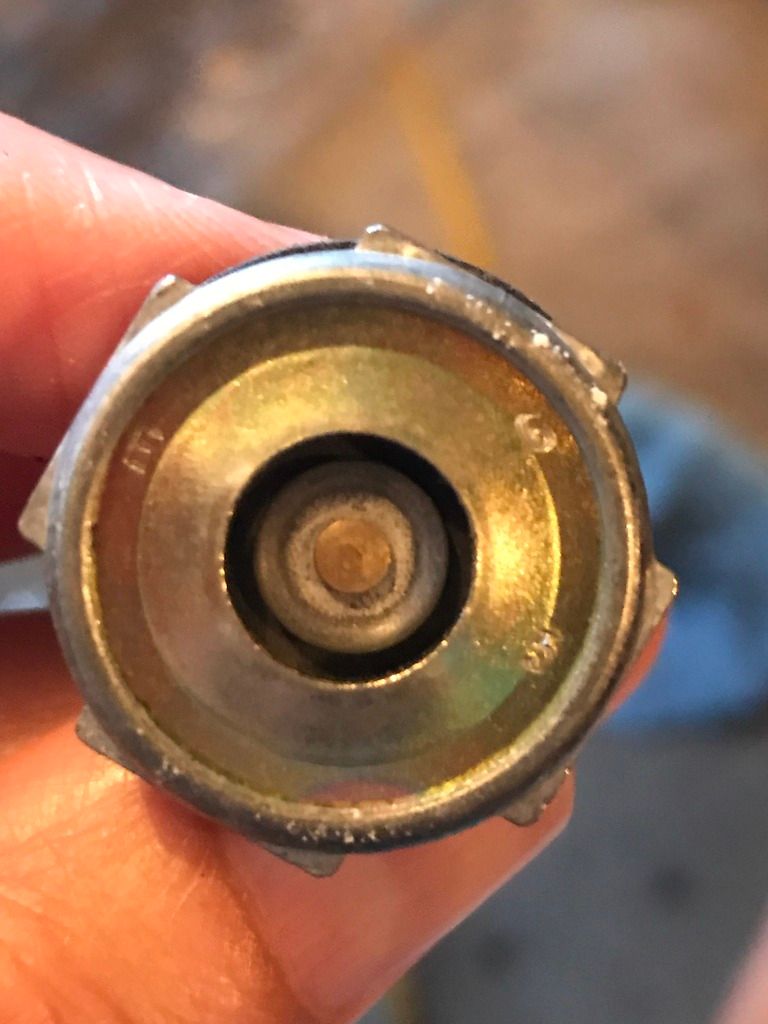
Old power valve


Joined: Nov 2007
Posts: 10,560
From: Eastern PA,
ROTM Winner's Club
The issues returned, It ran good in the garage but under load the hesitation/ flat spot is back. Today when I went out to check things I realized the accelerator pump stopped working again. This time the spring is flexing and the pump arm is not moving. After playing with it I am sure the check valve under the squitter is stuck. I remover the squitter and played with the pin and the acc pump started working again.
Joined: Nov 2007
Posts: 10,560
From: Eastern PA,
ROTM Winner's Club
So I got the pin out which was way harder then it should be. I could see nothing in the bore even with magnification. I check the diameter of the aluminum pin and found a drill bit a few thousands undersized and used the drill bit with my fingers. I felt something at first. but then the bore was clear and I installed a new pin, even though there appeared to be nothing wrong with the original pin. She runs great. I put about 20 miles on her tonight.

Thread
Thread Starter
Forum
Replies
Last Post

