
1994 3.4 SFI Water Pump Replacement:


Thread Starter
|
Newbie
Joined: Apr 2009
Posts: 2
Recently having to do this job myself, I searched these forums and found little, if not in most cases wrong information on this job. So as help to the next person looking here for answers I thought I'd jot down a few very helpful notes.
Tools You'll need:
*American and Metric sockets: 10, 13, 1/2", 7/16" and others will be used. (More then likely if your car is like mine, the block will say "Made in Mexico" on it, so there's a few metrics on it)
*Standard screwdriver: For removing the air intake
*Pliers or channel locks: for removing hose clamps
*Wrench Set:
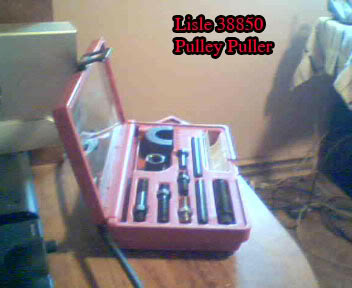
*Pulley Puller: Can not do the job without this tool. If you don't own one, buy one. If you don't want to buy the kit, have the job done by a mechanic.
*Torque Wrench: A must. The bolts around the water pump housing have 3 different torque settings.
*Strap Wrench: A must have for the bolts on the water pump pulley.
Of all the threads, I only seen one thread mention a pulley puller, and he spelled so terribly, that a majority of words others may use in a search string, would not yield the results needed. What I'll give here is basically by memory, and though I will attempt to be as complete as possible, I may forget something small, and for that I apologize. But I think most people can read this and decide if they want to do it themselves, or have it done.
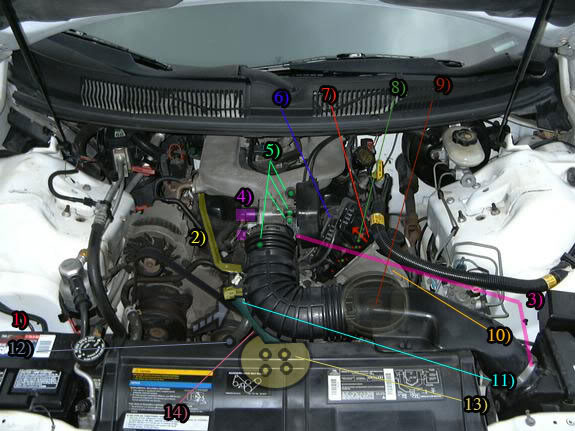
1) Remove negative battery cable (you'll be removing the coil packs later, so this is always a great first step).
2) Remove the tube, and the censor from the air intake.
3) Remove the air intake from the throttle, and where it connects to the air cleaner via the hose clamps.
4) Unplug the two censors from the throttle.
5) Three bolts and one nut hold on the throttle and throttle cable assembly. You'll need to get this out of the way to get to the bottom bolts on the coil pack with a ratchet and extension.
6) Number and remove the spark plug wires for easier access to the rear bolts on the coil pack.
7) Remove the coil packs with a 7/32" socket, bolts front and back. Keep these in order, and note each has a number on the top that corresponds to the cylinder it fires. Do not mix these up, and make sure to pull straight up parallel to the base so the connectors on the bottom are not damaged.
8) Three bolts hold on the coil pack mounting assembly, two at the top and one at the bottom, and once removed will reveal bolts on this bracket that covers the power steering pump that were previously inaccessible.
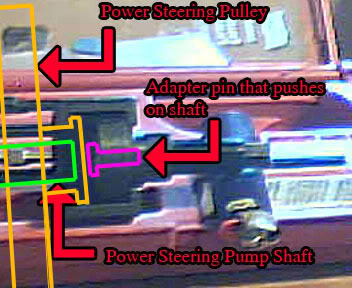
9) Remove pulley from power steering pump using a pulley puller kit, as below.
10) You can now remove all the bolts for the coil pack mounting assembly that fits over the power steering pump.
11) Remove the upper radiator hose at the engine. It can remain connected to the radiator.
12) Using a 1/2" socket in the tighten position crank the tension pulley to the right (as your facing it), and remove the serpentine belt from the water pump pulley (as it has no lip for the belt).
13) Using a strap wrench to hold the water pump pulley, use a ratchet to remove the four bolts. (I made my own with an old shovel handle I cut about a 2" flat spot on each side, an old leather belt, and a pair of channel locks. It wasn't pretty but it worked.)
14) The water pump and all of it's bolts are now full accessible and can be removed. I advise laying the bolts out in sequence as they are different, and you don't want them mixed up. There are eleven of them and it is easy to do.
15) This is the most time consuming, and tedious part, cleaning off the old gasket. It's very important to get every bit of the old gasket off so the new water pump and gasket seal properly. Take your time and do it right.
16) Replace the water pump and gasket, and make sure to start the right bolts in the right holes.
17) I know there is a torquing pattern, but I couldn't get one. The day I did this was on a Sunday, so no one was at my local garages, and the Haynes manual did not supply this information. I tightened them like you would a rim on a car, using opposite bolts as much as possible and this seemed to seal up fine. I do suggest getting this information prior to a day where mechanics want to be with their families.
18) The torque specs starting from the water inlet tube located at the "11 o'clock" position moving clockwise are as follows: 192 in/lbs, 192 in/lbs, 33ft/lbs, 33 ft/lbs, 192 in/lbs, 192 in/lbs, 89 in/lbs, 89 in/lbs, 89 in/lbs, 33 ft/lbs, 33 ft/lbs. Please note there's a difference in inch pounds and foot pounds, example: 192 in/lbs = 16 ft/lbs. Conversion is simple, divide or times by 12 depending on which way your going.
19) Now just start in reverse from step 13 to step 1.
There are other tutorials on "burping" your cooling system and filling up the system with coolant once you're all back together, so no point duplicating the post here. Hope this helps somebody else wondering if the job is something they would try.
Loc
Tools You'll need:
*American and Metric sockets: 10, 13, 1/2", 7/16" and others will be used. (More then likely if your car is like mine, the block will say "Made in Mexico" on it, so there's a few metrics on it)
*Standard screwdriver: For removing the air intake
*Pliers or channel locks: for removing hose clamps
*Wrench Set:
*Pulley Puller: Can not do the job without this tool. If you don't own one, buy one. If you don't want to buy the kit, have the job done by a mechanic.
*Torque Wrench: A must. The bolts around the water pump housing have 3 different torque settings.
*Strap Wrench: A must have for the bolts on the water pump pulley.
Of all the threads, I only seen one thread mention a pulley puller, and he spelled so terribly, that a majority of words others may use in a search string, would not yield the results needed. What I'll give here is basically by memory, and though I will attempt to be as complete as possible, I may forget something small, and for that I apologize. But I think most people can read this and decide if they want to do it themselves, or have it done.
1) Remove negative battery cable (you'll be removing the coil packs later, so this is always a great first step).
2) Remove the tube, and the censor from the air intake.
3) Remove the air intake from the throttle, and where it connects to the air cleaner via the hose clamps.
4) Unplug the two censors from the throttle.
5) Three bolts and one nut hold on the throttle and throttle cable assembly. You'll need to get this out of the way to get to the bottom bolts on the coil pack with a ratchet and extension.
6) Number and remove the spark plug wires for easier access to the rear bolts on the coil pack.
7) Remove the coil packs with a 7/32" socket, bolts front and back. Keep these in order, and note each has a number on the top that corresponds to the cylinder it fires. Do not mix these up, and make sure to pull straight up parallel to the base so the connectors on the bottom are not damaged.
8) Three bolts hold on the coil pack mounting assembly, two at the top and one at the bottom, and once removed will reveal bolts on this bracket that covers the power steering pump that were previously inaccessible.
9) Remove pulley from power steering pump using a pulley puller kit, as below.
10) You can now remove all the bolts for the coil pack mounting assembly that fits over the power steering pump.
11) Remove the upper radiator hose at the engine. It can remain connected to the radiator.
12) Using a 1/2" socket in the tighten position crank the tension pulley to the right (as your facing it), and remove the serpentine belt from the water pump pulley (as it has no lip for the belt).
13) Using a strap wrench to hold the water pump pulley, use a ratchet to remove the four bolts. (I made my own with an old shovel handle I cut about a 2" flat spot on each side, an old leather belt, and a pair of channel locks. It wasn't pretty but it worked.)
14) The water pump and all of it's bolts are now full accessible and can be removed. I advise laying the bolts out in sequence as they are different, and you don't want them mixed up. There are eleven of them and it is easy to do.
15) This is the most time consuming, and tedious part, cleaning off the old gasket. It's very important to get every bit of the old gasket off so the new water pump and gasket seal properly. Take your time and do it right.
16) Replace the water pump and gasket, and make sure to start the right bolts in the right holes.
17) I know there is a torquing pattern, but I couldn't get one. The day I did this was on a Sunday, so no one was at my local garages, and the Haynes manual did not supply this information. I tightened them like you would a rim on a car, using opposite bolts as much as possible and this seemed to seal up fine. I do suggest getting this information prior to a day where mechanics want to be with their families.
18) The torque specs starting from the water inlet tube located at the "11 o'clock" position moving clockwise are as follows: 192 in/lbs, 192 in/lbs, 33ft/lbs, 33 ft/lbs, 192 in/lbs, 192 in/lbs, 89 in/lbs, 89 in/lbs, 89 in/lbs, 33 ft/lbs, 33 ft/lbs. Please note there's a difference in inch pounds and foot pounds, example: 192 in/lbs = 16 ft/lbs. Conversion is simple, divide or times by 12 depending on which way your going.
19) Now just start in reverse from step 13 to step 1.
There are other tutorials on "burping" your cooling system and filling up the system with coolant once you're all back together, so no point duplicating the post here. Hope this helps somebody else wondering if the job is something they would try.
Loc

Thread Starter
|
Newbie
Joined: Apr 2009
Posts: 2
So what was that? An "I can do it better then you" comment? Considering I seen you chime in on the loads of threads devoted to this subject and offered no real answers to the people asking this question, lets just tell people how to do it correctly, and with a title that people can find in a search engine.
Hows that pumpkin? Can we leave it at that? I don't play well with trolls, so understand me from the get go partner. How cute....
Hows that pumpkin? Can we leave it at that? I don't play well with trolls, so understand me from the get go partner. How cute....

Newbie
Joined: Jan 2009
Posts: 6
Good write up.
I have one thing to add. I'm just doing this job today on my '94 3.4, and the strap wrench is not necessary. Just loosen the pulley bolts before you remove the fan belt. The belt holds the pulley fine. After you loosen them, remove the belt, and they should come out easily.
I have one thing to add. I'm just doing this job today on my '94 3.4, and the strap wrench is not necessary. Just loosen the pulley bolts before you remove the fan belt. The belt holds the pulley fine. After you loosen them, remove the belt, and they should come out easily.

Thread
Thread Starter
Forum
Replies
Last Post