
Basic Modifications Tech - Where to Start Modding


Thread Starter
|
Ninja Administrator
Joined: Jun 2007
Posts: 6,172
From: Potato

Basic Modifications Tech
Where to Begin Modifying Your EFI Engine
The following Write-up is designed to help you understand the basic functions of your powertrain's components and what, if any, effect aftermarket parts will make.
Where to Begin Modifying Your EFI Engine
The following Write-up is designed to help you understand the basic functions of your powertrain's components and what, if any, effect aftermarket parts will make.
This write-up uses the "weakest link" plan of attack in its presentaion. The idea is this: Your engine is a giant pump. It produces power by taking in oxygen, using it to combust gasoline, and expelling the left over gasses.The faster and more efficiently it can perform these 3 steps the more power you will make. Therefore, when moding, we attack whichever part hinders this process the most. Therefore modding your car in the order these modifications appear is not a bad approach. That being said, this is by no means the only way to modify a car, just one suggested way.
This write-up will also concentrate primarily on NA modifications, and therefore it should be understood that most of the time HP gains can be related to engine size (for example, a 3.4L cannot expect to see the same gains doing headers as a 3.8, which cannot see the same gains as a 5.7L
Quicklinks:
Intake
Catback
Midpipes
Headers
Intake Boltons
Accessory and Free Mods
Gears
Camshaft and Valvetrain
Thread Starter
|
Ninja Administrator
Joined: Jun 2007
Posts: 6,172
From: Potato
Intake
CAI's, Lids, and Ram Air
While Not always necessarily the most restrictive part on an engine, a common first modification is the air intake. Depending on model, the intake modifications can range from an entirely new air box to simply a new lid for that box. CAI's, Lids, and Ram Air
In stock form, most air intakes will have a few features
- The Air box - contains the filter, and also will typically have a baffle system to reduce intake noises
- Resonator - this is also for reducing sound
- Intake Tubing - in most stock applications, the intake tubing is made to be cost effective, which roughly translates into narrow and rough, also containing unnecessary or ill-formed bends
All three of these components can lead to restriction of the air flow. The baffles, resonators, and bends, as well as any imperfections within the tubing, tend to create turbulence and slow down the air flow. The ideal intake will in theory supply a solid column of air from the openning of the intake to the intake manifold.
It is important to remember that the intake is a very basic mod. On stock vehicles the stock intake usually supplies most of the air need of the engine, therefore dont expect a race car after doing just an intake swap.Typical gains are less than 10hp, regarldess of what the company selling the part tries to tell you.
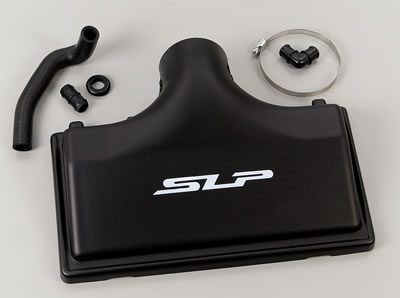
There are a few options when modifying an air intake. For LS1 cars, it is typically sufficient to simply add a new lid to the air tray. The new lid will be longer and taller than the new air lid, and will not include baffles. This creates a larger volume for the air to travel through, eliminates the resonators which sit directly behind the stock lid, and smooths out air travel.
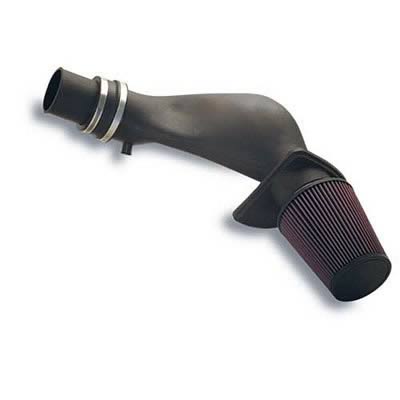
For cars which contain an air box off to the side of the engine bay, typical modifications include replacing the restrictive stock tubing, or replacing the entire system with a Cold Air Induction kit (CAI) or a Ram air kit.
CAI: Cold Air Induction kits work, in theory, by placing the air filter in a position that it pulls in air from outside of the engine bay. This can be done in some applications by sticking the filter in the fender, or by using a heat sheild to section the filter off from the rest of the bay. Be wary of custom kits, because some have a tendancy to put the filter below the motor resulting in damage if you ever drive over a puddle. The basic idea here is that cold air is more dense, so bringing this air into the engine can make more power. A problem with this theory is that when driving, the engine bay temps are usually not much higher than ambient due to the circulating air, and the excessive bends in the tubing required to position the filter can lead to unnecessary restriction.
Ram Air:These kits position the filter, again in theory, in such a way that the speed of the vehicle will force more air into the intake. The theory sounds good, however, many of these kits do not really achieve a proper position, nor is the effect as drastic as some would lead you to believe. Ram air effects at 80mph are approximately the same as 1psi of boost, or around 6hp. Of course, that is assuming intake is positioned such that it will experience higher exposure to air as speed is increased. Many short rams leave the filter exposed in the engine bay with no direct access to flowing air.
In the end, the different tricks involved in designing an intake just wash. The important thing to think about when buying an intake is:
Who made it? Reputable dealers gain their reputation for a reason. While this doesn't mean you will be getting the best product around, you can typically feel safe that you are not getting a piece of crap.
Are there any restriction points? Excessive bending or odd positions can reduce the airflow. Remember that in the ideal case you want a solid column of uninterupted air flowing into the engine.
Thread Starter
|
Ninja Administrator
Joined: Jun 2007
Posts: 6,172
From: Potato
Catback Exhaust
Grin Factor
Grin Factor
Like the subtitle says, the catback system is really all about that "Grin factor", that thing that makes you want to romp on the gas more often. The catback is the last section of the exhaust sytem, which also included the midpipe, and the headers (which will be discussed later). The catback will typically run over the axle and out the back of the car, unless the system you are looking at is for True Duals. These systems typically run under the rear axle. Catbacks can usually come in several parts and are held together with band clamps. A catback swap can be done with a jack, jackstands, and a screwdriver or ratchetmost of the time.
The stock catback in most cars isnt that terrible. Besides, by the time the exhaust hits the catback, typically any power loss due to restrictive parts has already taken place. For this reason, hp gains from catback exhausts are minimal. Usually on the order of 5hp or so.
However, if you want to get technical, the most restrictive part of the catback is the muffler. Different companies advertise as flowing more than the other guys (one company even claims to be the master of this..... however in reality their mufflers are the most restrictive of the big dealers on the market). None of this really matters for the reason given above. What is really important about the catback is that it makes a noise that makes you smile.
Different kits will have different levels of volume and drone. The best way to really research this is to go online and find soundclips, and to talk to owners of the kit. Dont ask questions like "do you like it". Of course they like it. Ask questions about sound level or things that might annoy you and cause you not to enjoy your new catback. A question like "Will I have to yell to talk to my passenger while driving?" is a good place to start
Catbacks are fairly safe because the midpipe/catback joint is where most companies start measuring from. This means that a catback made for a particular generation will fit almost any car of that generation. Even v6 cars can use a v8 catback, as long as they buy another mounting bracket (in some cases).
Thread Starter
|
Ninja Administrator
Joined: Jun 2007
Posts: 6,172
From: Potato
Exhaust Midpipes
X's,Y's, O/R, and Street Legal
X's,Y's, O/R, and Street Legal
After an intake and catback exhaust has been installed onto the car, another modification for people looking for some easy bolton power is to replace the factory midpipe. Factory midpipes are usually very narrow to maximize undercarriage clearance, and contain 1-4 catalytic converters which are also pretty restrictive.
One free mod you can perform is called "gutting the cat". This includes removing the midpipe and ramming a metal rod through the catalytic converter plates to break them apart, and then dumping them onto the ground. Stock midpipes are usually small enough (and the catalytic converter cross section is big enough) that this doesnt do much except change the sound of the car. There might be 1-2 hp hiding in there somewhere though. However, if you live in a state with emissions testing that does not use a sniffer test but only visual inspection, this is one way to modify the exhaust but continue to pass emissions. This will, however, cause a car to fail if an exhaust sniffer is used. It will also typically cause an SES light to come on in OBDII cars when the rear O2 sensor doesnt like what its seeing.
Options for aftermarket midpipes include Y-pipes, which are stock replacement, and Xpipes or straight pipes,which require a true dual catback system.
These midpipes also come in different variaties. Typical sizes include 2.5" and 3" diameters. They also come long and short (Long ypipe's are stock replacement, an short ypipes fit LT headers). They are also available in either Off Road (OR, or O/R, ORY for off road ypipe) which do not have any catalytic converters, and High-flow Catted midpipes. Again, if you need to pass visual inspection you can buy a catted Y and gut it. However aftermarket cat's are usually good enough that you would just be wasting time at this point.
Which midpipe is right for me?
Think ahead. Do you intend on doing true duals at some point? If so the entire exhaust package should be bought at one time. Do you intend on doing headers? Depending on your header choice (which will be discussed later) you may be restricted to certain types of midpipes (as stated earlier long ypipes fit up to your stock exhaust manifolds).
If you do not plan on doing headers, it is better to stay with a narrower midpipe. The best results come when the diameter of the tubes stays somewhat constant throughout the exhaust system, or to get slightly smaller toward the back. This is because as exhaust gas cools it contracts, so a smaller minimum diameter is needed. The thing to avoid is going from a 2" openning on your stock manifold to a 3" midpipe.
Because of all of the options, the flanges on all of these parts can typically meet up so it is up to you to choose wisely.
Thread Starter
|
Ninja Administrator
Joined: Jun 2007
Posts: 6,172
From: Potato
Headers
You got the air into your engine, now its time to pull it back out
You got the air into your engine, now its time to pull it back out
Headers replace your stock exhaust manifold. Typical stock manifolds are complete junk. They combine an entire bank of cylinders into 1 tube, they do not radiate heat well, and they have almost no scavenging. The only issue with doing this mod is that headers take alot of time, and the install is not easy. Many bolts are very hard to reach, exhaust leaks are common, and fitment is a big issue.
Headers can be made with a couple different intents: Best power, or best fitment. The fitment and power differences between these types are not much, but they are there. For example, pacesetter designes their headers to fit with next to no issues (at least on the LS1), however, kooks are more difficult, but the pipes each have a tuned length for max torque.
Headers come in 3 styles: Long tube (LT), Mid-length, and Short tube (Shorties). They also will come with fittings for your cars emissions equipment if necessary. For example, early LS1 headers will have both EGR and AIR fittings. These parts are necessary for emissions so make sure you know what parts you have before you choose your header options. Also, if you have deleted one or both of those systems you can get 'Race Style' headers which have no fittings other than O2 sensors.
Which headers flow best?
It doesnt matter. Thats right, doesnt matter. To be completely honest, shorty headers flow the best at the flange. Because flow is a function of diameter and length, and since shorties have the shortest tube length, the resistance is lowest. However, Long Tubes make the best hp and torque. The key is all about scanvenging.
Scavenging
As exhaust gasses move through the headers they cool down and contract. This contracting creates a negative pressure behind them (not a vacuum, negative pressure just means lower as compared to its suroundings). This lower pressure serves to "Suck" the exhaust gas out of the chamber, creating a similar situation in the chamber. This in turn helps to suck intake gas into the chamber, thus expediating the entire pump process (in, combust, out, as discussed in the top post).
Long Tubes
LT Headers are the best at producing this scavenging effect. Because of this they produce the most low-end torque and peak HP. The "downsides" to LT's is that they significantly reduce clearance under the car which makes bottoming out more of a possibility, they are difficult to pass inspection with if your state is strict with emissions, and they require an aftermarket short midpipe to make them work.

Shorties
Shorty headers have the same dimensions (flange to flange) as your stock manifold, therefore you can replace just the headers using a stock midpipe. This is not recommended. To see real gains you need to have an aftermarket midpipe installed either beforehand or with the headers. However, one advantage to these dimensions is that you can replace your exhaust system one piece at a time if you are on a budget, whereas long-tubes require a new midpipe at the time of installation. Another advantage is that shorties are very easy to get past emissions with, with or without a sniffer. While shorties do not produce the same numbers as LT's, they are still valid performance parts. The only real loss is in the low end torque department. At higher rpm shorties perform almost as well as their longer counterparts. This again is all due to scavenging. How well does the header dissipate heat (thereby contracting the gasses), and how well does it recombine the gasses in the collector? Because these headers were designed for spacial reasons, they sacrifice some of these abilities. But again, when the motor is revved up and the gasses are moving very quickly the cooling process has less of an effect.
Mid Length Headers
Mid's can come in two varieties. They can keep the dimensions of the stock manifold like shorties, but have more piping noodled in to increase the power output. This, obviously will affect fitment, but will keep some of the advantages of shorties. The other option is to move the header/midpipe joint as in with long tubes. This has the possibility of easier fitment and fewer clearance issues.
Once again, in the end it is up to you to know what your state allows (or what you can get away with) and what it is you want for your car.
Thread Starter
|
Ninja Administrator
Joined: Jun 2007
Posts: 6,172
From: Potato
Intake Boltons
MAF, and TB
Another set of intake mods is replacing or modifying the stock Mass Air Flow sensor, and the Throttle Body. Throttle BodyMAF, and TB
Depending on your vehicle and engine, the throttle body may be sufficient for your purposes. Typical choices include porting the stock throttle body. This means you buff out any imperfections inside of the throttle body and removing any obstructions, making a perfectly smooth surface for the air to travel through. If you are not comfortable doing this yourself many places online will sell you a ported stock throttle body for relatively cheap assuming you send them your stock TB.
Another option is to replace the TB all together with a larger one. Usually, no matter what you choose you will not hurt anything, but if the motor is not breathing well enough you will not be doing any good either, and that is money wasted.
MAF
The Mass air flow sensor measures the amount of air that passes it and adjusts your fuel trims accordingly. One somewhat common mod is to remove the screen over the front of the MAF in order to increase flow. This is not recommended however because of the likelyhood of having difficulty idling.
MAF's can be bought in larger sizes as well, and with preset programming for controlling aftermarket injectors (depending on your vehicle. newer vehicles can have their fuel trims edited by computer so this is not necessary). The same rule applies here as it did with TB's. You probably wont hurt anything by upgrading, but unless you have several mods already on the car you probably wont help anything by buying this part either.
Thread Starter
|
Ninja Administrator
Joined: Jun 2007
Posts: 6,172
From: Potato
Accessory Modifications and Free Mods
All Those Dealies on the Front of Your Engine
Some extra power can be found by modifying the motor accessories. Each of the pullies on the front of your engine represents parasitic loss because the crank has to put some of its energy into turning them around.All Those Dealies on the Front of Your Engine
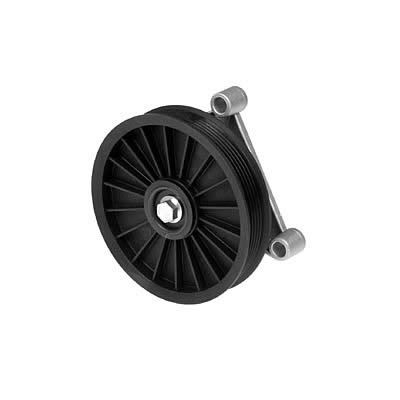
AC Delete:
Just like this says, this mod will remove your air conditioning system. The kit usually includes an idler pulley which will take the place of the air conditioner unit pulley. This frees up a little hp. However, you will not have air conditioning anymore (obviously). Also, your defroster wont work as well because it uses the AC system to remove humidity. The part may or may not require a new serpentine belt size.
Underdrive Pullies
These parts usually consist of a crank pulley, harmonic balancer (sometimes integrated with the crank pulley), and will sometimes contain a water pump and/or alternator pulley. The basic idea is you use a smaller crank pulley, which causes the accessories to spin slower per RPM, and draw less power. Be careful because overheating and voltage drop can occur when slowing down the water pump and alternator. Power gains from this are in the 5-10hp range, but not over 10hp.
EGR/AIR Deletes
The Exhaust Gas Recycling and Air Intake Recylcing systems are emissions accessories that are driven off of the battery. They need to be there for emissions, but if you dont have to worry about that there is nothing stopping you from taking them off for a couple extra ponies and some weight saved. When removing these parts be sure to properly block off or plug any holes left by them in the intake and exhaust systems.
Thread Starter
|
Ninja Administrator
Joined: Jun 2007
Posts: 6,172
From: Potato
Rearend
Ring, Pinion, or the Whole Darn Thing
Ring, Pinion, or the Whole Darn Thing
A ring and pinion gear set can help you put your car into its powerband quicker. Stock gears are usually in the low 3.xx range. Here is the easiest way to understand the gear ratio:For a 3.23 gear set, each time that the wheel turns around 1 time, the driveshaft will turn around 3.23 times. This is also called your final drive ratio.
This means with a taller gear that the driveshaft must turn around more times per revolution of the wheel. This can be somewhat counter intuitive. Why would I want my engine to have to turn more times to move me? Why not just put a 1.00 gear in there so the tires turn even faster!? Well, if you do this your engine will not have the torque it needs to turn the wheels. When you put a steeper gear in the rearend like a 3.73 or a 4.10, the engine is given a mechanical advantage over the inertia of the car. Its somewhat like putting a pipe over a ratchet to help you break loose a stuck bolt. The motor has to rev higher to get to the same speeds, but it doesn't have to try as hard. This results in a quicker car for you.
There is a common trap that people fall into concerning gears. This is, when you install taller gears your top speed will fall. This is both true and not at the same time. The top speed they talk about is the theoretical top speed, that at which the engine as at redline in its highest gear. When installing a steeper gear set, this theoretical top speed will fall because the engine must spin more times to turn the wheels the same amount as before. Most cars, however, cannot hit this speed. Not even close. Therefore when you switch to a steeper gear the motor's new found mechanical advantage allows you to actually hit a higher top speed than before. This is of course assuming that you do not possess enough power to approach the old theoretical top speed
A few things to consider with these gears:
The steeper you go, the lower your cruising gas mileage will be because you will be at a higher rpm than you were before. However, the difference in mpg is not nearly as bad as many people will have you believe, and in all honesty if a large drop in fuel economy is observed it probably has more to do with the fact that your foot is torque happy than with the rpm when cruising.
However, a steeper gear is a weaker gear. More torque is applied on the differential when using a steeper gear so things are more likely to break.
This is why many fbody owners swap out their stock 7.5" 10-bolt rear with either a 12bolt or a ford 9" rear. This is an expensive modification and there really arent many ways to make this any cheaper. Usually you want to buy a fully assembled rear end that is ready bolt in. These can be found all over internet sites and vendors.
Thread Starter
|
Ninja Administrator
Joined: Jun 2007
Posts: 6,172
From: Potato
Camshaft and Valvetrain
Everything Done to the Outside of the Engine. Time to Break Inside.
Everything Done to the Outside of the Engine. Time to Break Inside.
For these GM push rod motors (both v6 and V8) a camshaft swap is a good way to make power and to really liven up the motor.
A typical camshaft spec card will read something like: 224/224 int/exh .538"/.541" int/exh 112LSA +2. The numbers read left to right are: intake duration/exhaust duration, intake lift/exhaust lift, lobe separation angle, cam advance.
Duration:
The duration of the cam can be measured two ways, total duration, and duration at .050" lift. The .050" measurement is most common and that is what is given above. Typical durations for full lift are in the 290 range. The more the duration, the longer the valve is open, and the more gasses are allowed to flow through it. Also, there is more exhaust/intake overlap with longer durations. This overlap is what causes the classic "Lope" in the exhaust sound of a cammed car.
Lift:
The lift of the cam is the length from the top of the cam lobe to the base circle, and represents the travel of the valve. The lift is not set in stone, and is reported above as a funcion of the rocker arm. With 1.6 rockers, the cam shows .538"intake lift. If you switch to 1.7 rockers, the new lift can be calculated as such: .538"/1.6= .33625 (this is the cams lobe height). .33625*1.7 = .572. This is your new lift with 1.7 rockers. Higher lift tends to shift the power band higher into the RPM range. This means 2 things: 1) Less low end torque. 2) Higher peak hp. This is because HP is a function of torque and grows proportionally with rpm. It is best to match the cam specs to your particular application. Tons of lift isn't necessarily good for a street car because it may require steep gears and a high stall.
LSA:
The Lobe Separation Angle is the angle between the highest points of your intake and exhaust lobes for any 1 cylinder. A smaller LSA will increase overlap and thus increase the lope and problems with idle. Wider LSA decreases overlap and therefore has the opposite effect.
Cam Advance:
Cam advance is timing that is ground into the cam. Because your ignition reads the cam using either a distributor or a cam position sensor, the cam itself can advance the timing. This is just something to keep in mind when looking at cam specs. If you plan to run nitrous or forced induction you may want to decrease timing a little more than you would have otherwise.
Valvetrain:
The only valvetrain component that MUST be swapped when doing a cam swap is the springs. Stock springs are designed to travel only as far as they need to, so failing to swap springs when going to a higher lift cam will cause the springs to bind and little pieces of pushrods will end up in your oil pan. Springs come in single and duals. Single springs usually don't have the lift capabilities of double springs but are significantly cheaper. Duals have an inner and outer spring. These springs can support higher lift cams. In all honesty, get the spring that you need for your application or for plans you have down the road. There is absolutely no advantage on getting a .660" lift spring for a .538" lift cam.
Last edited by Camaro 69; Jan 20, 2012 at 10:59 AM.

Thread
Thread Starter
Forum
Replies
Last Post
rayistfaaku
General Tech
2
Jan 21, 2011 07:32 AM