
New Build Thread?

Thread Starter
|
2nd Gear member
Joined: Oct 2011
Posts: 527
From: so NJ
There is bodywork under I don't want to redo if I don't need. Thats why I prefer to hand sand with blocks. Theres filler where both quarters are replaced and where the door handles are shaved.
I can see the color change when the paint goes and I'm down to primer. I do pop through on occation.
I can see the color change when the paint goes and I'm down to primer. I do pop through on occation.
Thread Starter
|
2nd Gear member
Joined: Oct 2011
Posts: 527
From: so NJ
Havn't updated in a few. I'm still sanding.I posted in anther thread about the dent in the roof corner. When I sanded down I found rust under the bondo. Very light, but it showed as a blemish in the paint. I sanded it all clean then treated with eastwood rust converter. I'll sand and prime over this. I had to cut one side of the trunk lid. I could get it lined up on threee sides only. After hours of fooling around I cut 1/8" dowm to 0 on the left side.
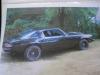
These are pics of the car when I first got it. Those of you paying attention remember it had new quarters,new floors and rockers. It was all primed and pretty straight.
These are pics of the car when I first got it. Those of you paying attention remember it had new quarters,new floors and rockers. It was all primed and pretty straight.
Thread Starter
|
2nd Gear member
Joined: Oct 2011
Posts: 527
From: so NJ
Well much of the work done prior was less than perfect!!!!
These two are pics of the inner not repaired and not connected to the replacement quarter. This is driver side only. This is driver side above the tail lights. No wonder so much tire smoke filled the car!!
Found a leak at the pumpkin gasket. Thats new.
These two are pics of the inner not repaired and not connected to the replacement quarter. This is driver side only. This is driver side above the tail lights. No wonder so much tire smoke filled the car!!
Found a leak at the pumpkin gasket. Thats new.

Second Generation Moderator
Feb 2010 ROTM winner
Jan 2013 ROTM winner
Feb 2010 ROTM winner
Jan 2013 ROTM winner
Joined: Aug 2008
Posts: 9,097
From: Portland, Or
ROTM Winner's Club
Wow! Looks like someone was fixing it to sell, not to keep! You'd think they would have at least glassed it, or treated the rust and filled it somehow. Guess it's better to have no fix, than a bad fix that you have to tear out.
Never seen a diff. cover that had the filler in it on a 8.5" 10 bolt. Must be something they did later. The 10 bolt in my Austin had a frozen plug in the differential and I broke a rachet off trying to get it out. I ended up pulling the cover and welding a 1/2" pipe coupling to it to make a way to fill and check fluid levels. Couldn't find a cover with a plug for the oddball big Canadian Pontiac 10 bolt.
Never seen a diff. cover that had the filler in it on a 8.5" 10 bolt. Must be something they did later. The 10 bolt in my Austin had a frozen plug in the differential and I broke a rachet off trying to get it out. I ended up pulling the cover and welding a 1/2" pipe coupling to it to make a way to fill and check fluid levels. Couldn't find a cover with a plug for the oddball big Canadian Pontiac 10 bolt.
Thread Starter
|
2nd Gear member
Joined: Oct 2011
Posts: 527
From: so NJ
I don't think he was selling it, It was an unfinished project. He had it for a long time after the work was done. He hurt his back and gave up. Think he got ripped off.
It would have been easier to repair this with steel than fiberglass. This guy was replacing the quarters at this time.He had steel and a welder there. Just was lazy!!
It would have been easier to repair this with steel than fiberglass. This guy was replacing the quarters at this time.He had steel and a welder there. Just was lazy!!

3rd Gear Member
Joined: Jun 2010
Posts: 804
From: middleville,michigan
seems silly to fix the quarter panel then leave all that mess behind it,now ur gonna have a h*** of a time trying to fix it,wouldnt have took him long at all to fix that,what u gonna do now,is it fixable with the quarter panel on.

Overdrive Member
Joined: Nov 2009
Posts: 4,848
From: off the grid
Its not really that bad to fix. The patches are available. I did it on the 78 when I painted it. Just measure up from the lip well past the rust and cut that length of the patch. The one side that looks like it still has some of the bottom on it will make a template to cut the patch. Good luck.
3rd Gear Member
Joined: Jun 2010
Posts: 804
From: middleville,michigan
yeah its never fun welding on ur back having flying welding debri coming at you,hopefully u have the full helmet on,to atleast keep from burning ur face and eyes..yeah all u need is a little patch of metal,im glad its in a place u can reach now,thats probably gonna be one of the bad places i find too,im gonna have to buy some quarter panel patches for mine too,but mine will be a little difficult as im going to a 71 camaro