
CRU!NCH TIME - 73 Z28 Build


Second Generation Moderator
Feb 2010 ROTM winner
Jan 2013 ROTM winner
Feb 2010 ROTM winner
Jan 2013 ROTM winner
Joined: Aug 2008
Posts: 9,097
From: Portland, Or
ROTM Winner's Club
Much as I love the 8.5" 10 bolts I think the 7.5 has got to be pretty strong too. I see factory specs on cars with them that are well over 400 HP, and many guys turbocharging them to twice that, and I'm not hearing stories of them coming apart.
Must be something to it.
Must be something to it.

Thread Starter
|
1st Gear Member
Joined: Mar 2011
Posts: 127
From: FoCo, Colorado
Much as I love the 8.5" 10 bolts I think the 7.5 has got to be pretty strong too. I see factory specs on cars with them that are well over 400 HP, and many guys turbocharging them to twice that, and I'm not hearing stories of them coming apart.
Must be something to it.
Must be something to it.
So I didn't end up working on the Chevy II like I thought. so I was able to do a little more on the Camaro and helped a friend finish his Eclipse thats been in the back ground of most of my pics so it's gone now. MORE room!
Thread Starter
|
1st Gear Member
Joined: Mar 2011
Posts: 127
From: FoCo, Colorado
Here's what I got done. I cleaned up the new rear calipers and backing plates Got the j nuts in and bolted the rear differential in and new shocks.
They cleaned up nice
DSC00926.jpg?t=1305649359
New vs. the old j-nuts
DSC00932.jpg?t=1305649359
Finally on some wheels again.
DSC00936.jpg?t=1305649359
I pulled the diff cover To check out the Limit slip and fluid condition. It was really clean I was impressed. I was worried I might find something bad inside.
DSC00933.jpg?t=1305649359
DSC00934.jpg?t=1305649359
Here are the axles out of the 4th gen T/A with the toner wheel. I Have been looking for places to shorten and re-spline the axle and no one does it with axles with c-clips. I don't want to a spend a bunch of money on those I am thinking I could just pressure those off and attach them to the original axles. simple and cheap thats aways good. (more on this later)
DSC00929.jpg?t=1305651170
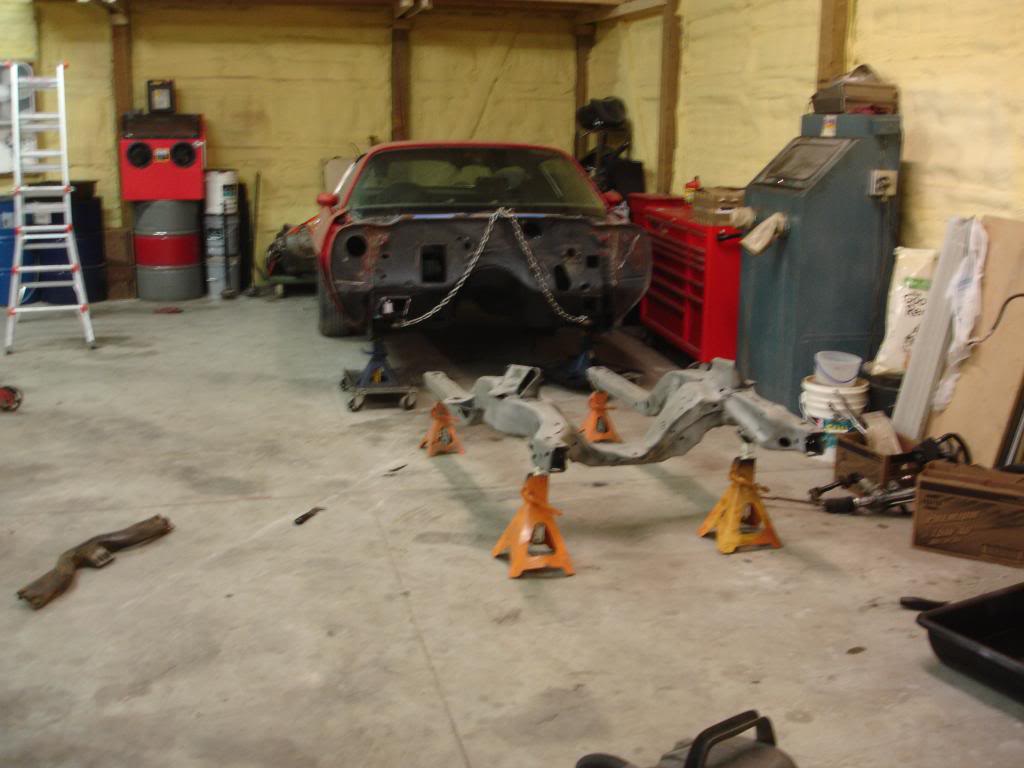
I am thinking about mocking up the subframe and engine on the car. I am keeping a/c I am going to have to notch the subframe so I should get on that before I get it powder coated. I'm also going to pull the windshield and work on fitting the dash. Lots to do so little time...
They cleaned up nice
DSC00926.jpg?t=1305649359
New vs. the old j-nuts
DSC00932.jpg?t=1305649359
Finally on some wheels again.
DSC00936.jpg?t=1305649359
I pulled the diff cover To check out the Limit slip and fluid condition. It was really clean I was impressed. I was worried I might find something bad inside.
DSC00933.jpg?t=1305649359
DSC00934.jpg?t=1305649359
Here are the axles out of the 4th gen T/A with the toner wheel. I Have been looking for places to shorten and re-spline the axle and no one does it with axles with c-clips. I don't want to a spend a bunch of money on those I am thinking I could just pressure those off and attach them to the original axles. simple and cheap thats aways good. (more on this later)
DSC00929.jpg?t=1305651170
I am thinking about mocking up the subframe and engine on the car. I am keeping a/c I am going to have to notch the subframe so I should get on that before I get it powder coated. I'm also going to pull the windshield and work on fitting the dash. Lots to do so little time...

Second Generation Moderator
Feb 2010 ROTM winner
Jan 2013 ROTM winner
Feb 2010 ROTM winner
Jan 2013 ROTM winner
Joined: Aug 2008
Posts: 9,097
From: Portland, Or
ROTM Winner's Club
Yes there are folks who shorten and re-spline C clip axles, if the axles are large enough to allow it. Some C clip axles are smaller shaft than the splined area, so as you shorten them the area behind the spline isn't large enough to re-spline.
Dutchman's Axles here in Portland can shorten and re-spline them, if the axle is large enough. The real question is will the bearings fit into the 2nd gen housing? No sense in shortening unless the rest fits too. Another question; does that geared ring fit on a 2nd gen axle if you did get it off? If so, then why not just buy a new one for your axle, it will probably be cheaper than re-splining.
Dutchman's Axles here in Portland can shorten and re-spline them, if the axle is large enough. The real question is will the bearings fit into the 2nd gen housing? No sense in shortening unless the rest fits too. Another question; does that geared ring fit on a 2nd gen axle if you did get it off? If so, then why not just buy a new one for your axle, it will probably be cheaper than re-splining.
Last edited by 1971BB427; May 18, 2011 at 09:41 AM.
Thread Starter
|
1st Gear Member
Joined: Mar 2011
Posts: 127
From: FoCo, Colorado
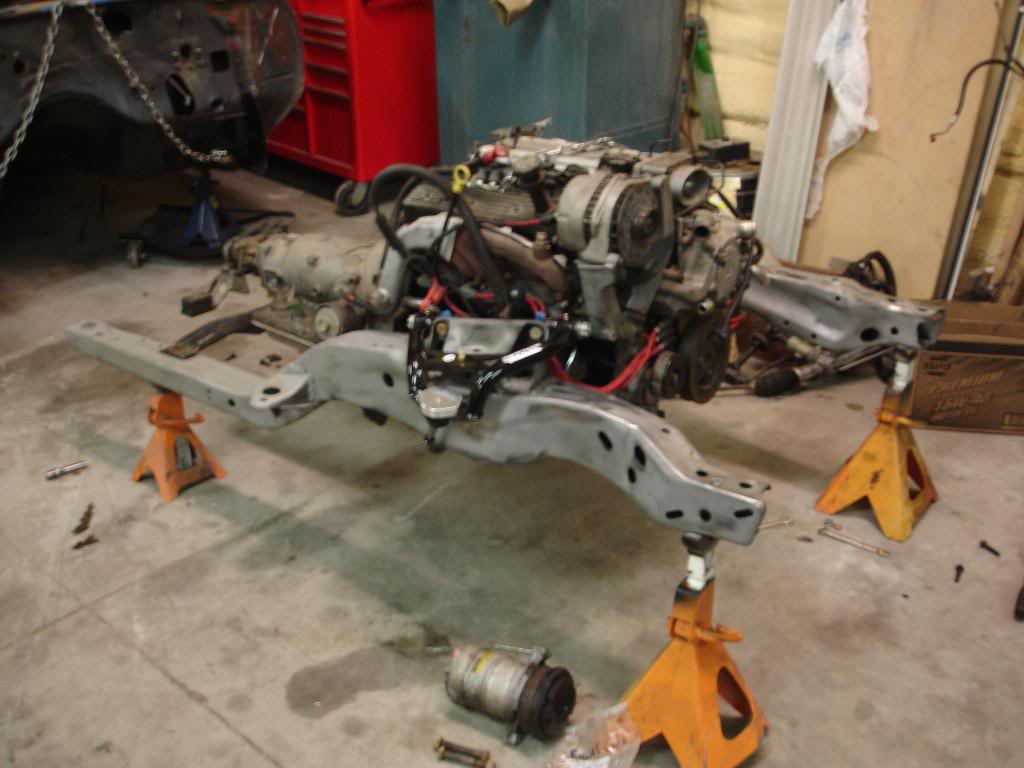
I've been doing lots of work on the car. I test fitted the LT1 and 4L60, built a transmission crossmber notched the subframe to clear the a/c compressor. I've been grinding and welding on the subframe. Got the firewall and interior floor cleaned up. I should have my new fuel injection fuel tank in a couple days.
Thread Starter
|
1st Gear Member
Joined: Mar 2011
Posts: 127
From: FoCo, Colorado
I've been planning this LT1 swap since 2004 when I found out the original engine block was cracked, I had planed to rebuild during automotive school in engines class. I canceled an order of $1200 for a wicked 383 rebuild kit 400 crank new pistons, rods, cam ect. I got on ebay and picked up this LT1 complete with 4L60e a/c compress, p/s pump, air pump, and wiring harness with 74,000ish miles. I knew a long time ago I was going to have to get a new trans cross member and drive shaft. I had no idea about clearance issue with the a/c compressor till like a month ago. I have completed my subframe notch to clear the compressor.
Here is how I did it...
First of all I knew about this issue a head of time, thats probably half the battle right there. I could only imagine how pissed I would have been subframe all powder coated and there I am trying to figure out why the engine isn't going in. (thank you to those of you who have posted about this before me)
So I did this test fit with the subframe off the body.
while I was at it I tried on the control arm to check for clearance between the accessory bracket and control arm w/shims installed.
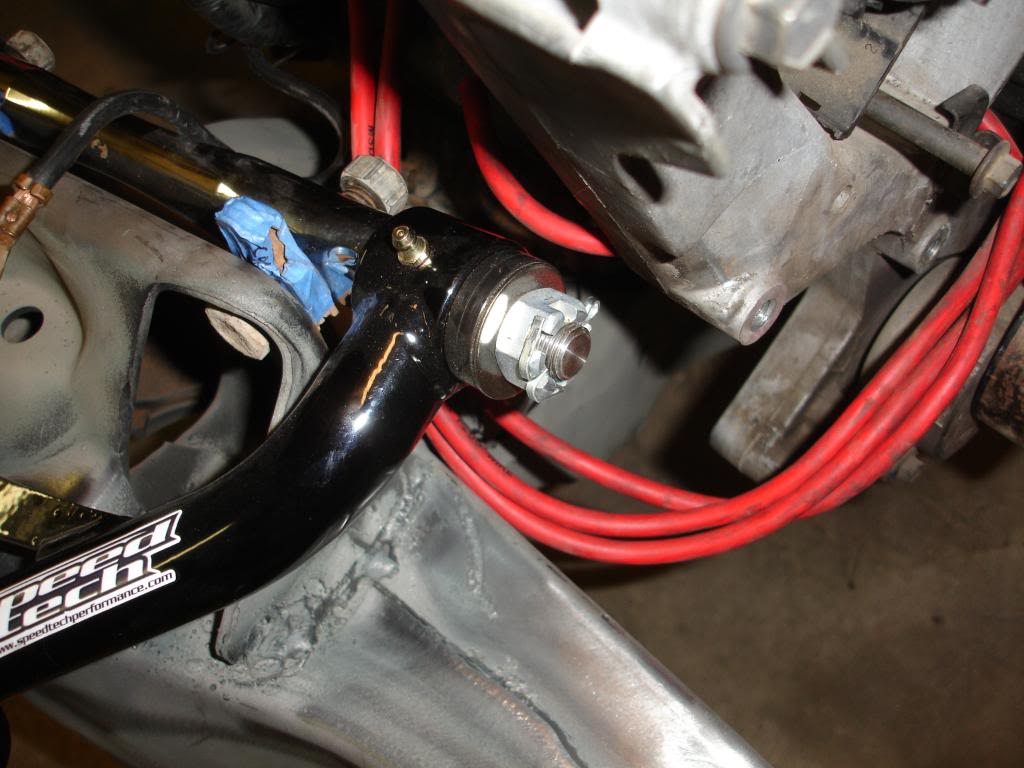
plenty of room with the tubular a arms.
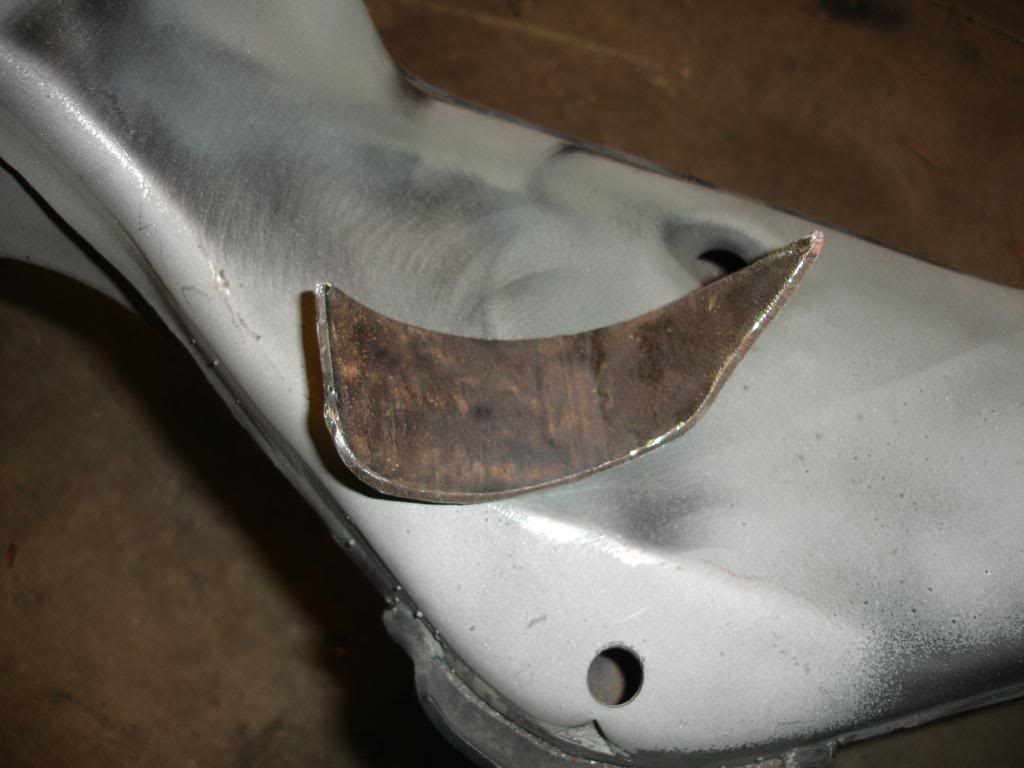
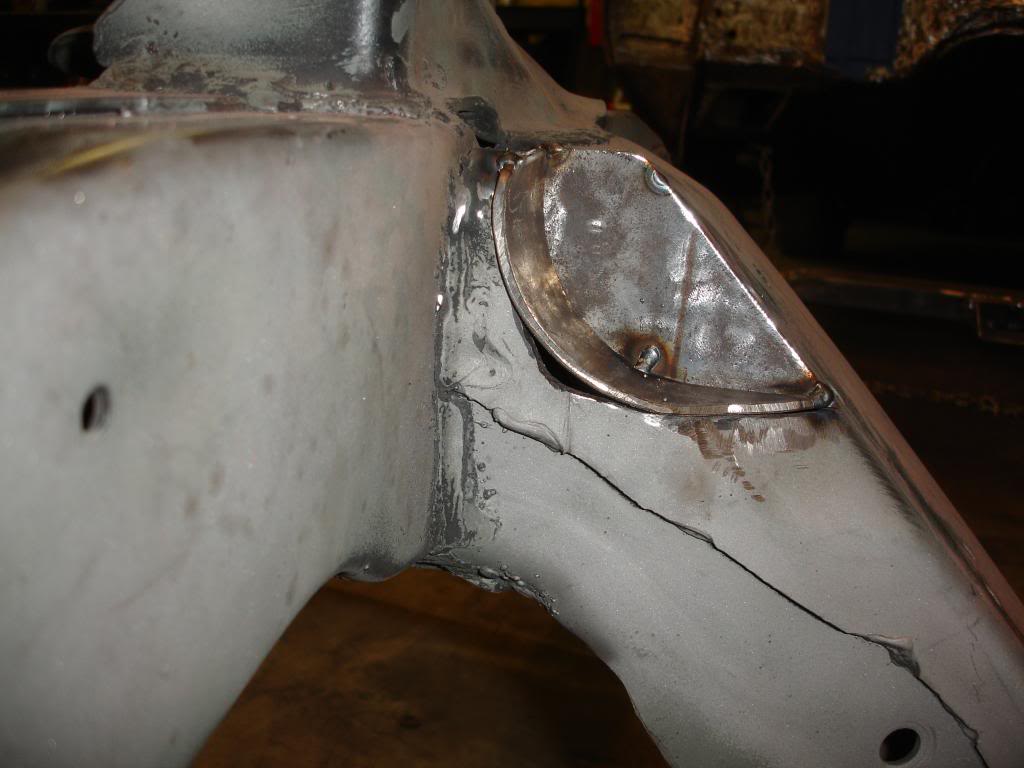
I used a couple long bolts and installed the compressor and marked around the outside of it were I would have to cut out. measured the depth and marked it like so.
removed the engine, cut it out , set the engine back on and checked the fit.
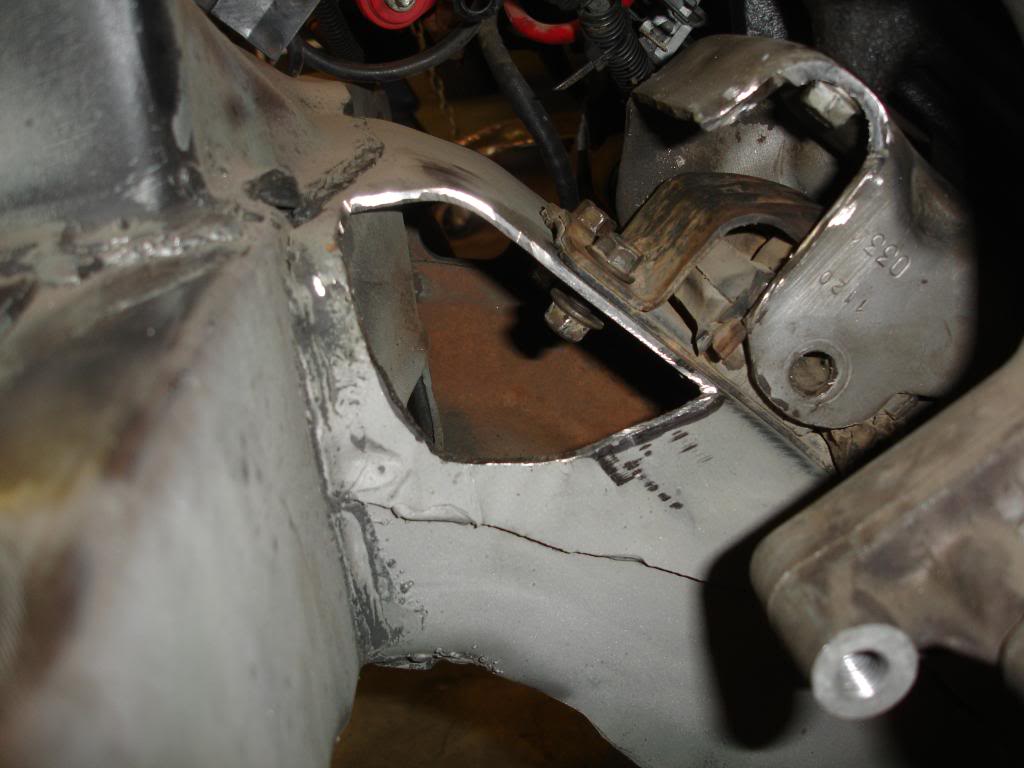
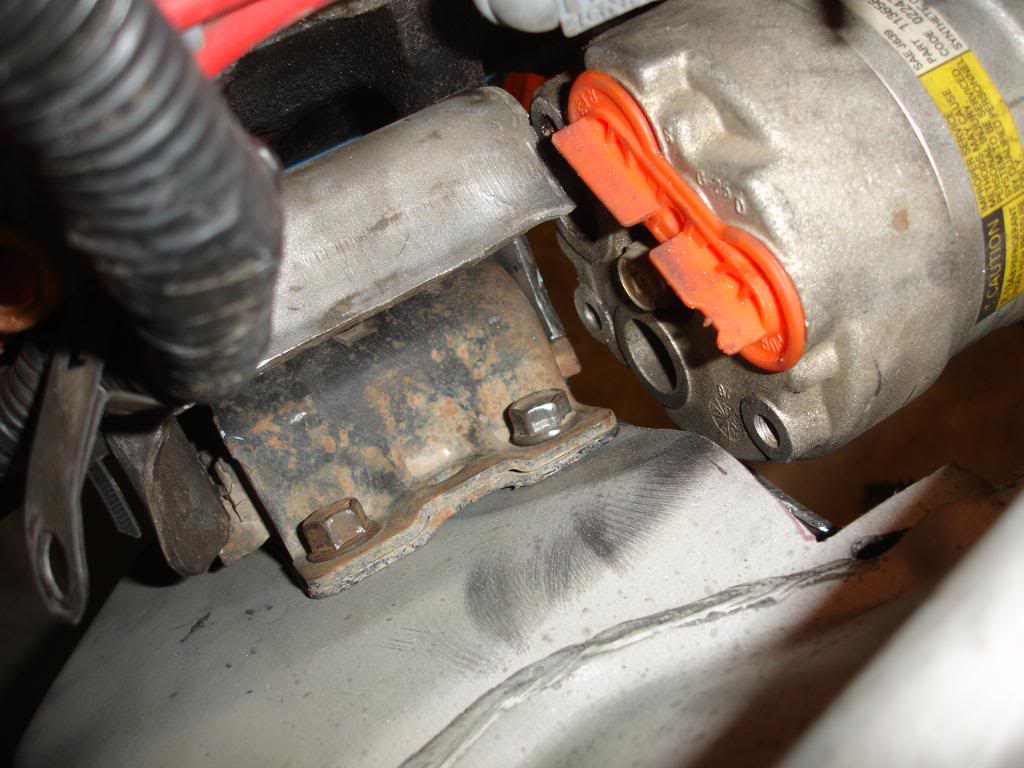
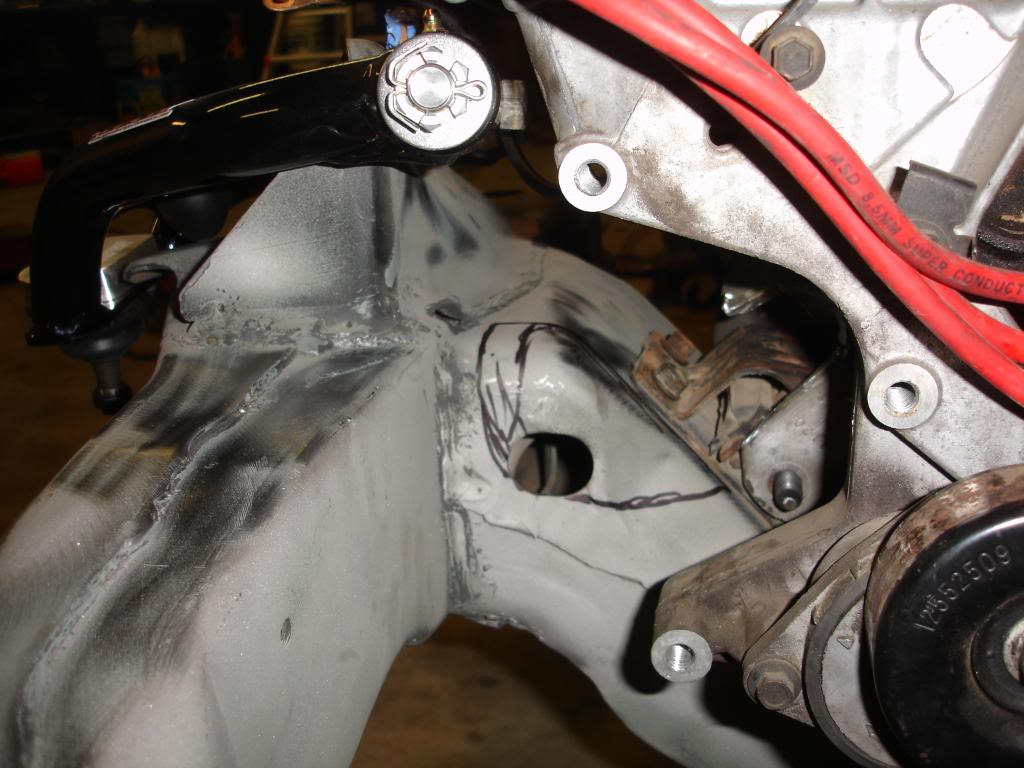
You can also see I had to clearance the the engine side motor mount too. I'm going to add a tab to support the back of the a/c compressor later.
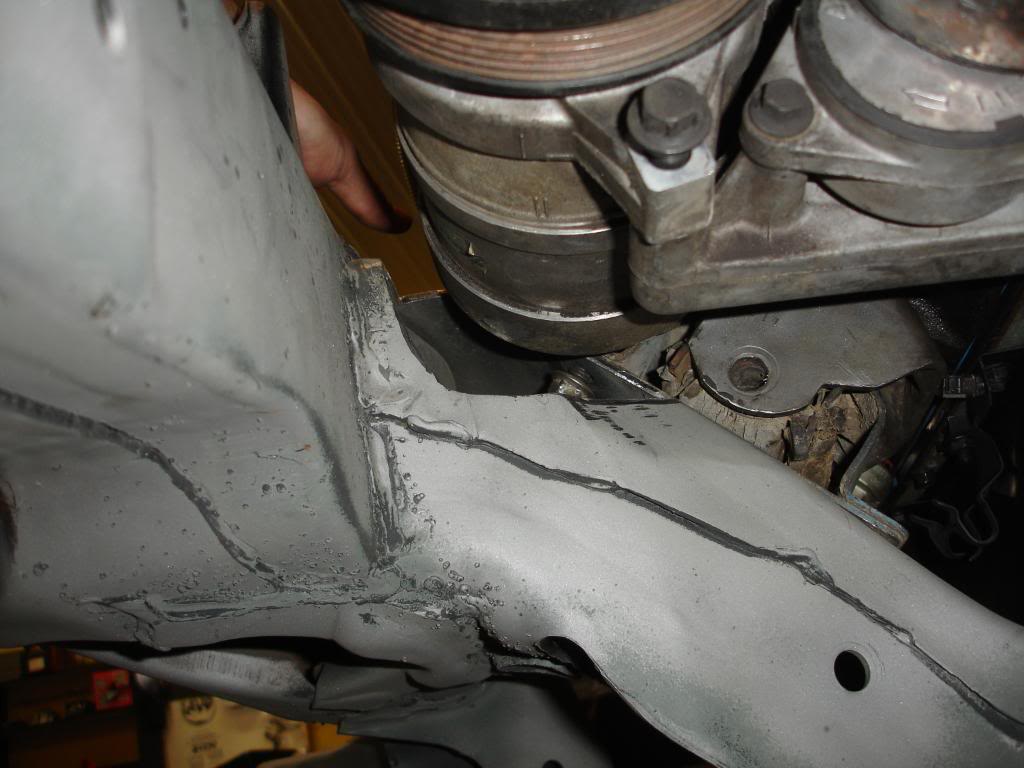
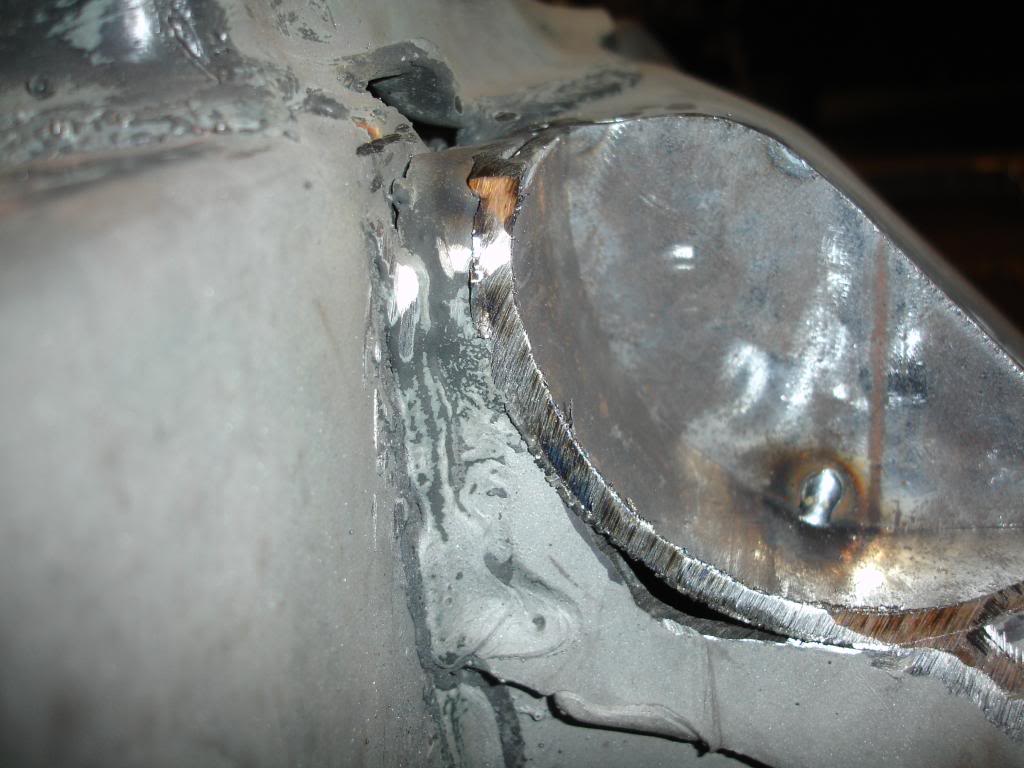
I removed the engine again and welded a couple pieces of metal I cut out of a 5" pipe. I had to adjust the curve to fit and flatten out a piece in the vise for the back. (It's the only metal I had at the time it worked nicely though)
Here is the hole before.
Here is the bottom trimmed and ready
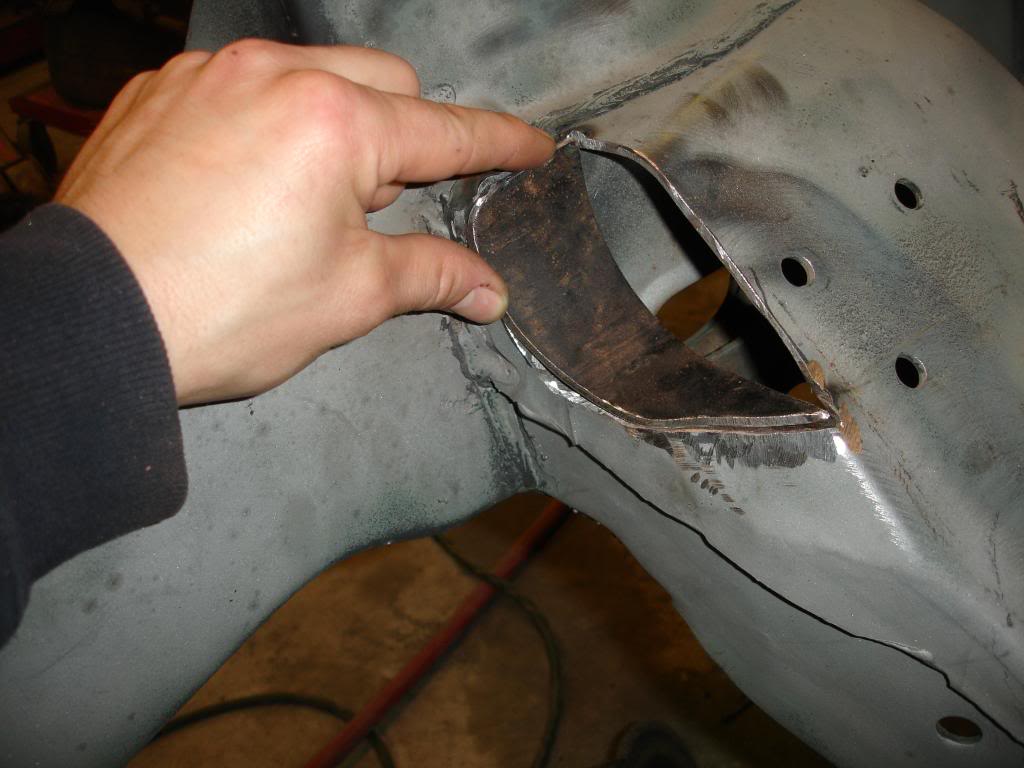
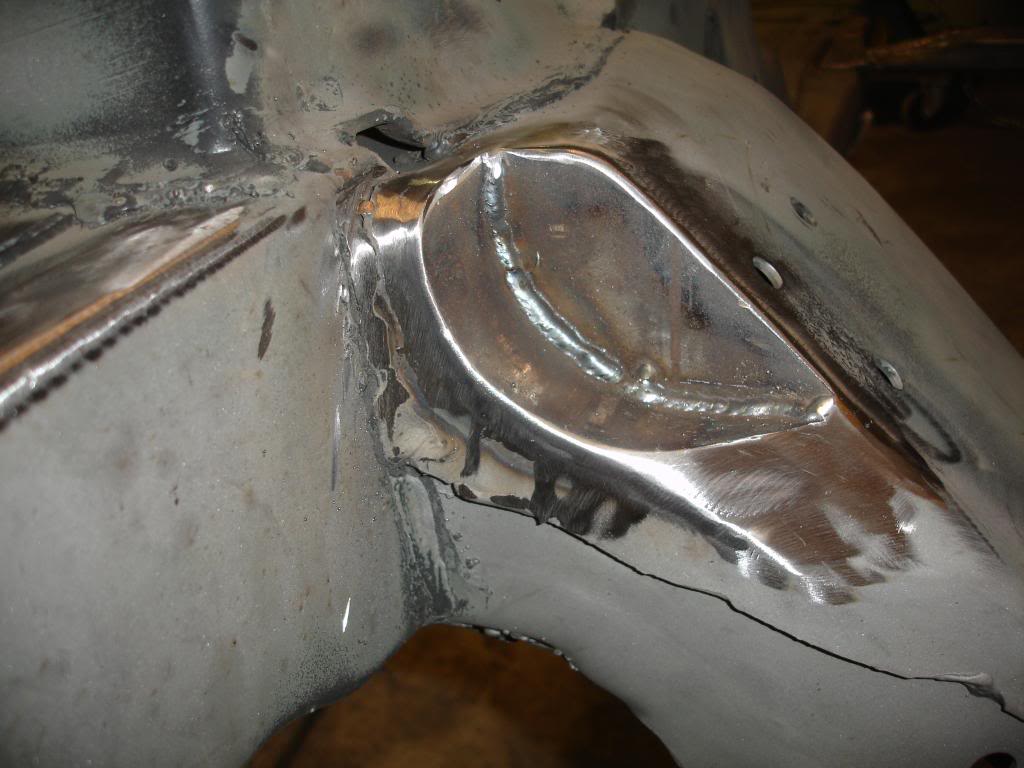
both pieces tacked in.
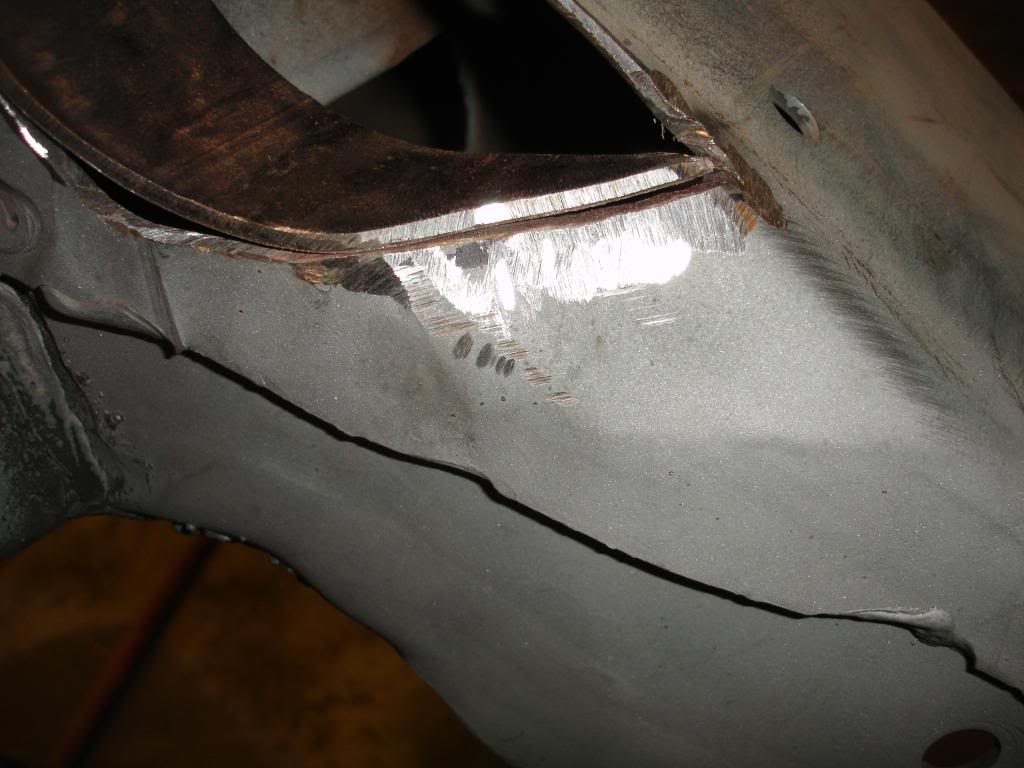
I ground down the edges.
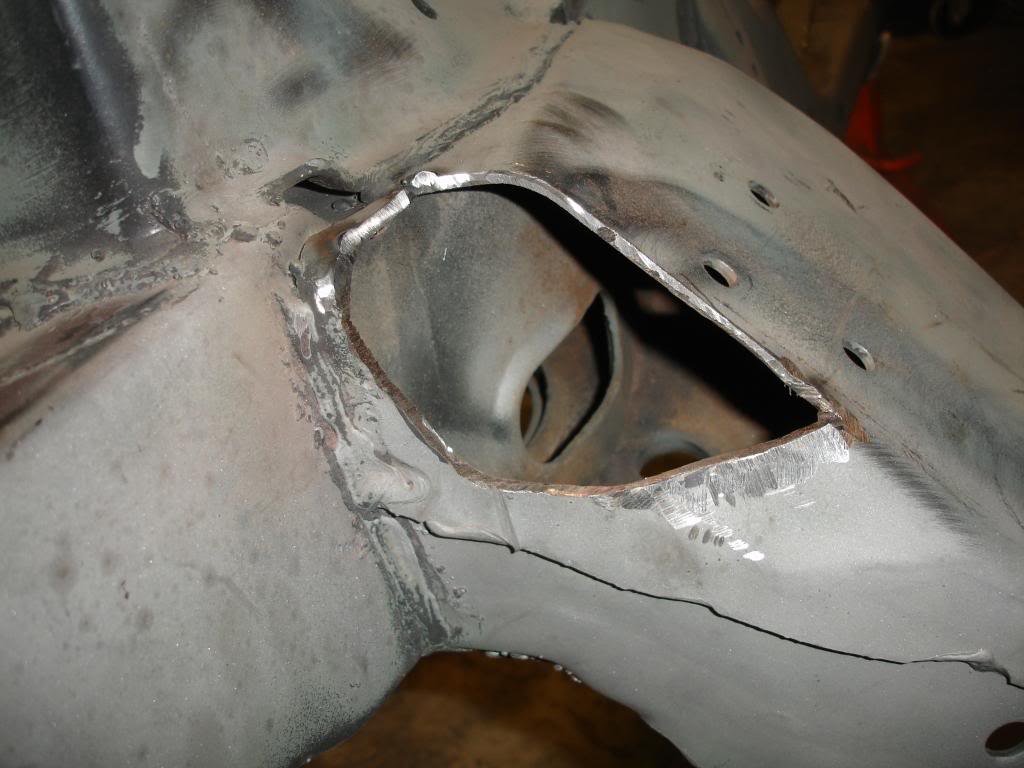
welded it in then ground it all smooth to look pretty.
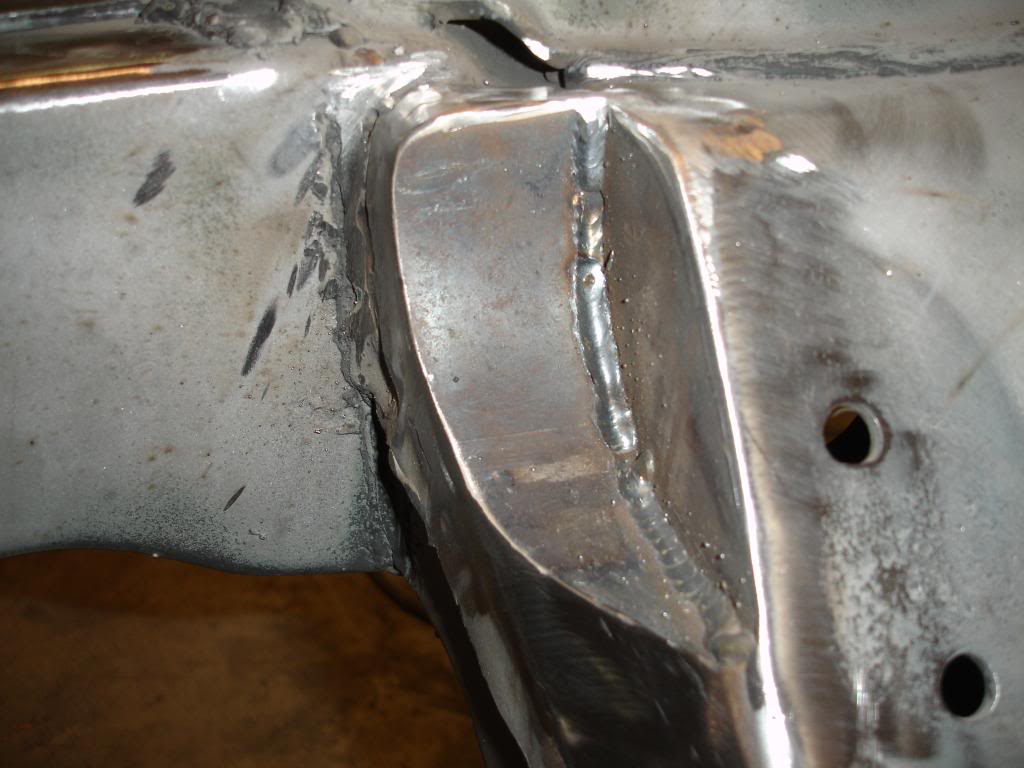
you can see how the weld starts and stops every couple inches the wire kept sticking in the tip grrr. oh well not so pretty.
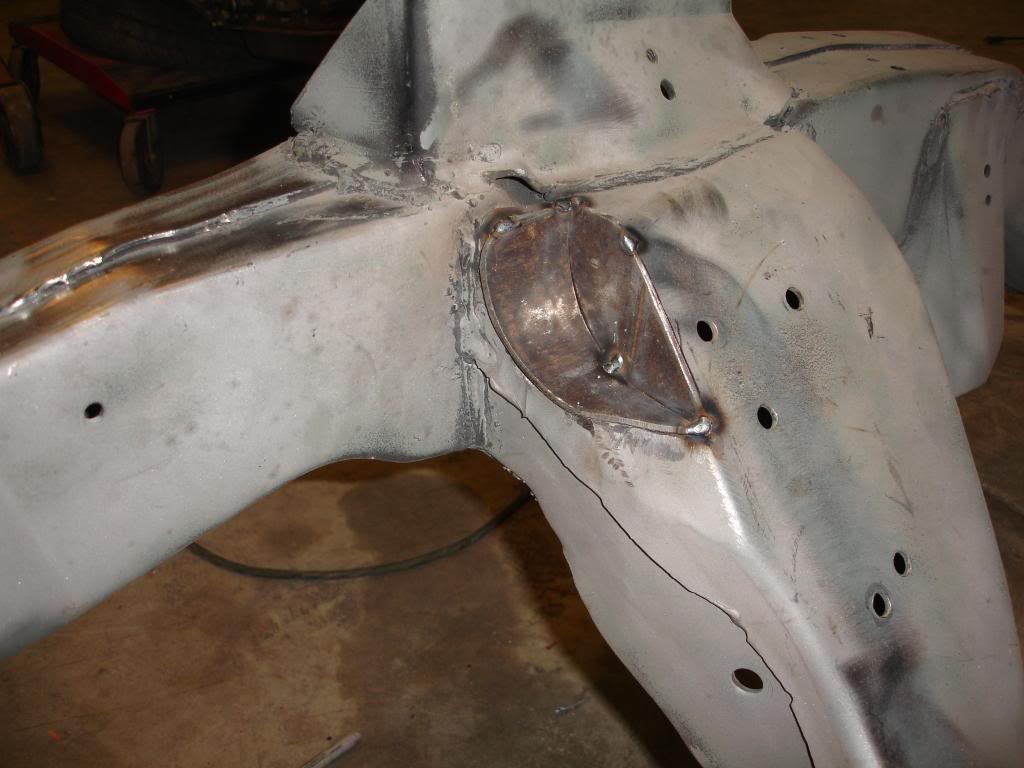
I definitely made the notch larger then it needed to be, but I wasn't going to mess around and make it to small.
The reason I did not just install a/c delete pulley... Well because I want a/c of course. I hate the corvette accessory bracket, a/c compressor and hoses all in the way and what not. But the biggest reason is cost. Everyone selling those wants a stupid amount of money. Notching the subframe cost me next to nothing and it was an easy and enjoyable process. It turned out better than I could have imagined, considering this is the first time welding with a mig welder. I've read tons of threads and seen normal people like me welding all this stuff on there cars and I thought it was so hard to weld cause In the past all I've even done scabbed exhaust together with a flux core wire feed welder (aka next to worthless welder) it is impossible to turn out anything that didn't look like poop. I don't care what anyone says in comparison flux core is junk. I loaned out my flux welder to a friend and he gave it back broken and I didn't even care thats how worthless I think they are lol. I felt so good able this whole Mig welding thing I decided I was going to make my own transmission cross member...
Here is how I did it...
First of all I knew about this issue a head of time, thats probably half the battle right there. I could only imagine how pissed I would have been subframe all powder coated and there I am trying to figure out why the engine isn't going in. (thank you to those of you who have posted about this before me)
So I did this test fit with the subframe off the body.
while I was at it I tried on the control arm to check for clearance between the accessory bracket and control arm w/shims installed.
plenty of room with the tubular a arms.
I used a couple long bolts and installed the compressor and marked around the outside of it were I would have to cut out. measured the depth and marked it like so.
removed the engine, cut it out , set the engine back on and checked the fit.
You can also see I had to clearance the the engine side motor mount too. I'm going to add a tab to support the back of the a/c compressor later.
I removed the engine again and welded a couple pieces of metal I cut out of a 5" pipe. I had to adjust the curve to fit and flatten out a piece in the vise for the back. (It's the only metal I had at the time it worked nicely though)
Here is the hole before.
Here is the bottom trimmed and ready
both pieces tacked in.
I ground down the edges.
welded it in then ground it all smooth to look pretty.
you can see how the weld starts and stops every couple inches the wire kept sticking in the tip grrr. oh well not so pretty.
I definitely made the notch larger then it needed to be, but I wasn't going to mess around and make it to small.
The reason I did not just install a/c delete pulley... Well because I want a/c of course. I hate the corvette accessory bracket, a/c compressor and hoses all in the way and what not. But the biggest reason is cost. Everyone selling those wants a stupid amount of money. Notching the subframe cost me next to nothing and it was an easy and enjoyable process. It turned out better than I could have imagined, considering this is the first time welding with a mig welder. I've read tons of threads and seen normal people like me welding all this stuff on there cars and I thought it was so hard to weld cause In the past all I've even done scabbed exhaust together with a flux core wire feed welder (aka next to worthless welder) it is impossible to turn out anything that didn't look like poop. I don't care what anyone says in comparison flux core is junk. I loaned out my flux welder to a friend and he gave it back broken and I didn't even care thats how worthless I think they are lol. I felt so good able this whole Mig welding thing I decided I was going to make my own transmission cross member...
Last edited by JmeZ28; Jun 7, 2011 at 01:56 AM.

1st Gear Member
Joined: May 2011
Posts: 213
actually stopping every couple inches is good, because the heat from going to long on a single weld can and will warp the metal that you are working with and in your case that would suck if you did all this work and ended up slightly warping the fsf because you welded too long. not saying that you would in this case since its not a huge area that you are welding anyway. but for future reference I do about an inch or so at a time then move to a different location if I am doing a good bit of welding on a car or wait if its a smaller area so that the heat has time to dissipate some before continuing.