
69 restoration

K
Last edited by Odin; Apr 1, 2012 at 06:41 AM.
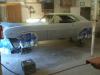
Just got back from the shop. Everything is looking great. I was putting the engine back together with the help of Jason the shop owner. The subframe should be re-attached to the car tomorrow. It's almost ready for paint.
Hey guys, I have a question. Has anyone put the hockey stick stripes on a car? I talked to someone today and they told me that the proper way to do it is to use a stencil on the fenders and a decal on the doors. Then clear on top. Is that right? Does anyone know the right way if that's not it.
As always, thanks for your help.
K
2nd Gear member
Joined: Jan 2012
Posts: 421
From: PA
I heard that is the proper way. If you want, I can find you the site for the hockey strip made in all vinyl?
Doesn't it give you that good feeling seeing your car getting put back together and actually looking like a car again?
Doesn't it give you that good feeling seeing your car getting put back together and actually looking like a car again?
Just wanted to post a couple of shots taken this week. Hope you like them. I can't wait for the last photos.
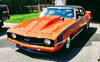
I got the stripe kit I needed. Thanks Bruce69Camaro for the support. I'm hoping by the end of next week it will be painted. Then we'll start putting her insides back together. In case anyone is wondering about the photos....yes its a 68' Camaro on the hoist and its a real RS. Jason and his crew do excellent work on these bad boys.
Until next time.
K


Yeah, but I want to put something cool in her down the road. The way gas prices are rising in Toronto, that 6 might be in her for a long time. The car will look faster than she really is.
K
Hi guys. Sorry I've been away for a little bit. I've got a new batch of photos that I think your going to love. I just have to download them to my computer. Should be up tonight or tomorrow. Hang in there.
K
K
Hi guys, as promised here's an update of my project. I just picked some of the better photos to show the progression forward. There might not be in order.
A small frame repair was done (tiny holes), a new floor seat pans welded in. The roof primer sanded, Quarters sanded, driver side door blocked first time. As you can see in some of the photos, the car has been sealed, primer and block sanded.
Door, hood and rear spoiler still have to go on. Adjust the gaps and off to the spray both. I'm getting pretty excited now. It's looking like a car again. Jason and his team are doing a great job on this. It's moving pretty fast.
K
Car's looking nice. Can't blame you for sticking with the I6 with gas prices being what they are. Maybe when and if they go down, you should think maybe of putting a 572 BB in there.
