
My First Camaro Project


Thread Starter
|
Newbie
Joined: Dec 2015
Posts: 2
From: Spokane, WA
Back in August, I bought my first car. It is a stock 1994 Camaro Base model coupe with 181,000 miles on it... an east coast car. The only major thing wrong was a blown head gasket.
First the problems:
There was junk everywhere in that car. The carpet was disgusting, and the engine bay looked like it'd never been washed either. The underside of that car pretty rusty too, being from the east coast (I hear they use salt as a de-icer).
Thankfully the body is in pretty good shape, being 21 years old, other than a few scrapes and scratches. It's not perfect, but hey, it cost me $900.
A few reasons for buying a V6:
Coming from using my parents nissan sentra, I wanted something a little more fun to drive. I absolutely wanted a 5 or 6 speed, with being a RWD sports car more an option, but I got all 3 with this car. Also, the PO said he got pretty decent mileage with this car... 29 on the highway. Being a college student, I can't really afford V8 MPGs (or insurance) with college being an hour away(one-way) every day. Also, I believe starting with less powerful cars, gradually working up to more powerful cars will build a greater appreciation for nice, powerful cars. Basically, I cant afford a V8.
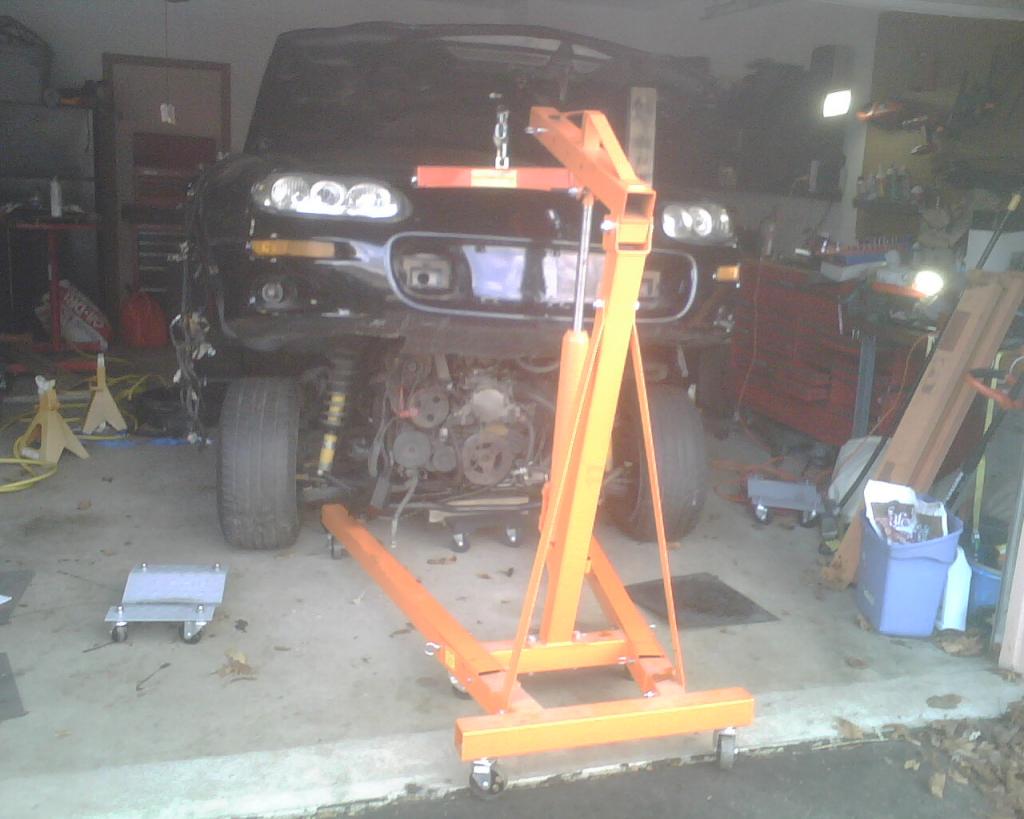
Anyways, on to the actual project. Back in August, the first thing me and my dad did was to work on getting the engine out. We decided to pull the engine out through the top. I'm not sure I'd recommend it as it seems impossible at times, but we were able to get that sucker out. We have a family friend who is a mechanic that rebuilt the engine, including all the machining, for us for the cost of only parts, not the labor. It cost about $1000 in total for the engine to be rebuilt.
While the engine was being rebuilt, I worked on cleaning up the interior. I took all the seats and center console out, and shampooed the carpet twice. I took the headboard out and reupholstered it (thank you youtube!). While I was wheeling around under the car, I found that parts of the floorboard had rusted through. So after ripping the carpet out, me and my dad got to work on patching the holes. Thankfully the holes were all mostly hidden, so the patches didn't have to look very pretty. However, the metal was caked in dirt from all of the gunk getting through the holes, so I set to work cleaning that all up. After cleaning the carpet one more time, I put it back into the car. Thankfully it kept its shape and slid right into place.
This car is all stock, except for two little things. I wanted to up the coolness factor of the car, so I pulled the hood vents off the hood, after discovering they arent vents, and siliconed some color-changing led light strips in there. I also attached some clear tubing with the light strip inside to the rocker panels, to give the underbody glow effect. I enjoyed making my own harness and wiring these lights up. I hooked them to the cig lighter power, so I could have them on without the keys in the ignition. I also put some switches into the door panel to be able to cut the power. This also made installing the center console take me 2 hours to put back in - not fun. Another small thing I did was to change the instrument gauge lights into leds, however cracked the dash pad in the process
I do have advice for if anyone wants to install the engine through the top.
1: pull out the knock sensor, oil level and pressure sensors, and the oil pan drain plug bolt. I'm pretty sure I mucked up a brand new knock sensor - a $40 part.
2: Lots of patience.
3: We had to buy longer bolts that matched the bell housing bolt pattern in order to hook the engine on the stand. These we also used for when the engine was close to being in. We finger-tighened these bolts, one at a time, to line up the engine onto the shaft in the middle of the tranny. Be super careful, if you do this, not to crossthread. That would suck.
4: Patience
As of now, she is closer than ever to being ready. All thats left is to finish installing the alternator, starter, exhaust to the headers, airbox and radiator. Then to finish plugging in the harness and sparkplug wires, flush the radiator, and brake lines, put some oil and gas in, put the hood back on and hopefully she'll start up. I plan on posting some pics soon.
I have one question: Does the return fuel line hook into the EVAP purge solenoid bottom port?
If you have any questions or need clarification to help with your projects, lemme know. Thank you all for reading this!
First the problems:
There was junk everywhere in that car. The carpet was disgusting, and the engine bay looked like it'd never been washed either. The underside of that car pretty rusty too, being from the east coast (I hear they use salt as a de-icer).
Thankfully the body is in pretty good shape, being 21 years old, other than a few scrapes and scratches. It's not perfect, but hey, it cost me $900.
A few reasons for buying a V6:
Coming from using my parents nissan sentra, I wanted something a little more fun to drive. I absolutely wanted a 5 or 6 speed, with being a RWD sports car more an option, but I got all 3 with this car. Also, the PO said he got pretty decent mileage with this car... 29 on the highway. Being a college student, I can't really afford V8 MPGs (or insurance) with college being an hour away(one-way) every day. Also, I believe starting with less powerful cars, gradually working up to more powerful cars will build a greater appreciation for nice, powerful cars. Basically, I cant afford a V8.
Anyways, on to the actual project. Back in August, the first thing me and my dad did was to work on getting the engine out. We decided to pull the engine out through the top. I'm not sure I'd recommend it as it seems impossible at times, but we were able to get that sucker out. We have a family friend who is a mechanic that rebuilt the engine, including all the machining, for us for the cost of only parts, not the labor. It cost about $1000 in total for the engine to be rebuilt.
While the engine was being rebuilt, I worked on cleaning up the interior. I took all the seats and center console out, and shampooed the carpet twice. I took the headboard out and reupholstered it (thank you youtube!). While I was wheeling around under the car, I found that parts of the floorboard had rusted through. So after ripping the carpet out, me and my dad got to work on patching the holes. Thankfully the holes were all mostly hidden, so the patches didn't have to look very pretty. However, the metal was caked in dirt from all of the gunk getting through the holes, so I set to work cleaning that all up. After cleaning the carpet one more time, I put it back into the car. Thankfully it kept its shape and slid right into place.
This car is all stock, except for two little things. I wanted to up the coolness factor of the car, so I pulled the hood vents off the hood, after discovering they arent vents, and siliconed some color-changing led light strips in there. I also attached some clear tubing with the light strip inside to the rocker panels, to give the underbody glow effect. I enjoyed making my own harness and wiring these lights up. I hooked them to the cig lighter power, so I could have them on without the keys in the ignition. I also put some switches into the door panel to be able to cut the power. This also made installing the center console take me 2 hours to put back in - not fun. Another small thing I did was to change the instrument gauge lights into leds, however cracked the dash pad in the process
I do have advice for if anyone wants to install the engine through the top.
1: pull out the knock sensor, oil level and pressure sensors, and the oil pan drain plug bolt. I'm pretty sure I mucked up a brand new knock sensor - a $40 part.
2: Lots of patience.
3: We had to buy longer bolts that matched the bell housing bolt pattern in order to hook the engine on the stand. These we also used for when the engine was close to being in. We finger-tighened these bolts, one at a time, to line up the engine onto the shaft in the middle of the tranny. Be super careful, if you do this, not to crossthread. That would suck.
4: Patience
As of now, she is closer than ever to being ready. All thats left is to finish installing the alternator, starter, exhaust to the headers, airbox and radiator. Then to finish plugging in the harness and sparkplug wires, flush the radiator, and brake lines, put some oil and gas in, put the hood back on and hopefully she'll start up. I plan on posting some pics soon.
I have one question: Does the return fuel line hook into the EVAP purge solenoid bottom port?
If you have any questions or need clarification to help with your projects, lemme know. Thank you all for reading this!


Fourth Generation Moderator
October 2009 ROTM
October 2009 ROTM
iTrader: (1)
Joined: Nov 2007
Posts: 10,560
From: Eastern PA,
ROTM Winner's Club
I have advice for anyone that wants to go through the top on any 4th gen engine removal. "DON'T DO IT". I have read post from guys that have done it both way and there is one common theme. Don't pull the motor from the top it is crazy more work.
Disconnect the hose and wires six bolts on the subframe, the Strut mounts, rack knuckle, 2 brake lines and the Cat back exhaust . Bam I have been told it is an hour and a half job but I am slower then that.
It a shame you did not come here first. You should have gotten 96+ 3800 5 speed, they have more power and get better MPG. They respond better to mods like header and cold air intakes, You can even find used low miles replacement motors for next to nothing since GM used them in front wheel drive cars up till 2009.
Disconnect the hose and wires six bolts on the subframe, the Strut mounts, rack knuckle, 2 brake lines and the Cat back exhaust . Bam I have been told it is an hour and a half job but I am slower then that.

It a shame you did not come here first. You should have gotten 96+ 3800 5 speed, they have more power and get better MPG. They respond better to mods like header and cold air intakes, You can even find used low miles replacement motors for next to nothing since GM used them in front wheel drive cars up till 2009.
Last edited by Gorn; Dec 20, 2015 at 11:49 AM.

Thread
Thread Starter
Forum
Replies
Last Post