
Valve Cover Gasket Replacement Procedures (94-V6-3.4)


Thread Starter
|
In the Staging Lanes
Joined: Apr 2012
Posts: 52
So I just recently replaced my bad valve cover gaskets on my 94 V6 3.4. I took a lot of pics while doing in case I messed up and figured I would turn them into a tutorial of sorts for anyone that was interested. New to this though so dont hate me if I do something wrong.
Since I was a complete noob at anything about cars (didn't even change my own oil or tires) it took me quite a long time to do this job as there is a lot involved. So if you are like me you should take an entire weekend and make sure you dont need this car for a while. If you have worked on cars before it shouldn't be more than a few hours.
Some things you will need :
Things to do BEFORE you start :
Okay, so you have disconnected your battery. Now you need to drain your coolant. Make sure your car has been sitting for at least an hour and the engine has cooled down.There is a plug on the bottom of your radiator on the passenger side. Its just below the lower radiator hose. Place your drain pan below this, unscrew the plug and let it drain. Alternately if you cant unscrew it or cant find it, you can take the clamp off the lower radiator hose and drain it from there. That method though is a little messier. But which ever method you choose make sure you wear gloves (unless you dont care about anti-freeze getting on you).
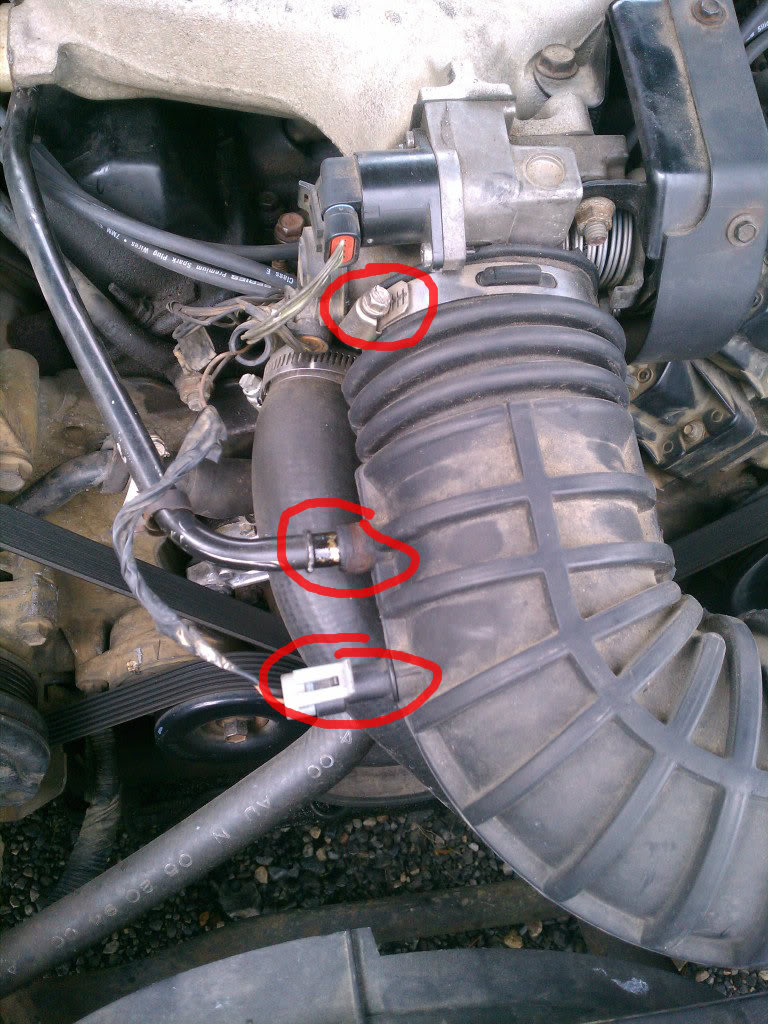
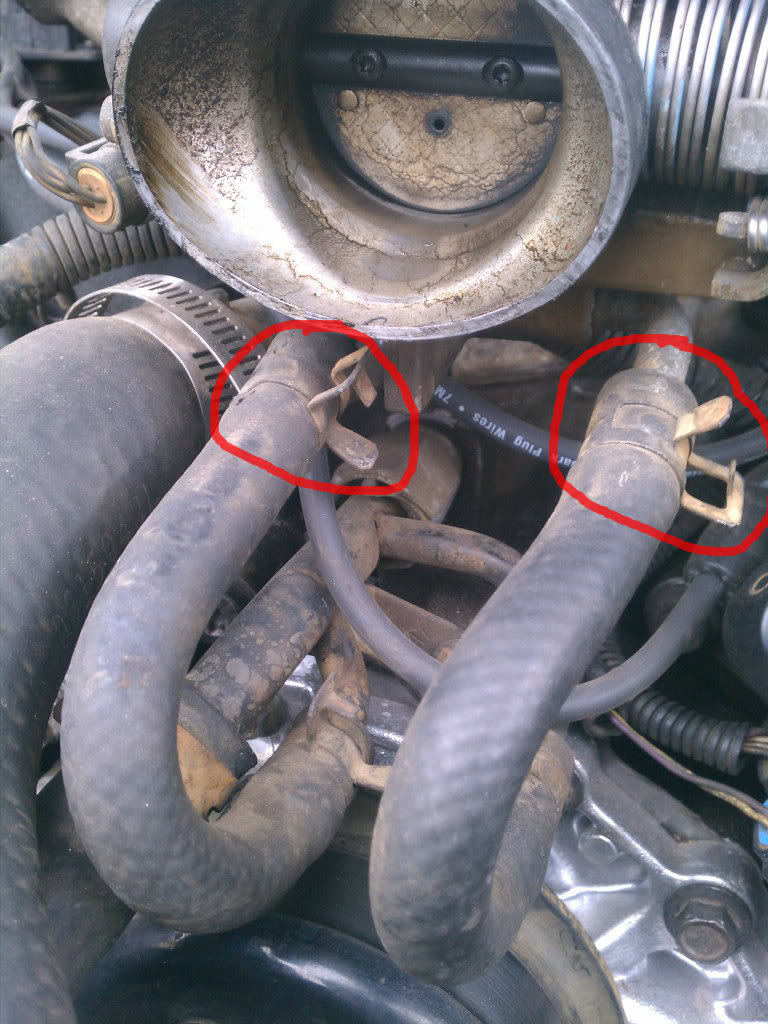
So while that is draining you can start taking things off. First thing to do is remove the air intake hose / air filter.
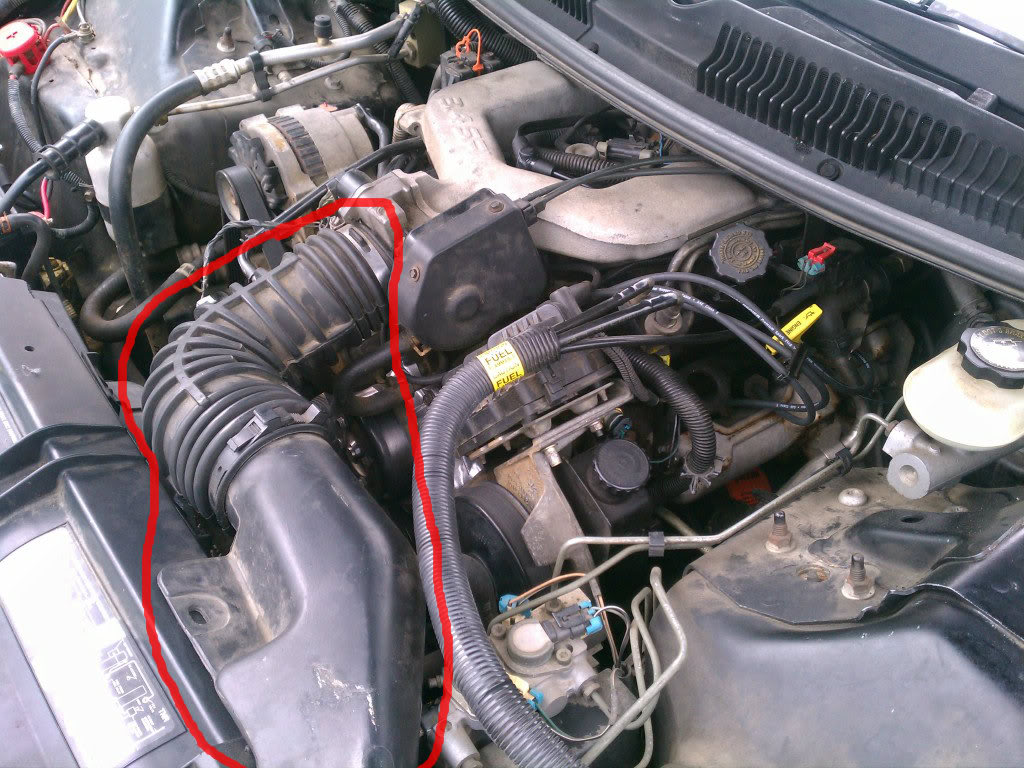
To do this you need to unscrew the clamp that is connected to the throttle body, and remove any hoses / wires. They are marked below.
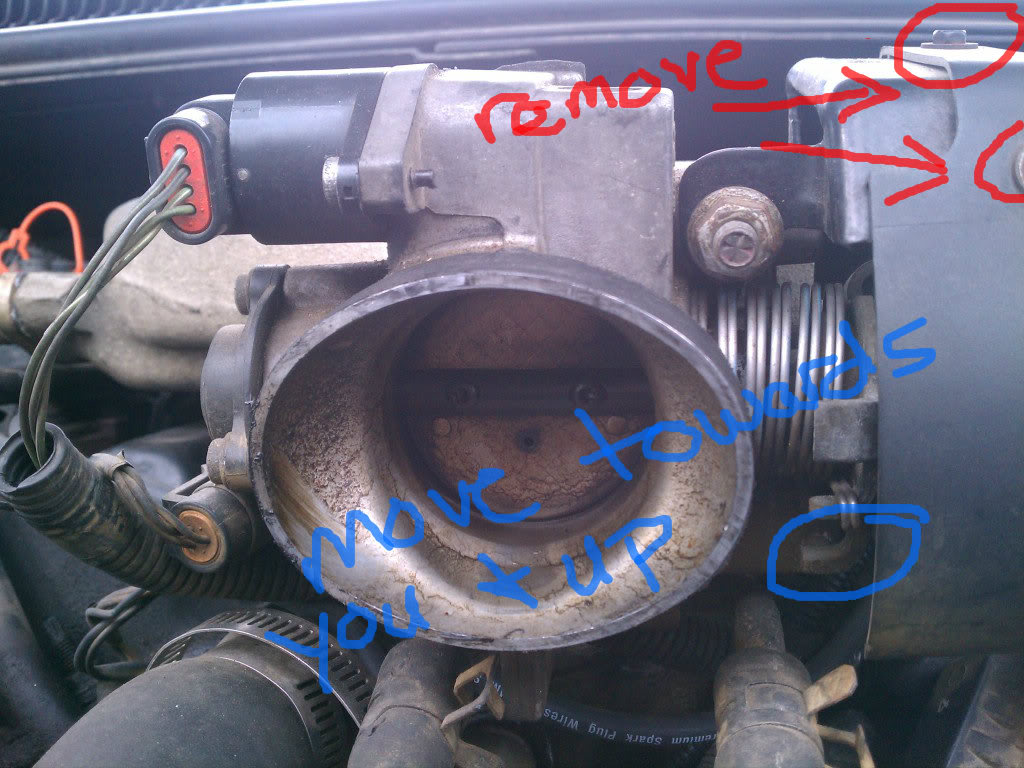
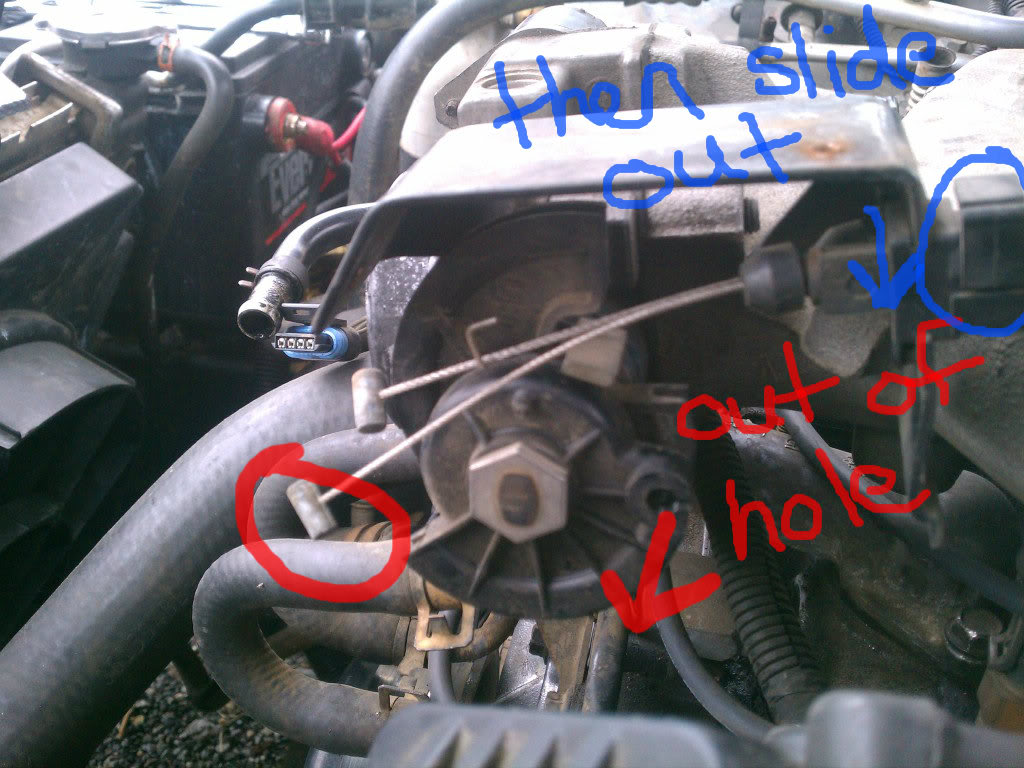
The next thing is to remove the acceleration / cruise control cables. Remove the two screws holding the cover on. Then with one hand lift the "throttle lever" up (as i call it since im a noob) which i marked in blue. It is tough to move though. While it is in the up position you can move the cables over their tracks and slide the pegs out of the holes. I tried to show in pictures as best I could.
Now remove the cables
Okay, by now your coolant should be mostly drained (if not wait a few more minutes) and we can remove the coolant hoses from below the throttle body. Just undo the clamps and pull the hoses back.
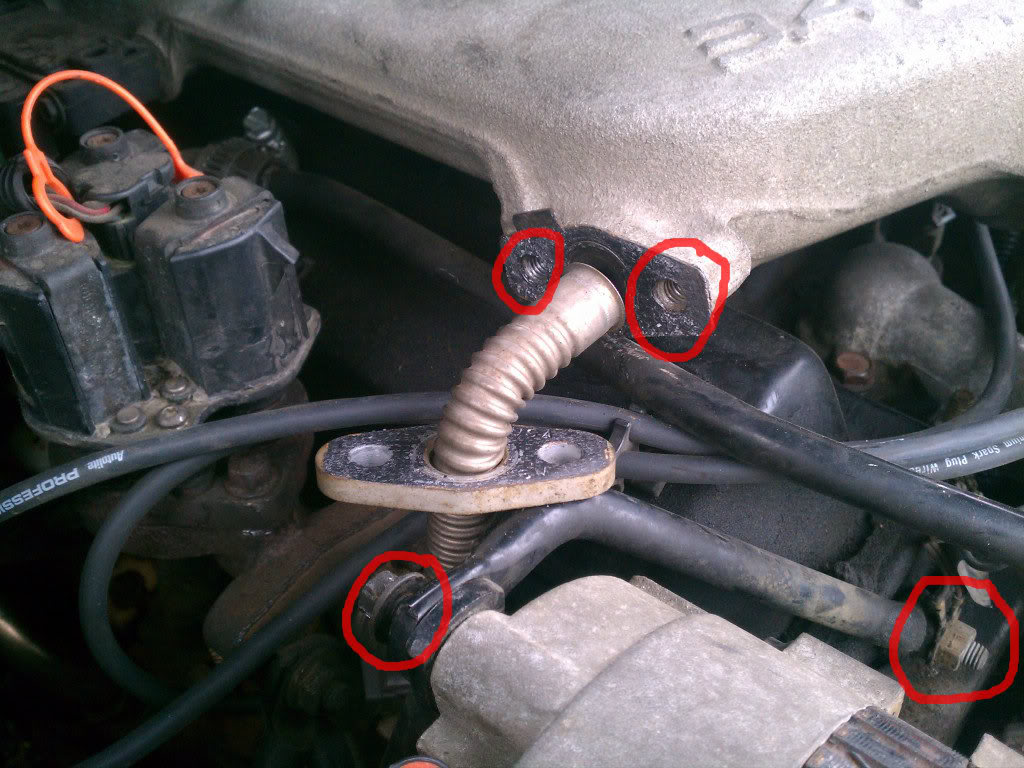
The next two things are really easy. You need to remove the rear alternator brace and the EGR hose that attaches to the air intake. Just a total of 3 bolts and one nut. See below. The harvey's manual says you need to move the alternator out of the way, but I didn't have any problems with it. On the other hand the EGR can prove to be difficult at times. I decided to keep it on, but Im sure it would be a lot easier with it off. While you have the EGR removed you should scrape off the old gasket and replace it with a new one.
Next thing you can do is go ahead and remove all the electrical plugs from the throttle body.
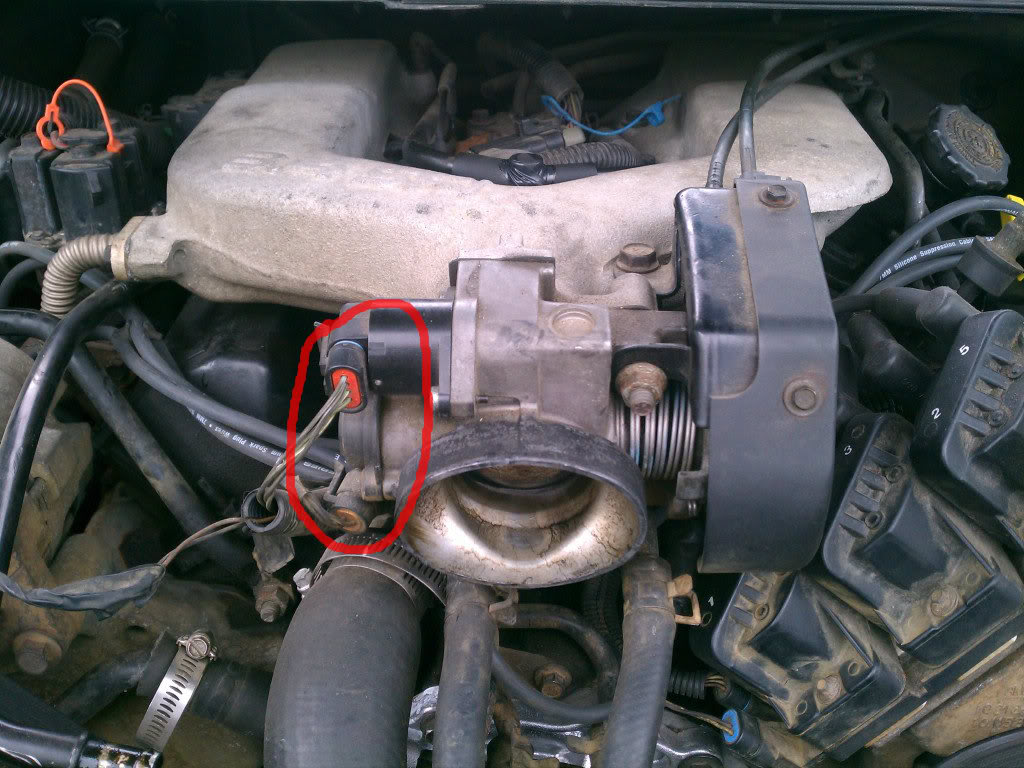
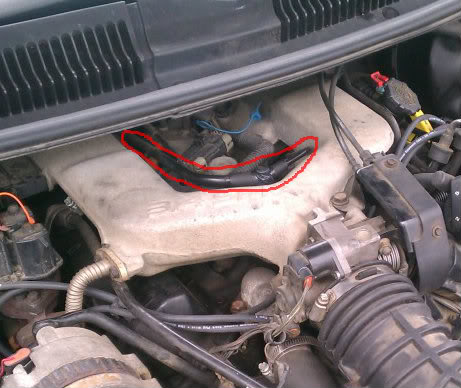
The next thing is to remove the vacuum hose on top of the air intake. Just unplug it and move the hoses/pipes out of the way / off.
READ ALL OF THIS SECTION BELOW. ITS ABOUT FUEL STUFFS
Now we start getting to the fun stuff. The next thing you need to do is release the fuel pressure and disconnect the fuel lines from the fuel rail. If you read up above you should have already removed the filler cap on your gas tank. If you haven't, do this now.
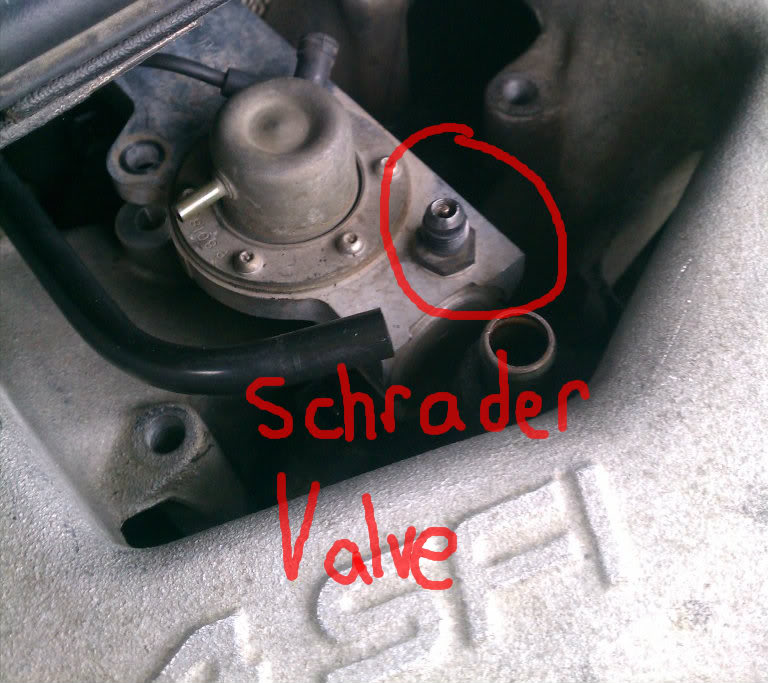
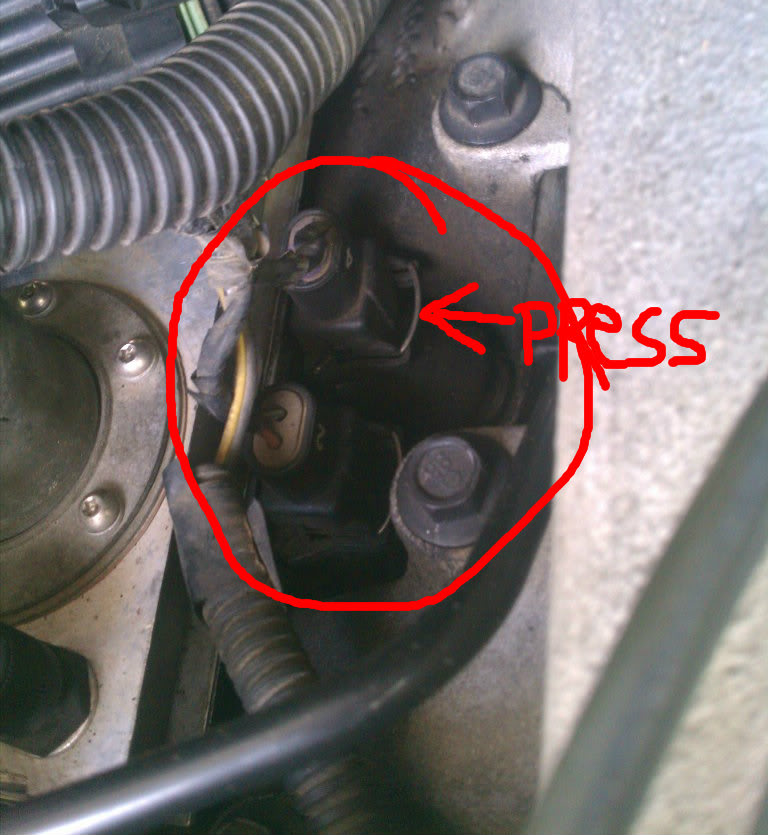
To release the fuel pressure in the system you need to depress the "Schrader" valve. This is located just behind the vacuum hose that you just took off. First thing you need to do is make sure you lay some shop towels/rags around the valve just in case fuel sprays out. Next take a small screw driver and jam it through a couple towels so you keep fuel from spraying upwards. You should also wear safety glasses while doing this. Now take the cap off the valve and you will see a little stem in the middle. All you need to do is depress this and you will relieve any pressure in the system. Do it slowly though or you can get fuel everywhere. Dont worry if nothing comes out after you have depressed it all the way. This just means than your system is not pressurized and is fine to work on.
Now that your system isn't pressurized you can disconnect your fuel lines. Move the boots down off the connections. Grab your disconnect tool and undo the lines.
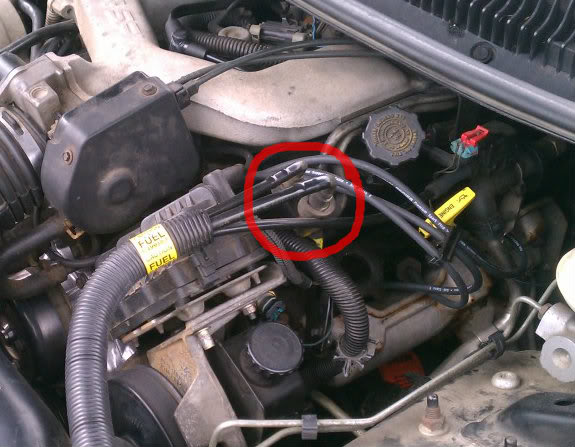
Next you need to disconnect the wiring harness from all of your fuel injectors. They are all held in by a silver spring like clip. just press the middle of the clip toward the center of the harness while pulling up and the come out rather easily. There is also a wire that you need to disconnect that is located to the right of the thermostat housing.
Okay. Now remove both of the bolts holding down the fuel rail. After you do this you can *attempt* to remove the fuel rail and injectors. *IMPORTANT*Take care when removing the injectors. These things are not cheap at about $80-$100 EACH for "cheap" ones. When you pull up on the fuel rail the injectors will come with it. Be careful but keep in mind that it takes a good deal of effort to pull the injectors out. They are sealed in with O rings that hold tight. What I did was get the front ones loose first then the back. Seemed to work okay for me.
And the reason I say *attempt* to pull it all the way out is because I couldn't due to the restricted clearance above the air intake. I ended up having to take the air intake and the fuel rail/injectors out at the same time.
------
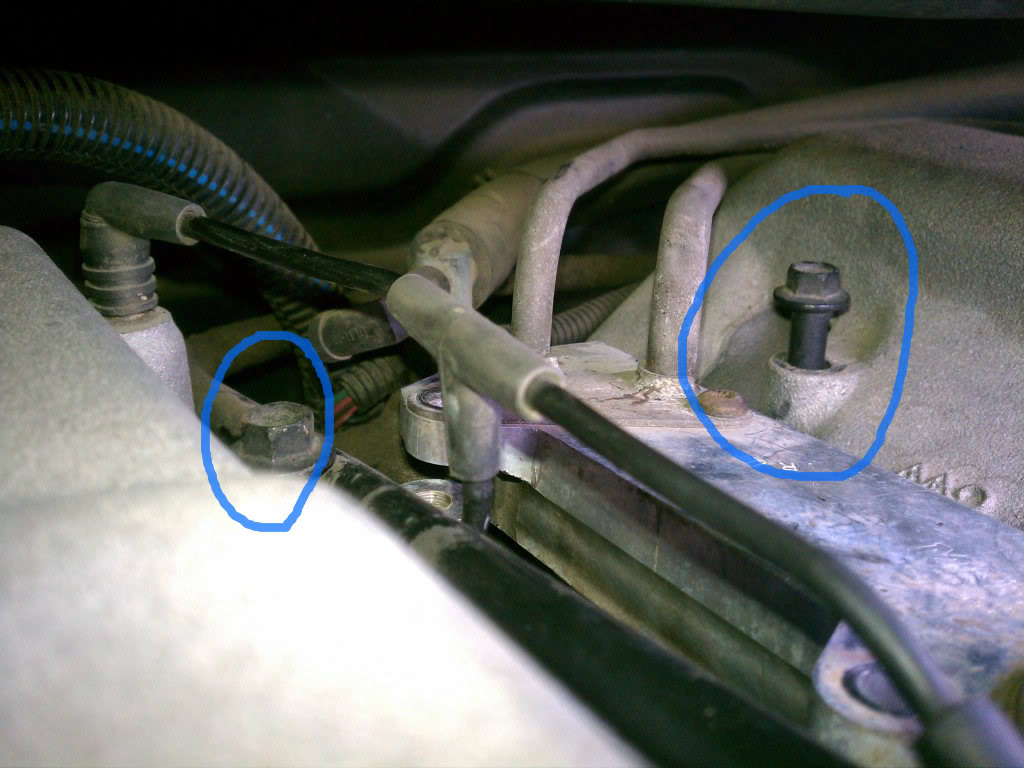
The only thing left is to remove the air intake manifold. There are eight bolts holding it down. They use a 10m socket. The two in the back, which i have circled in blue might not come out due to the restricted clearance I mentioned earlier. Just loosen these all the way, and try to tilt them so they are clear of the holes in your engine block.
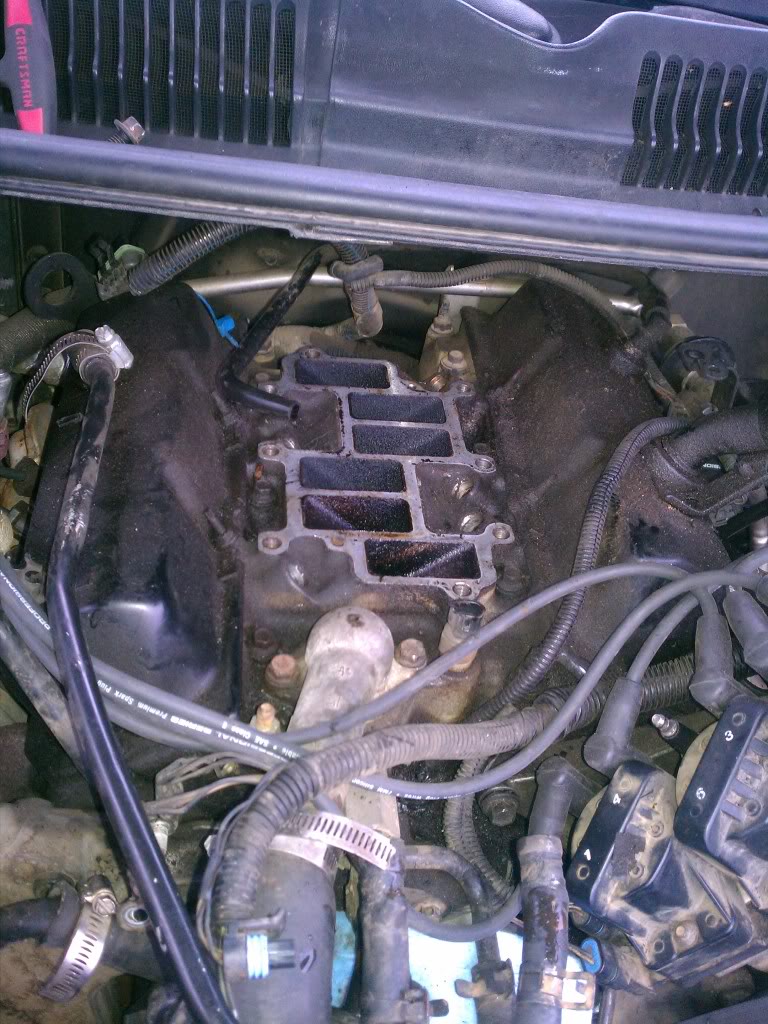
Now that you have the bolts removed you can take the air intake and fuel rail/injectors out. You should have something similar to this
Now the only thing left to do is remove the valve covers (FINALLY). Each one is held down by six nuts with brackets/elongated washers. The nuts here are also 10mm socket size. When removing them be sure not to drop any. They are a pain to find and a pain to replace. I lost both a nut and bracket and had to improvise because I couldn't get a replacement at the auto parts store.
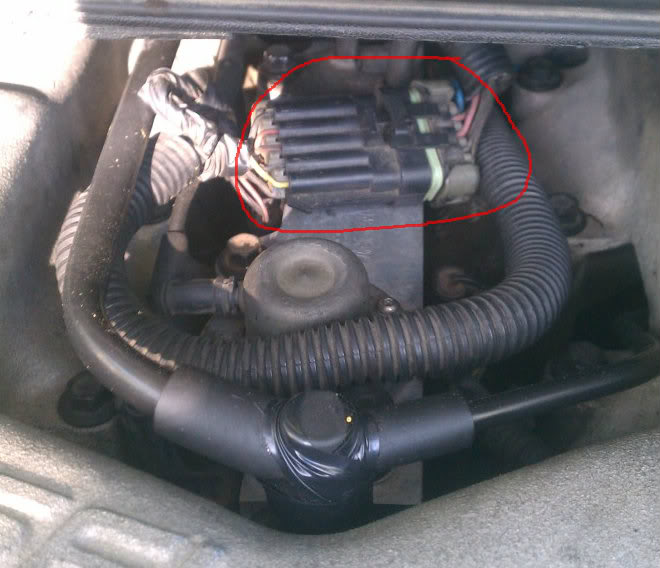
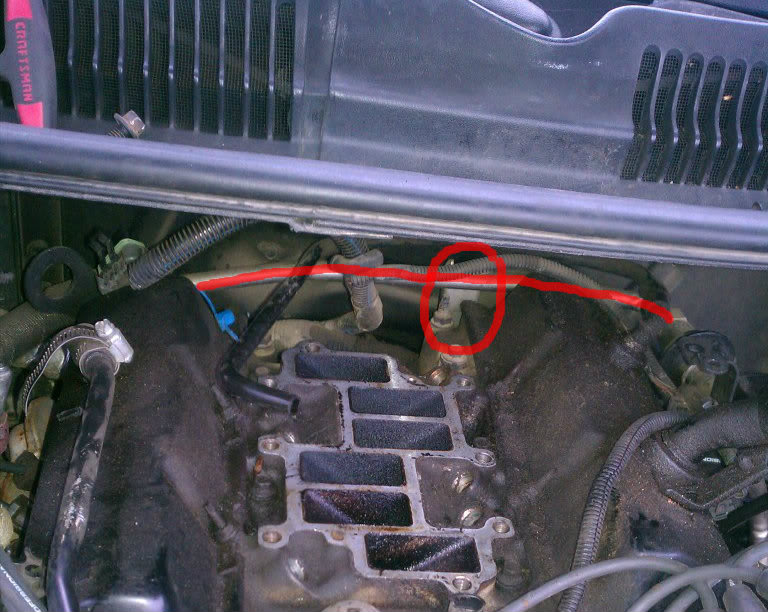
*NOTE*As you can see in the picture below there is a metal pipe running behind both of the valve covers. It is welded to the circled bracket on the back of the block. This will be in the way of the rear nut on the drivers side valve cover. It is held in by a 13mm bolt. Removing this bolt will not remove the pipe but it will let you bend the pipe enough to get the valve cover nut off with your socket wrench.
After you get all the nuts off you can remove the covers. If they dont want to come loose take a piece of WOOD and a hammer to them. Lay the wood against the cover and tap it GENTLY to try and break it loose. Then try to pull the cover off. Repeat as necessary.
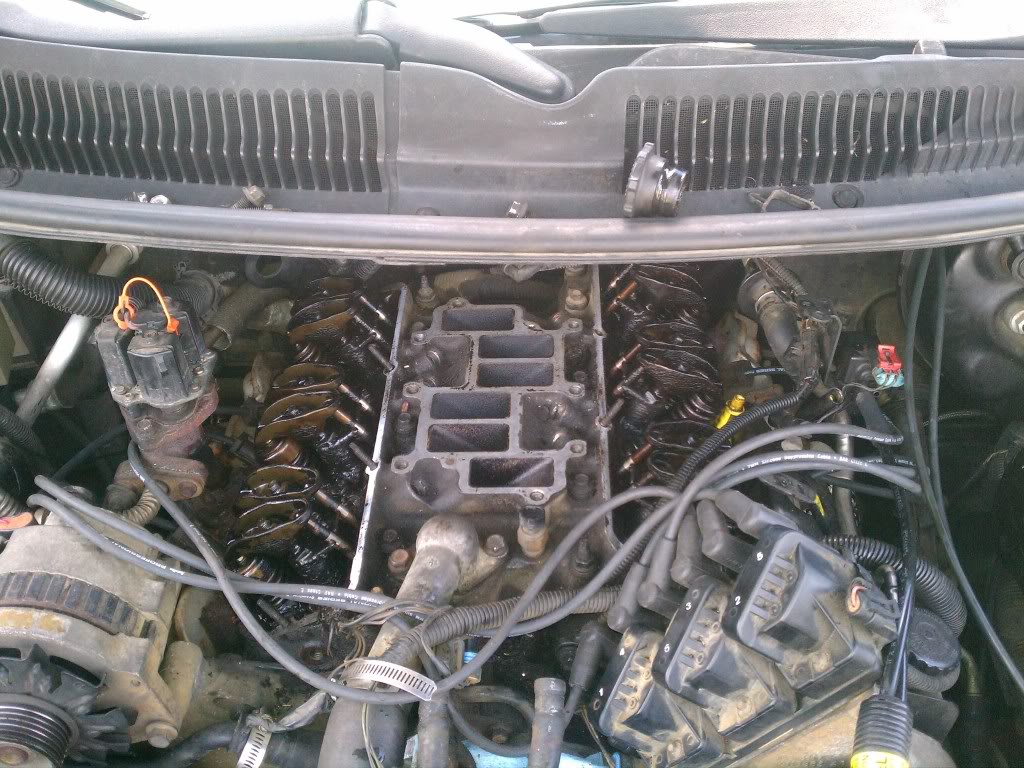
Now you should have your valve covers off and can begin the cleaning process. You should clean the old gaskets off as much as possible. If any is left it can lead to a bad seal and you will be right back where you started. Also, while cleaning you should try to cover all the holes you are working around so nothing falls in them. IMPORTANTYour block is aluminium and will scratch/gouge easy. So take care when removing gaskets. Take your time and be careful.
The good observer might notice in the above picture that my oil dipstick is now broken and sitting where the valve cover was just before. It might be a good idea to take this out before you get too far.
----
After everything is clean and you are satisfied you can put your new gaskets on and put everything back together.
If you have extra parts be sure to go and recheck everything cause it is bad to have extras.
I would recommend taking pictures as you go along so you can look at how things were before you took them apart/off.
Things to check when you are finished BEFORE you start your car :
FILLING YOUR COOLANT AND STARTING YOUR CAR:
After you are sure everything is back together you need to fill your car with coolant and start your car.
First make sure that all the radiator hoses are put back together and your drain valve is screwed back in. Fill the radiator with your choice of coolant all the way to the top of the fill neck. With the cap off put a funnel (large mouth preferable) inside the radiator filler. Start your car and turn the heat on full blast. The reason you are doing this is to make sure that you get your coolant filled back up in the ENTIRE system, not just the radiator.
Let your car sit there and idle with the cap off the radiator. You are waiting for your thermostat to open and let it fill your engine with coolant. You will know when this happens because the coolant level in your radiator will drop suddenly and dramatically. This usually happens after about 10 minutes. When it happens finish filling your radiator up with coolant and put the lid back on.
Over the course of the next few days you need to check your coolant level in the radiator and top it off as necessary as the system gets rid of any air pockets.
If everything seems good then you are all done.
Hope this helped someone. Thanks for reading.
Since I was a complete noob at anything about cars (didn't even change my own oil or tires) it took me quite a long time to do this job as there is a lot involved. So if you are like me you should take an entire weekend and make sure you dont need this car for a while. If you have worked on cars before it shouldn't be more than a few hours.
Some things you will need :
- Your new valve cover gaskets
- You should go ahead and buy an "Intake Gasket Set" (about $20) This will give you gaskets for your upper intake manifold, EGR gasket, and your valve cover gaskets as well
- Shop Towels / Rags (Always good to have)
- Socket Wrench with at least 10mm & 13mm sockets (full set is best)
- Socket wrench extenders and swivels
- Quick Disconnect tool for the fuel lines (a few dollars at the parts store)
- Gasket Scraping Tool
- Drain Pan or bucket(for coolant)
- Flat Head Screwdriver
- Assortment of Pliers
Things to do BEFORE you start :
- Make sure you have a good clean work environment
- Disconect the negative battery terminal
- Open your gas tank filler to release gas pressure (more on this later)
- Drain your coolant (make sure your car is cooled down) ( if you dont know how see below)
Okay, so you have disconnected your battery. Now you need to drain your coolant. Make sure your car has been sitting for at least an hour and the engine has cooled down.There is a plug on the bottom of your radiator on the passenger side. Its just below the lower radiator hose. Place your drain pan below this, unscrew the plug and let it drain. Alternately if you cant unscrew it or cant find it, you can take the clamp off the lower radiator hose and drain it from there. That method though is a little messier. But which ever method you choose make sure you wear gloves (unless you dont care about anti-freeze getting on you).
So while that is draining you can start taking things off. First thing to do is remove the air intake hose / air filter.
To do this you need to unscrew the clamp that is connected to the throttle body, and remove any hoses / wires. They are marked below.
The next thing is to remove the acceleration / cruise control cables. Remove the two screws holding the cover on. Then with one hand lift the "throttle lever" up (as i call it since im a noob) which i marked in blue. It is tough to move though. While it is in the up position you can move the cables over their tracks and slide the pegs out of the holes. I tried to show in pictures as best I could.
Now remove the cables
Okay, by now your coolant should be mostly drained (if not wait a few more minutes) and we can remove the coolant hoses from below the throttle body. Just undo the clamps and pull the hoses back.
The next two things are really easy. You need to remove the rear alternator brace and the EGR hose that attaches to the air intake. Just a total of 3 bolts and one nut. See below. The harvey's manual says you need to move the alternator out of the way, but I didn't have any problems with it. On the other hand the EGR can prove to be difficult at times. I decided to keep it on, but Im sure it would be a lot easier with it off. While you have the EGR removed you should scrape off the old gasket and replace it with a new one.
Next thing you can do is go ahead and remove all the electrical plugs from the throttle body.
The next thing is to remove the vacuum hose on top of the air intake. Just unplug it and move the hoses/pipes out of the way / off.
READ ALL OF THIS SECTION BELOW. ITS ABOUT FUEL STUFFS
Now we start getting to the fun stuff. The next thing you need to do is release the fuel pressure and disconnect the fuel lines from the fuel rail. If you read up above you should have already removed the filler cap on your gas tank. If you haven't, do this now.
To release the fuel pressure in the system you need to depress the "Schrader" valve. This is located just behind the vacuum hose that you just took off. First thing you need to do is make sure you lay some shop towels/rags around the valve just in case fuel sprays out. Next take a small screw driver and jam it through a couple towels so you keep fuel from spraying upwards. You should also wear safety glasses while doing this. Now take the cap off the valve and you will see a little stem in the middle. All you need to do is depress this and you will relieve any pressure in the system. Do it slowly though or you can get fuel everywhere. Dont worry if nothing comes out after you have depressed it all the way. This just means than your system is not pressurized and is fine to work on.
Now that your system isn't pressurized you can disconnect your fuel lines. Move the boots down off the connections. Grab your disconnect tool and undo the lines.
Next you need to disconnect the wiring harness from all of your fuel injectors. They are all held in by a silver spring like clip. just press the middle of the clip toward the center of the harness while pulling up and the come out rather easily. There is also a wire that you need to disconnect that is located to the right of the thermostat housing.
Okay. Now remove both of the bolts holding down the fuel rail. After you do this you can *attempt* to remove the fuel rail and injectors. *IMPORTANT*Take care when removing the injectors. These things are not cheap at about $80-$100 EACH for "cheap" ones. When you pull up on the fuel rail the injectors will come with it. Be careful but keep in mind that it takes a good deal of effort to pull the injectors out. They are sealed in with O rings that hold tight. What I did was get the front ones loose first then the back. Seemed to work okay for me.
And the reason I say *attempt* to pull it all the way out is because I couldn't due to the restricted clearance above the air intake. I ended up having to take the air intake and the fuel rail/injectors out at the same time.
------
The only thing left is to remove the air intake manifold. There are eight bolts holding it down. They use a 10m socket. The two in the back, which i have circled in blue might not come out due to the restricted clearance I mentioned earlier. Just loosen these all the way, and try to tilt them so they are clear of the holes in your engine block.
Now that you have the bolts removed you can take the air intake and fuel rail/injectors out. You should have something similar to this
Now the only thing left to do is remove the valve covers (FINALLY). Each one is held down by six nuts with brackets/elongated washers. The nuts here are also 10mm socket size. When removing them be sure not to drop any. They are a pain to find and a pain to replace. I lost both a nut and bracket and had to improvise because I couldn't get a replacement at the auto parts store.
*NOTE*As you can see in the picture below there is a metal pipe running behind both of the valve covers. It is welded to the circled bracket on the back of the block. This will be in the way of the rear nut on the drivers side valve cover. It is held in by a 13mm bolt. Removing this bolt will not remove the pipe but it will let you bend the pipe enough to get the valve cover nut off with your socket wrench.
After you get all the nuts off you can remove the covers. If they dont want to come loose take a piece of WOOD and a hammer to them. Lay the wood against the cover and tap it GENTLY to try and break it loose. Then try to pull the cover off. Repeat as necessary.
Now you should have your valve covers off and can begin the cleaning process. You should clean the old gaskets off as much as possible. If any is left it can lead to a bad seal and you will be right back where you started. Also, while cleaning you should try to cover all the holes you are working around so nothing falls in them. IMPORTANTYour block is aluminium and will scratch/gouge easy. So take care when removing gaskets. Take your time and be careful.
The good observer might notice in the above picture that my oil dipstick is now broken and sitting where the valve cover was just before. It might be a good idea to take this out before you get too far.
----
After everything is clean and you are satisfied you can put your new gaskets on and put everything back together.
If you have extra parts be sure to go and recheck everything cause it is bad to have extras.
I would recommend taking pictures as you go along so you can look at how things were before you took them apart/off.
Things to check when you are finished BEFORE you start your car :
- Make sure your fuel lines are reconnected
- fill the car back up with coolant (more on this below)
- reconnect your battery
- double check everything !!
FILLING YOUR COOLANT AND STARTING YOUR CAR:
After you are sure everything is back together you need to fill your car with coolant and start your car.
First make sure that all the radiator hoses are put back together and your drain valve is screwed back in. Fill the radiator with your choice of coolant all the way to the top of the fill neck. With the cap off put a funnel (large mouth preferable) inside the radiator filler. Start your car and turn the heat on full blast. The reason you are doing this is to make sure that you get your coolant filled back up in the ENTIRE system, not just the radiator.
Let your car sit there and idle with the cap off the radiator. You are waiting for your thermostat to open and let it fill your engine with coolant. You will know when this happens because the coolant level in your radiator will drop suddenly and dramatically. This usually happens after about 10 minutes. When it happens finish filling your radiator up with coolant and put the lid back on.
Over the course of the next few days you need to check your coolant level in the radiator and top it off as necessary as the system gets rid of any air pockets.
If everything seems good then you are all done.
Hope this helped someone. Thanks for reading.

Newbie
Joined: Aug 2012
Posts: 12


April 2011 ROTM

Joined: Mar 2009
Posts: 22,042
From: Tokeland, Washington
ROTM Winner's Club

Sorry on a old thread but at the harness connection should I have 12volts from the pink power to the injector ground on the same side if the clip apart and I take the power side and test the 12 volt and put a t pin in on of the injector driver wires should it be grounded

Newbie
Joined: Nov 2014
Posts: 20
This is an old thread but I change my valve cover gaskets and got everything back together but I can find the hose that is supposed to go into the t on the back and now my car ses light is on. I can't find the hose anywhere and all I done way discretion from where the fuel injector are on the back.

Thread
Thread Starter
Forum
Replies
Last Post