
Fuel pump replace


Thread Starter
|
Second Generation Moderator
Feb 2010 ROTM winner
Jan 2013 ROTM winner
Feb 2010 ROTM winner
Jan 2013 ROTM winner
Joined: Aug 2008
Posts: 9,097
From: Portland, Or
ROTM Winner's Club
To you guys who've changed one of these, you have my utmost respect and condolences!
A friend brought over his 4th gen today and asked if I would change the fuel pump for him. I wasn't too keen on it, since it involved dropping the tank, but finally gave in when he said he'd pay me rather than pay a shop.
I should have declined in hindsight, but I figured what the heck, it can't be that bad. I've never regretted anything as much in all my car working days! I couldn't believe all the crap that has to come off the car just to let the tank drop!!! I was beginning to think I was doing something wrong, and several times I contemplated putting it all back together and sending it to a shop to finish it. Only my stubborness made me forge on.
I spent 3 hrs. pulling the exhaust system, including from the cat to the tailpipe ends. Then a bunch of shields, frame braces, panhard bar, and God only knows what else, as I've forgotten.
Once it came off, then it was still necessary to drop the axle down to it's limit to be able to lower the tank enough and remove the float/fuel pump assembly.
What a pain, and then have to reverse it all and put it together again! I was so glad to see it start and drive away, and I wont ever agree to do another. I'm too old for this crap.

Fourth Generation Moderator
October 2009 ROTM
October 2009 ROTM
iTrader: (1)
Joined: Nov 2007
Posts: 10,561
From: Eastern PA,
ROTM Winner's Club
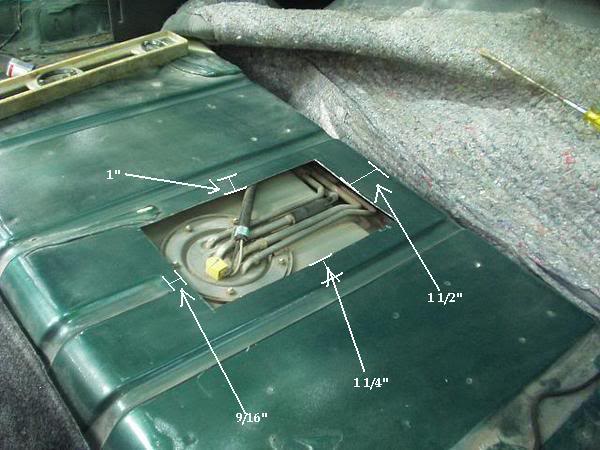
We call it the hatch method. You can do it in 30 minutes, 40 if you don't want to set your beer down  You just cut a hole in the floor, we even have all the measurment. I made nice carbon fiber patch panel on mine.
Wait till you find out the pump is defective and you need to replace it, I bought one of the autozone Airtechs. 3 installs later I was done.
You just cut a hole in the floor, we even have all the measurment. I made nice carbon fiber patch panel on mine.Wait till you find out the pump is defective and you need to replace it, I bought one of the autozone Airtechs. 3 installs later I was done.
Thread Starter
|
Second Generation Moderator
Feb 2010 ROTM winner
Jan 2013 ROTM winner
Feb 2010 ROTM winner
Jan 2013 ROTM winner
Joined: Aug 2008
Posts: 9,097
From: Portland, Or
ROTM Winner's Club
We call it the hatch method. You can do it in 30 minutes, 40 if you don't want to set your beer down You just cut a hole in the floor, we even have all the measurment. I made nice carbon fiber patch panel on mine.
Wait till you find out the pump is defective and you need to replace it, I bought one of the autozone Airtechs. 3 installs later I was done.
You just cut a hole in the floor, we even have all the measurment. I made nice carbon fiber patch panel on mine.Wait till you find out the pump is defective and you need to replace it, I bought one of the autozone Airtechs. 3 installs later I was done.
If it goes bad I'll be back for dimensions and tell him we're cutting the trunk next time.
Edit: Just checked the packaging he left behind and his is a "Master NASCAR Performance" brand. Hope that's better!
Last edited by 1971BB427; Aug 16, 2011 at 08:19 AM.

Thread Starter
|
Second Generation Moderator
Feb 2010 ROTM winner
Jan 2013 ROTM winner
Feb 2010 ROTM winner
Jan 2013 ROTM winner
Joined: Aug 2008
Posts: 9,097
From: Portland, Or
ROTM Winner's Club
Ok, thanks. But I went to Drivetrain Tech, and looked at all the stickies under Fuel and found none pertaining to fuel pump installs or mods. Wish I could find it.
And that's a great picture, but the floor in his doesn't look like that. It's smooth and rounded. Did they change the floor in some of the 4th gens?? His is a convertible, could that be the difference?

And that's a great picture, but the floor in his doesn't look like that. It's smooth and rounded. Did they change the floor in some of the 4th gens?? His is a convertible, could that be the difference?

Senior Moderator
January 2010 ROTM Winner
January 2010 ROTM Winner
Joined: Oct 2007
Posts: 18,306
From: The 'Burbs of Chicago

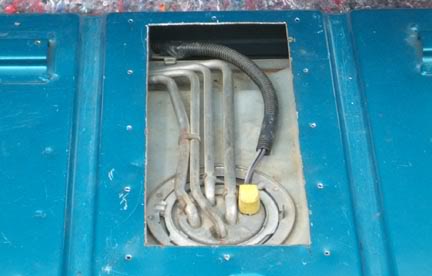
It's been done with a convertible, but with the low overhead clearance, I'm curious to see just how easily that sending unit assembly comes up and out? If you don't remove the unit with some "finesse", you could tweak the float arm and screw up your gas gauge reading. I replaced the pump in my old 3rd gen, which is in there exactly the same way as the 4th gens are. Only difference is the 4th gens have some line disconnects that the 3rd gens don't have, and I realized that after I already cut the access hatch in there. At that point, I felt more comfortable with removing the tank anyway and leaving the one-piece lines in tact, instead of cutting the lines and re-flaring them to do it the right and safe way. My car needed a new exhaust anyway, and the old system came off easily with a sawzall. The rest of the project wasn't too bad. The one thing dropping the tank will give you, is the opportunity to do a thorough flush and dump, should you have a good build up of crud inside. Pics of mine:

Last edited by Camaro 69; Aug 16, 2011 at 08:50 AM.
Thread Starter
|
Second Generation Moderator
Feb 2010 ROTM winner
Jan 2013 ROTM winner
Feb 2010 ROTM winner
Jan 2013 ROTM winner
Joined: Aug 2008
Posts: 9,097
From: Portland, Or
ROTM Winner's Club
That was my concern too Chuck when I saw the hole pictured in Gorn's reply. The unit comes out with all those hard lines connected to it, and I couldn't see how you could maneuver the lines and the fuel pump/float assembly up through the small hole. I had a heck of a time getting it all out of the tank with no obstructions above.
The other concern I had was the electrical plug. It's a pretty large end and not sure how it would find a way past the tank to allow the unit to rise enough to pull it. There's very little room alongside the tank for that plug to slip past. Do they cut and spice the wires too?
The other concern I had was the electrical plug. It's a pretty large end and not sure how it would find a way past the tank to allow the unit to rise enough to pull it. There's very little room alongside the tank for that plug to slip past. Do they cut and spice the wires too?
Last edited by 1971BB427; Aug 16, 2011 at 09:26 AM.

Overdrive Member
Joined: Nov 2006
Posts: 4,042
From: IL
Senior Moderator
January 2010 ROTM Winner
January 2010 ROTM Winner
Joined: Oct 2007
Posts: 18,306
From: The 'Burbs of Chicago
^ It's unfortunate that in those links, they didn't show how to address the fuel lines. I wonder why they didn't, everything else was displayed? Someone who doesn't know any better might just cut the high pressure supply line and splice it back together with a rubber hose and clamp, which is a recipe for disaster. I hope to never buy one of those half-arsed, firetrap cars.
Overdrive Member
Joined: Nov 2006
Posts: 4,042
From: IL
Did you follow a better guide? Or document your own? 
^ It's unfortunate that in those links, they didn't show how to address the fuel lines. I wonder why they didn't, everything else was displayed? Someone who doesn't know any better might just cut the high pressure supply line and splice it back together with a rubber hose and clamp, which is a recipe for disaster. I hope to never buy one of those half-arsed, firetrap cars.

Thread
Thread Starter
Forum
Replies
Last Post