
Changing Dashboard Cluster light bulbs


Thread Starter
|
Newbie
Joined: Nov 2010
Posts: 13
From: SoCal
Hi Guys, I have a couple light bulbs burned out on my cluster, and trying to find an easy way to change it without taking down the steering wheel down and the radio bezel etc. Any response to an easy way of doing it. Otherwise, I'll keep the burned ones and not mess with it. thanks


If this is for the 98 v6, I don't know what in the world you're talking about. It takes 10 minutes to change bulbs, all you need to do is pull of the cluster bezels and pop out the cluster. NOTHING else comes out. I can give a detailed write up if this is the car that needs the bulbs changed.
Thread Starter
|
Newbie
Joined: Nov 2010
Posts: 13
From: SoCal
If this is for the 98 v6, I don't know what in the world you're talking about. It takes 10 minutes to change bulbs, all you need to do is pull of the cluster bezels and pop out the cluster. NOTHING else comes out. I can give a detailed write up if this is the car that needs the bulbs changed.
I recommend using a 7mm nut driver. There's some screws that are hard to reach, but a nut driver works great for them. Start by unscrewing the 2 screws that holds the outer most bezel around the cluster. It's only 2 screws, behind it there are plastic pegs with metal clips that holds the bottom in place. Just pull it forward and tilt the top out first. I put my steering wheel all the way down to give a little more room. There's a bunch of screws all around the cluster which is where the nut driver comes in handy. They should all be 7mm. I can never seem to get the whole cluster out at once, so I unclip the clear plastic bezel while the cluster is still plugged in. Takes a little finessing, but it's possible. If you can get all of it out together, then more power to you. Finally, pull the cluster out. It's just a single plug in the back, pull straight out. Then figure out which bulbs are out and replace them (194 bulbs). I use a pair of pliers to gently twist the bulbs out (they're in little holders, you can tell as soon as you see them). Assembly is the same in reverse. Just make sure you plug the cluster in and test the bulbs before fully reassembling everything.
Here's a few photos of what it should look like. Not the greatest pics, but I circled in pink some of the key things I pointed out.
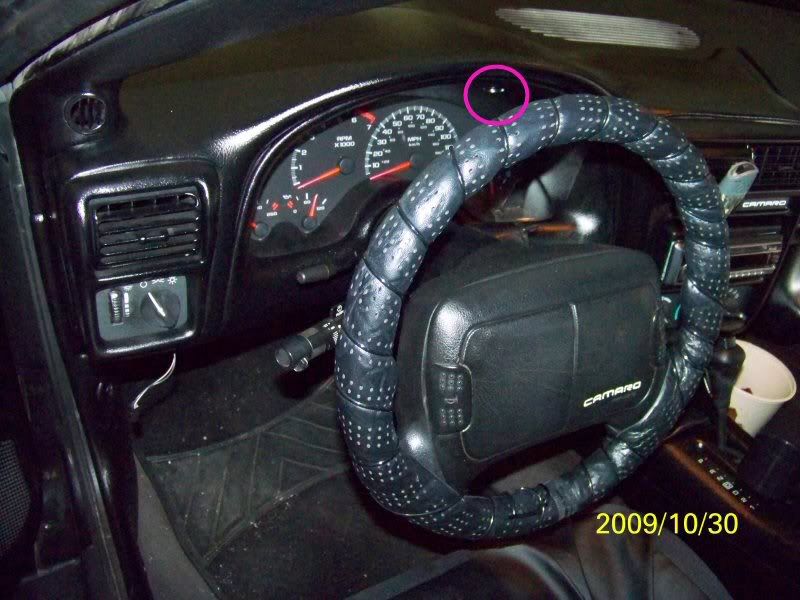
One of the two screws is circled that needs to come out first.

The screws around the cluster itself
The plug
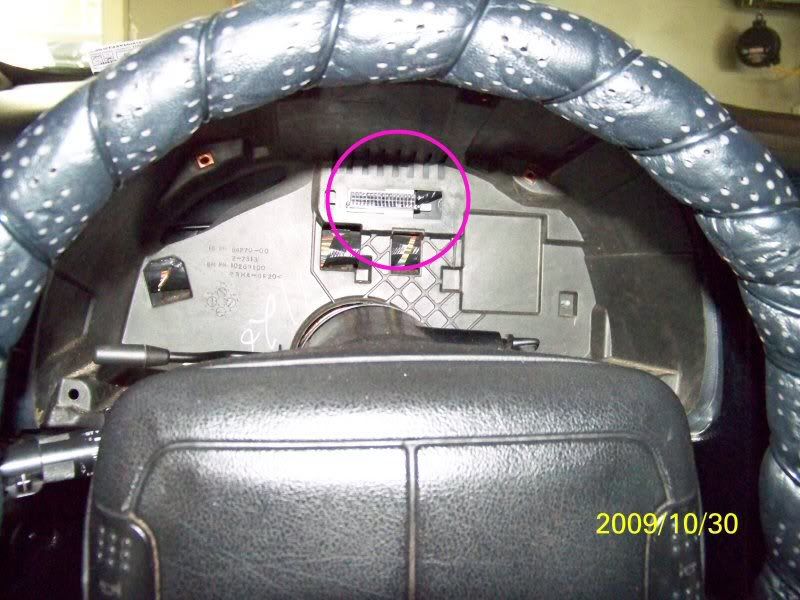
Here's a few photos of what it should look like. Not the greatest pics, but I circled in pink some of the key things I pointed out.
One of the two screws is circled that needs to come out first.
The screws around the cluster itself
The plug

Thread Starter
|
Newbie
Joined: Nov 2010
Posts: 13
From: SoCal
I recommend using a 7mm nut driver. There's some screws that are hard to reach, but a nut driver works great for them. Start by unscrewing the 2 screws that holds the outer most bezel around the cluster. It's only 2 screws, behind it there are plastic pegs with metal clips that holds the bottom in place. Just pull it forward and tilt the top out first. I put my steering wheel all the way down to give a little more room. There's a bunch of screws all around the cluster which is where the nut driver comes in handy. They should all be 7mm. I can never seem to get the whole cluster out at once, so I unclip the clear plastic bezel while the cluster is still plugged in. Takes a little finessing, but it's possible. If you can get all of it out together, then more power to you. Finally, pull the cluster out. It's just a single plug in the back, pull straight out. Then figure out which bulbs are out and replace them (194 bulbs). I use a pair of pliers to gently twist the bulbs out (they're in little holders, you can tell as soon as you see them). Assembly is the same in reverse. Just make sure you plug the cluster in and test the bulbs before fully reassembling everything.
Here's a few photos of what it should look like. Not the greatest pics, but I circled in pink some of the key things I pointed out.
One of the two screws is circled that needs to come out first.
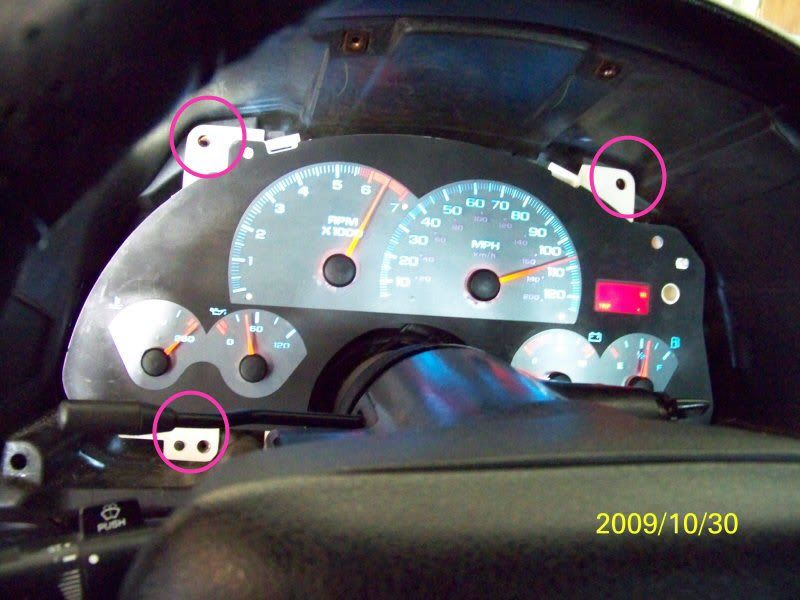
The screws around the cluster itself
The plug
Here's a few photos of what it should look like. Not the greatest pics, but I circled in pink some of the key things I pointed out.
One of the two screws is circled that needs to come out first.
The screws around the cluster itself
The plug
Thank you

Newbie
Joined: Feb 2015
Posts: 4
I recommend using a 7mm nut driver. There's some screws that are hard to reach, but a nut driver works great for them. Start by unscrewing the 2 screws that holds the outer most bezel around the cluster. It's only 2 screws, behind it there are plastic pegs with metal clips that holds the bottom in place. Just pull it forward and tilt the top out first. I put my steering wheel all the way down to give a little more room. There's a bunch of screws all around the cluster which is where the nut driver comes in handy. They should all be 7mm. I can never seem to get the whole cluster out at once, so I unclip the clear plastic bezel while the cluster is still plugged in. Takes a little finessing, but it's possible. If you can get all of it out together, then more power to you. Finally, pull the cluster out. It's just a single plug in the back, pull straight out. Then figure out which bulbs are out and replace them (194 bulbs). I use a pair of pliers to gently twist the bulbs out (they're in little holders, you can tell as soon as you see them). Assembly is the same in reverse. Just make sure you plug the cluster in and test the bulbs before fully reassembling everything.
Here's a few photos of what it should look like. Not the greatest pics, but I circled in pink some of the key things I pointed out.
One of the two screws is circled that needs to come out first.
The screws around the cluster itself
The plug
Here's a few photos of what it should look like. Not the greatest pics, but I circled in pink some of the key things I pointed out.
One of the two screws is circled that needs to come out first.
The screws around the cluster itself
The plug

Thread
Thread Starter
Forum
Replies
Last Post