
My 1981 Z28 mods & updates.
#1
 11-02-2010, 09:27 AM


Join Date: Mar 2009
Location: Princeton, NC, US
Posts: 44
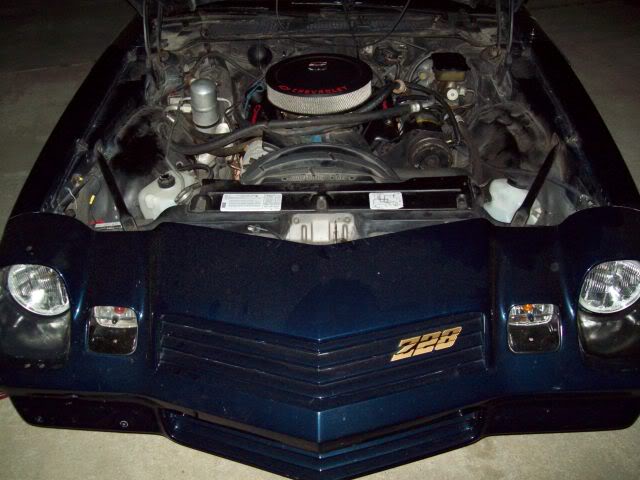
Over the last month, I have been working on getting my Z28 the way I want it. I started by re-dying the interior, replacing the radio with a full din radio. Then I dug the louvres out of the barn, re-conditioned them and put them back on.
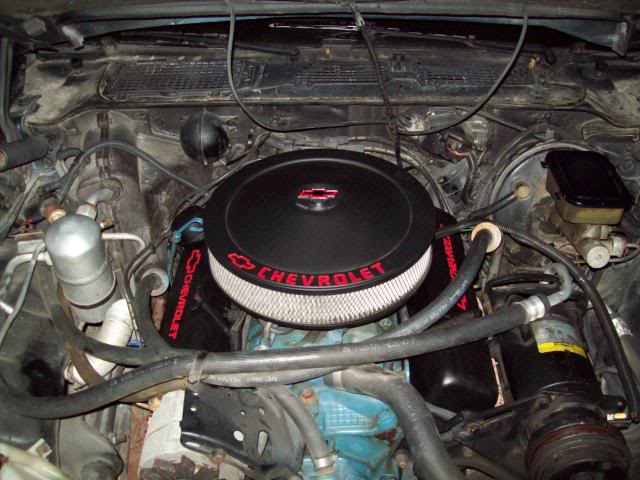
I decided the engine bay needed more work, so I cleaned it up good and then started buying chrome bits and pieces for it. After I got everything on, the car developed a bad miss and I found that the distributor cap and rotor was badly worn. Listed below is all the parts added, replaced, or modified:
-Fender Braces, replaced with Chrome.
-Hood Latch plate, replaced with Chrome.
-Valve Covers, chrome
-Braided hose kit. Stainless ends.
-Corrugated Chrome tubing.
-Fuel hose and filter (due to rupture which is the reason for the fire extinguisher below)
-Engine block and intake, repaint.
-Alternator, repaint
-Compressor, repainted with brush
-Master cylinder and booster re-paint
-Hood insulation
-Factory breather dish, put back on and repainted.
-K&N Filter
-K&N Valve Cover breather
-Windshield base vents repainted.
-MSD Distributor
-Accel Blue Inductor core plug wires
-MSD Multiple Spark Discharge box (in the process of installing).
-MOROSO wire looms.
-Smog Rail delete (damn putting plug wires on with that thing in the way.)
-Fire Extinguisher mounted back seat hump
-Re-dyed upper and lower sail panels, console lid, and t-top trim.
BEFORE.
AS OF SEPT 20

During. October 4.


During. October 9.


During. October 27.


During. October 31.
Smog Delete

Still have not centered the distributor, plug wires are on. Gotta clean the valve covers up a little.

More pictures to come, once I get the distributor centered and the MSD box installed.
Also, request something you want to see if it is not pictured and I'll try to snap a picture of it real quick.
I decided the engine bay needed more work, so I cleaned it up good and then started buying chrome bits and pieces for it. After I got everything on, the car developed a bad miss and I found that the distributor cap and rotor was badly worn. Listed below is all the parts added, replaced, or modified:
-Fender Braces, replaced with Chrome.
-Hood Latch plate, replaced with Chrome.
-Valve Covers, chrome
-Braided hose kit. Stainless ends.
-Corrugated Chrome tubing.
-Fuel hose and filter (due to rupture which is the reason for the fire extinguisher below)
-Engine block and intake, repaint.
-Alternator, repaint
-Compressor, repainted with brush
-Master cylinder and booster re-paint
-Hood insulation
-Factory breather dish, put back on and repainted.
-K&N Filter
-K&N Valve Cover breather
-Windshield base vents repainted.
-MSD Distributor
-Accel Blue Inductor core plug wires
-MSD Multiple Spark Discharge box (in the process of installing).
-MOROSO wire looms.
-Smog Rail delete (damn putting plug wires on with that thing in the way.)
-Fire Extinguisher mounted back seat hump
-Re-dyed upper and lower sail panels, console lid, and t-top trim.
BEFORE.
AS OF SEPT 20
During. October 4.
During. October 9.
During. October 27.
During. October 31.
Smog Delete
Still have not centered the distributor, plug wires are on. Gotta clean the valve covers up a little.
More pictures to come, once I get the distributor centered and the MSD box installed.
Also, request something you want to see if it is not pictured and I'll try to snap a picture of it real quick.

#3
11-02-2010, 09:47 AM
Join Date: Mar 2009
Location: Princeton, NC, US
Posts: 44
Seems to be doing really good in the test run, but the idle was really too turbulent to be 100% sure. I couldn't retard the timing enough to smooth it out because the distributor was so far off center, it was hitting the trans dipstick tube.
I just have to realign it with the oil pump and center it.
I just have to realign it with the oil pump and center it.
Last edited by EvansBlue; 11-02-2010 at 10:00 AM.
#5
11-03-2010, 07:18 AM
Join Date: Mar 2009
Location: Princeton, NC, US
Posts: 44
Its ok. I appreciated it. lol
I'm a liaison between the Camaro forums and the sister Chevrolet Forum, but I help out where needed, I just don't get around to posting much.
Updating on the progress of the ignition swap.. I pulled out my unused sand canister under the windshield fluid reservior and I'm thinking about mounting the Multiple Spark Discharge box in its place.
I had to pull the 4-pin ignition module out of the distributor and replace it with a wiring harness to run to the MSD box. I still have a relay to put in to power it and a killswitch. Then all thats left is to just put the wiring in corrugated tubing and time the ignition.

#8
11-03-2010, 10:46 PM
Join Date: Mar 2009
Location: Princeton, NC, US
Posts: 44
'preciate it bud!
77nomad, thats a pretty good idea, but they make HEI blasters too, so I may eventually get one if the standard MSD coil ever craps on me.
Updating the thread, I got the distributor mostly wired today and took more pictures. I also took some pictures of the killswitch I installed and consequentially also took a picture of the radio I installed. I just have to dig up some wiring connectors and I will be completely finished with the wiring of the ignition system.
#9
11-03-2010, 10:59 PM
I don't know if you drive in the rain but make sure water can't get to your box down there. I power washed mine once. ONCE. Fortunately it was still under warranty. I told them it was on my truck and they assumed I meant mud truck and warrantied it. they sent it back with a list of diodes that blew. LOL