


Air Dam & Spoiler


3rd Gear Member
Joined: Aug 2008
Posts: 957
From: Vancouver, WA

well i found mine locally on craigslist. you can look on craigs in your area and find one in good condition that you would just need to sand and repaint.
i dont know if you can glue them on but they bolt on. You can also get it molded into the trunk so you dont see a crease/groove. thats what im gonna do when i get my car painted
i dont know if you can glue them on but they bolt on. You can also get it molded into the trunk so you dont see a crease/groove. thats what im gonna do when i get my car painted

Second Generation Moderator
Feb 2010 ROTM winner
Jan 2013 ROTM winner
Feb 2010 ROTM winner
Jan 2013 ROTM winner
Joined: Aug 2008
Posts: 9,097
From: Portland, Or
ROTM Winner's Club
They bolt on, and molding them in properly is extensive. If you're familiar with bonding fiberglass to steel, then it can be done. They look great to some folks, while others hate to see bonded spoilers. I wouldn't do so with a carbon graphite, as there's no reason to spend that kind of money and then cover it with glass and paint. The fiberglass will work better, and be cheaper too.
Several steps to bond glass to steel. First you need to drill and bolt the three pieces to your deck lid and fenders, leaving a slightly larger hole around each mounting point for final adjustment. Once in place, snug the nuts down and close the deck lid. You can then tap and push the pieces around until the gaps and contours fit perfectly. After everything aligns you can tighten the nuts and check it again.
Now mark the edges of all the pieces with a pencil or fine point felt marker. Remove all three pieces and grind all the paint off your spoiler plus a good 3-4" past the marked edges for blending. With everything prepped, mix up some epoxy that has a drying time of at least 30 min., and coat the bottom of the spoiler pieces before attaching them again. Tighten them, and align them again. Once they're done and aligned, let it dry overnight.
Now you need to start laying up fiberglass cloth strips across all the edges, overlapping the spoiler and the metal. Start with strips that are about 2" wide, and don't run them more than a couple feet long. Longer will cause them to ripple and not lay down flat. Once you've done all the edges, then come back and rough sand the imperfections. Now put another strip that overlaps the first one on each side. After that's done, you'll repeat step one, and do another down the middle again. I'd repaet this until you get 4-5 layers.
Once you've got all the layers built up, come back with a light disc and shape the glass to get it smooth. Now you're ready to get some fiberglass filler bondo, and apply a thing layer to the entire surface. Sand that smooth, and repeat as needed to get it all blended in.
Properly done, this will still take you several days of work, or more. At least it did for me when I did my old hood, and my flares. The end result will look nice, and last a lot of years, but it's sure not easy, and just bolting one on will be way less work!
I did this same procedure to rebuild my one piece spoiler, so I could add 2" to the height. That was way easier, as it only took a couple days to glass it all in using metal as an extension to the fiberglass.
Several steps to bond glass to steel. First you need to drill and bolt the three pieces to your deck lid and fenders, leaving a slightly larger hole around each mounting point for final adjustment. Once in place, snug the nuts down and close the deck lid. You can then tap and push the pieces around until the gaps and contours fit perfectly. After everything aligns you can tighten the nuts and check it again.
Now mark the edges of all the pieces with a pencil or fine point felt marker. Remove all three pieces and grind all the paint off your spoiler plus a good 3-4" past the marked edges for blending. With everything prepped, mix up some epoxy that has a drying time of at least 30 min., and coat the bottom of the spoiler pieces before attaching them again. Tighten them, and align them again. Once they're done and aligned, let it dry overnight.
Now you need to start laying up fiberglass cloth strips across all the edges, overlapping the spoiler and the metal. Start with strips that are about 2" wide, and don't run them more than a couple feet long. Longer will cause them to ripple and not lay down flat. Once you've done all the edges, then come back and rough sand the imperfections. Now put another strip that overlaps the first one on each side. After that's done, you'll repeat step one, and do another down the middle again. I'd repaet this until you get 4-5 layers.
Once you've got all the layers built up, come back with a light disc and shape the glass to get it smooth. Now you're ready to get some fiberglass filler bondo, and apply a thing layer to the entire surface. Sand that smooth, and repeat as needed to get it all blended in.
Properly done, this will still take you several days of work, or more. At least it did for me when I did my old hood, and my flares. The end result will look nice, and last a lot of years, but it's sure not easy, and just bolting one on will be way less work!
I did this same procedure to rebuild my one piece spoiler, so I could add 2" to the height. That was way easier, as it only took a couple days to glass it all in using metal as an extension to the fiberglass.
Last edited by 1971BB427; Dec 2, 2009 at 06:33 PM.

Thread Starter
|
1st Gear Member
Joined: Nov 2009
Posts: 144
From: Redlands, CA
They bolt on, and molding them in properly is extensive. If you're familiar with bonding fiberglass to steel, then it can be done. They look great to some folks, while others hate to see bonded spoilers. I wouldn't do so with a carbon graphite, as there's no reason to spend that kind of money and then cover it with glass and paint. The fiberglass will work better, and be cheaper too.
Several steps to bond glass to steel. First you need to drill and bolt the three pieces to your deck lid and fenders, leaving a slightly larger hole around each mounting point for final adjustment. Once in place, snug the nuts down and close the deck lid. You can then tap and push the pieces around until the gaps and contours fit perfectly. After everything aligns you can tighten the nuts and check it again.
Now mark the edges of all the pieces with a pencil or fine point felt marker. Remove all three pieces and grind all the paint off your spoiler plus a good 3-4" past the marked edges for blending. With everything prepped, mix up some epoxy that has a drying time of at least 30 min., and coat the bottom of the spoiler pieces before attaching them again. Tighten them, and align them again. Once they're done and aligned, let it dry overnight.
Now you need to start laying up fiberglass cloth strips across all the edges, overlapping the spoiler and the metal. Start with strips that are about 2" wide, and don't run them more than a couple feet long. Longer will cause them to ripple and not lay down flat. Once you've done all the edges, then come back and rough sand the imperfections. Now put another strip that overlaps the first one on each side. After that's done, you'll repeat step one, and do another down the middle again. I'd repaet this until you get 4-5 layers.
Once you've got all the layers built up, come back with a light disc and shape the glass to get it smooth. Now you're ready to get some fiberglass filler bondo, and apply a thing layer to the entire surface. Sand that smooth, and repeat as needed to get it all blended in.
Properly done, this will still take you several days of work, or more. At least it did for me when I did my old hood, and my flares. The end result will look nice, and last a lot of years, but it's sure not easy, and just bolting one on will be way less work!
I did this same procedure to rebuild my one piece spoiler, so I could add 2" to the height. That was way easier, as it only took a couple days to glass it all in using metal as an extension to the fiberglass.

Several steps to bond glass to steel. First you need to drill and bolt the three pieces to your deck lid and fenders, leaving a slightly larger hole around each mounting point for final adjustment. Once in place, snug the nuts down and close the deck lid. You can then tap and push the pieces around until the gaps and contours fit perfectly. After everything aligns you can tighten the nuts and check it again.
Now mark the edges of all the pieces with a pencil or fine point felt marker. Remove all three pieces and grind all the paint off your spoiler plus a good 3-4" past the marked edges for blending. With everything prepped, mix up some epoxy that has a drying time of at least 30 min., and coat the bottom of the spoiler pieces before attaching them again. Tighten them, and align them again. Once they're done and aligned, let it dry overnight.
Now you need to start laying up fiberglass cloth strips across all the edges, overlapping the spoiler and the metal. Start with strips that are about 2" wide, and don't run them more than a couple feet long. Longer will cause them to ripple and not lay down flat. Once you've done all the edges, then come back and rough sand the imperfections. Now put another strip that overlaps the first one on each side. After that's done, you'll repeat step one, and do another down the middle again. I'd repaet this until you get 4-5 layers.
Once you've got all the layers built up, come back with a light disc and shape the glass to get it smooth. Now you're ready to get some fiberglass filler bondo, and apply a thing layer to the entire surface. Sand that smooth, and repeat as needed to get it all blended in.
Properly done, this will still take you several days of work, or more. At least it did for me when I did my old hood, and my flares. The end result will look nice, and last a lot of years, but it's sure not easy, and just bolting one on will be way less work!
I did this same procedure to rebuild my one piece spoiler, so I could add 2" to the height. That was way easier, as it only took a couple days to glass it all in using metal as an extension to the fiberglass.
Second Generation Moderator
Feb 2010 ROTM winner
Jan 2013 ROTM winner
Feb 2010 ROTM winner
Jan 2013 ROTM winner
Joined: Aug 2008
Posts: 9,097
From: Portland, Or
ROTM Winner's Club
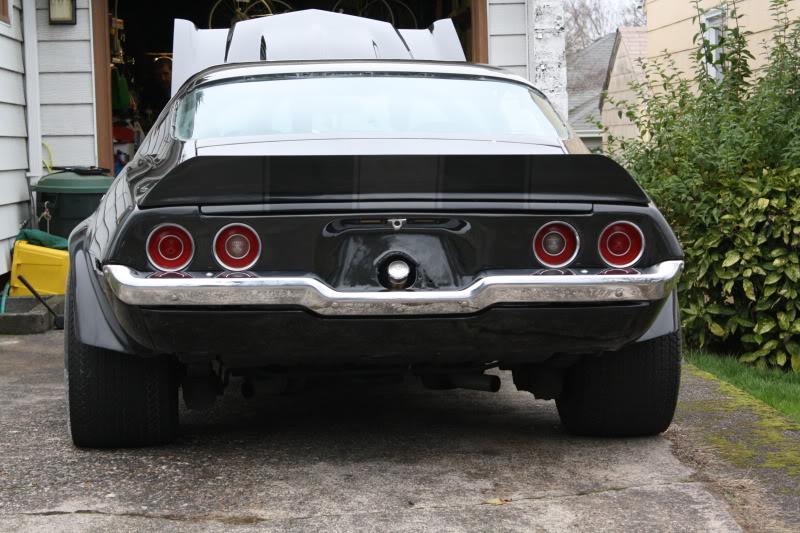
My hood is a 3" steel OER part. I don't have my spoiler glassed in, as can be seen in the attached picture. No way to really glass in a one piece, as they overlap the fenders, so the trunk lid wouldn't open if glassed in.
I don't have a good picture of the front edge of the spoiler, and it's covered up in the garage. If I get it outside Fri. or Sat. to install the door glass I'll try to get another picture.
This picture shows a bit of a side view from before it was painted:
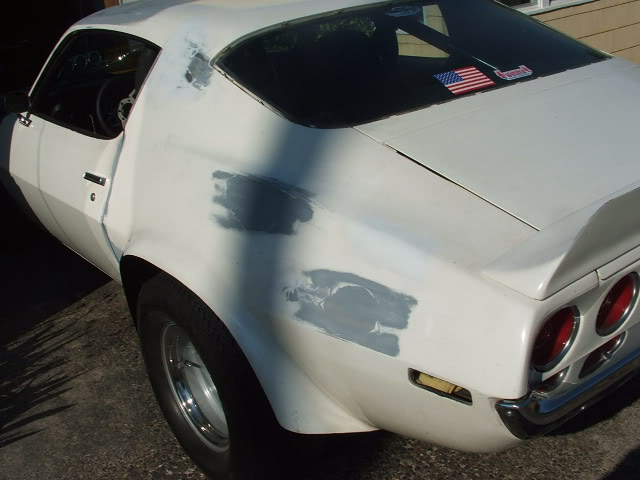
You can also see that I did glass my flares in, so they have no visable seam. I used the same procedure for them. It's a ton of work to get these add on pieces smooth and flawless.
I don't have a good picture of the front edge of the spoiler, and it's covered up in the garage. If I get it outside Fri. or Sat. to install the door glass I'll try to get another picture.
This picture shows a bit of a side view from before it was painted:
You can also see that I did glass my flares in, so they have no visable seam. I used the same procedure for them. It's a ton of work to get these add on pieces smooth and flawless.
Thread Starter
|
1st Gear Member
Joined: Nov 2009
Posts: 144
From: Redlands, CA
My hood is a 3" steel OER part. I don't have my spoiler glassed in, as can be seen in the attached picture. No way to really glass in a one piece, as they overlap the fenders, so the trunk lid wouldn't open if glassed in.
I don't have a good picture of the front edge of the spoiler, and it's covered up in the garage. If I get it outside Fri. or Sat. to install the door glass I'll try to get another picture.
This picture shows a bit of a side view from before it was painted:

You can also see that I did glass my flares in, so they have no visable seam. I used the same procedure for them. It's a ton of work to get these add on pieces smooth and flawless.
I don't have a good picture of the front edge of the spoiler, and it's covered up in the garage. If I get it outside Fri. or Sat. to install the door glass I'll try to get another picture.
This picture shows a bit of a side view from before it was painted:
You can also see that I did glass my flares in, so they have no visable seam. I used the same procedure for them. It's a ton of work to get these add on pieces smooth and flawless.
I really like your hood, especially since it is actually is steel. Did you get it on that site you sent me the link for earlier? For my fender flares, I'm actually going to have my body guy fix them and make them out of sheet metal so I don't have the same issue with them cracking, plus it'll reduce the risk of it chipping if anything gets kicked up by the rear tires.
Second Generation Moderator
Feb 2010 ROTM winner
Jan 2013 ROTM winner
Feb 2010 ROTM winner
Jan 2013 ROTM winner
Joined: Aug 2008
Posts: 9,097
From: Portland, Or
ROTM Winner's Club
Couple things. If your body guy thinks the flares or spoiler can't be fixed to prevent cracking, then get another body guy. My flares, spoiler, and the hood I just replaced; all were done about 30 yrs. ago, and none of them have cracked.
I'm no body and fender guy, so if I can make them stay in place then anyone can. All of these were fiberglass mated to steel, so it can be succesfully done. I did originally (in 1975) have a Bill Jenkins hood scoop that was plastic bonded to my hood. No matter what I did the scoop kept cracking because I couldn't find a suitable material that bonds to plastic and steel. I finally went to a snorkel scoop just rivetted to the hood and painted to match.
Once I changed the intake from an extreme high rise to the present EdelbrockTorker I was able to install the L88 style cowl and glass it in. No more issues after that.
I still wouldn't do a spoiler, as they take a pretty good shot everytime you close the trunk lid. So I'd go with a bolt on and leave it alone too. As for steel flares, they take a lot of handwork to look good. I've seen a lot of steel hand built flares, but very few looked professional and clean.
My OER hood came from Super Chevy Store about 6 blocks from my house. I think Biscay's sells Goodmark, which are similar, but only 2" raised, not 3". OER is the only company making a 3" steel cowl hood. I needed every inch of rise, as my aircleaner sits about 1/2" from the raised section, and that's with the thinnest element I could find.
I'm no body and fender guy, so if I can make them stay in place then anyone can. All of these were fiberglass mated to steel, so it can be succesfully done. I did originally (in 1975) have a Bill Jenkins hood scoop that was plastic bonded to my hood. No matter what I did the scoop kept cracking because I couldn't find a suitable material that bonds to plastic and steel. I finally went to a snorkel scoop just rivetted to the hood and painted to match.
Once I changed the intake from an extreme high rise to the present EdelbrockTorker I was able to install the L88 style cowl and glass it in. No more issues after that.
I still wouldn't do a spoiler, as they take a pretty good shot everytime you close the trunk lid. So I'd go with a bolt on and leave it alone too. As for steel flares, they take a lot of handwork to look good. I've seen a lot of steel hand built flares, but very few looked professional and clean.
My OER hood came from Super Chevy Store about 6 blocks from my house. I think Biscay's sells Goodmark, which are similar, but only 2" raised, not 3". OER is the only company making a 3" steel cowl hood. I needed every inch of rise, as my aircleaner sits about 1/2" from the raised section, and that's with the thinnest element I could find.
Last edited by 1971BB427; Dec 3, 2009 at 10:24 PM.