Subframe tie-in project
#11
 07-17-2009, 02:11 PM

Just picked up the parts from Victory Circle - the crossbar with two 90* bends, and notched, the lower hoop braces with notches, and ten roll cage gussets. All for less than $38. Can't beat that, notched, bent, custom ordered, one day service.
Last edited by hkunz; 07-19-2009 at 12:10 PM.
#12
07-20-2009, 09:07 PM
My new seats came in, power, leather, red, out of a 93 Vette.

The lower hoop brace in place - still needs to be angle cut on bottom.
 The notched end fits nicely onto the main hoop.

The crossbar extends across the interior.

Not much work done recently, the outside temps are dropping into the high 90's at night....
The lower hoop brace in place - still needs to be angle cut on bottom.
The notched end fits nicely onto the main hoop.The crossbar extends across the interior.
Not much work done recently, the outside temps are dropping into the high 90's at night....
#14
07-26-2009, 10:20 AM
The controller has two lines in, B+ and ground, so that was easy. There are two plugs out of it - one for each seat. Then the seats themselves have a two wire plug, I am assuming again B+ and ground. The seats seem to have an air pump, maybe for lumbar support, and possibly a seat heater. I got a Corvette C4 service manual on eBay, it should be here this week.
The seat base in mock-up position. I had to figure out which way was front.

The controller. I'm holding one of the seat connectors in my fingers, and the main power in connector is in my palm. I still have to mount the controller switch assembly when I get done fabricating. I tried taking it apart, but it seems to be a circuit board in there, so I may not want to do that. I may leave that for my interior guy - I am not an upholstery guru

The two wire connector in the seat itself. You can also see the pump with three hoses, an extra switch I think is for the seat heater, and the seat recline lever. My C6 also has full power seats, but the recline is manual with a lever similar to this.

Wires and air lines under the seat itself.

The seat track. I figured out which was up and which was front by trying to bolt these two together. GM did make it so that they only went one way, and if you can't tell which part of the seat is up and front, I'm sorry for your loss.

The seat base in mock-up position. I had to figure out which way was front.
The controller. I'm holding one of the seat connectors in my fingers, and the main power in connector is in my palm. I still have to mount the controller switch assembly when I get done fabricating. I tried taking it apart, but it seems to be a circuit board in there, so I may not want to do that. I may leave that for my interior guy - I am not an upholstery guru
The two wire connector in the seat itself. You can also see the pump with three hoses, an extra switch I think is for the seat heater, and the seat recline lever. My C6 also has full power seats, but the recline is manual with a lever similar to this.
Wires and air lines under the seat itself.
The seat track. I figured out which was up and which was front by trying to bolt these two together. GM did make it so that they only went one way, and if you can't tell which part of the seat is up and front, I'm sorry for your loss.
#15
07-26-2009, 10:23 AM
For those wondering why seats are in a subframe thread - they all tie together. The seats dictate where the crossbar goes - I can't finish the subframe tie in without installing the seats, at least for mock-up.
#16
07-26-2009, 04:18 PM
More of the cage work.
The lower hoop brace tacked in place. These fit so sweetly with those notches from Victory Circle....
The old seat mount is still welded in at this point.

The driver side lower hoop brace tacked in place. I put a very slight rearward angle so the lower end would land on the plates I built last week.

The crossbar tacked in place. Note that it intersects the lower hoop brace at the center of its landing area. That height is directly behind my shoulders while sitting in the seat at its lowest position. If I move the seat up with the adjustments, the shoulder belt mounts will still be less than 4" below my shoulders.

Seat mounts fabricated and burned in. The seats are in the lowest position, and fit nice with this location. I did consider tying into the lower hoop braces somehow, but it really seemed like overkill. That said, I'm still considering a cross bar from the bottom of the hoop to the lower hoop braces, then across to the other side to provide a complete loop around me.
One of the front seat mounts is stock original, the other right next tothe original mount hole.

The lower hoop brace tacked in place. These fit so sweetly with those notches from Victory Circle....
The old seat mount is still welded in at this point.
The driver side lower hoop brace tacked in place. I put a very slight rearward angle so the lower end would land on the plates I built last week.
The crossbar tacked in place. Note that it intersects the lower hoop brace at the center of its landing area. That height is directly behind my shoulders while sitting in the seat at its lowest position. If I move the seat up with the adjustments, the shoulder belt mounts will still be less than 4" below my shoulders.
Seat mounts fabricated and burned in. The seats are in the lowest position, and fit nice with this location. I did consider tying into the lower hoop braces somehow, but it really seemed like overkill. That said, I'm still considering a cross bar from the bottom of the hoop to the lower hoop braces, then across to the other side to provide a complete loop around me.
One of the front seat mounts is stock original, the other right next tothe original mount hole.
#17
07-26-2009, 06:52 PM
More seat pictures.
The bottom taken out. Here you can see the heater wires and the air pump and hoses.

Another view from further away.

Seat installed in the full forward position.

Fully reclined. Doesn't hit the crossbar even when all the way back.

The colors match nicely.

The bottom taken out. Here you can see the heater wires and the air pump and hoses.
Another view from further away.
Seat installed in the full forward position.
Fully reclined. Doesn't hit the crossbar even when all the way back.
The colors match nicely.
#18
07-27-2009, 12:16 AM
I worked all morning and only got one tube put in. Of course, I had to build a landing site for it first, and notch it with a cheap notcher from China Freight...
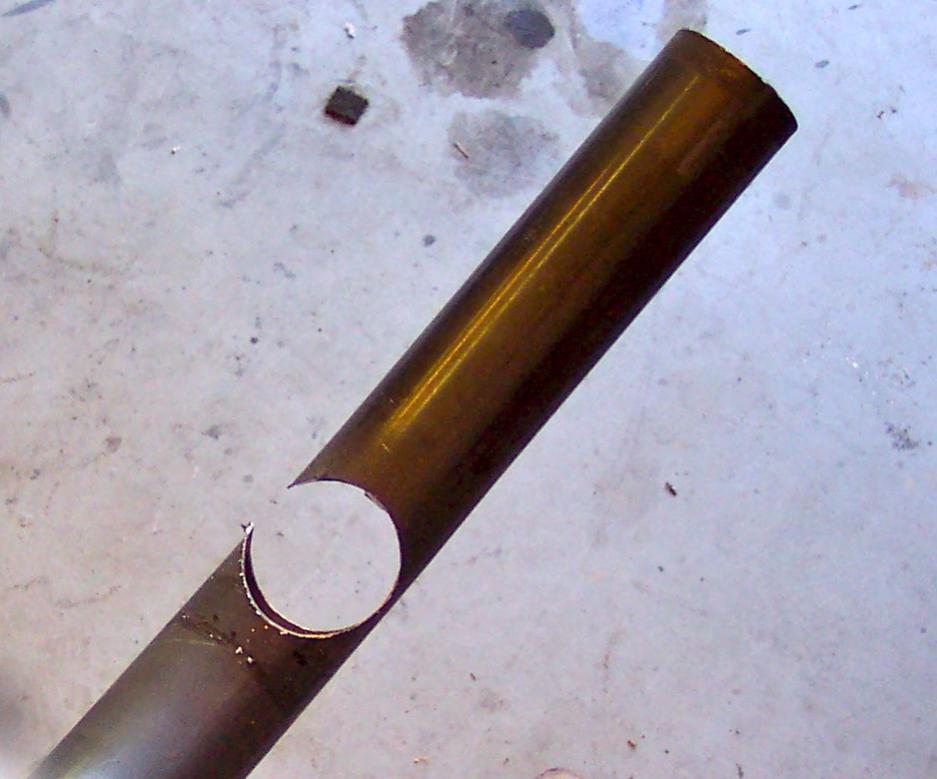
I thought this shot was kind of cool - the notcher drilled right through the tube. This is the upper end of the door bar.
The door bar before I knocked the extra off.

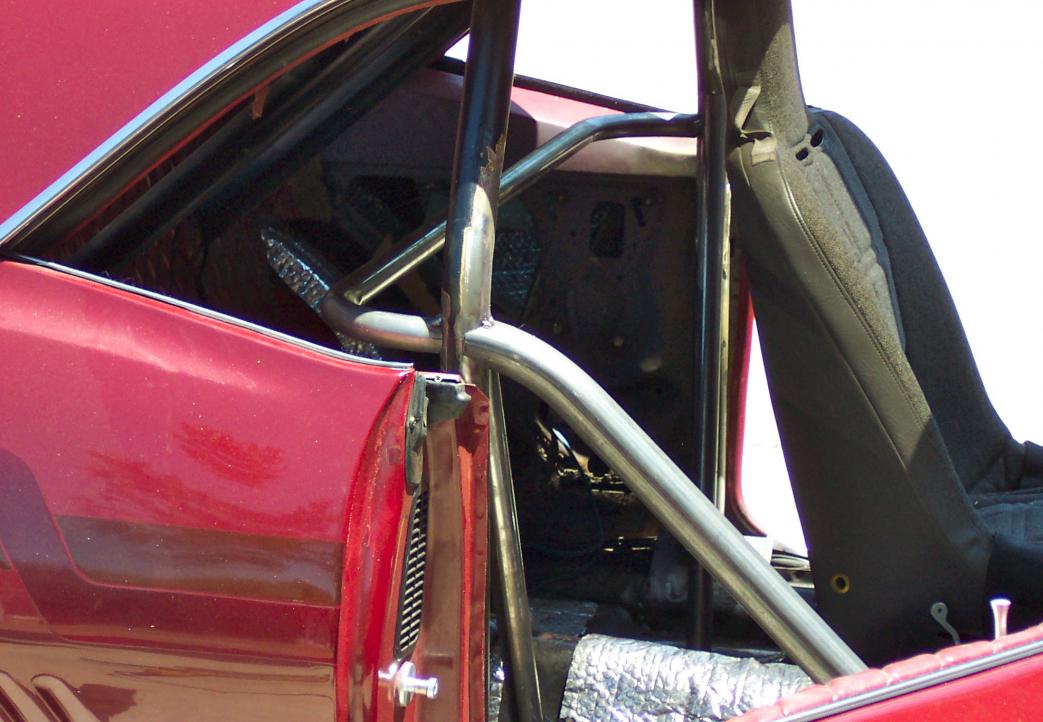
The sidebar/doorbar tube tacked in place. I had to do a lot of floorboard work before I could put it in.

Here you can see down into the floorboard. That is the subframe you can see through the removed floorboard. Floorboards are made of honeycomb aluminum, very light, and very stiff. This came from a decommissioned helicopter bulkhead.
The doorbar clears the door hardware, and is a finger's width from the inner door panels. This should let my interior guy work his magic without too much interference. Oh, and it clears the seat well, too.

The tubes all hit at the same spot, called "nodes" in rock crawler cages.
I thought this shot was kind of cool - the notcher drilled right through the tube. This is the upper end of the door bar.
The door bar before I knocked the extra off.
The sidebar/doorbar tube tacked in place. I had to do a lot of floorboard work before I could put it in.
Here you can see down into the floorboard. That is the subframe you can see through the removed floorboard. Floorboards are made of honeycomb aluminum, very light, and very stiff. This came from a decommissioned helicopter bulkhead.
The doorbar clears the door hardware, and is a finger's width from the inner door panels. This should let my interior guy work his magic without too much interference. Oh, and it clears the seat well, too.
The tubes all hit at the same spot, called "nodes" in rock crawler cages.
#19
07-28-2009, 02:58 PM
Inside view of the door bar. The landing site on the rocker needed plating. That is indeed the garage floor you can see under the rocker.

The landing site. I had to extend the rocker plate forward as the end of the new tube is forward of the old tube.

The tube intersecting the plates. I had to repair old burn-through holes from the stick welder days, circa 1981.

The stereo, fuel pump, battery, and other cables had to be moved out of the way during welding.

The landing site. I had to extend the rocker plate forward as the end of the new tube is forward of the old tube.
The tube intersecting the plates. I had to repair old burn-through holes from the stick welder days, circa 1981.
The stereo, fuel pump, battery, and other cables had to be moved out of the way during welding.
#20
08-02-2009, 12:39 AM
I did so much welding today that I got a sunburn on my chest - and I was wearing a shirt
I burned in the rest of the cage after I built the driver's seat mounts. I realized after I cleaned up that I forgot to do the gussets, but they won't take long tomorrow.
The wiring rig I adapted into the seat controller. I'm now using an extra battery to run the seats, at least until I can get the wiring completed to the car battery.

The two seat bases, one in the "up" position, one in the "down". There is quite a bit of travel on these seat bases. Each end goes up and down independently, so you can rock the seat forward and back. Each of the three motors you see does a different thing - the motors closest to the ends move that end up and down, and the center motor moves the seat fore and aft.

The new driver seat mounts - way nicer than the old stick welded booty-fab mounts I had before. When I built my rock crawler I learned a lot about fabrication, and that has served me well on this project.

I burned in the rest of the cage after I built the driver's seat mounts. I realized after I cleaned up that I forgot to do the gussets, but they won't take long tomorrow.
The wiring rig I adapted into the seat controller. I'm now using an extra battery to run the seats, at least until I can get the wiring completed to the car battery.
The two seat bases, one in the "up" position, one in the "down". There is quite a bit of travel on these seat bases. Each end goes up and down independently, so you can rock the seat forward and back. Each of the three motors you see does a different thing - the motors closest to the ends move that end up and down, and the center motor moves the seat fore and aft.
The new driver seat mounts - way nicer than the old stick welded booty-fab mounts I had before. When I built my rock crawler I learned a lot about fabrication, and that has served me well on this project.