93-97 Z28 Longtube Header Install Writeup
#1
 07-28-2009, 01:13 PM


Hey guys,
I just got done getting my tail whooped by this install today and figured I'd try to help some other people who want to tackle this install. Anyway, I took some pictures along the way, not as many as I'd like, but maybe it will help.
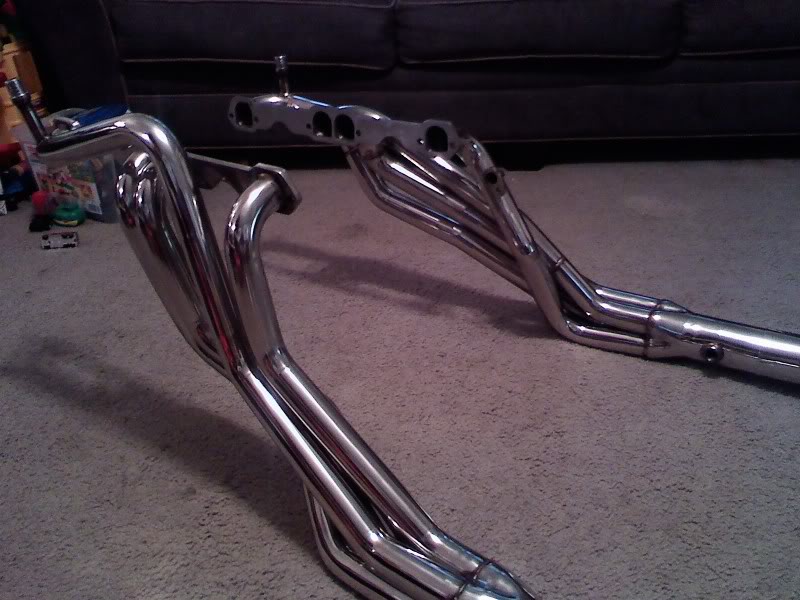
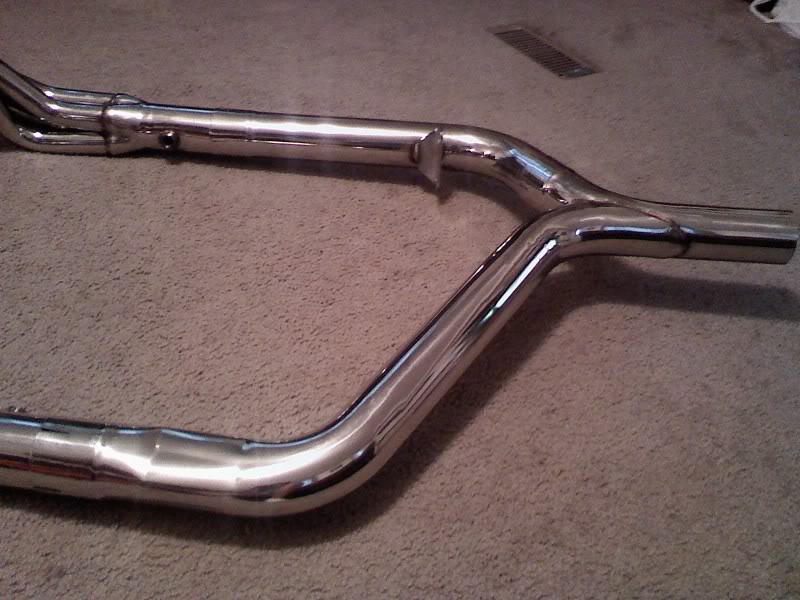
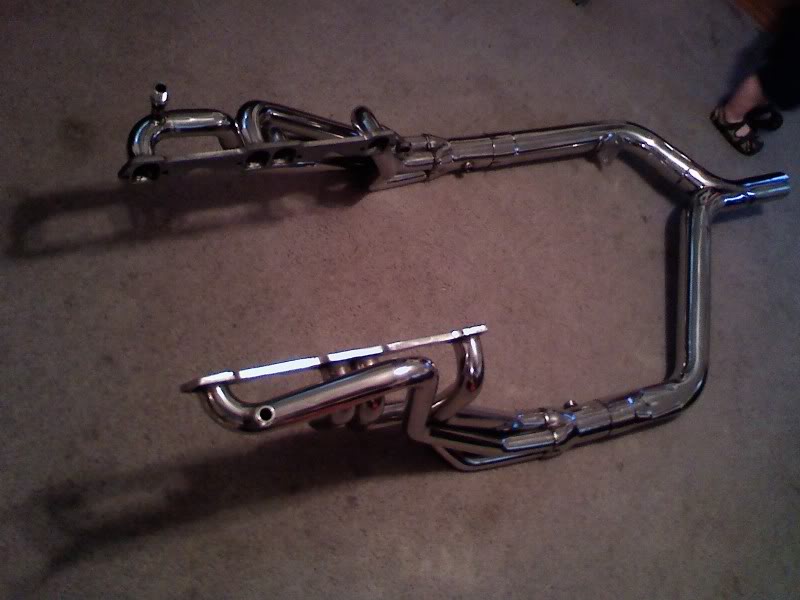
To begin, I bought the ebay headers for a 93-97 LT1(seller eworldsales1). Got them for $399 shipped with an ory(offroad y-pipe) and gaskets. These headers actually work for 94-97 with no modifications. The 93 model LT1 has different EGR and AIR connections so if you order these you will have to do some modifying such as plugging up parts on the headers and removing your EGR/AIR systems. They really don't do anything important other than recirculating air/exhaust through the intake.
Anyway, the headers are of good quality, and I am please with the purchase. Here are some pics:
This is a very involved process, and you should make sure you have plenty of time and patience before you begin. It took me about a total of 16 working hours(including breaks due to the 92 degree heat).
1. Disconnect your ground cable on your battery.
2. I'm not sure if you would have to, but I took off my air intake(I replaced it with a K&N).
3. Get your jack and jackstands ready and jack up the front end to where you can crawl under it easily as you will be making many, many trips underneath.
4. Crawl under the front and take tension off your serpentine belt by ratcheting the idler arm down and pulling the belt off of it.
5. Unbolt and remove the alternator. It has 4 bolts and an arm that connects to the exhaust manifold. Also an electrical plugin and a power wire that is bolted to it.
6. Crawl underneath with a 15mm ratchet and long extension. Remove the starter.
7. Now back up top to take off the AIR and EGR components. I found it easier to leave the AIR connected to the manifold and just take apart the rubber elbow. The EGR will have to be unscewed from the manifold.
8. I left my passenger side O2 sensor in until I removed the manifold, but took out the driver side sensor. You could do it either way, but note that you can unplug the wires. On the 93 model, the O2 sensor is only 1 wire, I believe 94-97 is 4 wires.
9. Now onto your stock ypipe. If you are replacing it, you can just cut it up with a saw. If not, there are 3 bolts holding each side on. Spray plenty of lube on them and go to work. Make sure you have a very long extension for these. I believe these are either 9/16 or 15mm. If you are putting on an ory, go ahead and cut your exhaust downstream so you can pull out the old y-pipe and cat.
10. You can now begin taking off the exhaust manifolds. These are a huge pain as you have to squeeze your arm and body into some awkward positions. You will need a 9/16 wrench, ratchet, multiple extensions, and plenty of muscle/cussing/brainstorming.
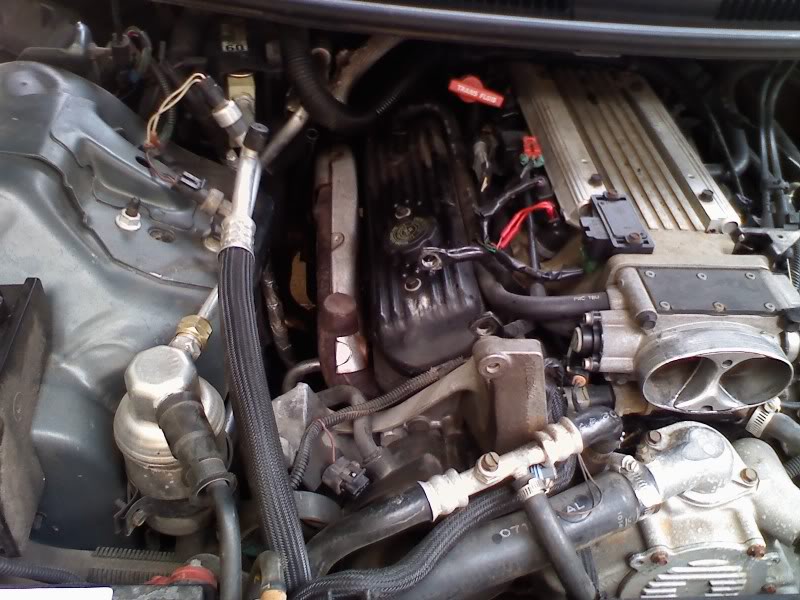
You should be looking like this now:

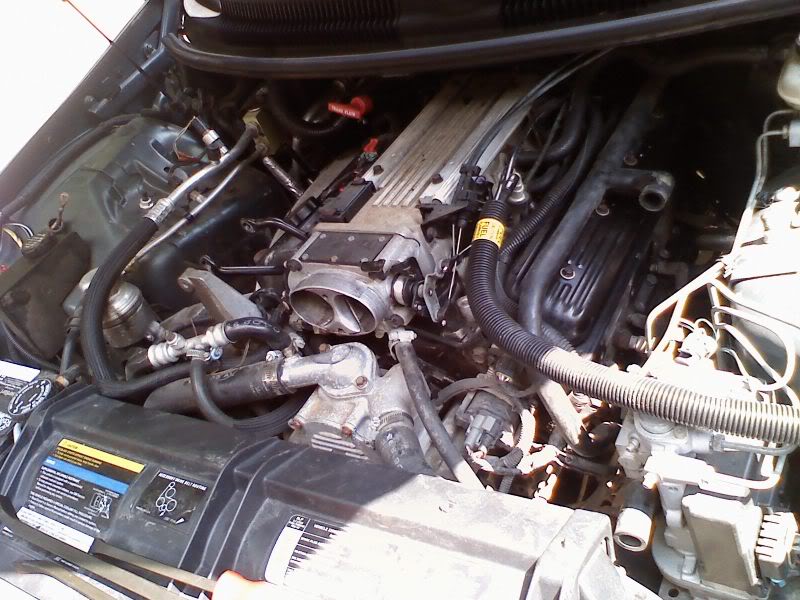
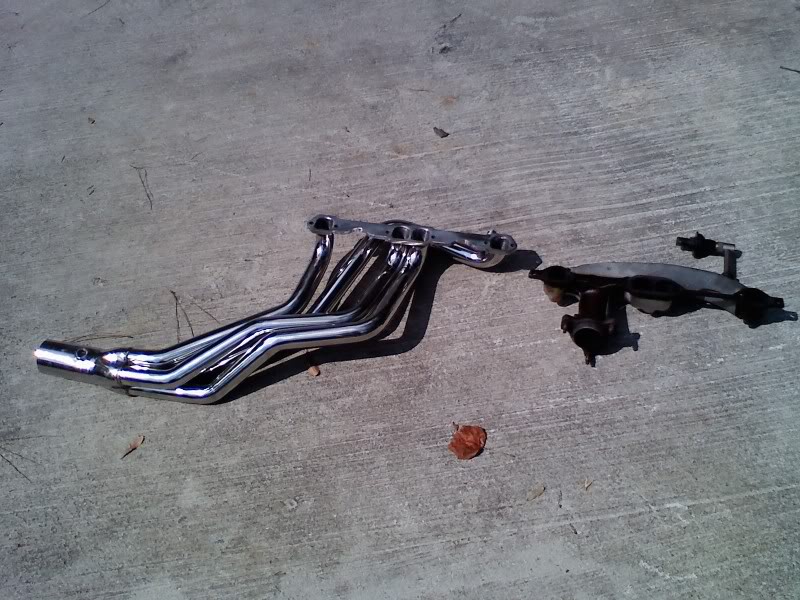
Here's the difference between the stock manifolds and the long tubes:
Now, you need to start preparing to put in the longtubes.
I took out the 3 rear spark plugs on both sides. (Some may have to take out the oil pressure sensor but I didn't)
Take a 9/16 socket and disconnect the steering column from the knuckle. I needed a prybar to separate it.
The driver side header should drop in easily from the top. Make sure you have your gaskets correct left from right and begin to install it. Work from the middle out and be careful not to strip out the holes. This is probably what took me the longest as mine did not want to line up good. I ended up taking my floor jack and positioning it under the bottom of the collector so I wouldn't have to hold up the header while trying to bolt it on.
The passenger side is a tight fit. If you can get the car up high enough, I was told it would slide in from the bottom. I couldn't get this to work, so I unbolted the motor mount from the block(3 15mm bolts). Jack up the motor a little and it will slide in from the top.
Bolt in the header and you're ready to start putting it all back together.
Things to remember during reassembly:
Starter and wiring
Alternator and wiring
Spark plugs/wiring(correct order)
O2 sensors/wiring(the wiring will need to be lengthened or extensions purchased)
Steering column
Air intake
I am currently just running the headers until I get to town to get my muffler shop to put on my ory. I believe I'm gonna have them weld it in as I don't plan on going back to stock. Hope this helps someone out there as I would have loved to have come across this before I started.
I just got done getting my tail whooped by this install today and figured I'd try to help some other people who want to tackle this install. Anyway, I took some pictures along the way, not as many as I'd like, but maybe it will help.
To begin, I bought the ebay headers for a 93-97 LT1(seller eworldsales1). Got them for $399 shipped with an ory(offroad y-pipe) and gaskets. These headers actually work for 94-97 with no modifications. The 93 model LT1 has different EGR and AIR connections so if you order these you will have to do some modifying such as plugging up parts on the headers and removing your EGR/AIR systems. They really don't do anything important other than recirculating air/exhaust through the intake.
Anyway, the headers are of good quality, and I am please with the purchase. Here are some pics:
This is a very involved process, and you should make sure you have plenty of time and patience before you begin. It took me about a total of 16 working hours(including breaks due to the 92 degree heat).
1. Disconnect your ground cable on your battery.
2. I'm not sure if you would have to, but I took off my air intake(I replaced it with a K&N).
3. Get your jack and jackstands ready and jack up the front end to where you can crawl under it easily as you will be making many, many trips underneath.
4. Crawl under the front and take tension off your serpentine belt by ratcheting the idler arm down and pulling the belt off of it.
5. Unbolt and remove the alternator. It has 4 bolts and an arm that connects to the exhaust manifold. Also an electrical plugin and a power wire that is bolted to it.
6. Crawl underneath with a 15mm ratchet and long extension. Remove the starter.
7. Now back up top to take off the AIR and EGR components. I found it easier to leave the AIR connected to the manifold and just take apart the rubber elbow. The EGR will have to be unscewed from the manifold.
8. I left my passenger side O2 sensor in until I removed the manifold, but took out the driver side sensor. You could do it either way, but note that you can unplug the wires. On the 93 model, the O2 sensor is only 1 wire, I believe 94-97 is 4 wires.
9. Now onto your stock ypipe. If you are replacing it, you can just cut it up with a saw. If not, there are 3 bolts holding each side on. Spray plenty of lube on them and go to work. Make sure you have a very long extension for these. I believe these are either 9/16 or 15mm. If you are putting on an ory, go ahead and cut your exhaust downstream so you can pull out the old y-pipe and cat.
10. You can now begin taking off the exhaust manifolds. These are a huge pain as you have to squeeze your arm and body into some awkward positions. You will need a 9/16 wrench, ratchet, multiple extensions, and plenty of muscle/cussing/brainstorming.
You should be looking like this now:
Here's the difference between the stock manifolds and the long tubes:
Now, you need to start preparing to put in the longtubes.
I took out the 3 rear spark plugs on both sides. (Some may have to take out the oil pressure sensor but I didn't)
Take a 9/16 socket and disconnect the steering column from the knuckle. I needed a prybar to separate it.
The driver side header should drop in easily from the top. Make sure you have your gaskets correct left from right and begin to install it. Work from the middle out and be careful not to strip out the holes. This is probably what took me the longest as mine did not want to line up good. I ended up taking my floor jack and positioning it under the bottom of the collector so I wouldn't have to hold up the header while trying to bolt it on.
The passenger side is a tight fit. If you can get the car up high enough, I was told it would slide in from the bottom. I couldn't get this to work, so I unbolted the motor mount from the block(3 15mm bolts). Jack up the motor a little and it will slide in from the top.
Bolt in the header and you're ready to start putting it all back together.
Things to remember during reassembly:
Starter and wiring
Alternator and wiring
Spark plugs/wiring(correct order)
O2 sensors/wiring(the wiring will need to be lengthened or extensions purchased)
Steering column
Air intake
I am currently just running the headers until I get to town to get my muffler shop to put on my ory. I believe I'm gonna have them weld it in as I don't plan on going back to stock. Hope this helps someone out there as I would have loved to have come across this before I started.


#4
07-28-2009, 08:46 PM


Join Date: Mar 2009
Location: Tokeland, Washington
Posts: 21,671
#5
07-28-2009, 10:38 PM
#6
07-29-2009, 08:32 AM
i had a really good one for when i did mine and i can't remember where i got it. but either way, that's a nice write up!
#7
07-29-2009, 11:47 AM

good write up but you may wish to edit it
for the motor mounts, you only need to remove the 1 long bolt (not the 3 that you did), place a block of wood under the oil pan and jack it up, shove the engine over and the passenger header drops right in from the top.
for the motor mounts, you only need to remove the 1 long bolt (not the 3 that you did), place a block of wood under the oil pan and jack it up, shove the engine over and the passenger header drops right in from the top.
#8
07-29-2009, 01:46 PM

Torque, that depends on the brand of header, there's no way my Kooks would have fit in from the top unless the motor was out of the car...You can get any of them in from the bottom though.
To the OP: Good guide, do you mind if we move it to the tech submissions part of our forum for further review by the staff so it can be in the running to become a stickied guide?
To the OP: Good guide, do you mind if we move it to the tech submissions part of our forum for further review by the staff so it can be in the running to become a stickied guide?
#9
07-29-2009, 07:14 PM
95slvrz28, that sounds fine with me.
As for jacking up the motor, I tried jacking up by the oil pan, but was afraid of crushing it. So I found a long piece of wood and jacked up the front of the engine. I took out the three bolts as they were easy to get to and also didn't require me to do any yoga to get two ratchets in there at once. But, to each their own. This is just an "overview" unless you install these type headers. Each style will need their own "techniques" to install. Thanks for the compliments guys...
As for jacking up the motor, I tried jacking up by the oil pan, but was afraid of crushing it. So I found a long piece of wood and jacked up the front of the engine. I took out the three bolts as they were easy to get to and also didn't require me to do any yoga to get two ratchets in there at once. But, to each their own. This is just an "overview" unless you install these type headers. Each style will need their own "techniques" to install. Thanks for the compliments guys...
#10
07-30-2009, 08:51 AM
perhaps with a manny tranny
or on a service lift so the headers could be aimed straight down
maybe we can help others in the future by being specific
example: pacesetters- unless you have a service lift, for the pasenger side just jack the motor and in they go from the top; for drivers side, don't fight it, disconnect the steering shaft