Test-N-Tune, X half a dozen!
#131
 05-13-2018, 06:07 PM


Fuse Box Relocate.
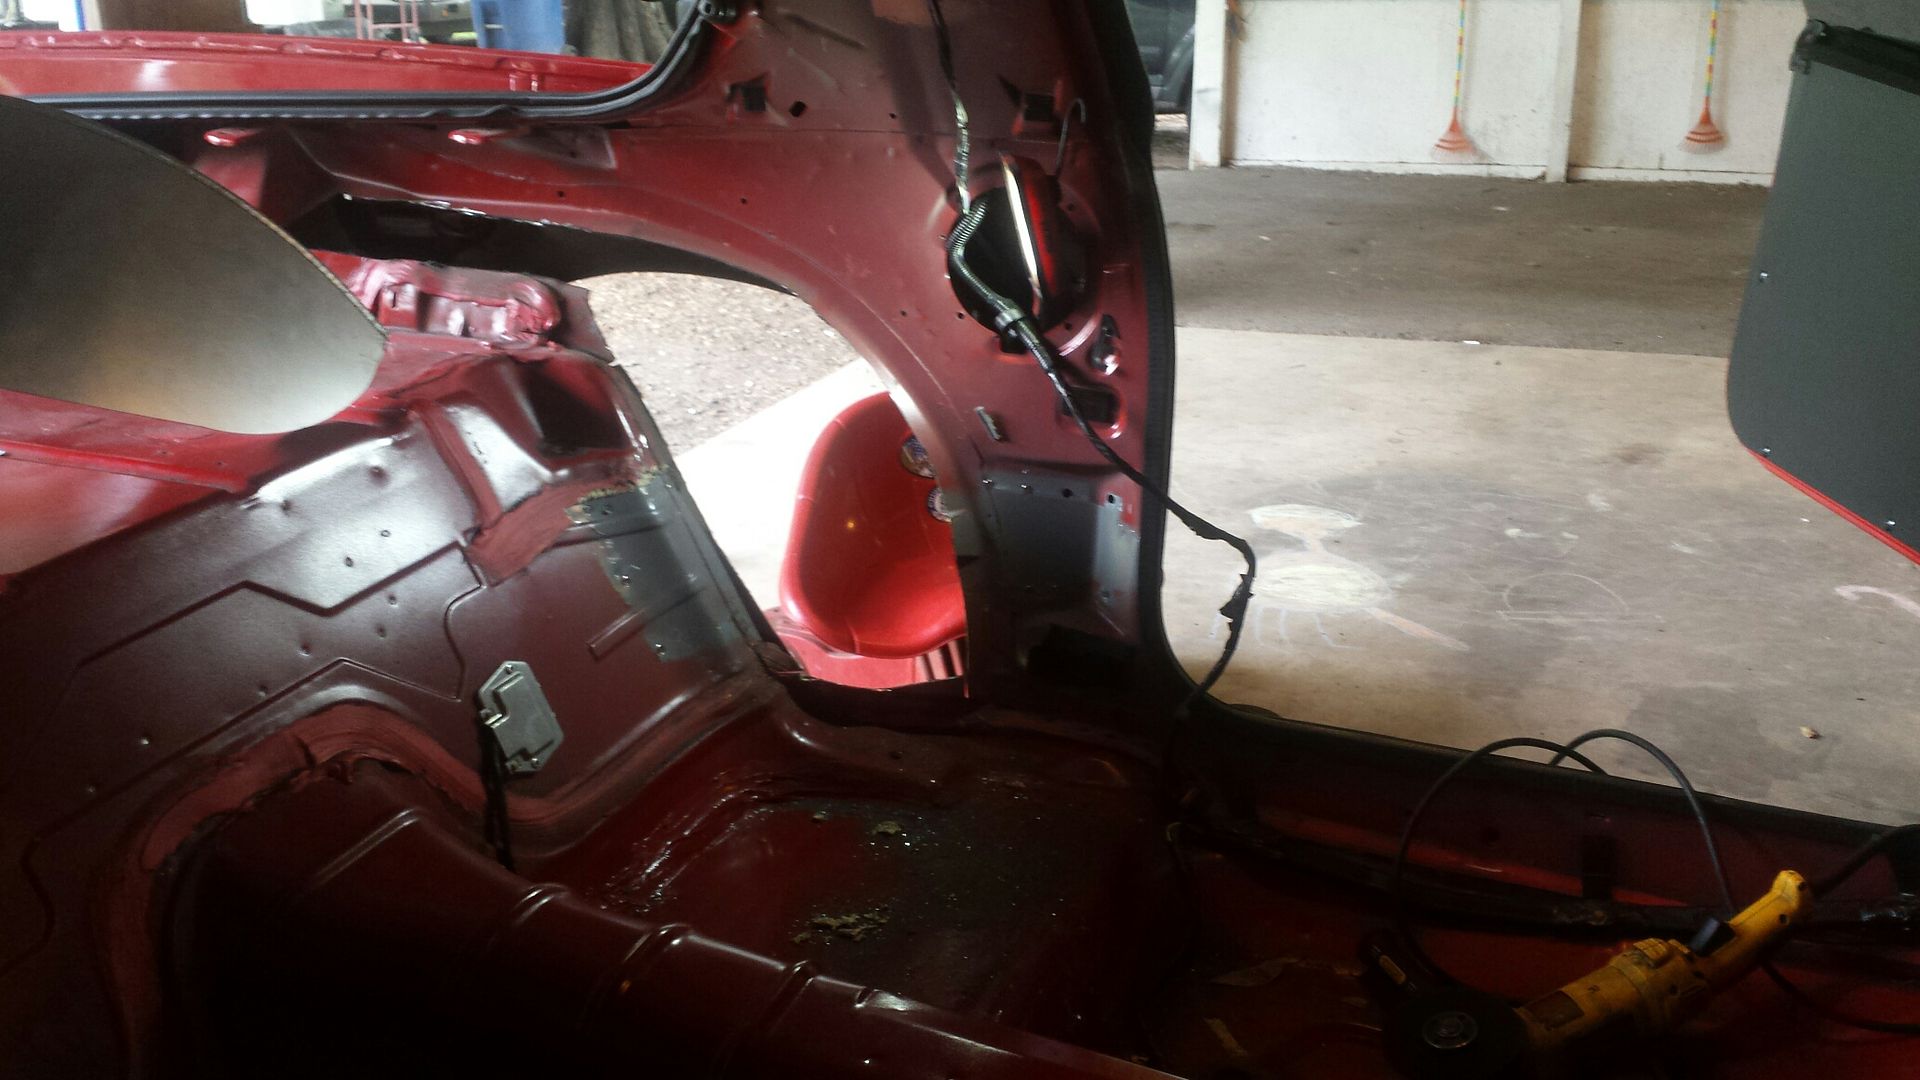
First let me say I have 3 afternoons tied up in this. It was not difficult but slow. You will strip every piece of loom and electrical tape off the car so be prepared for sticking fingers and a mess to clean up. Let me also add that I've already removed some audio wiring in the past. There are almost NO wires needing to be altered. You'll see by the end.
First, strip the car, and cut off every plug of the things you do not want/need. I plan to keep all lights, power windows and locks, and electric hatch release. The plugs that were cut were, daytime running lights (module), power driver seat, wipers, washer fluid motor, fog lights, all AC, all audio, all airbags, power mirrors, ABS, traction control, defroster, horn, all emissions, basically if it doesnt run the car, its gone.
Strip it. Mine needed to come out for a cage so it was perfect timing.
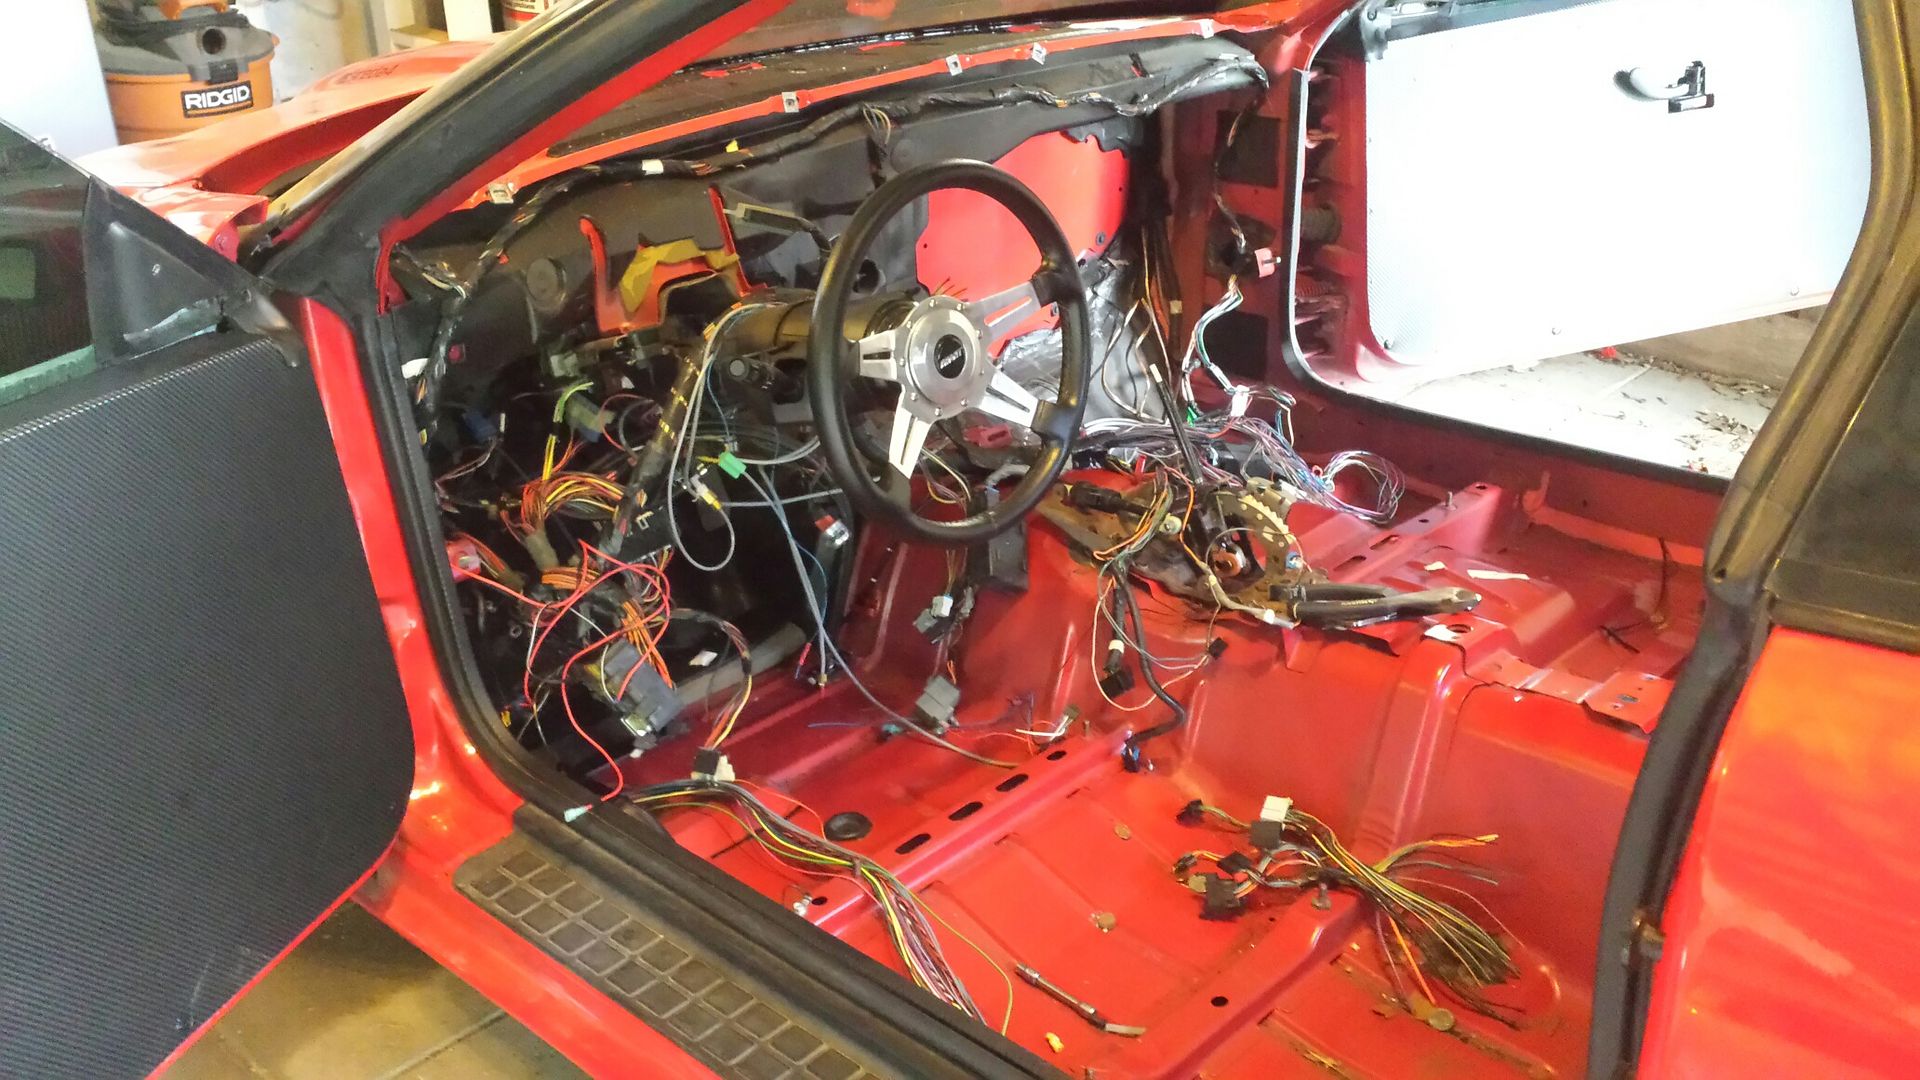
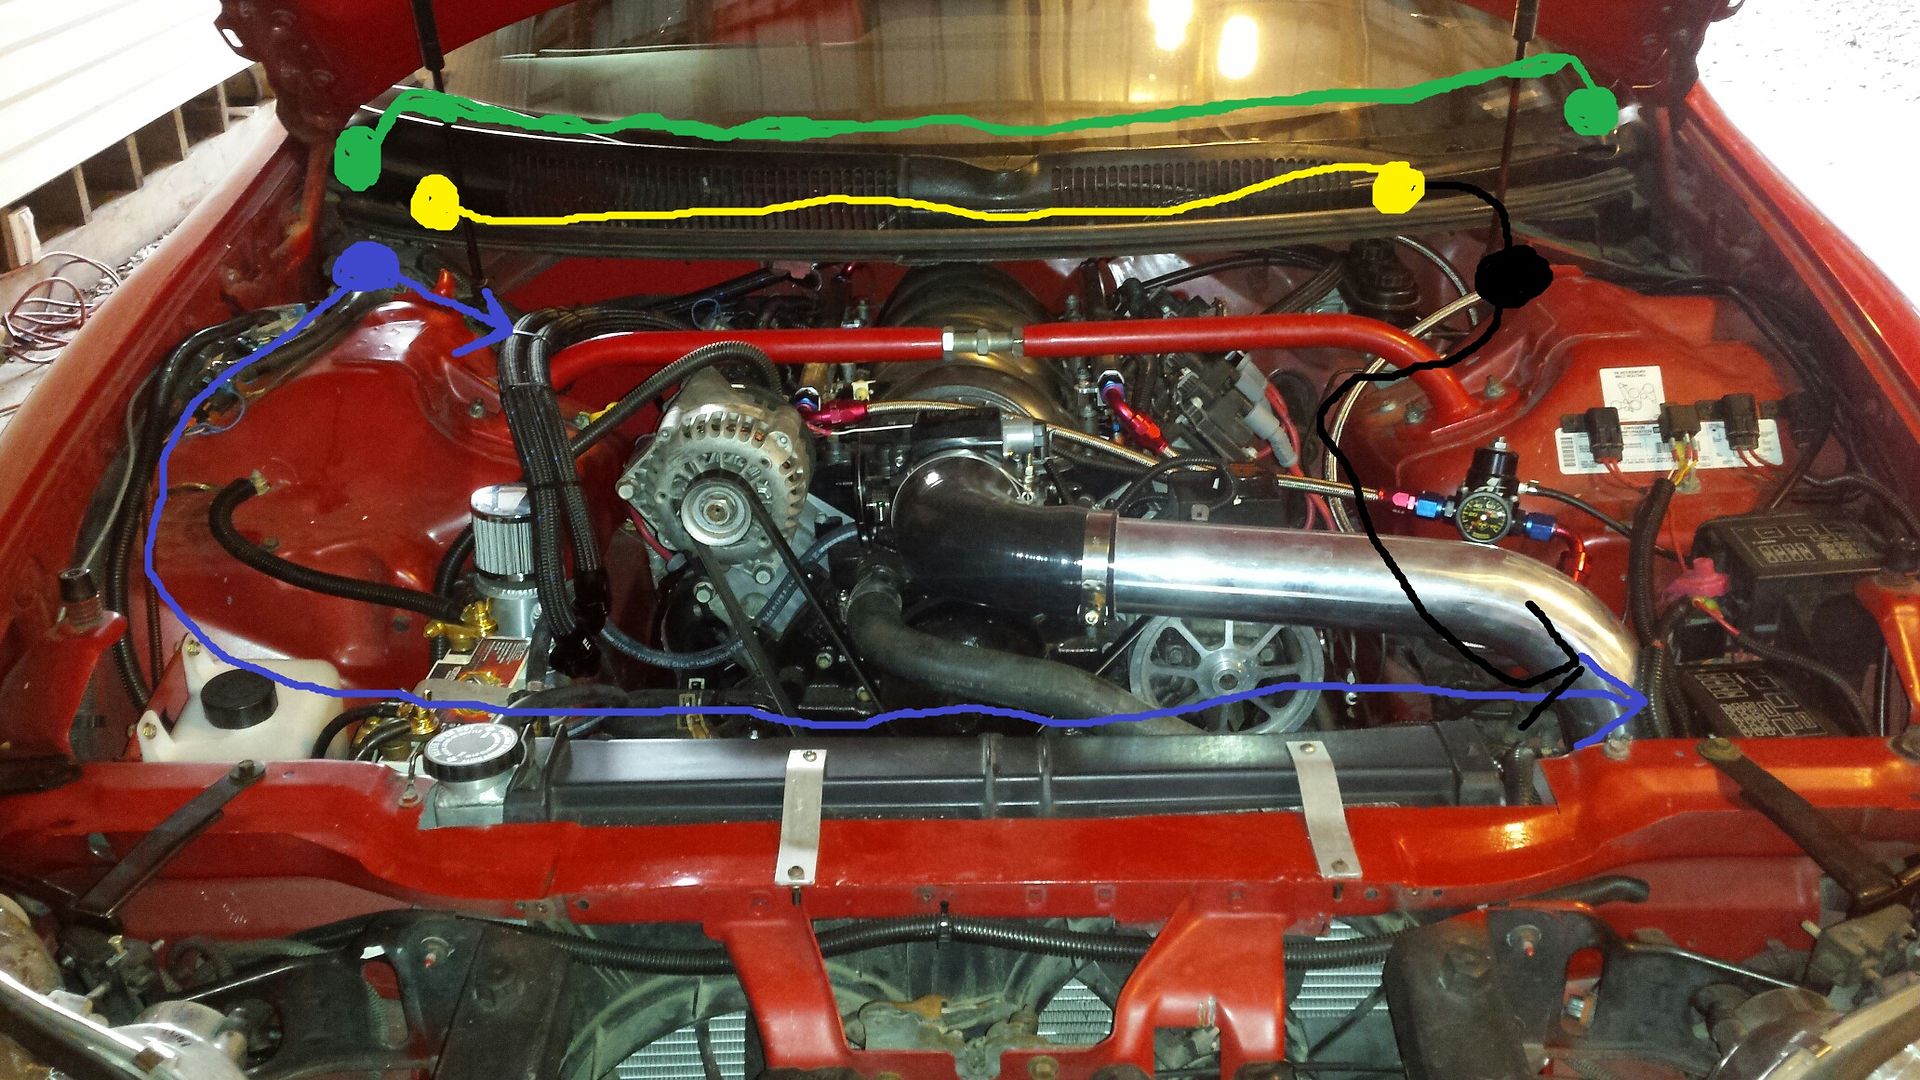
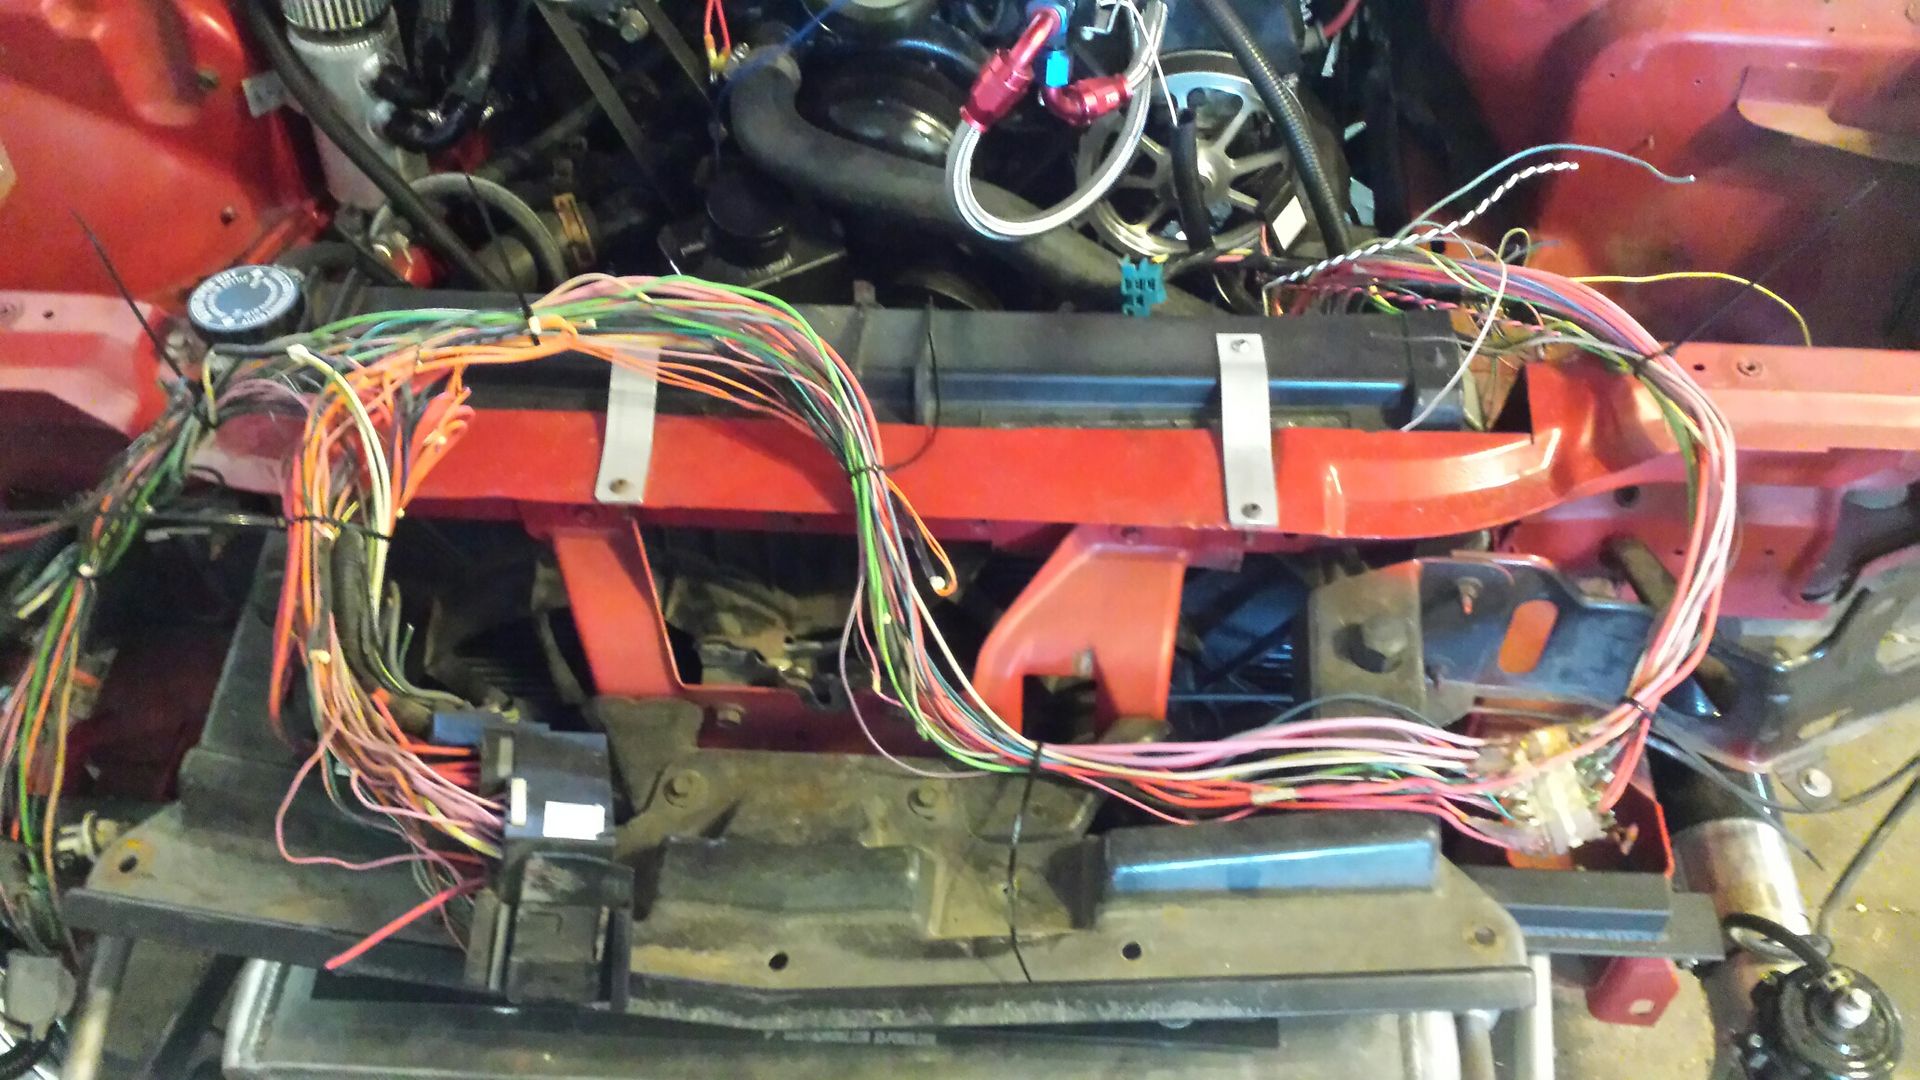
I made this really crappy drawing in MS Paint, but please reference it, the color codes tell you what harnesses do what and how we will move them. The green harness runs about from door to door INSIDE under the windshield, it contains mostly audio and door wiring. You can clearly see this harness in the pic above. The yellow is the BCM harness, its in the passenger kick panel and the harness runs mid-level in the dash. This harness gets basically unaltered except deleting wires out of it. The black goes through the driver firewall through a bulkhead fitting and contains all the power and signal for everything inside to work with everything outside the car. The blue is from the pcm to the car, all its power and interactions strictly dealing with engine functions, it runs along the top of the radiator. This is real easy, where the black meets the yellow, we will disconnect there, pull it through the firewall, back around the top of the radiator and shove it all back in the passenger side AC delete panel.
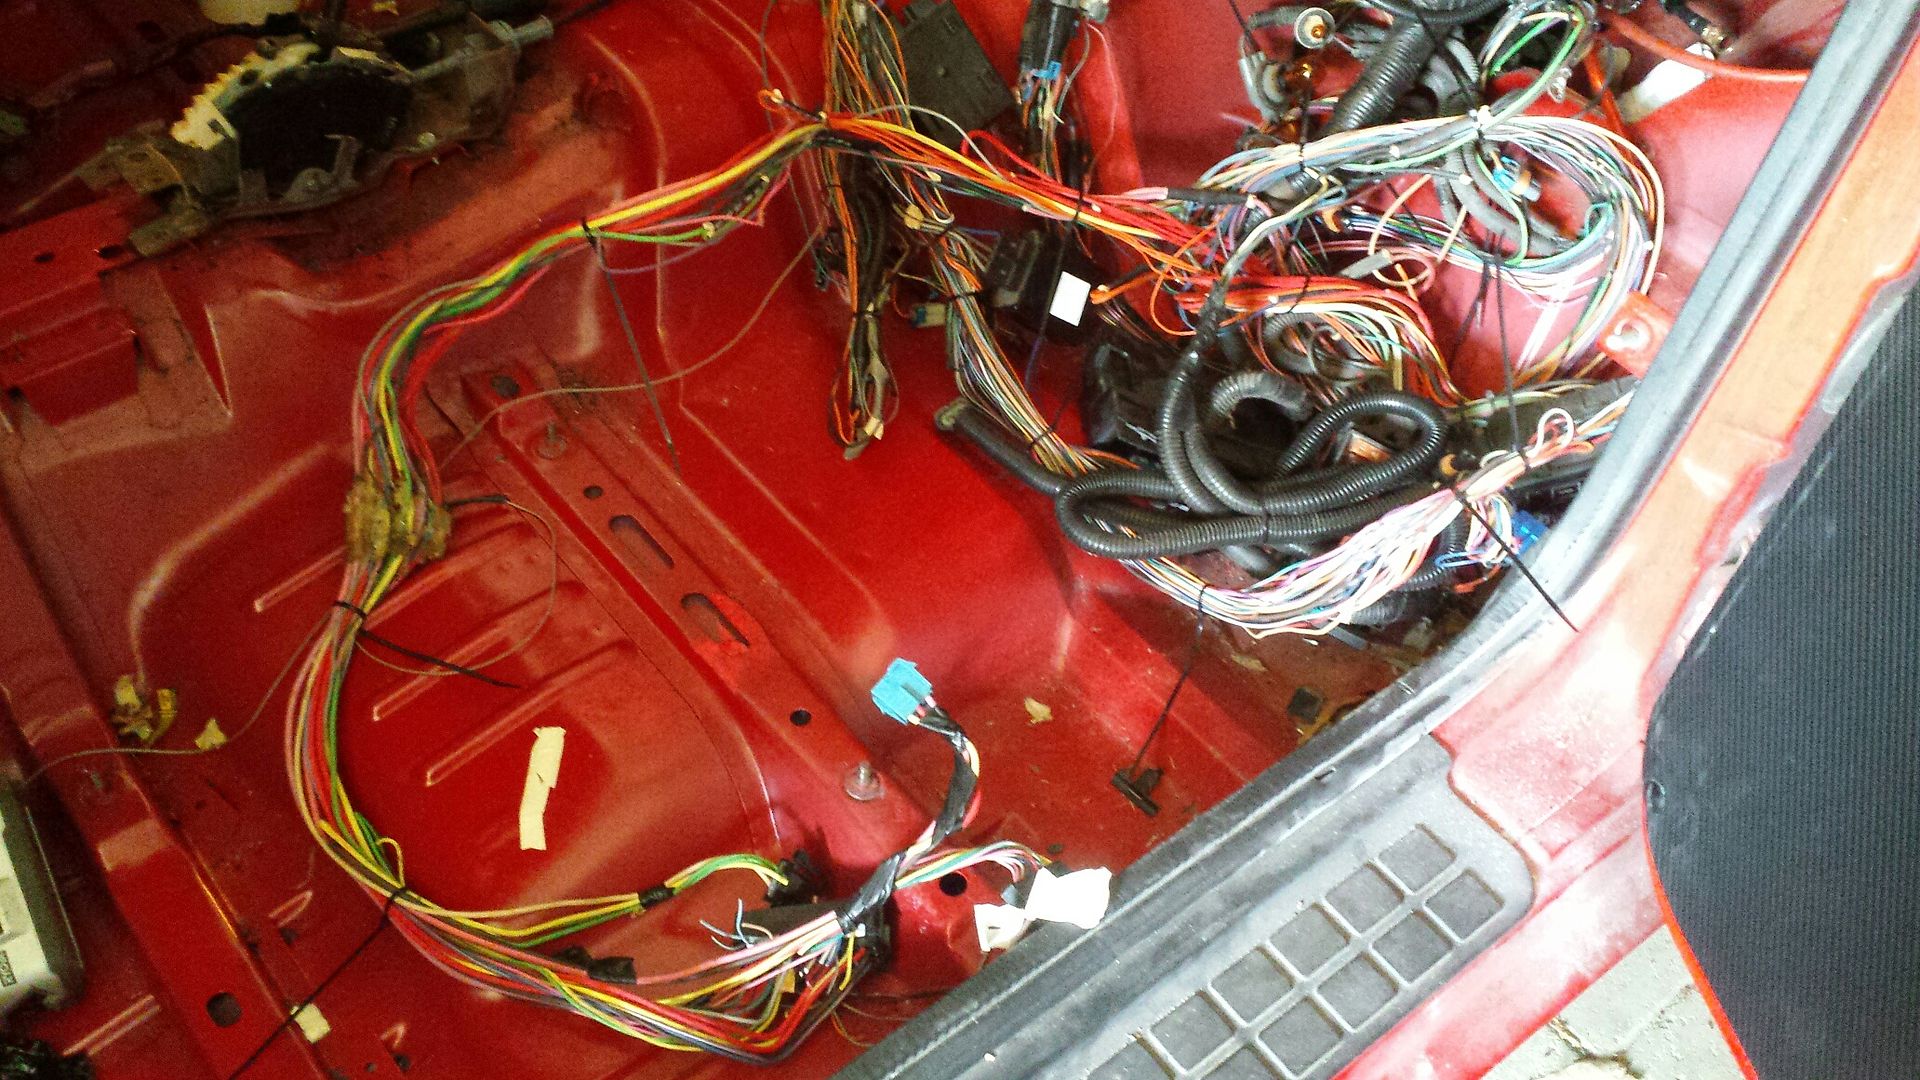
I first pulled every single unneeded wire from both door sills, and center console, that will give you a nice easy start. If you delete audio, there will be no more passenger door side wires. Driver side will still have tail-lights and hatch if you keep those. Just take your time and trace every wire. If you cut the end off, trace it through the harnesses till it terminates and clip it off.
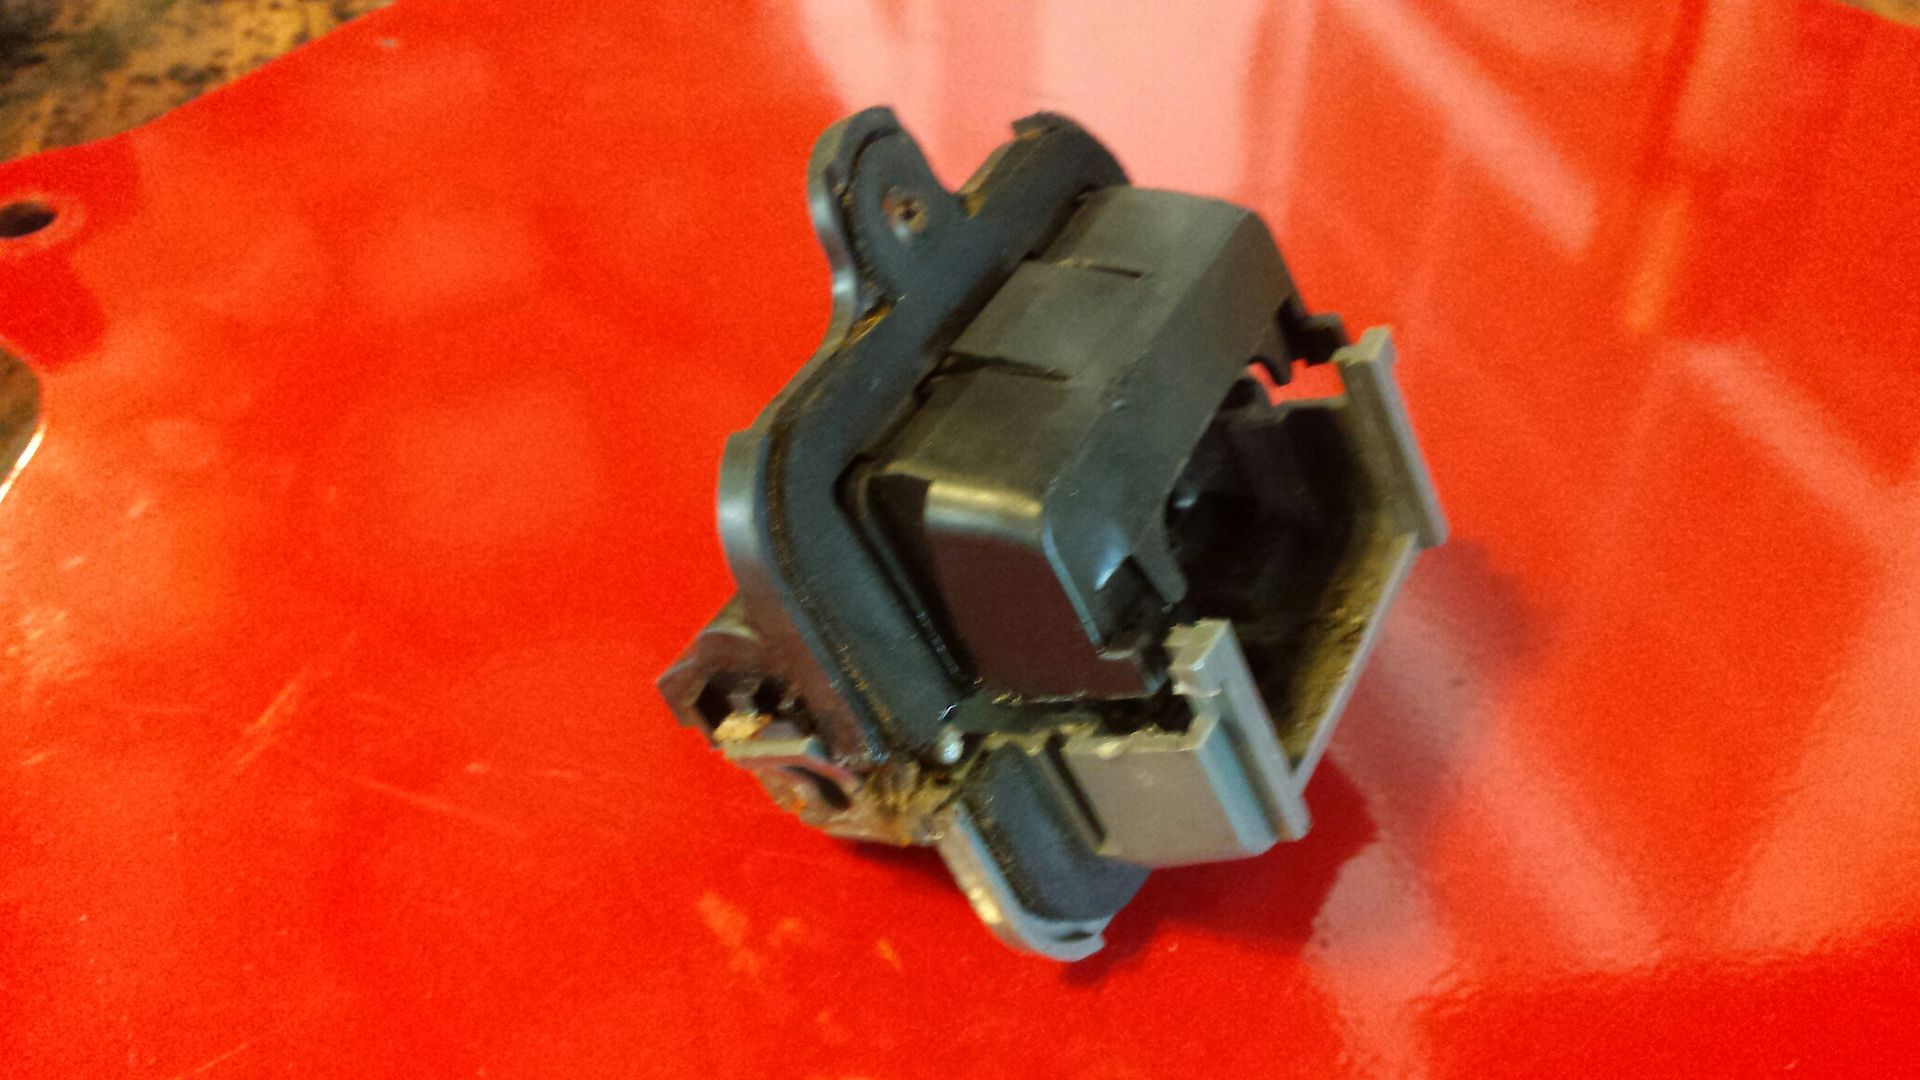
There were 4 total wires i had to cut (to get the black harness out of the car and into the engine bay), but the rest unplugged and the bulkhead under the booster is ready to be disassembled.
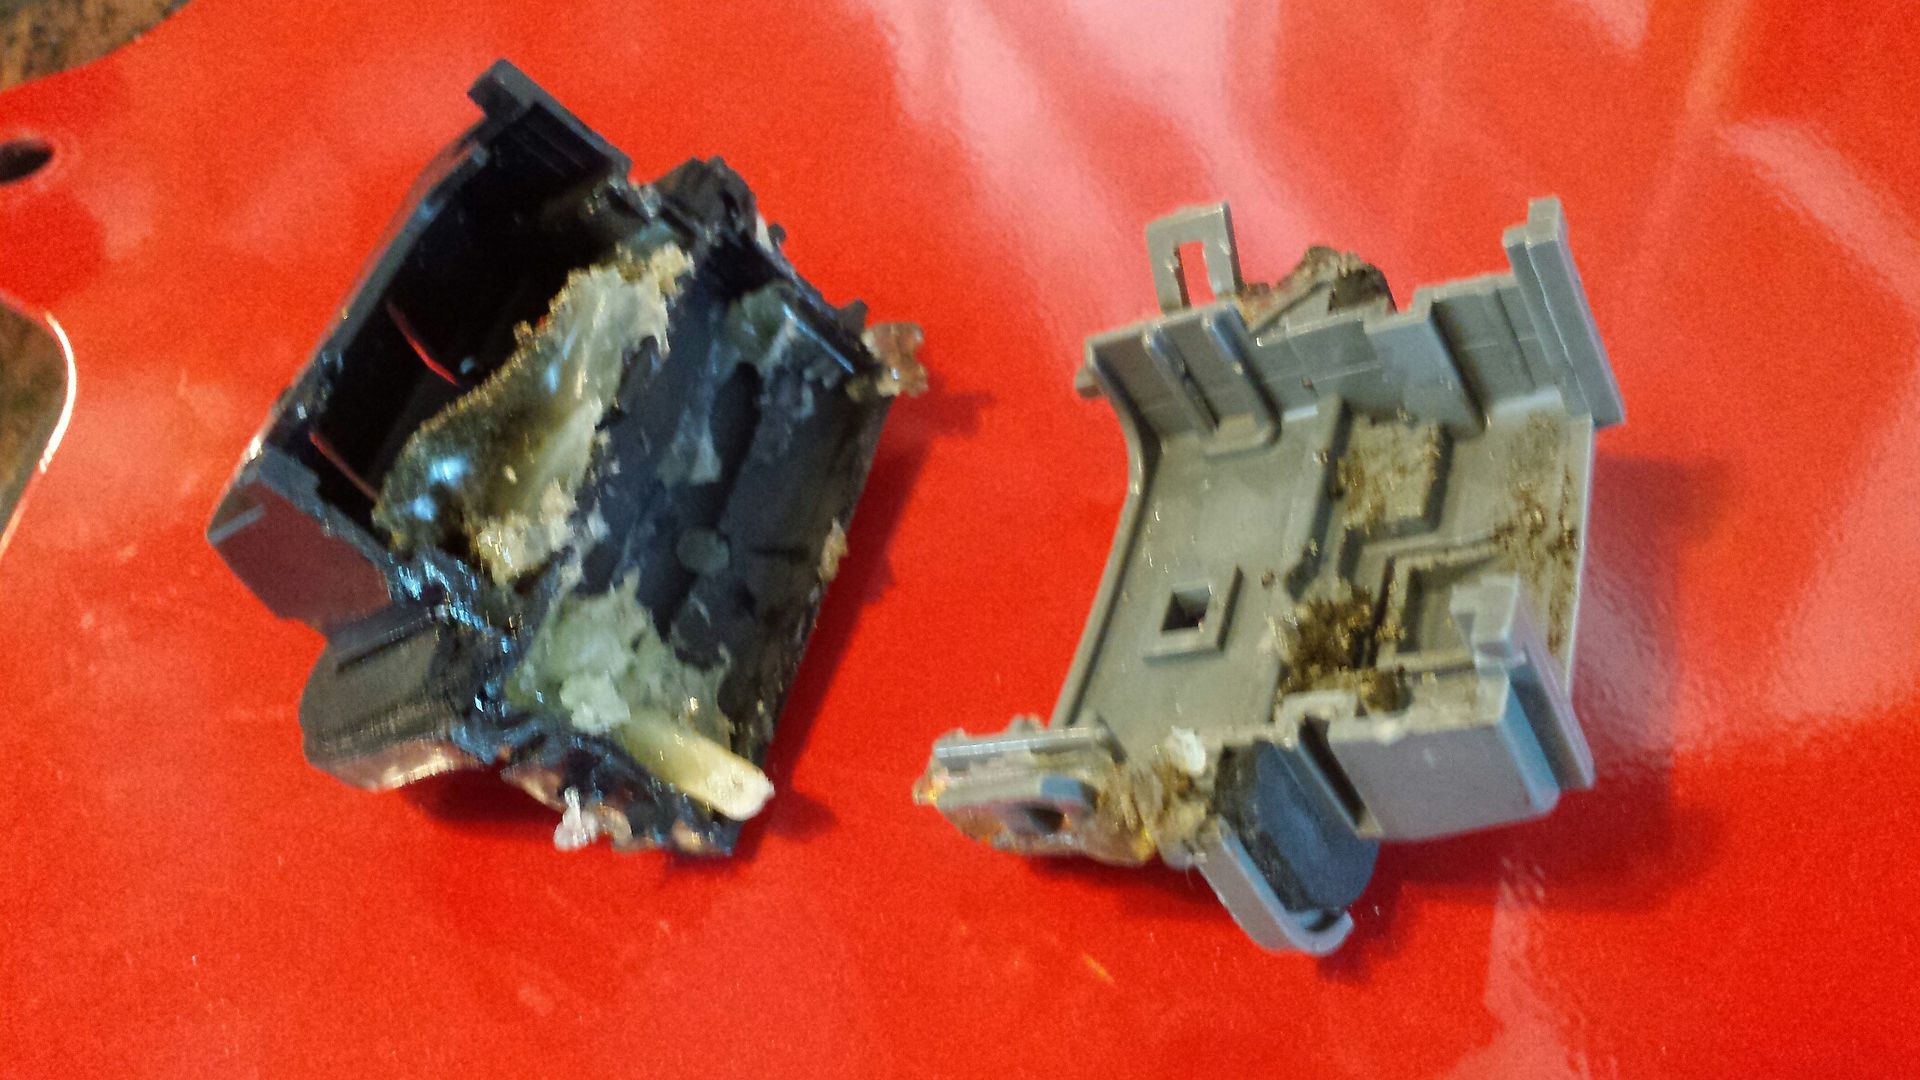
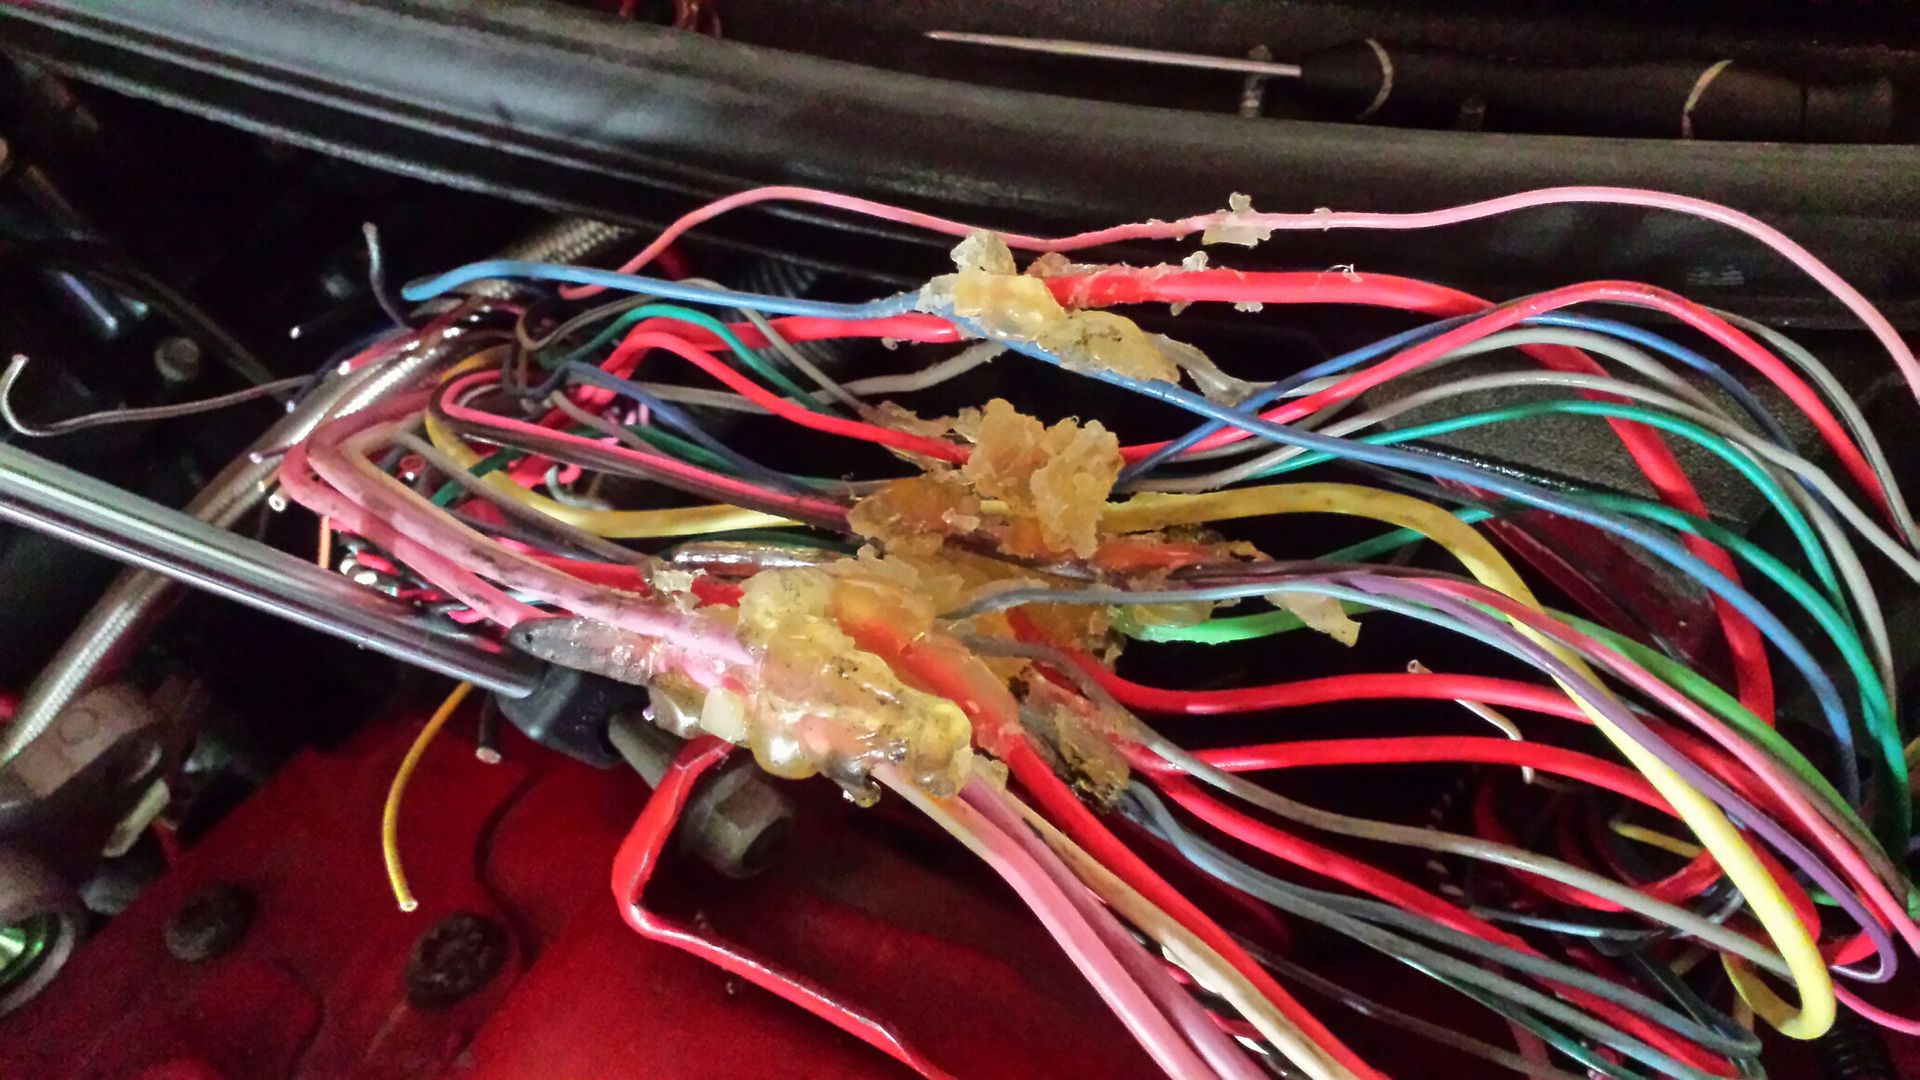
It has a bees wax type stuff injection molded into it. You'll need to melt that with a heat gun and pry it apart.
I did a full disassemble bc lots of wire colors are similar, and a lot that you deleted inside led you to here, so you'll need to continue the delete under the hood. And i didnt want to probe wires.
With the 4 wires cut, and a couple off the steering column disconnected, you can pull the whole harness from the drivers side to keep going. At this point the whole thing is only connected through the passenger side.
Pull out fog lights, horn, whatever is along your way and get those fuse boxes un-mounted.
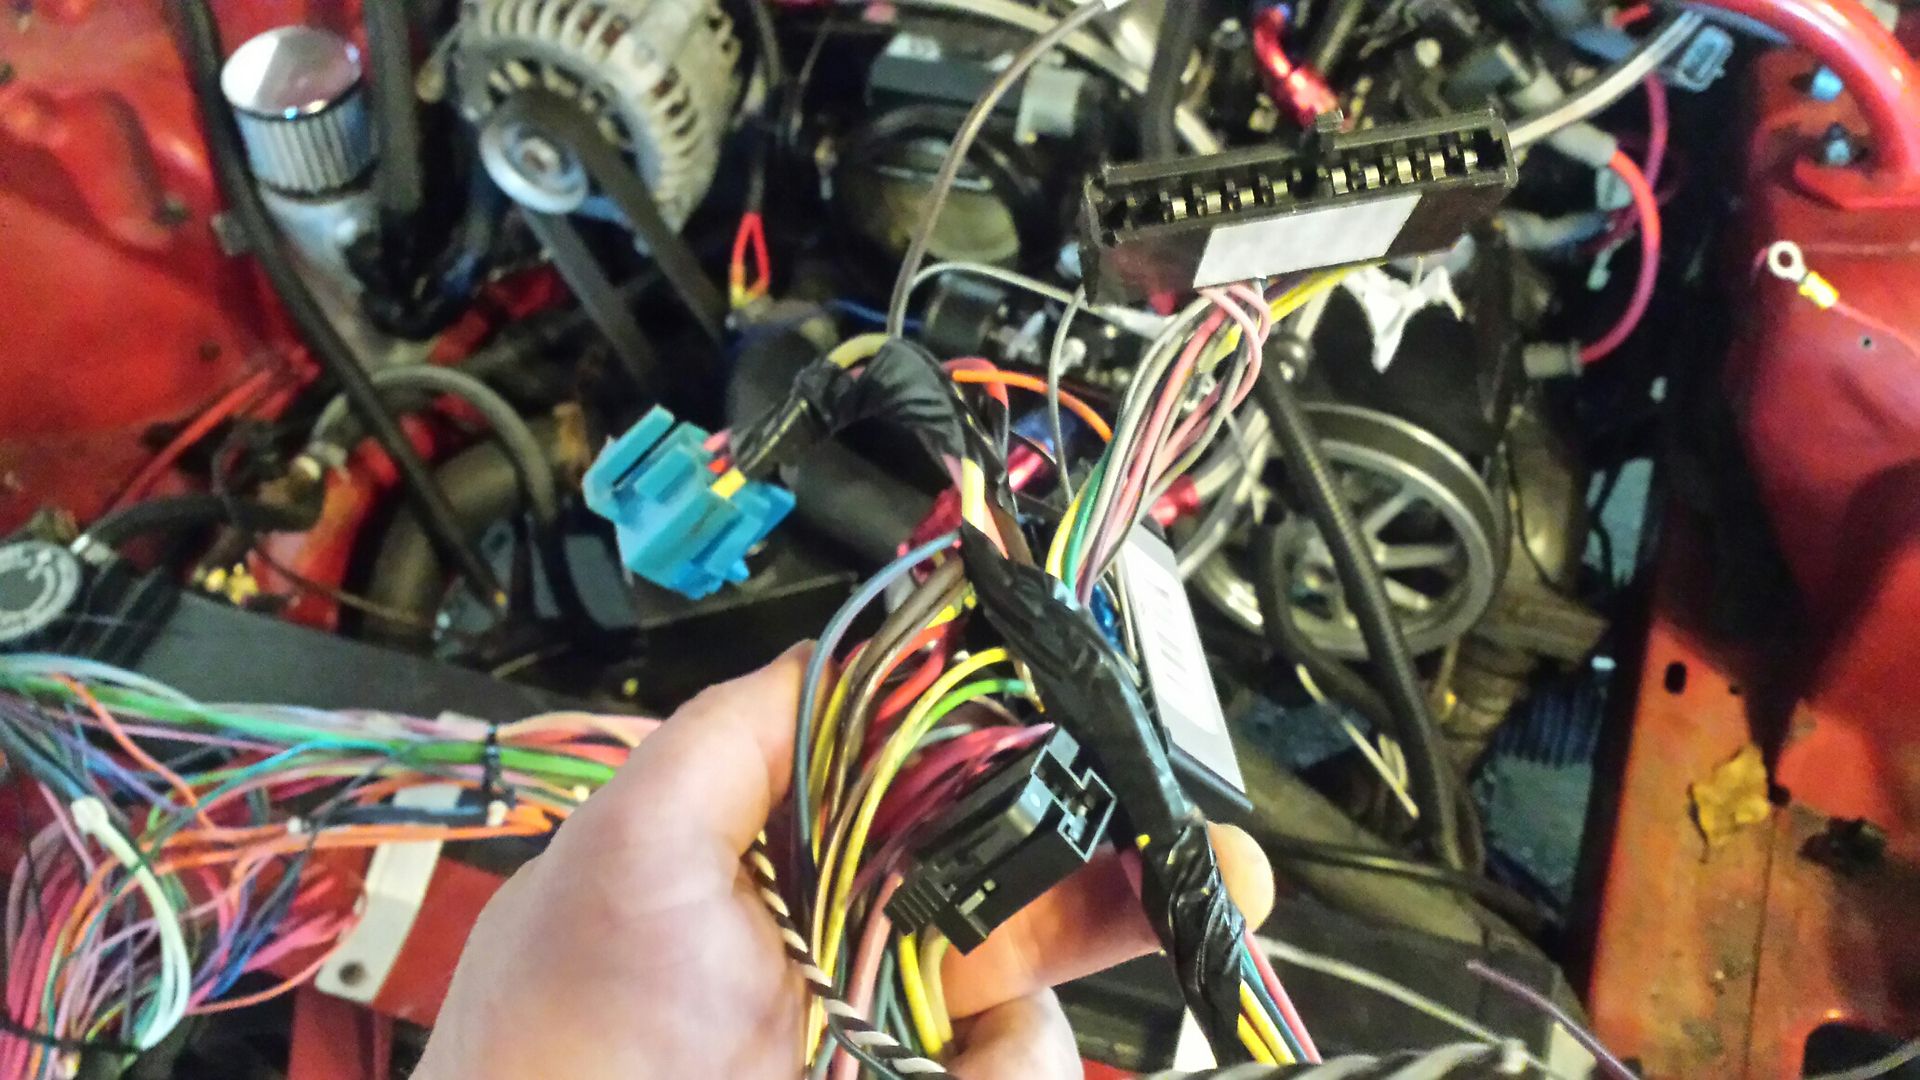
Here's the end of the harness, this was plugged in about where the yellow and black met in the crappy pic above. Once we shove it back through the passenger side, they will reach easily to reconnect, this time on the inside of the car.
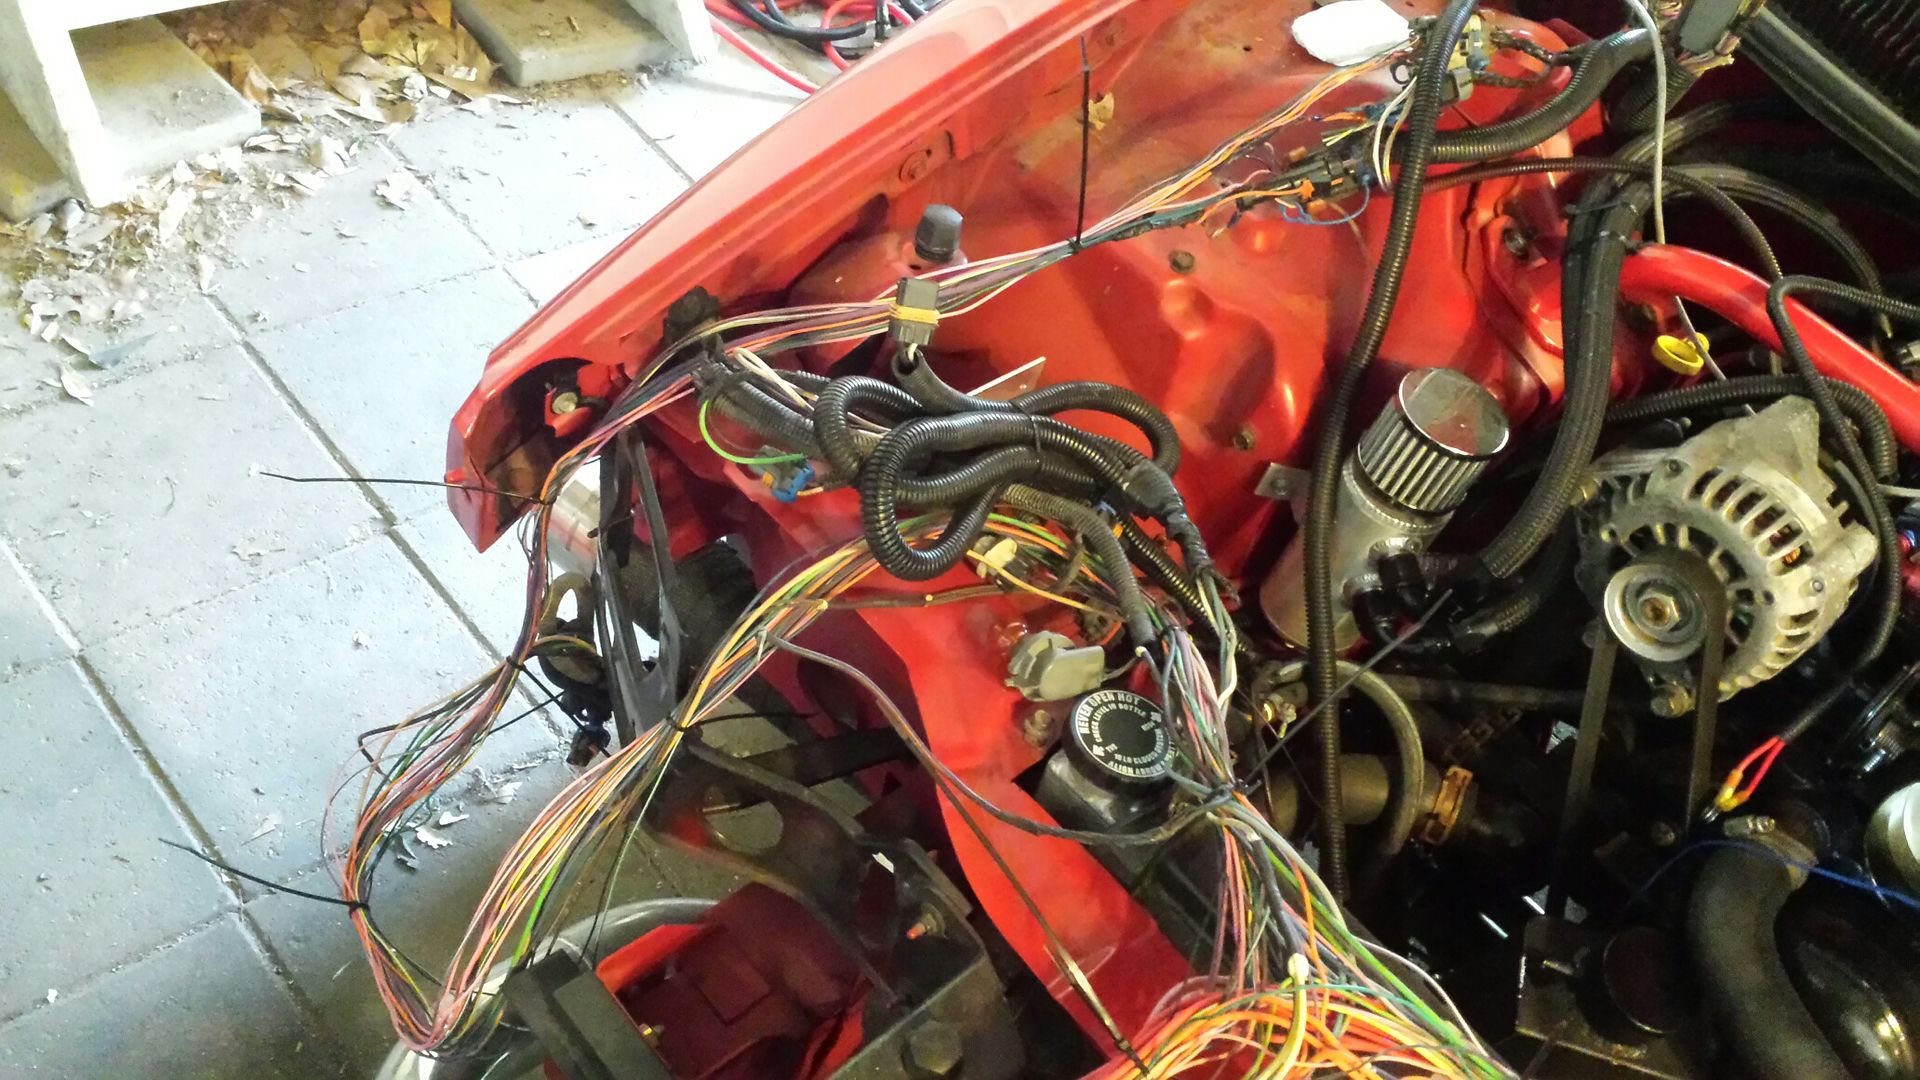
For simplicity sake i tied up each headlight side wiring and fan harness as they have to come too.
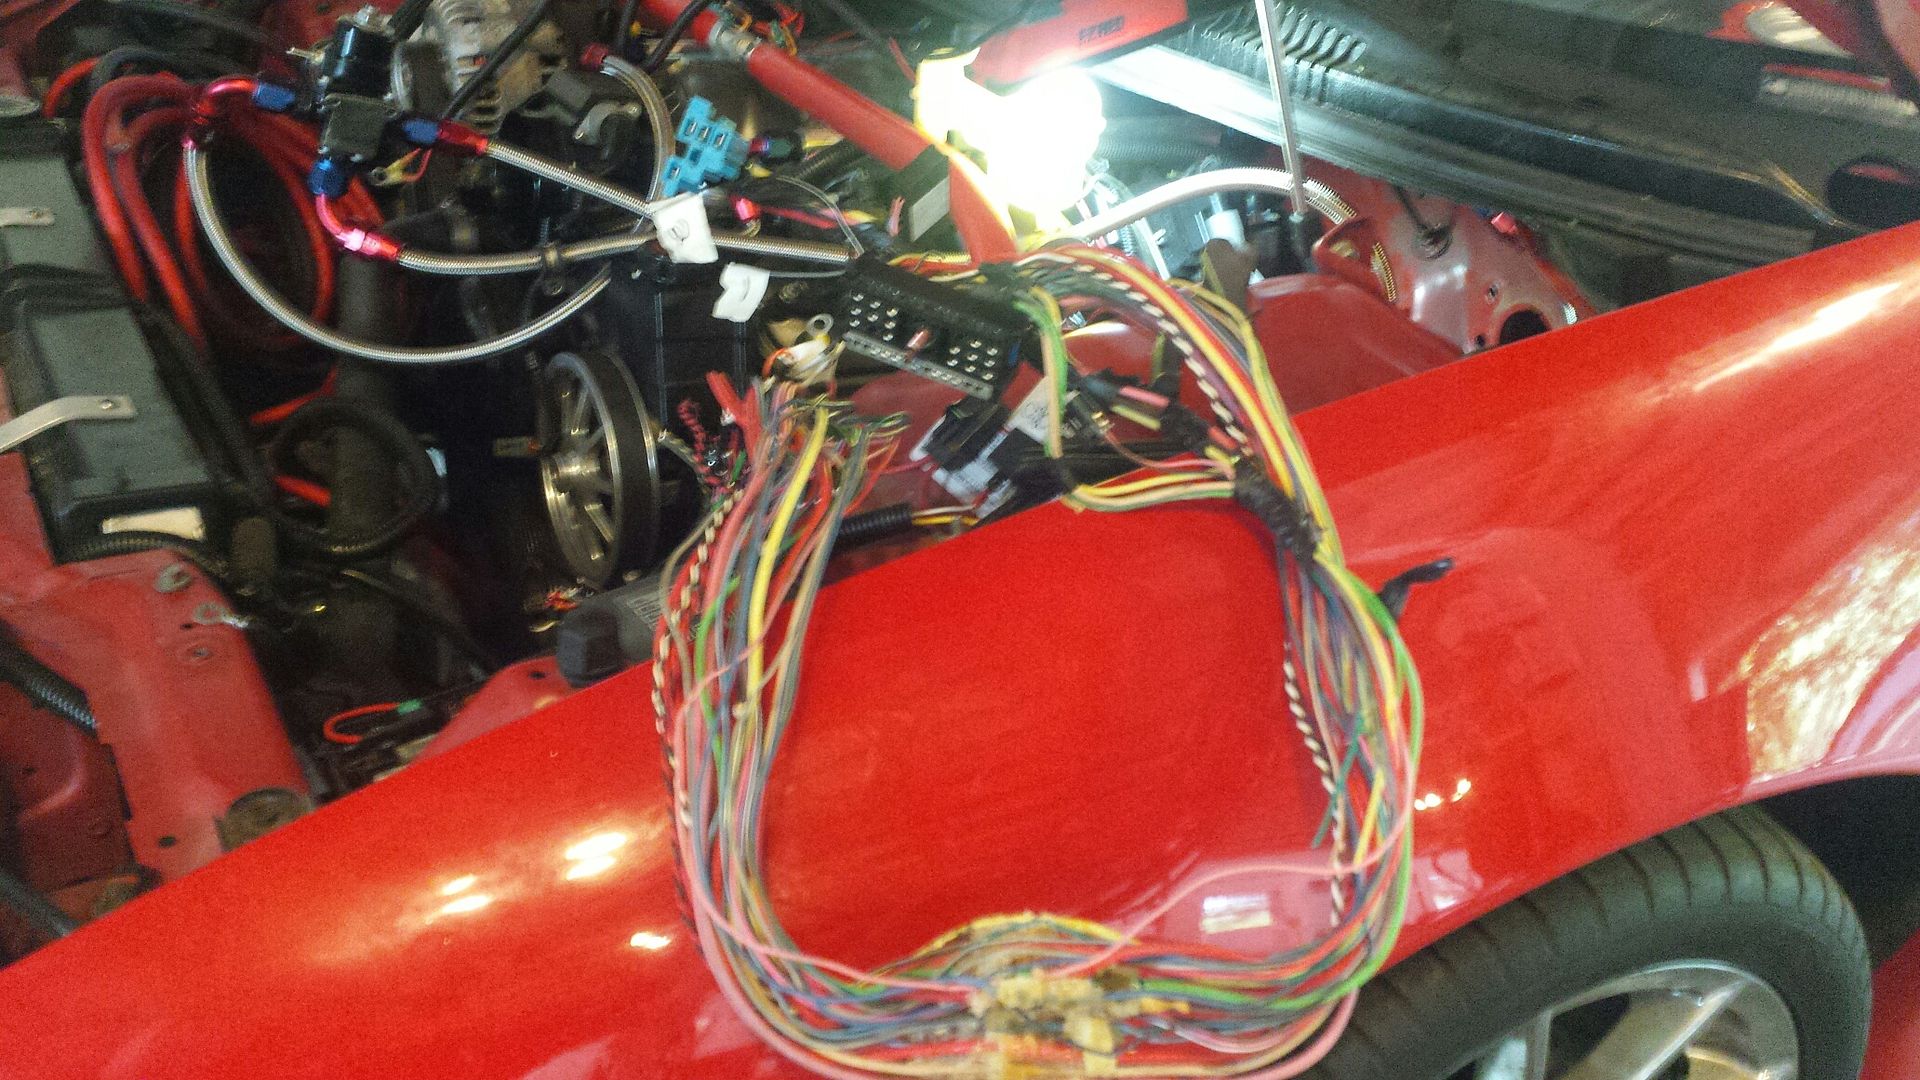
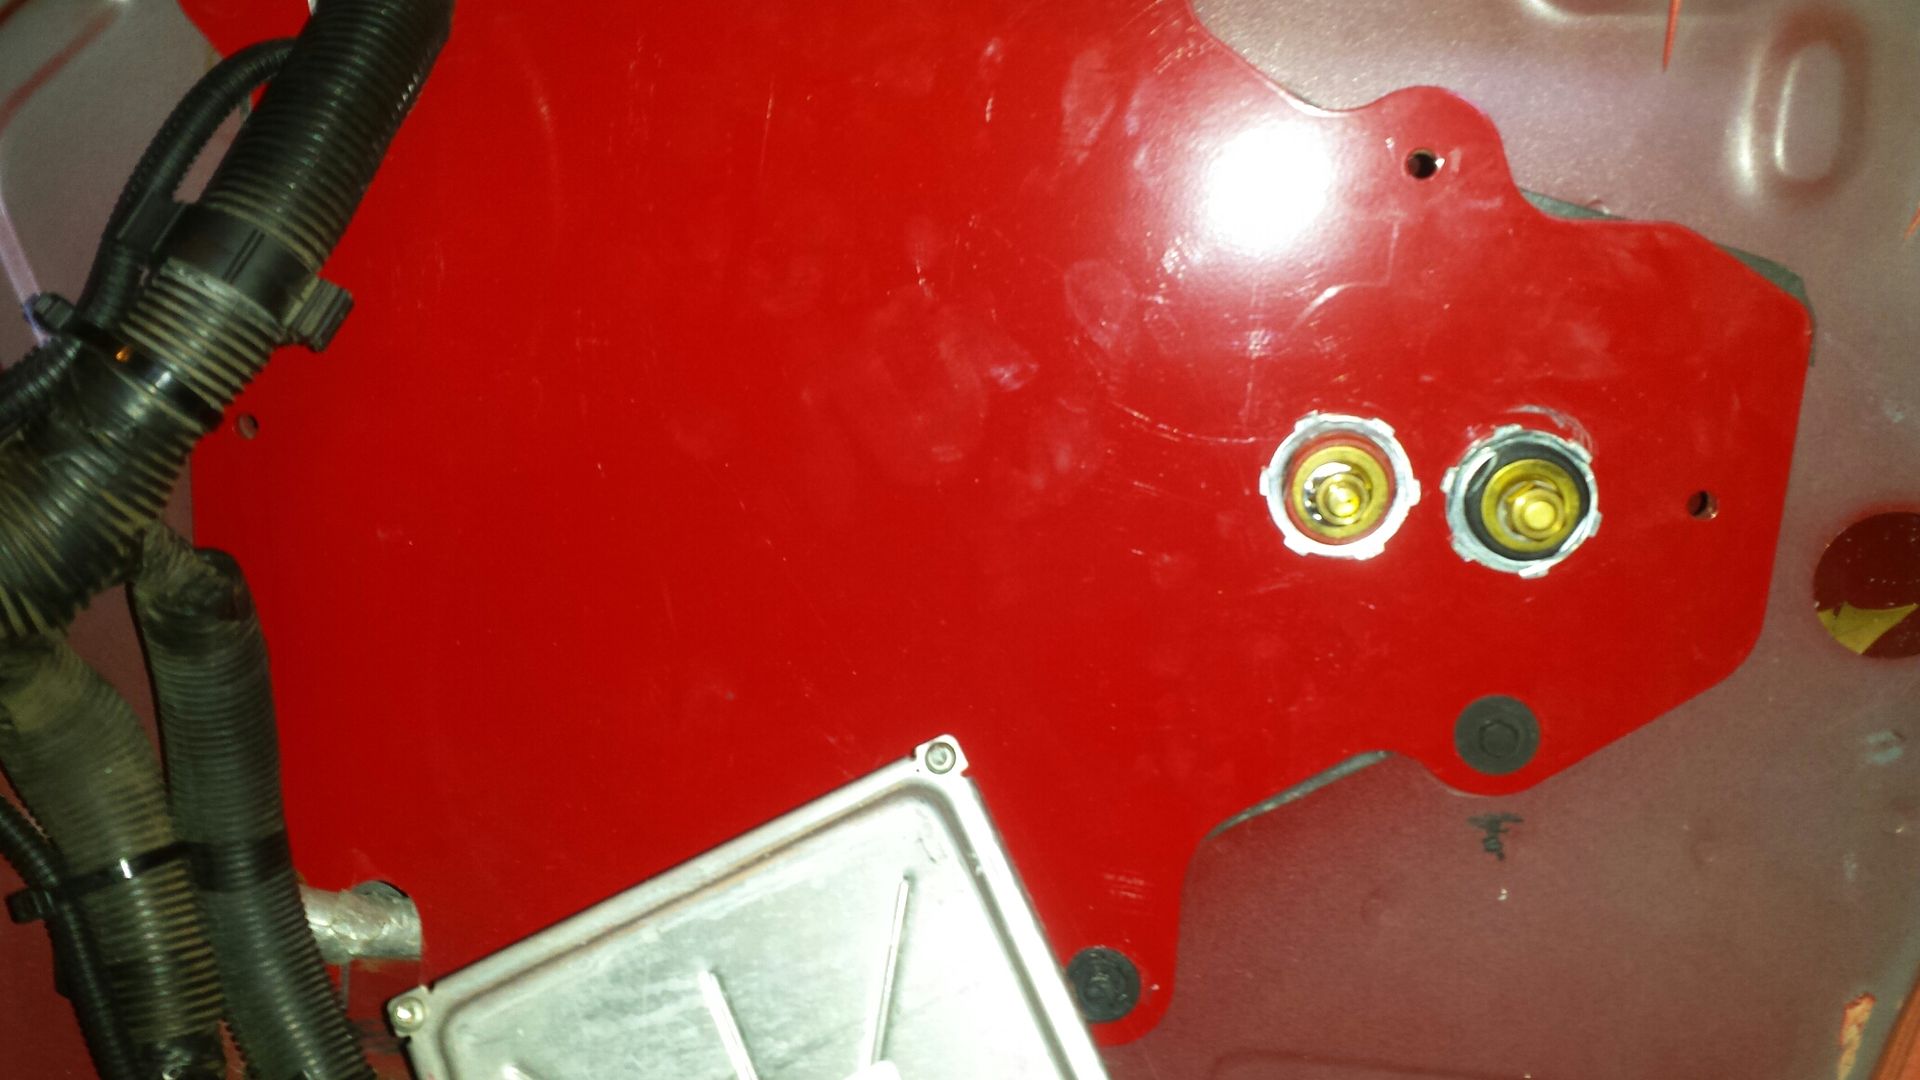
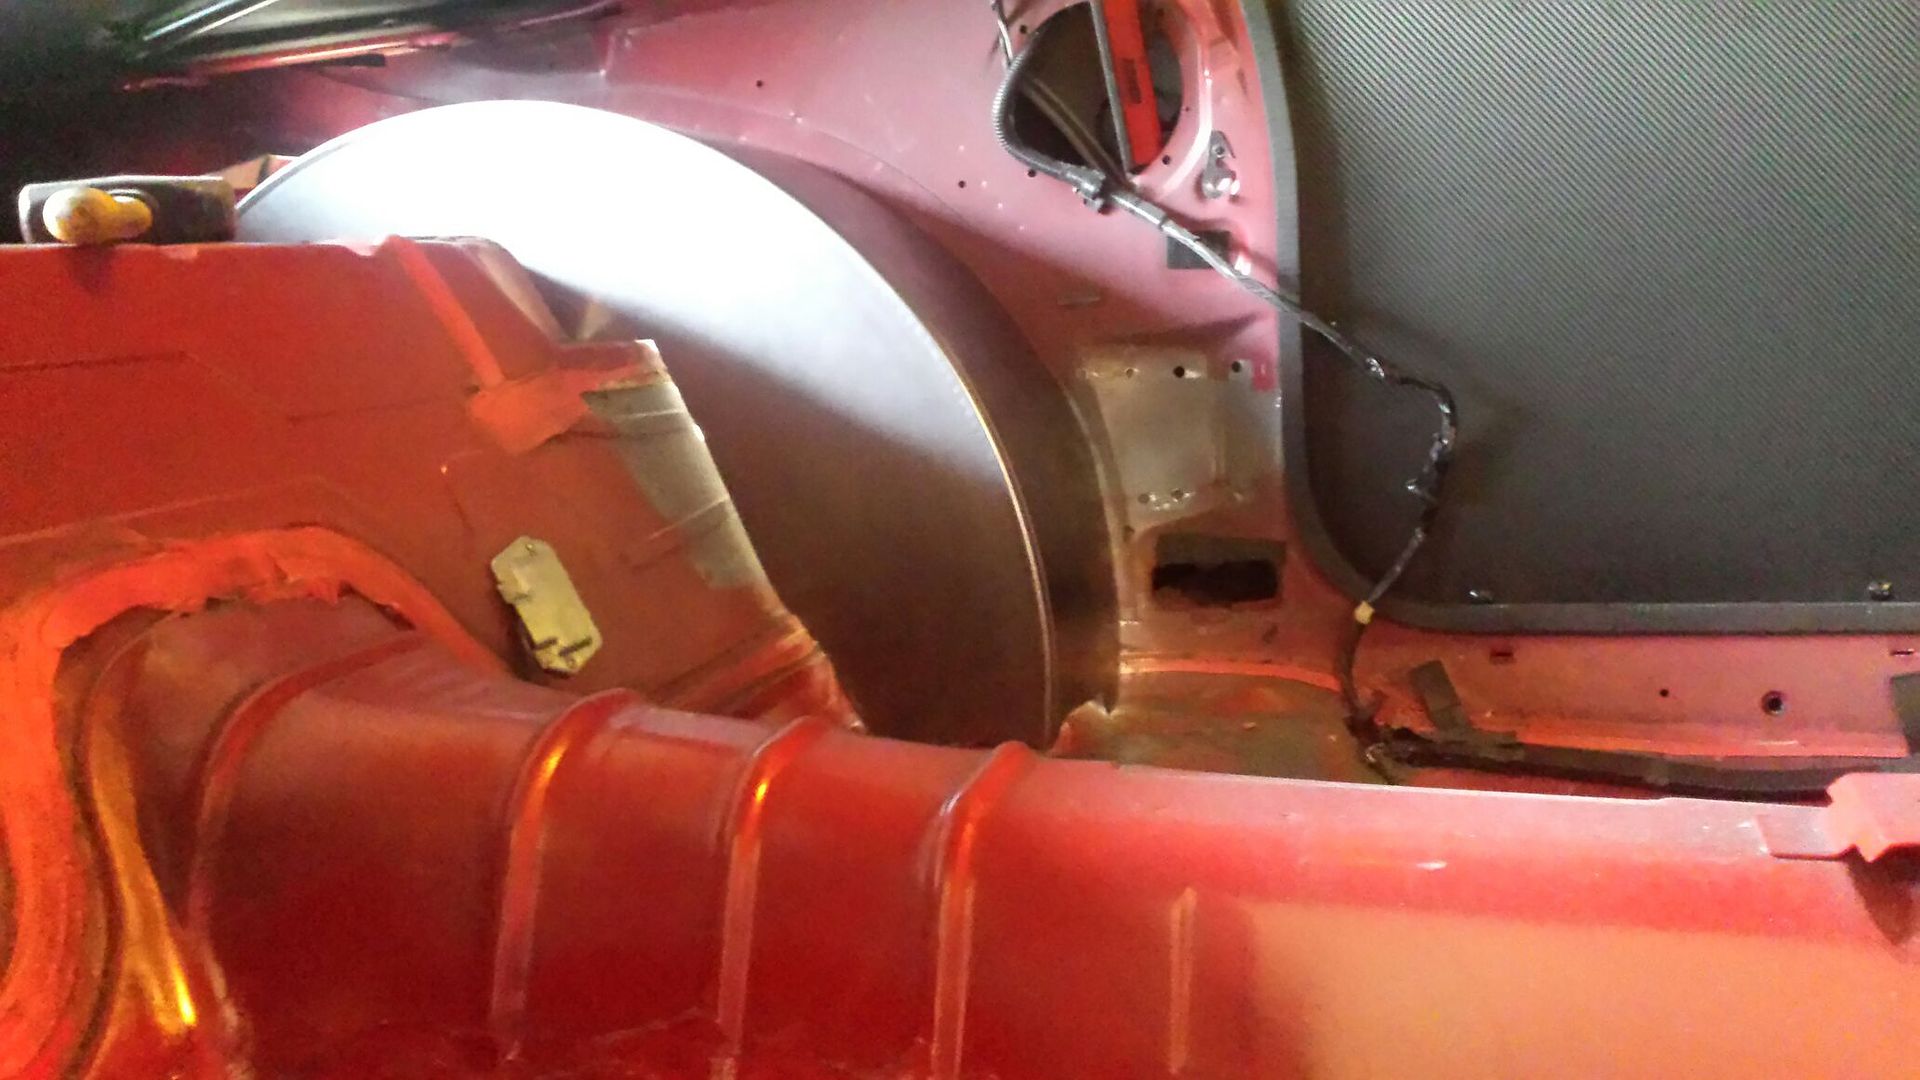
Take the pcm, its passenger fender connectors, and both fuse boxes and shove em through the delete panel.
Notch your plate at the bottom corner for the starter wire, and the top corner for the PCM bulk wiring.

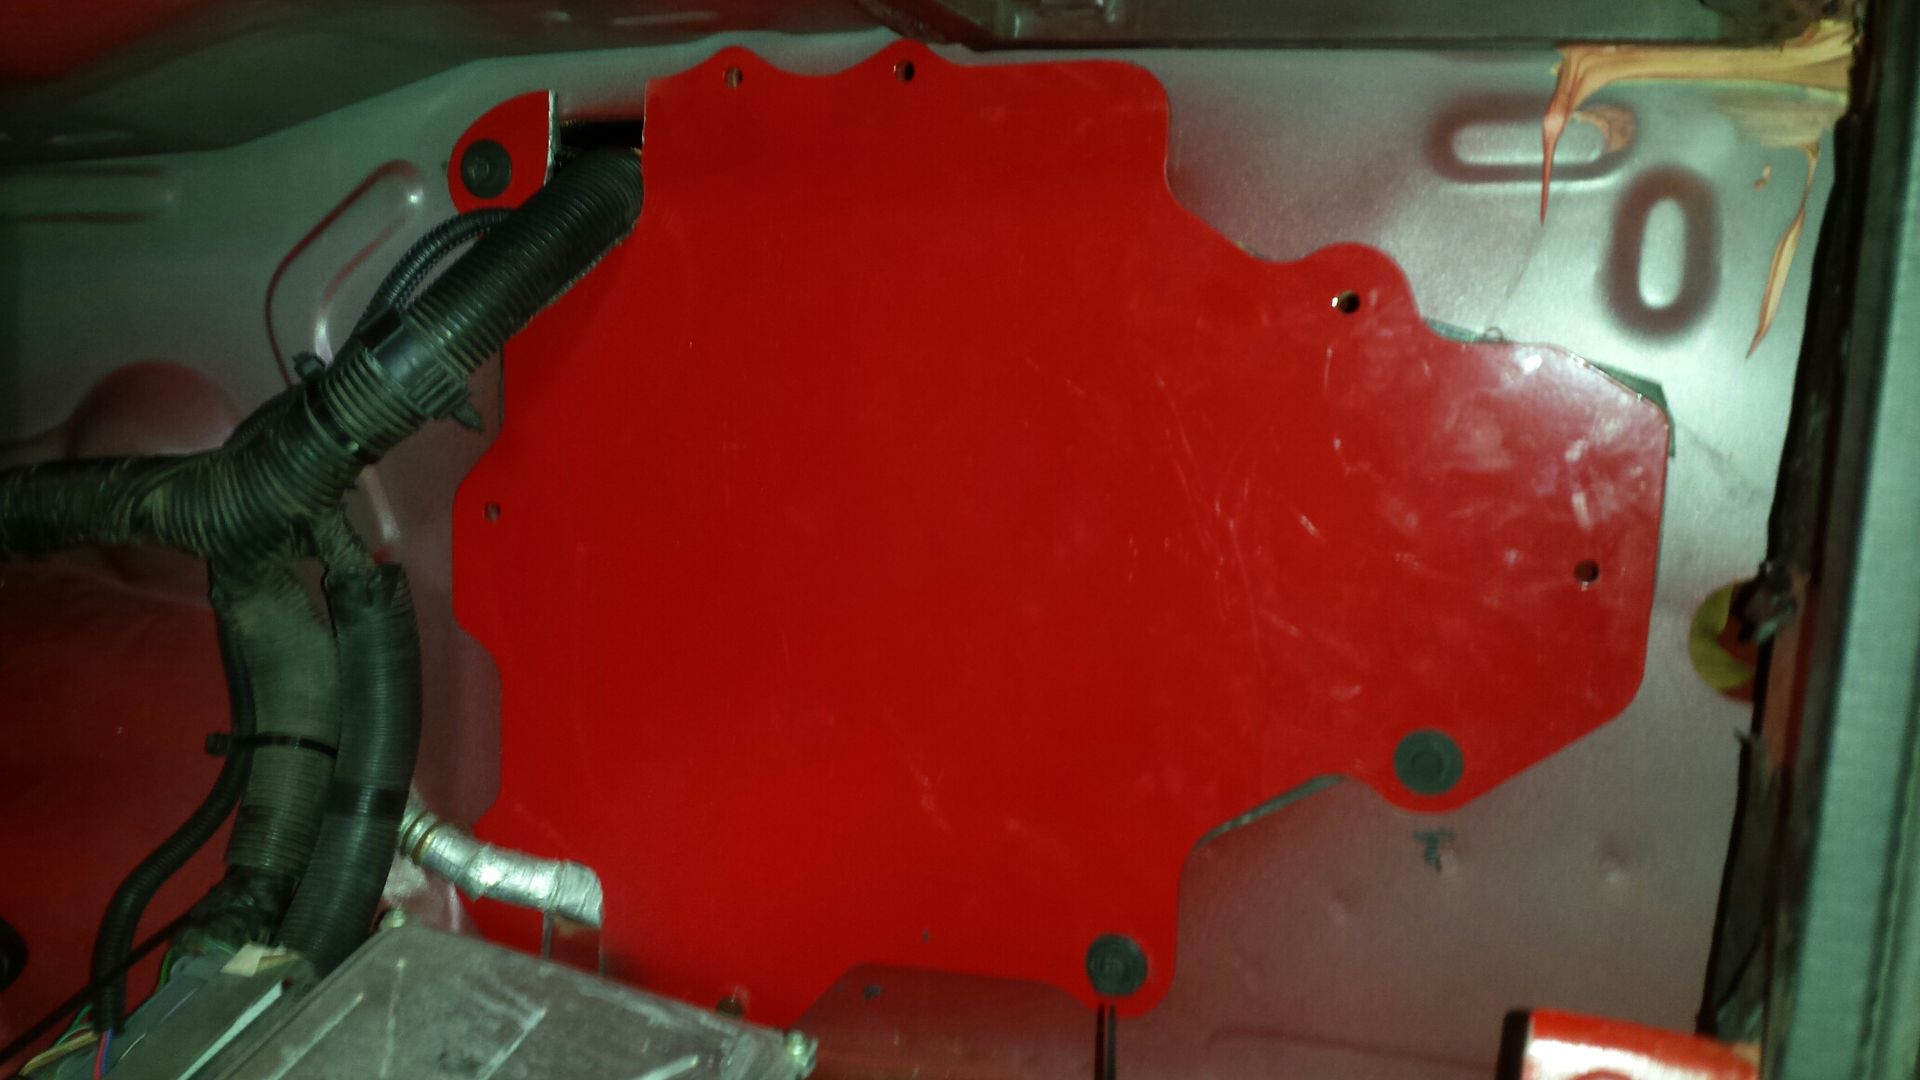
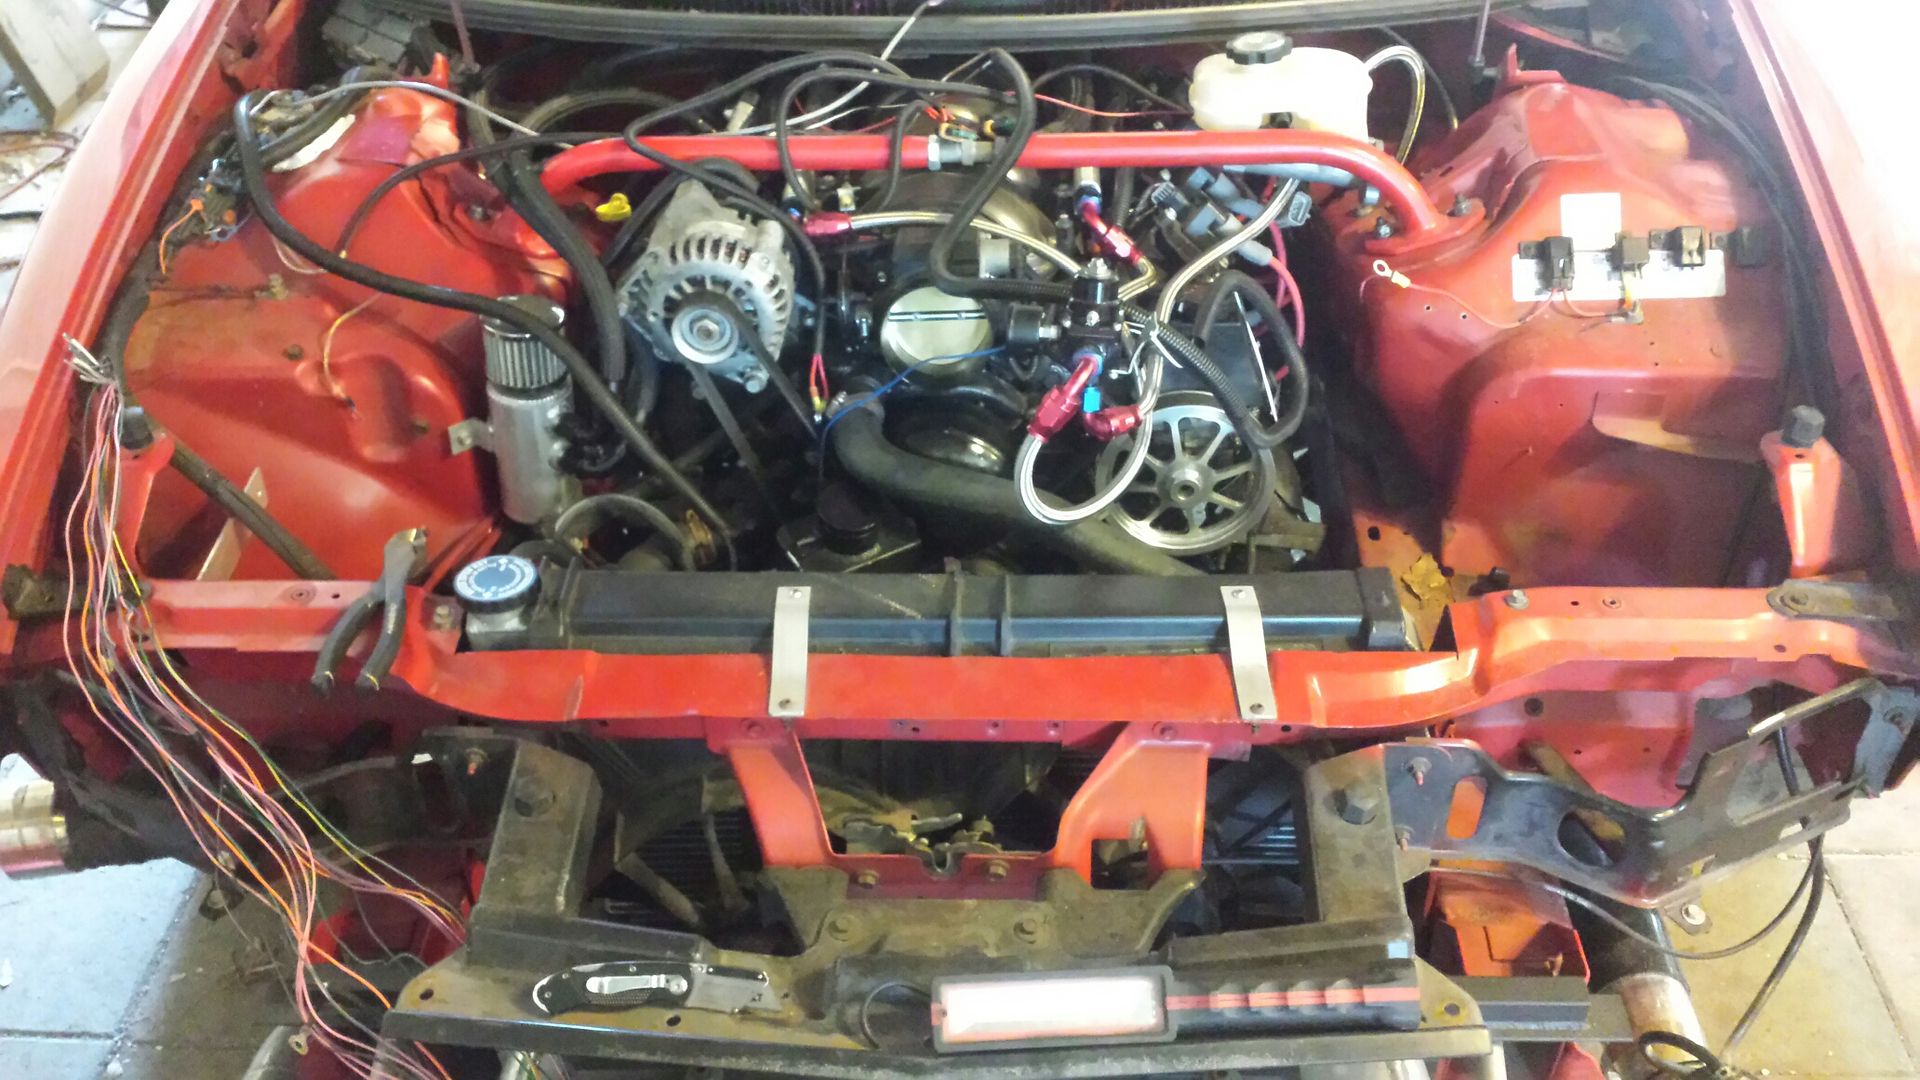
Im moving my battery to the back so I'm adding bulkheads here to distribute main power wires. Pcm will be mounted right next to them.
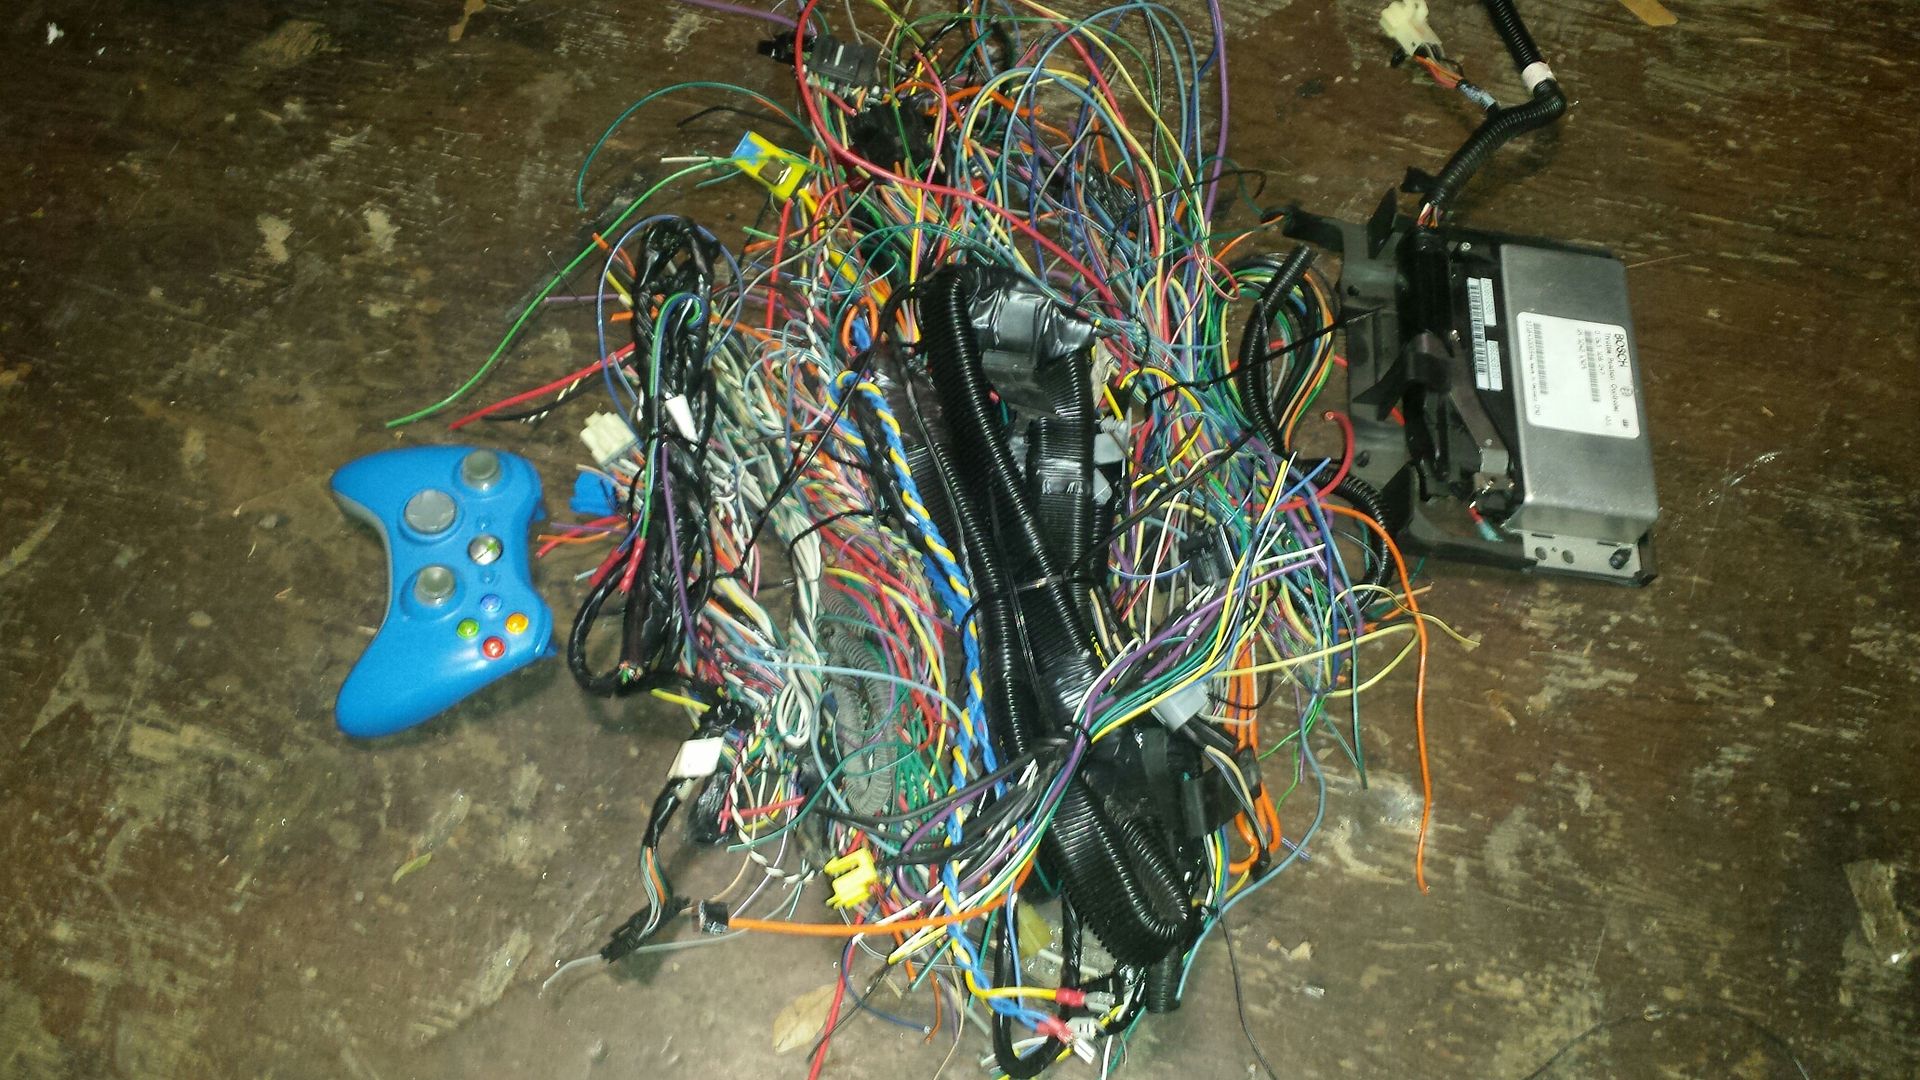
Here's the wiring I deleted. Xbox remote for size reference.
Other variations for YOUR car will include what you do with your battery, what all you delete, and how you want to get PCM wiring back through OR leave it where it was. I want the PCM inside the car for whatever dumb reason. You'll need to get headlight and fan wiring back to the front. So cut it and extend it (maybe 15 wires), route how you like. I'm doing a tubular front end so I'm waiting on that first. Remember to reconnect the black harness where you disconnected from. Make a PCM/fuse block mount to whatever you fabrication skills allow.
First let me say I have 3 afternoons tied up in this. It was not difficult but slow. You will strip every piece of loom and electrical tape off the car so be prepared for sticking fingers and a mess to clean up. Let me also add that I've already removed some audio wiring in the past. There are almost NO wires needing to be altered. You'll see by the end.
First, strip the car, and cut off every plug of the things you do not want/need. I plan to keep all lights, power windows and locks, and electric hatch release. The plugs that were cut were, daytime running lights (module), power driver seat, wipers, washer fluid motor, fog lights, all AC, all audio, all airbags, power mirrors, ABS, traction control, defroster, horn, all emissions, basically if it doesnt run the car, its gone.
Strip it. Mine needed to come out for a cage so it was perfect timing.

I made this really crappy drawing in MS Paint, but please reference it, the color codes tell you what harnesses do what and how we will move them. The green harness runs about from door to door INSIDE under the windshield, it contains mostly audio and door wiring. You can clearly see this harness in the pic above. The yellow is the BCM harness, its in the passenger kick panel and the harness runs mid-level in the dash. This harness gets basically unaltered except deleting wires out of it. The black goes through the driver firewall through a bulkhead fitting and contains all the power and signal for everything inside to work with everything outside the car. The blue is from the pcm to the car, all its power and interactions strictly dealing with engine functions, it runs along the top of the radiator. This is real easy, where the black meets the yellow, we will disconnect there, pull it through the firewall, back around the top of the radiator and shove it all back in the passenger side AC delete panel.

I first pulled every single unneeded wire from both door sills, and center console, that will give you a nice easy start. If you delete audio, there will be no more passenger door side wires. Driver side will still have tail-lights and hatch if you keep those. Just take your time and trace every wire. If you cut the end off, trace it through the harnesses till it terminates and clip it off.
There were 4 total wires i had to cut (to get the black harness out of the car and into the engine bay), but the rest unplugged and the bulkhead under the booster is ready to be disassembled.

It has a bees wax type stuff injection molded into it. You'll need to melt that with a heat gun and pry it apart.

I did a full disassemble bc lots of wire colors are similar, and a lot that you deleted inside led you to here, so you'll need to continue the delete under the hood. And i didnt want to probe wires.

With the 4 wires cut, and a couple off the steering column disconnected, you can pull the whole harness from the drivers side to keep going. At this point the whole thing is only connected through the passenger side.

Pull out fog lights, horn, whatever is along your way and get those fuse boxes un-mounted.

Here's the end of the harness, this was plugged in about where the yellow and black met in the crappy pic above. Once we shove it back through the passenger side, they will reach easily to reconnect, this time on the inside of the car.

For simplicity sake i tied up each headlight side wiring and fan harness as they have to come too.


Take the pcm, its passenger fender connectors, and both fuse boxes and shove em through the delete panel.


Notch your plate at the bottom corner for the starter wire, and the top corner for the PCM bulk wiring.


Im moving my battery to the back so I'm adding bulkheads here to distribute main power wires. Pcm will be mounted right next to them.

Here's the wiring I deleted. Xbox remote for size reference.

Other variations for YOUR car will include what you do with your battery, what all you delete, and how you want to get PCM wiring back through OR leave it where it was. I want the PCM inside the car for whatever dumb reason. You'll need to get headlight and fan wiring back to the front. So cut it and extend it (maybe 15 wires), route how you like. I'm doing a tubular front end so I'm waiting on that first. Remember to reconnect the black harness where you disconnected from. Make a PCM/fuse block mount to whatever you fabrication skills allow.
#132
05-18-2018, 09:52 AM
Well here's what Im going for.:
https://rock-solid-motorsports.com/p...ular-front-end
Me and the owner of the company couldnt strike a deal on his kit so I decided to build my own. There is a certain amount of pride when you can say its made by you, instead of ordered off a website. First thing is first, strip the front.
I chose to leave the hotside on for now (hoping I had enough room for the cuts) and since about 75% of the kit is uninstalled, and about 50% of it will likely need to be rerouted, it is listed locally for sale. If it sells I will build a t6 kit from scratch, if it doesnt, i wont modify the pipes in this kit just replace certain parts and keep the others intact to sell it later as a complete kit. Cliff notes: t6 turbo coming, but not sure when.
Made the initial cut, just to get the bulk of the metal out of my way. Fun fact: I removed the inner plastic front fender liners, and in like 11/12 years of owning this car are one of the few pieces that have never been off the car. I threw them in the bushes.
Here's where we ended up. This was a rough cut and frame rails need to be smoothed out and all that. The plan now is, I have steel plate to cap off the rails and fender area. I need to select pipe, buy it, bend it, and get to welding.
The look on my kid's face was priceless when they walked around and thought daddy WTF did you do to your car?? I'm pretty sure no one in the house thinks it will ever run again.
https://rock-solid-motorsports.com/p...ular-front-end
Me and the owner of the company couldnt strike a deal on his kit so I decided to build my own. There is a certain amount of pride when you can say its made by you, instead of ordered off a website. First thing is first, strip the front.

I chose to leave the hotside on for now (hoping I had enough room for the cuts) and since about 75% of the kit is uninstalled, and about 50% of it will likely need to be rerouted, it is listed locally for sale. If it sells I will build a t6 kit from scratch, if it doesnt, i wont modify the pipes in this kit just replace certain parts and keep the others intact to sell it later as a complete kit. Cliff notes: t6 turbo coming, but not sure when.
Made the initial cut, just to get the bulk of the metal out of my way. Fun fact: I removed the inner plastic front fender liners, and in like 11/12 years of owning this car are one of the few pieces that have never been off the car. I threw them in the bushes.

Here's where we ended up. This was a rough cut and frame rails need to be smoothed out and all that. The plan now is, I have steel plate to cap off the rails and fender area. I need to select pipe, buy it, bend it, and get to welding.


The look on my kid's face was priceless when they walked around and thought daddy WTF did you do to your car?? I'm pretty sure no one in the house thinks it will ever run again.
#133
05-23-2018, 08:31 AM
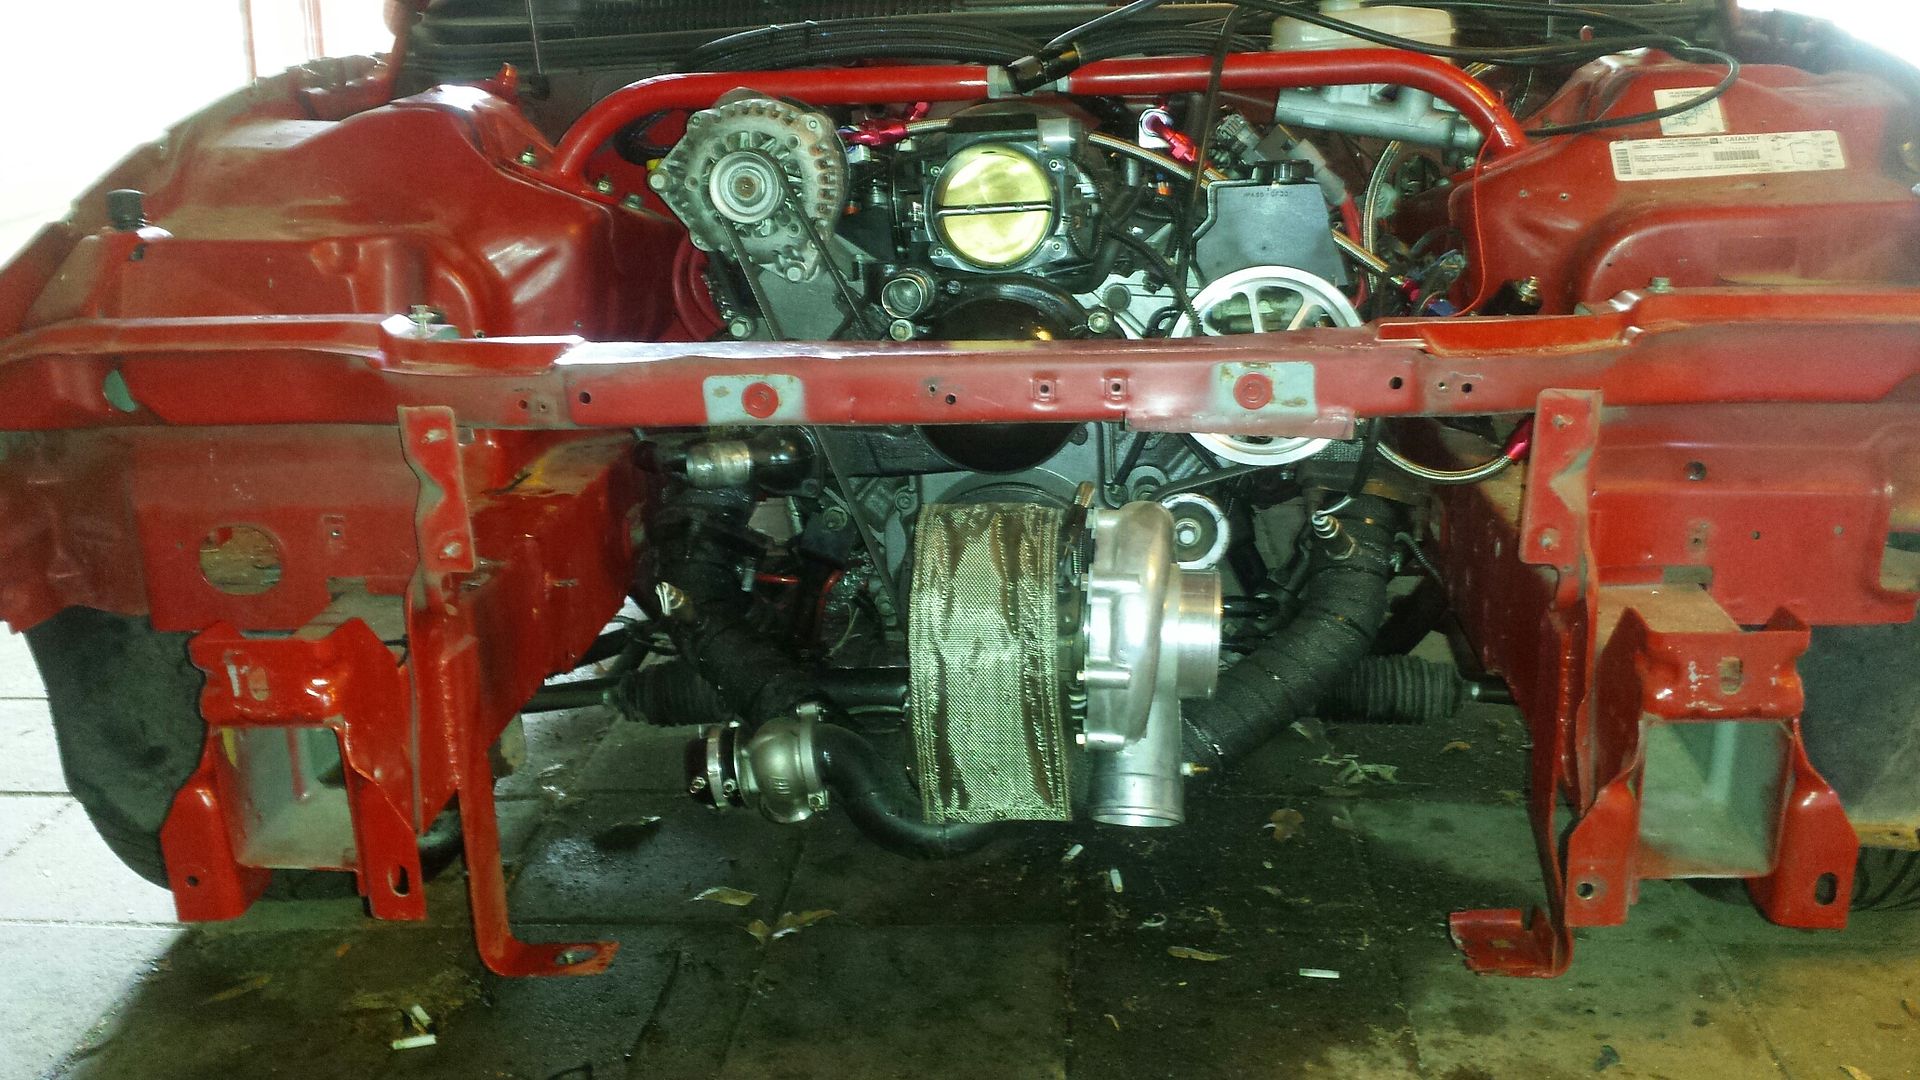
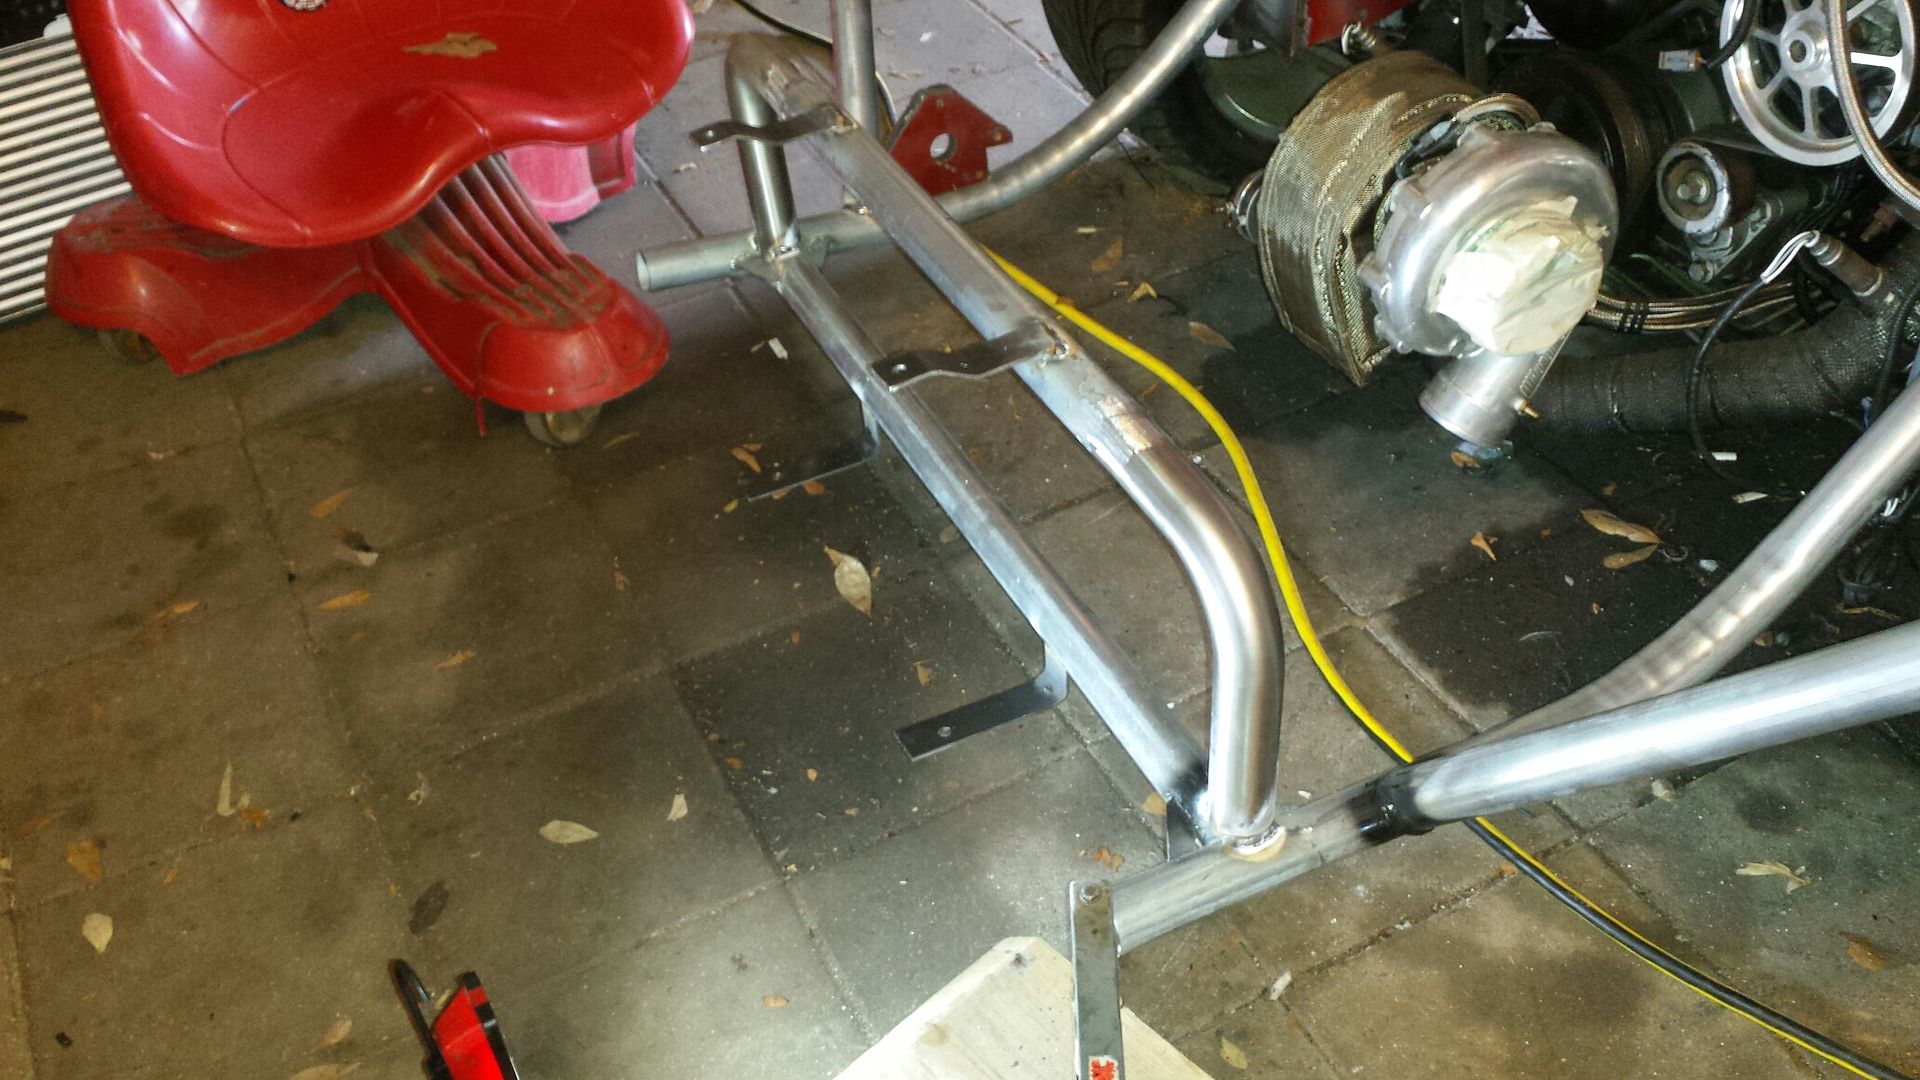
Made some progress with the pipe bender. I selected a 1 5/8" 16 gauge steel. This is easy to crush when bending it so you have to take your time and bend some, then move down the pipe and bend some more. That's why the bends look more rounded. Got a few pieces tacked on just to see how it all went together.
The front of the car sits way up with all this stuff removed as an FYI. Long time F-body buddy Hilton let me borrow his welding 75/25 bottle. I swapped my machine over from flux to gas and started to finish the welding portion. Once done, through careful engineering calculations I determined my design, material selection, and welding procedure WOULD be strong enough for this application. My calculations consisted of......jumping/bouncing on the pipe. Success!!
I started adding gussets and cleaning up welds while waiting for the front hoop bends to arrive (bought two 90 degree mandrel bends) and got delayed, so more to come this weekend. I'm also debating on color for the front pipes? Black? Red? Silver/graphite?


The front of the car sits way up with all this stuff removed as an FYI. Long time F-body buddy Hilton let me borrow his welding 75/25 bottle. I swapped my machine over from flux to gas and started to finish the welding portion. Once done, through careful engineering calculations I determined my design, material selection, and welding procedure WOULD be strong enough for this application. My calculations consisted of......jumping/bouncing on the pipe. Success!!

I started adding gussets and cleaning up welds while waiting for the front hoop bends to arrive (bought two 90 degree mandrel bends) and got delayed, so more to come this weekend. I'm also debating on color for the front pipes? Black? Red? Silver/graphite?
#134
05-28-2018, 08:15 AM
This first pic is off RSMs facebook page. I thought some would find it useful.
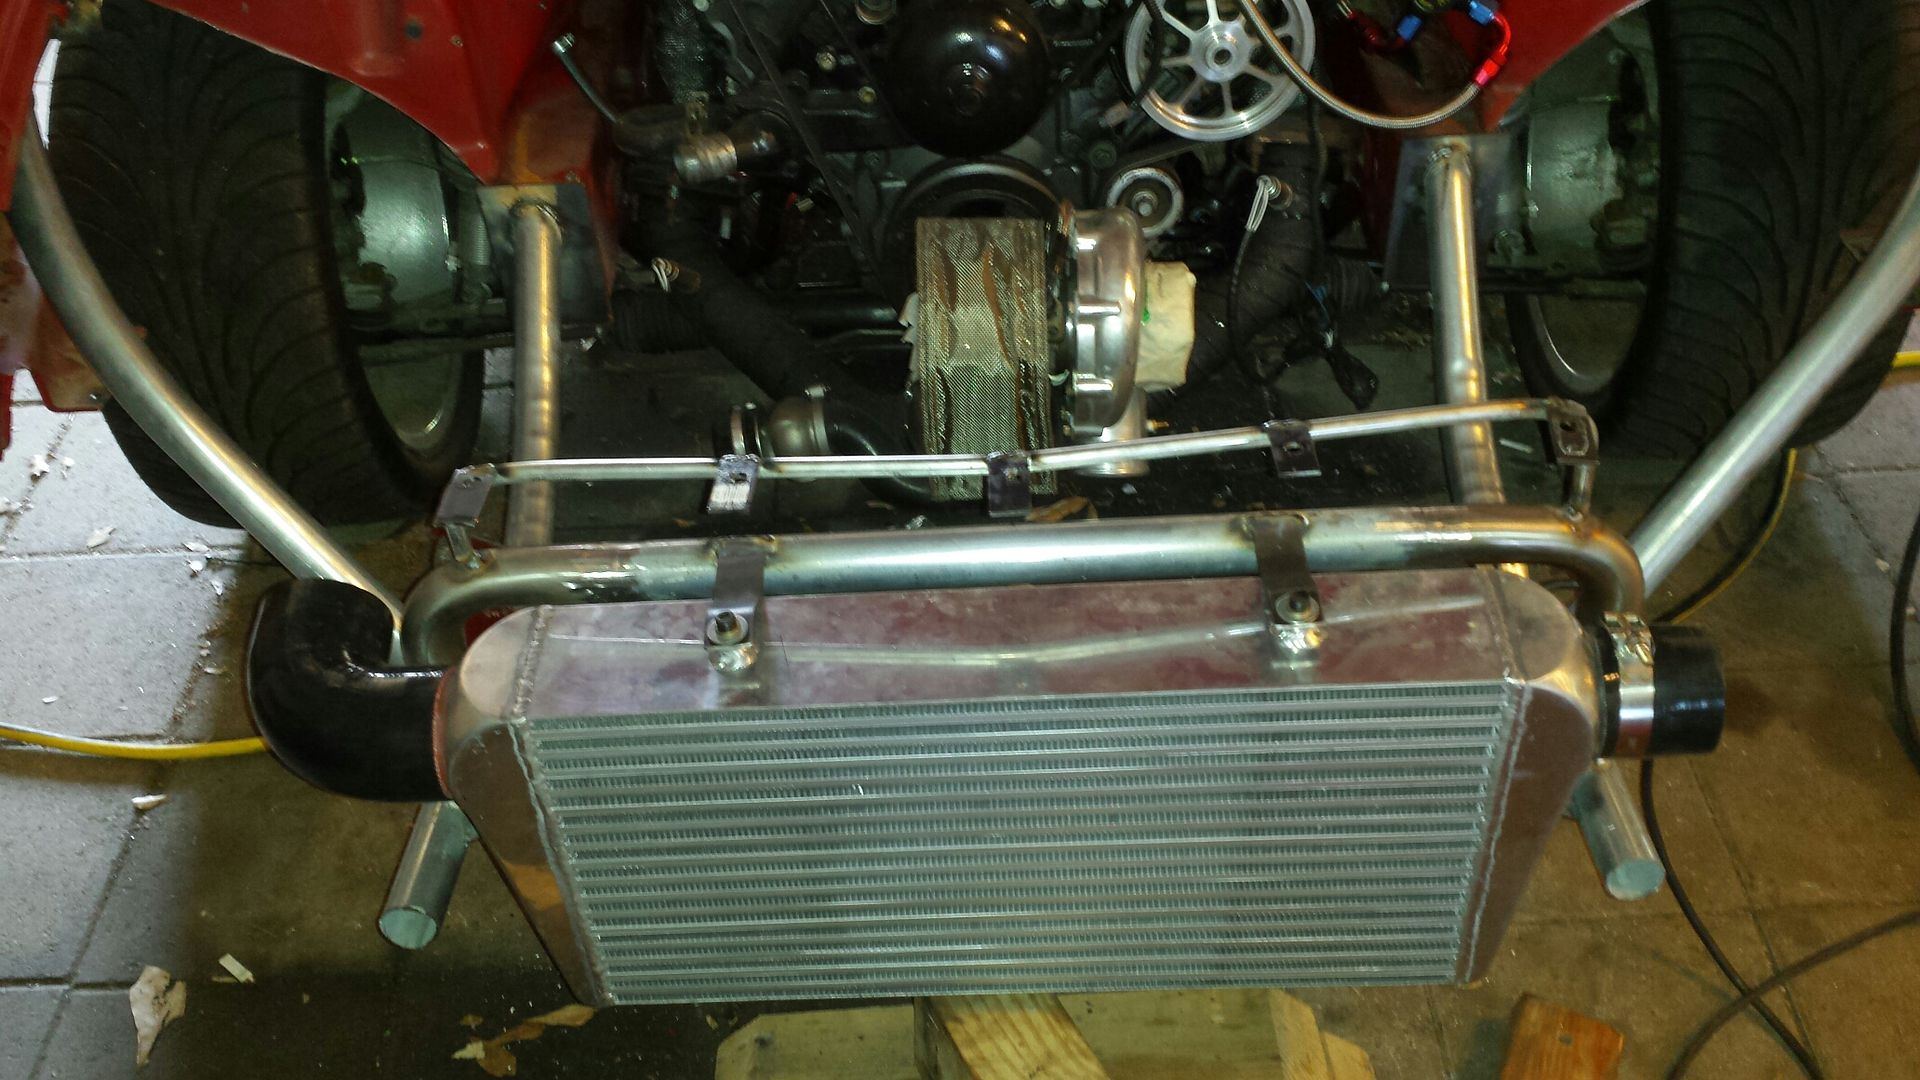
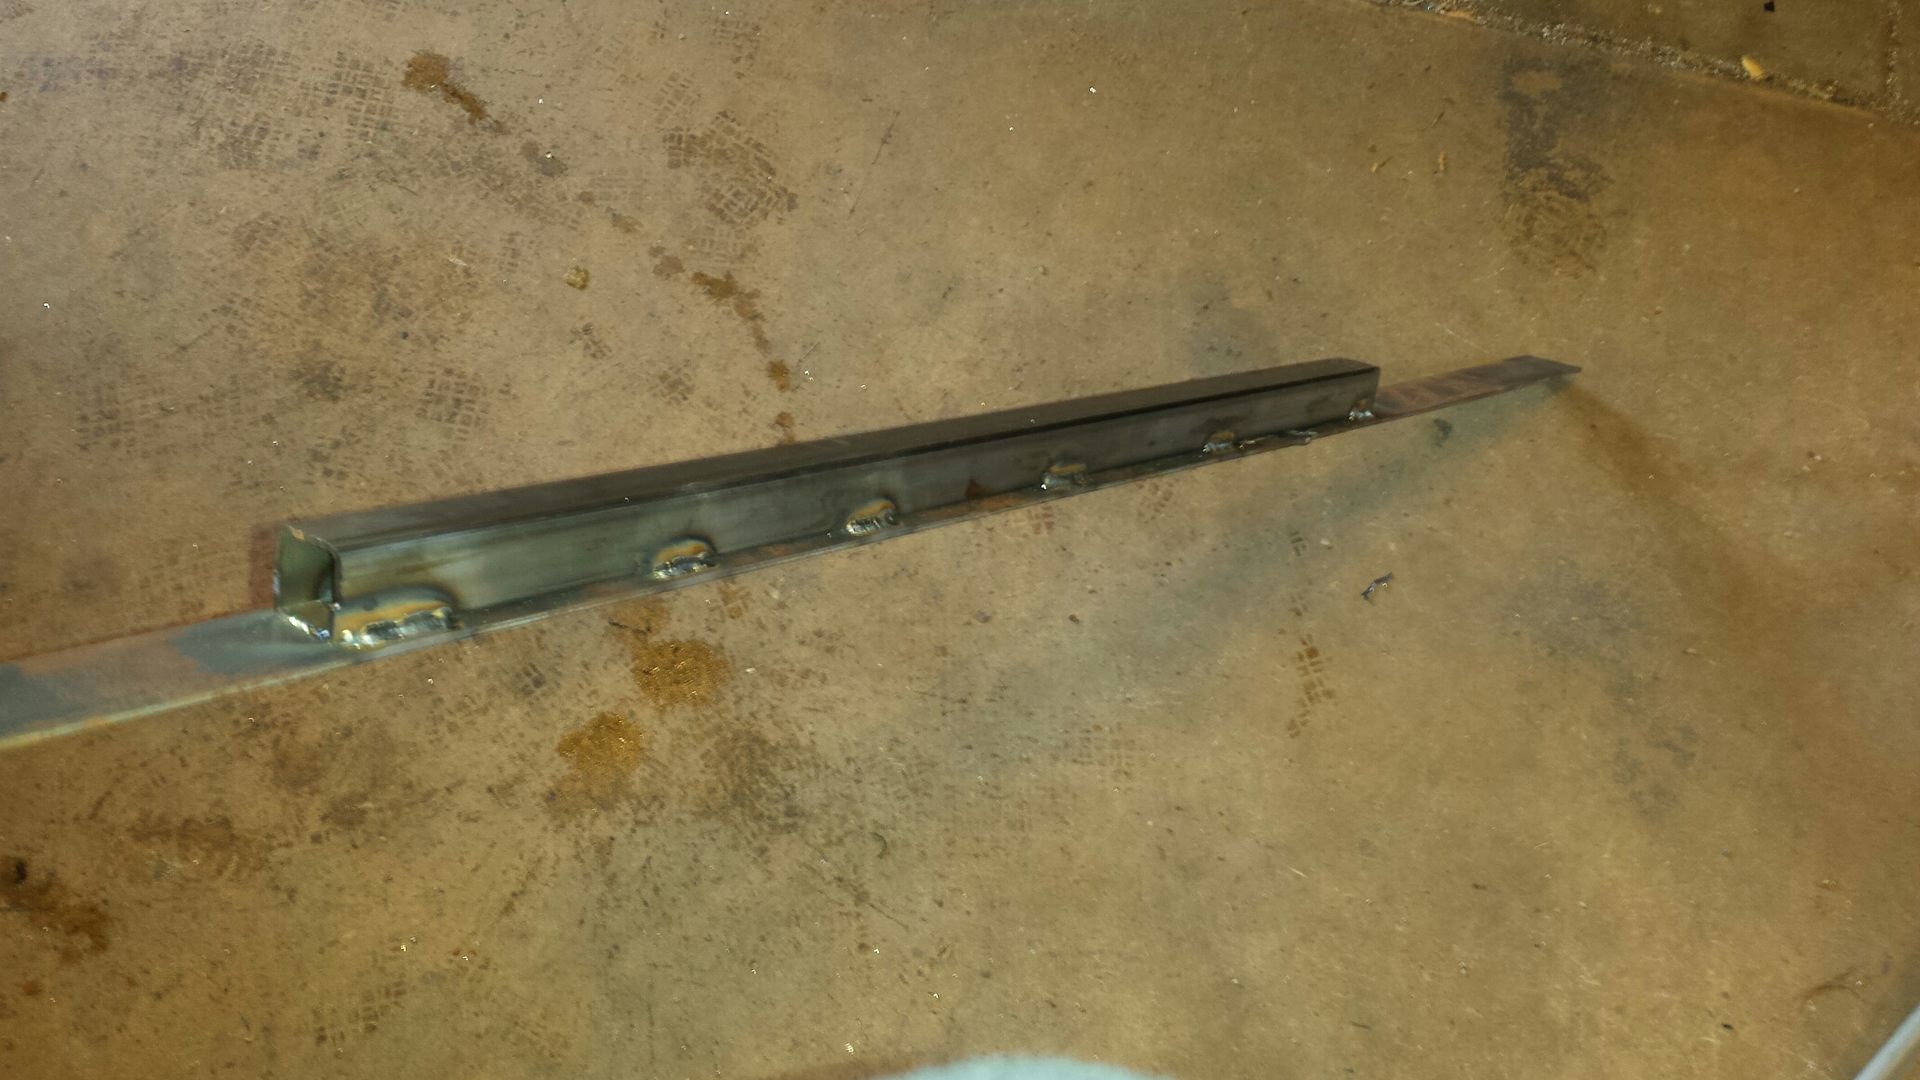
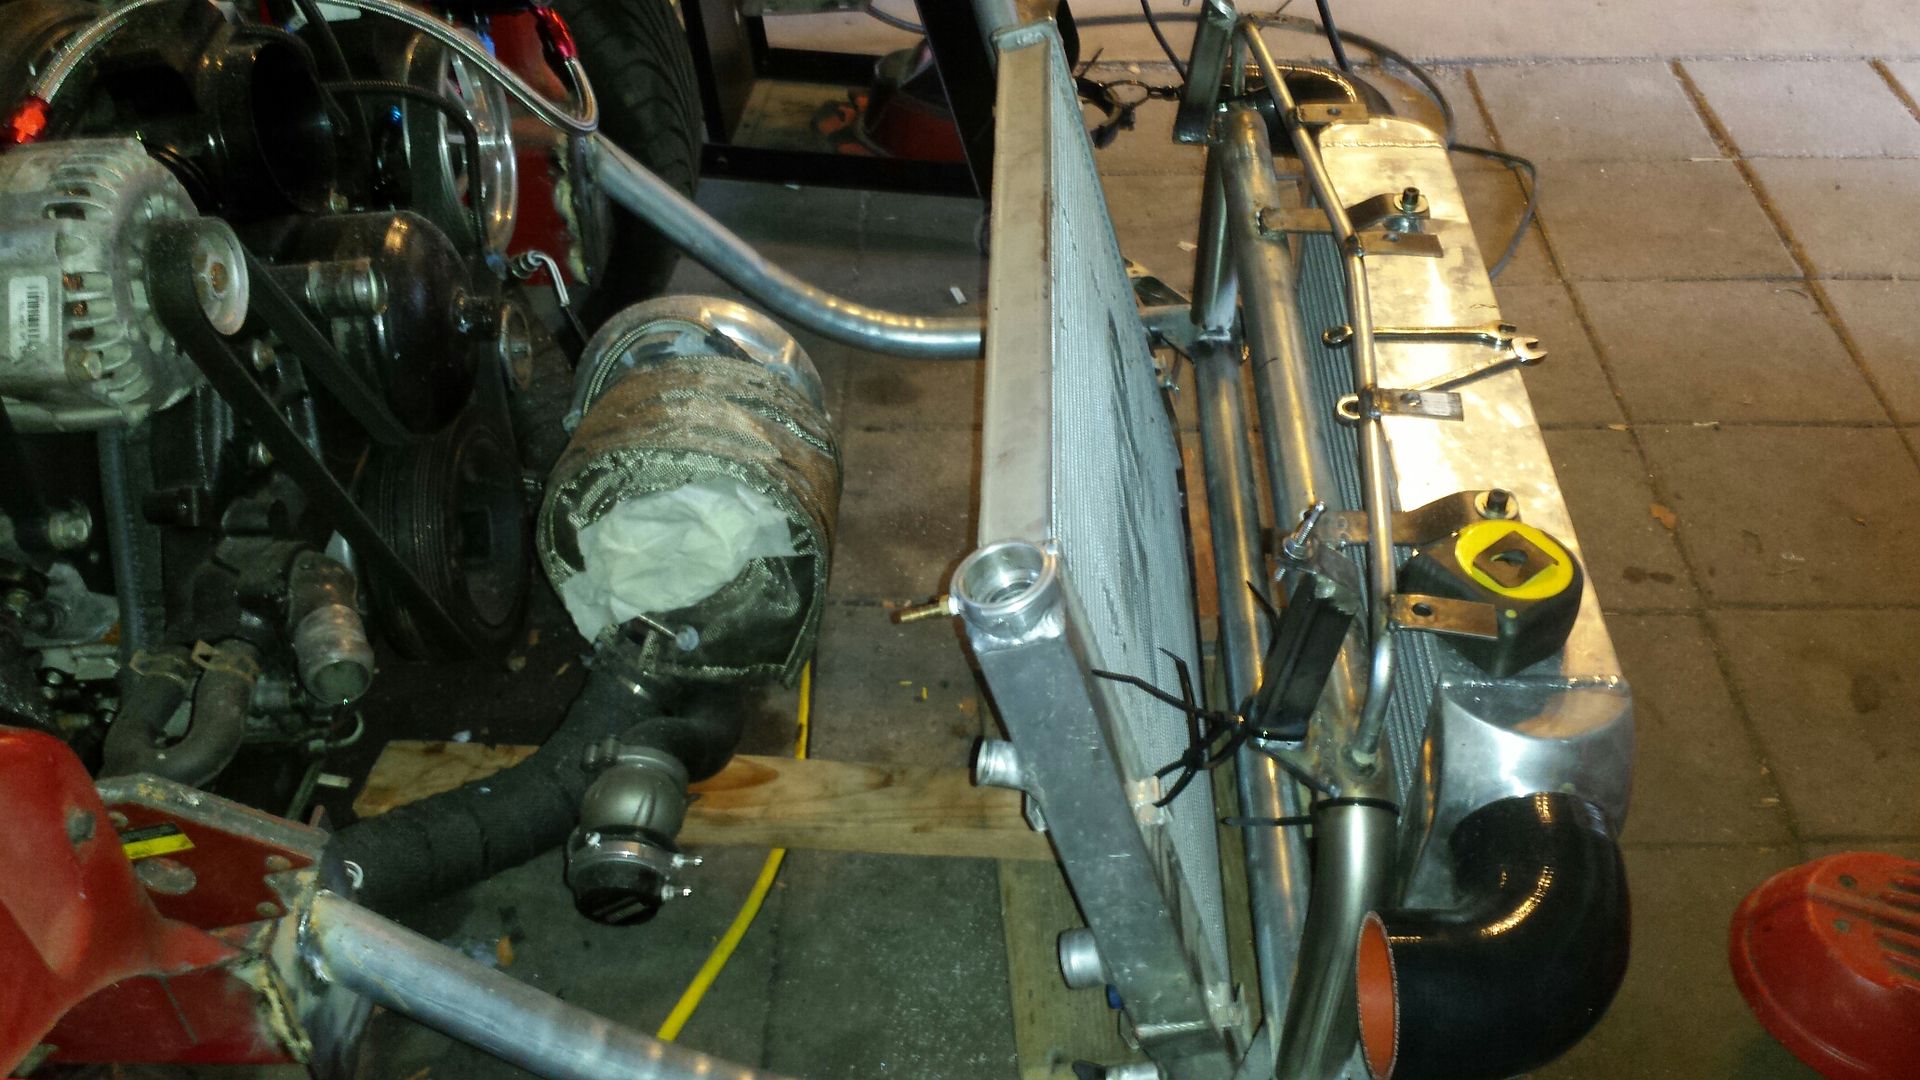
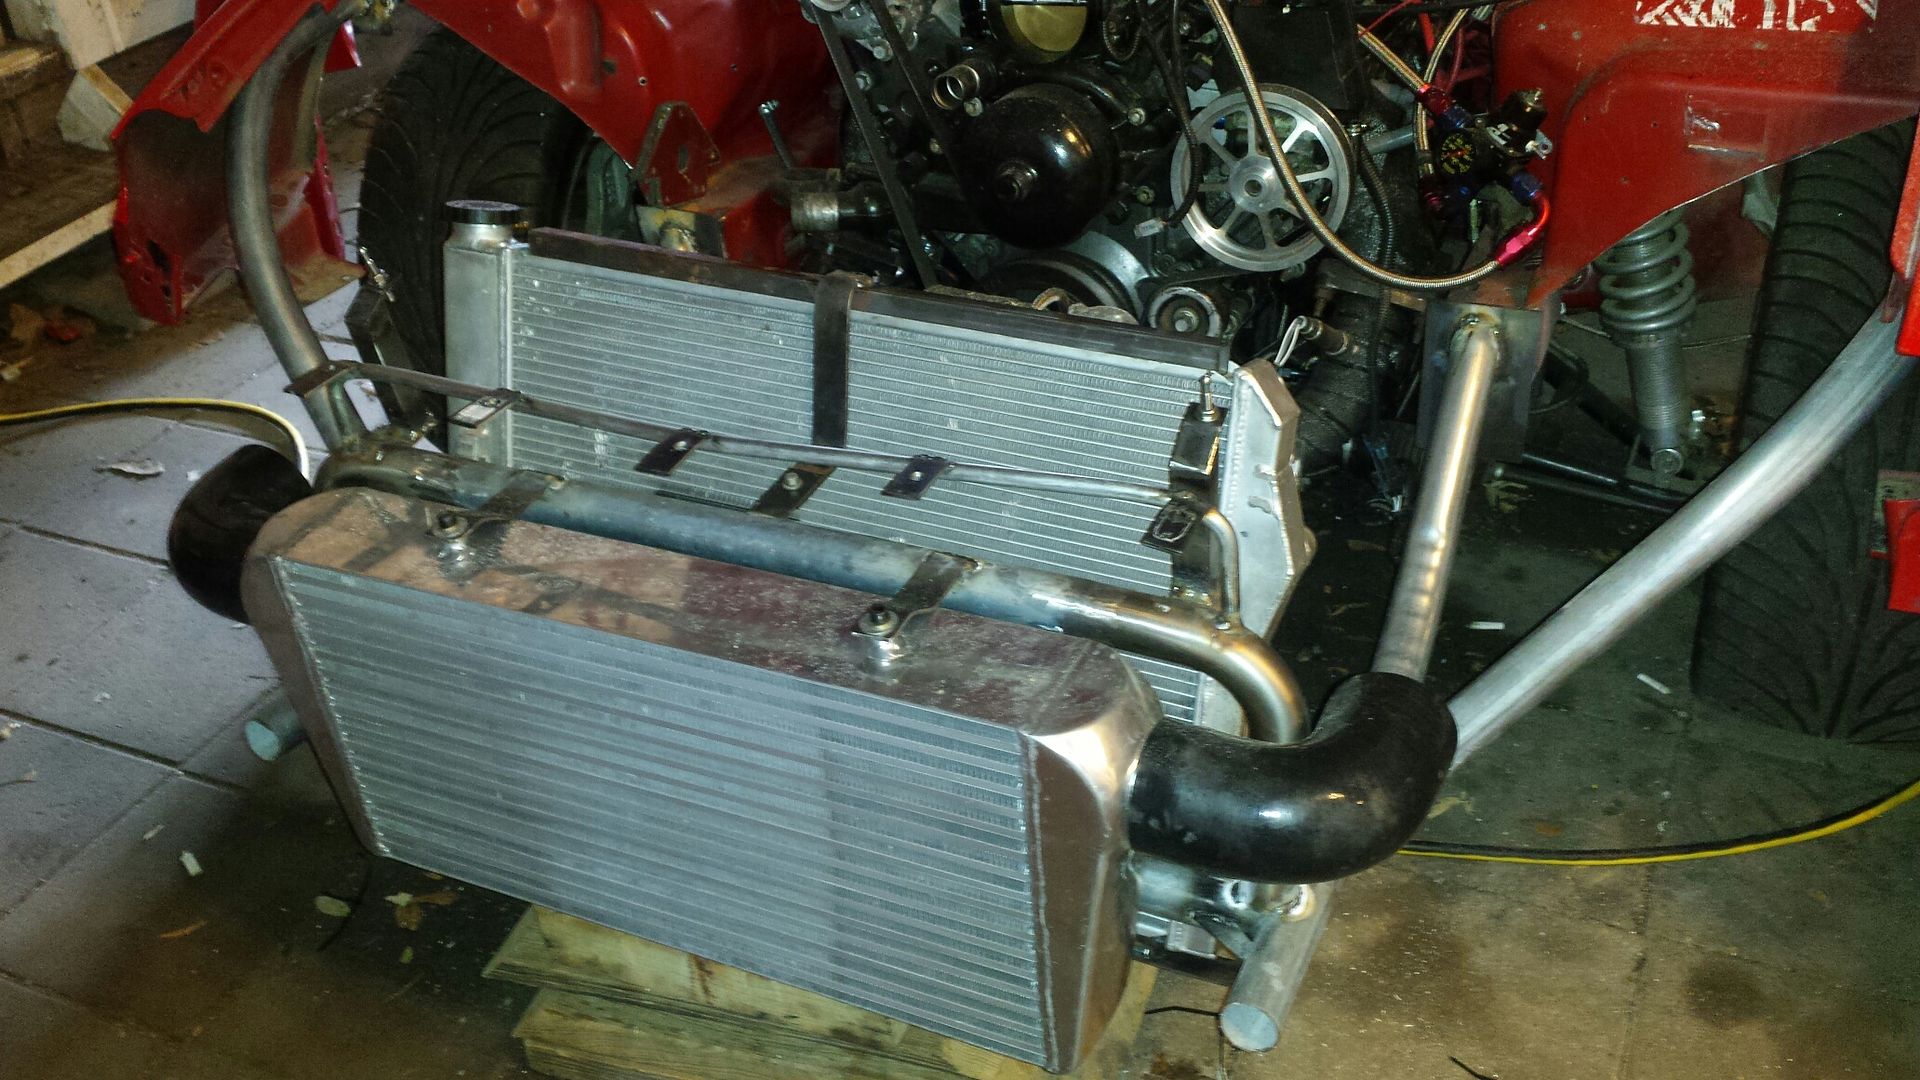
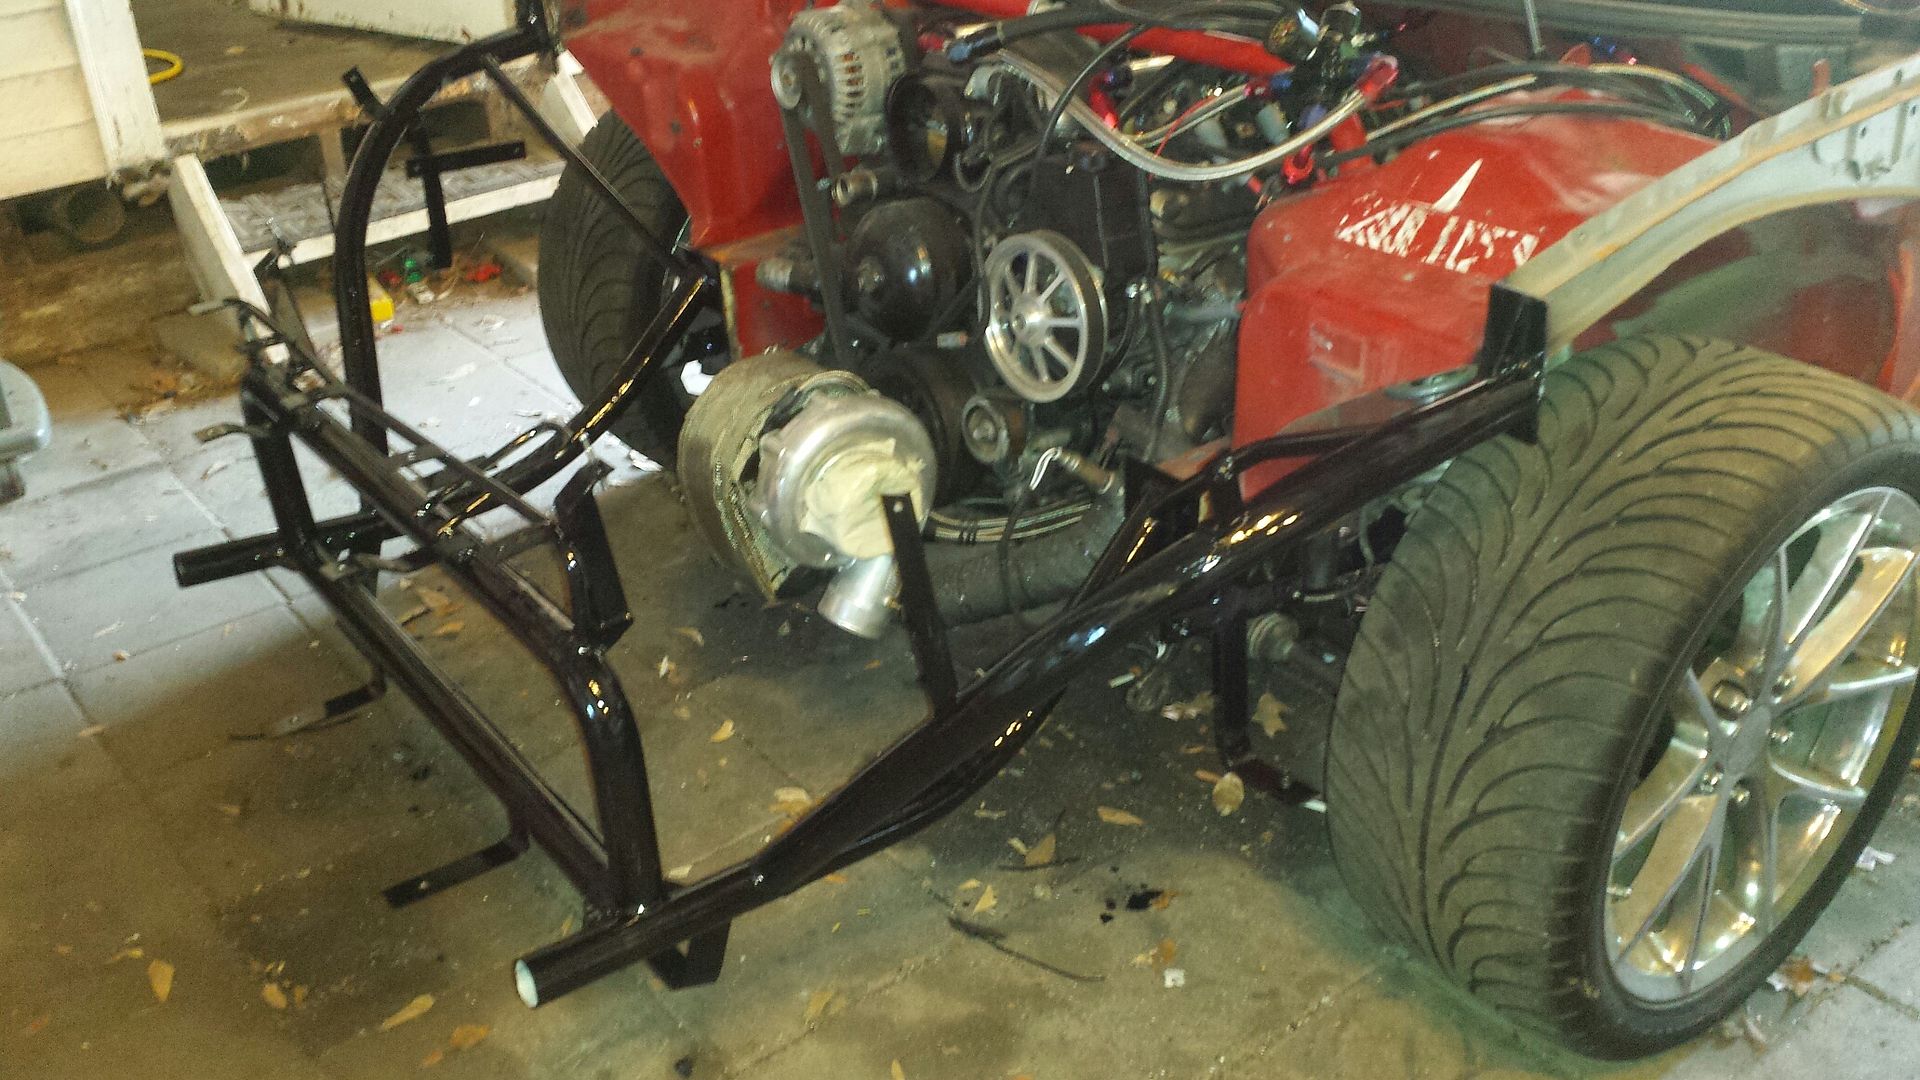
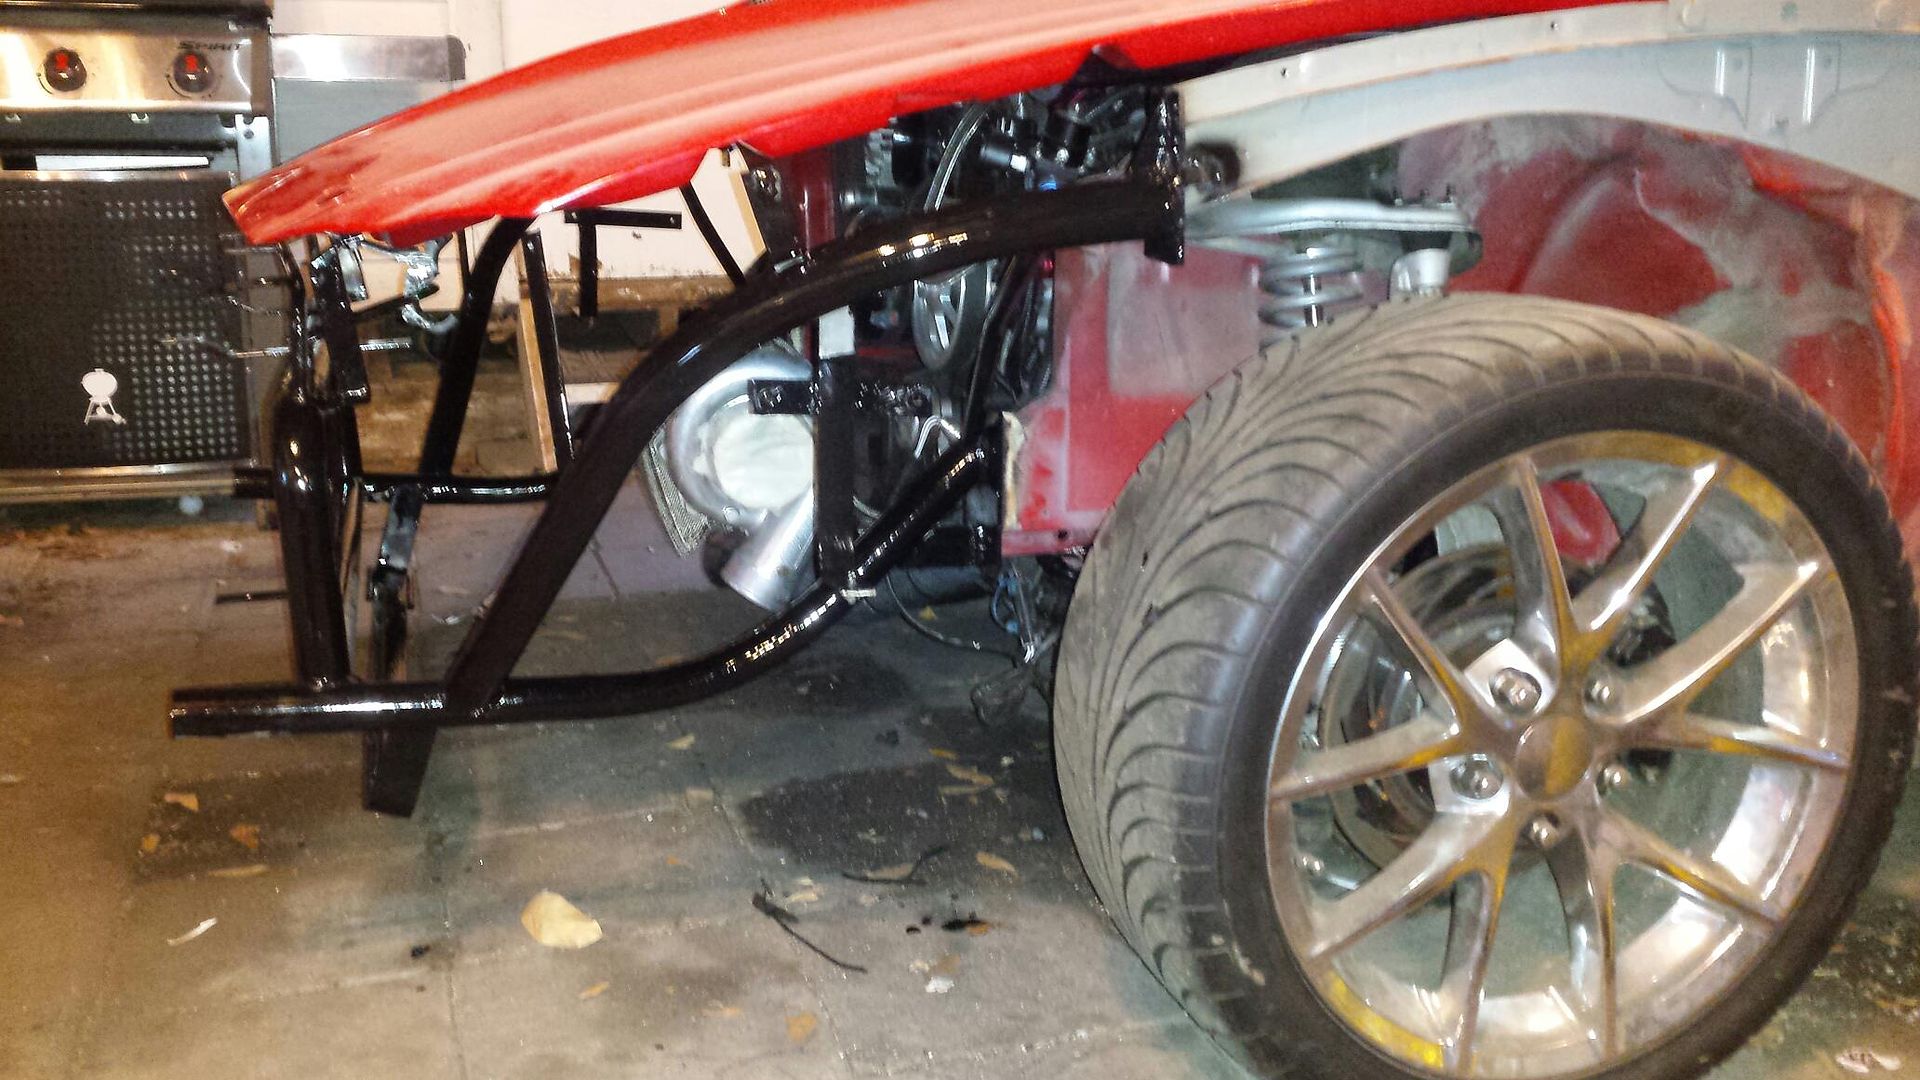
Got the main hoop made and some simple flat bar brackets welded on to hold the intercooler. The 90 degree bends here are stainless and were found on ebay for 20 bucks. No way I could have made a bend that nice so I decided it was ok to buy/use these.
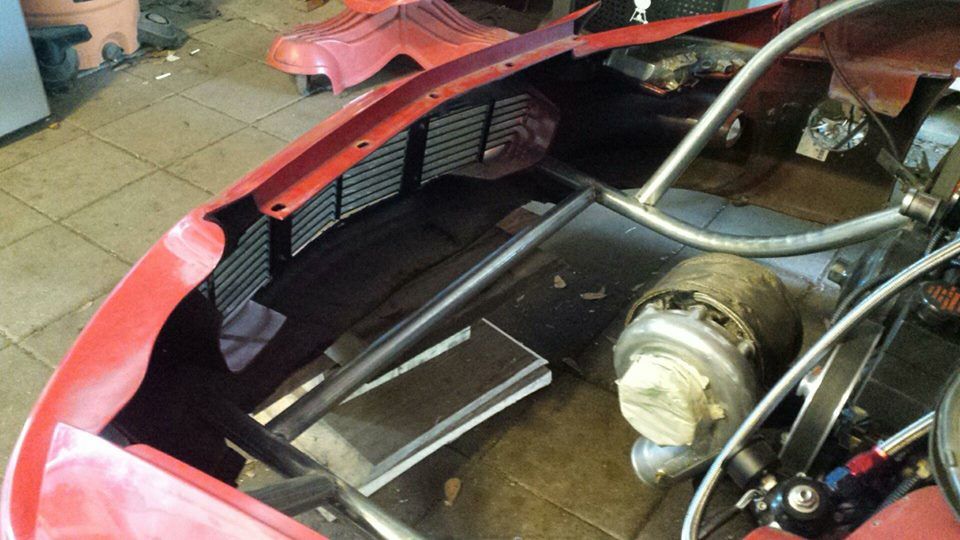
The intercooler has been flipped where the outlets are up top. With 90 degree elbows they just clear the main hoop, and are just under the headlights. I also made an extension on the main hoop to hold 5 tabs that support the bumper and have holes for the pushpins.
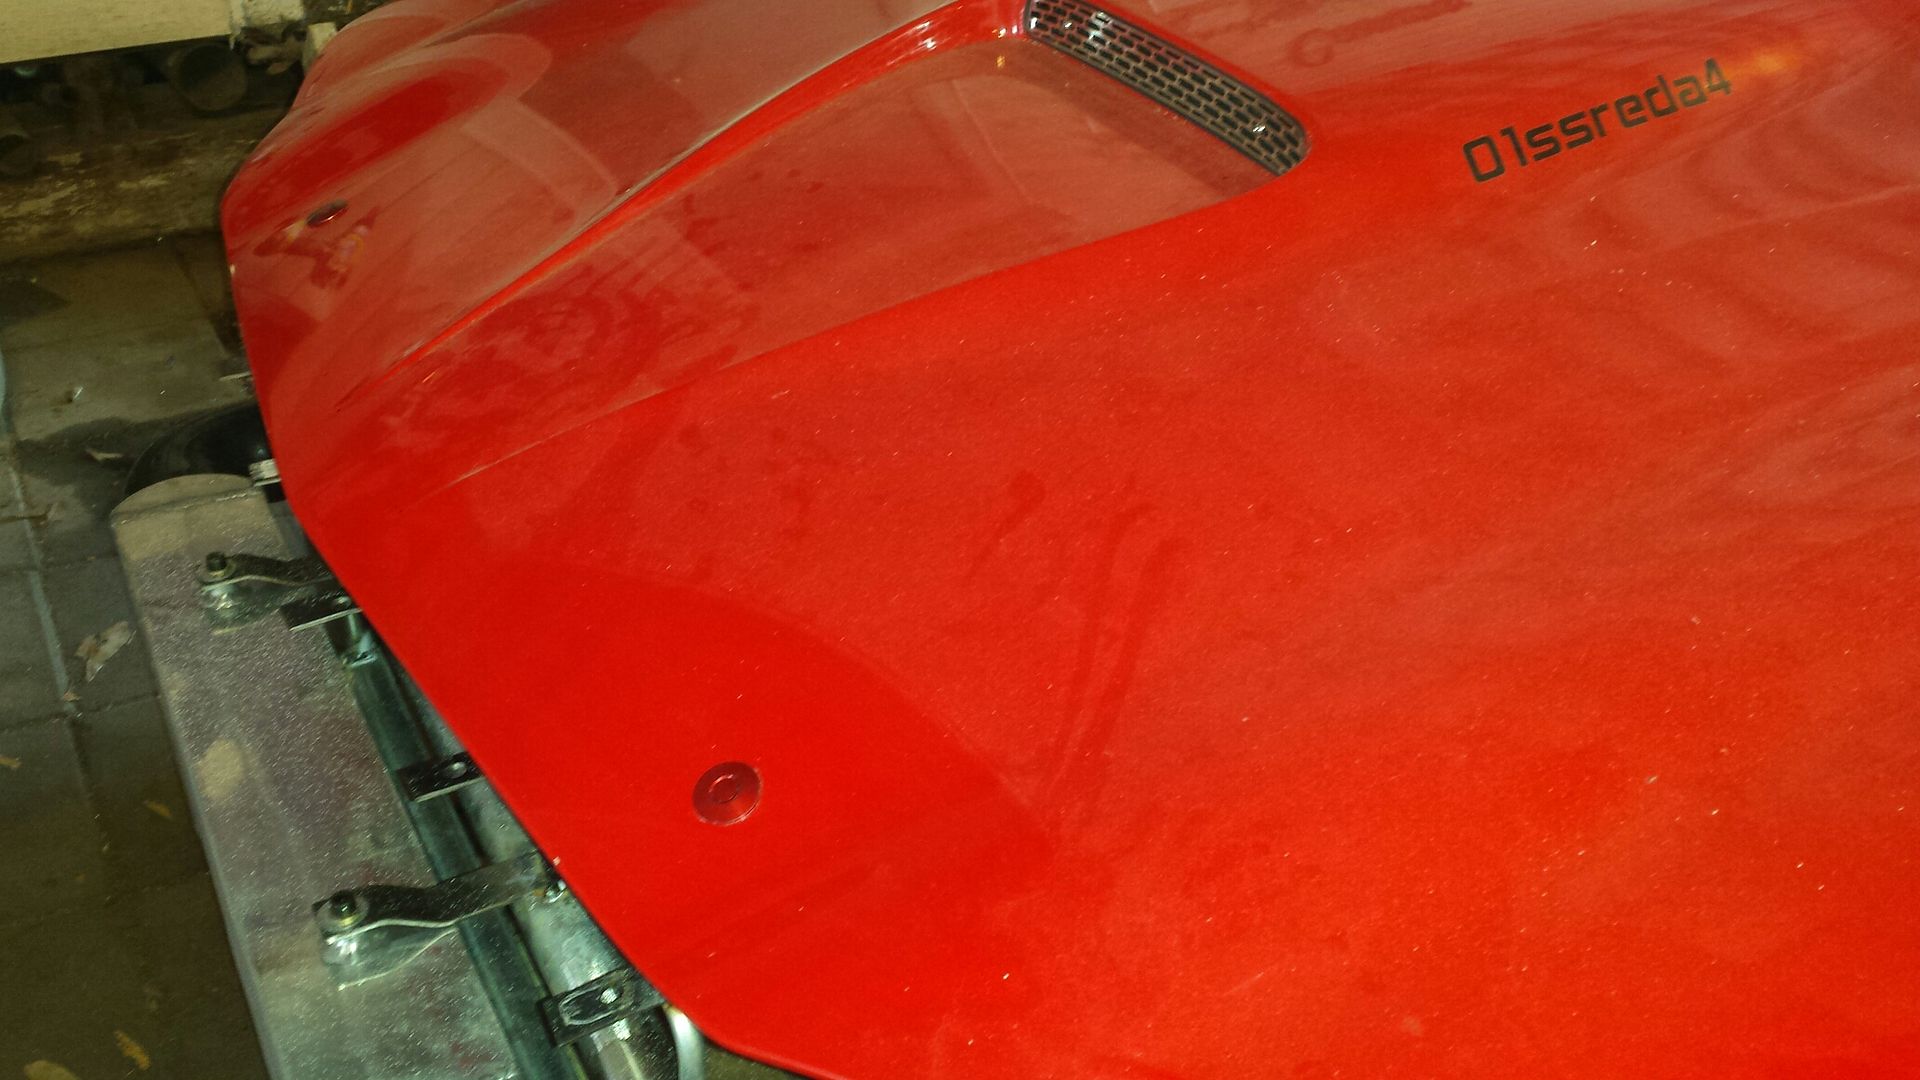
Hood latches, and the biggest tap Ive ever owned.
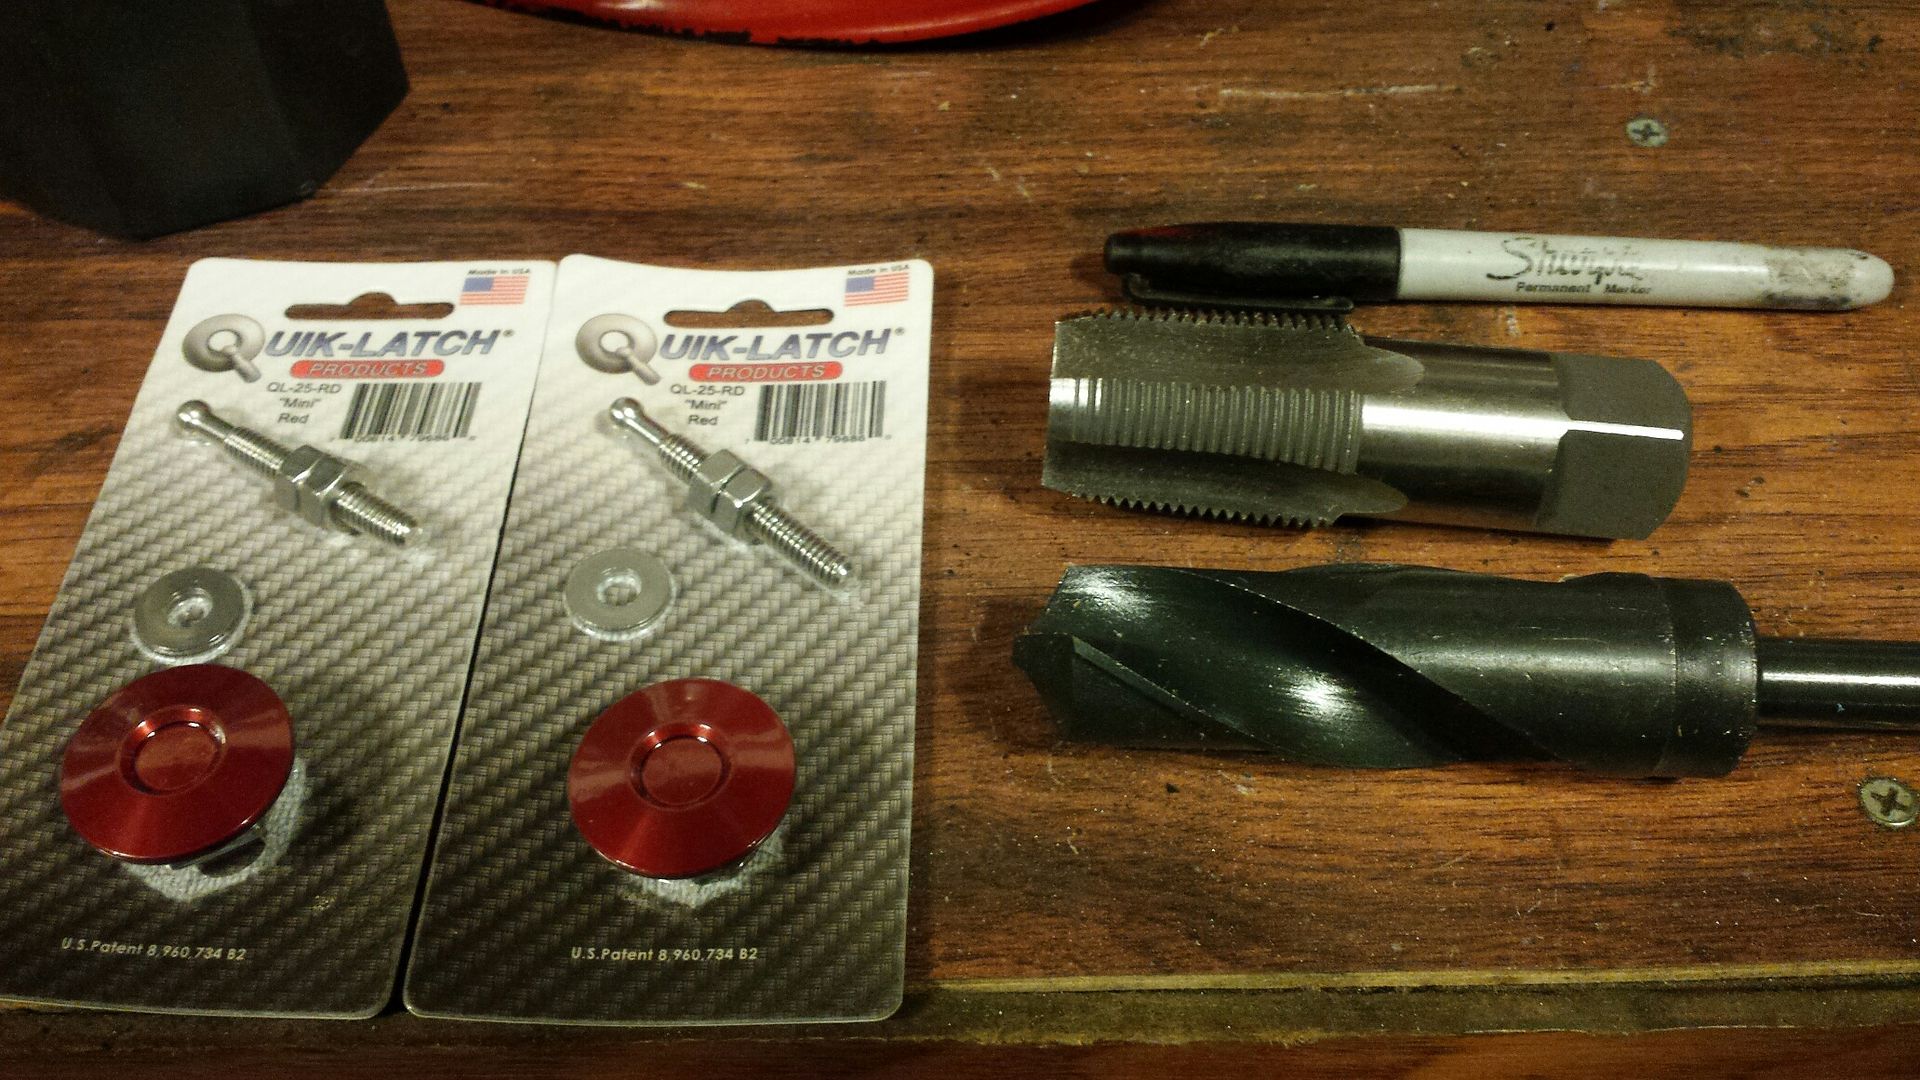
I cringed a little drilling through the hood. Not a lot but a little.
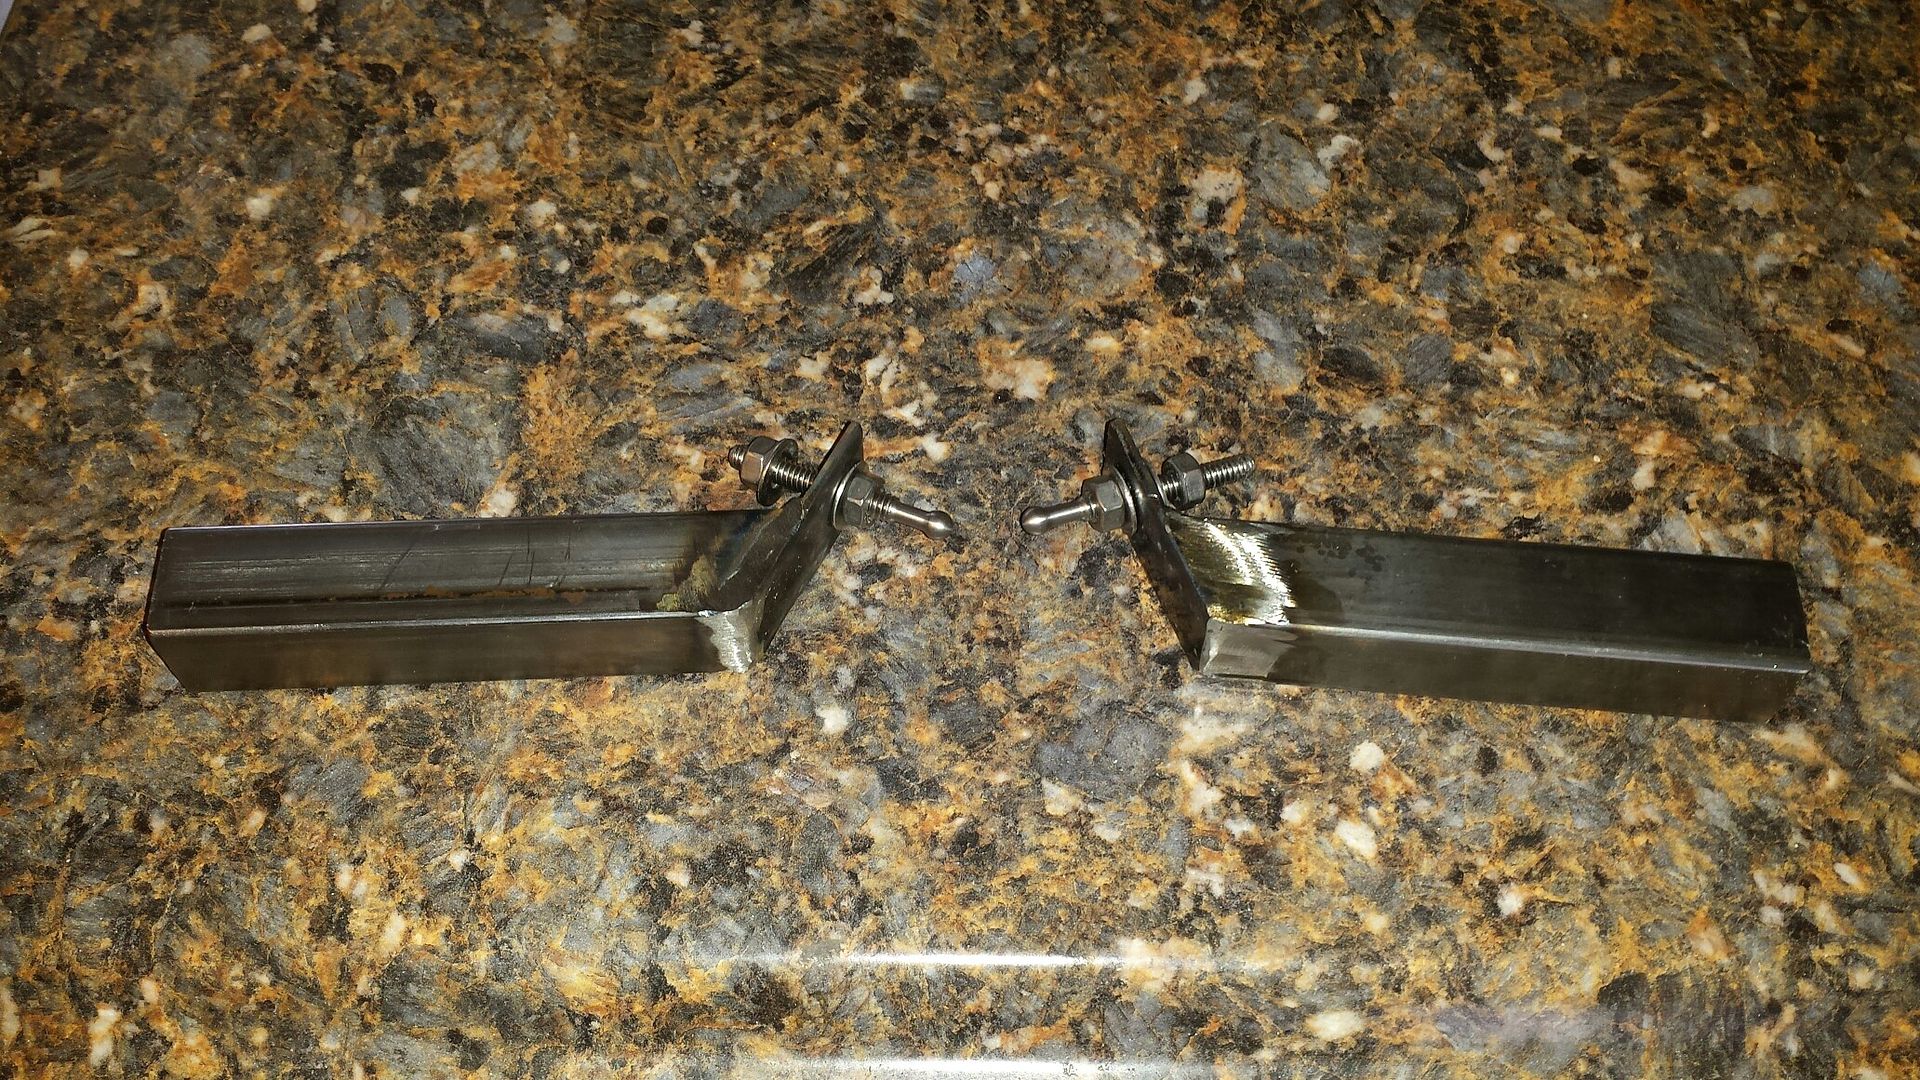
Some simple square tube and flat bar brackets for the hood latches. This was the first attempt. I realized the angle needed altered. These are welded on the main hoop.
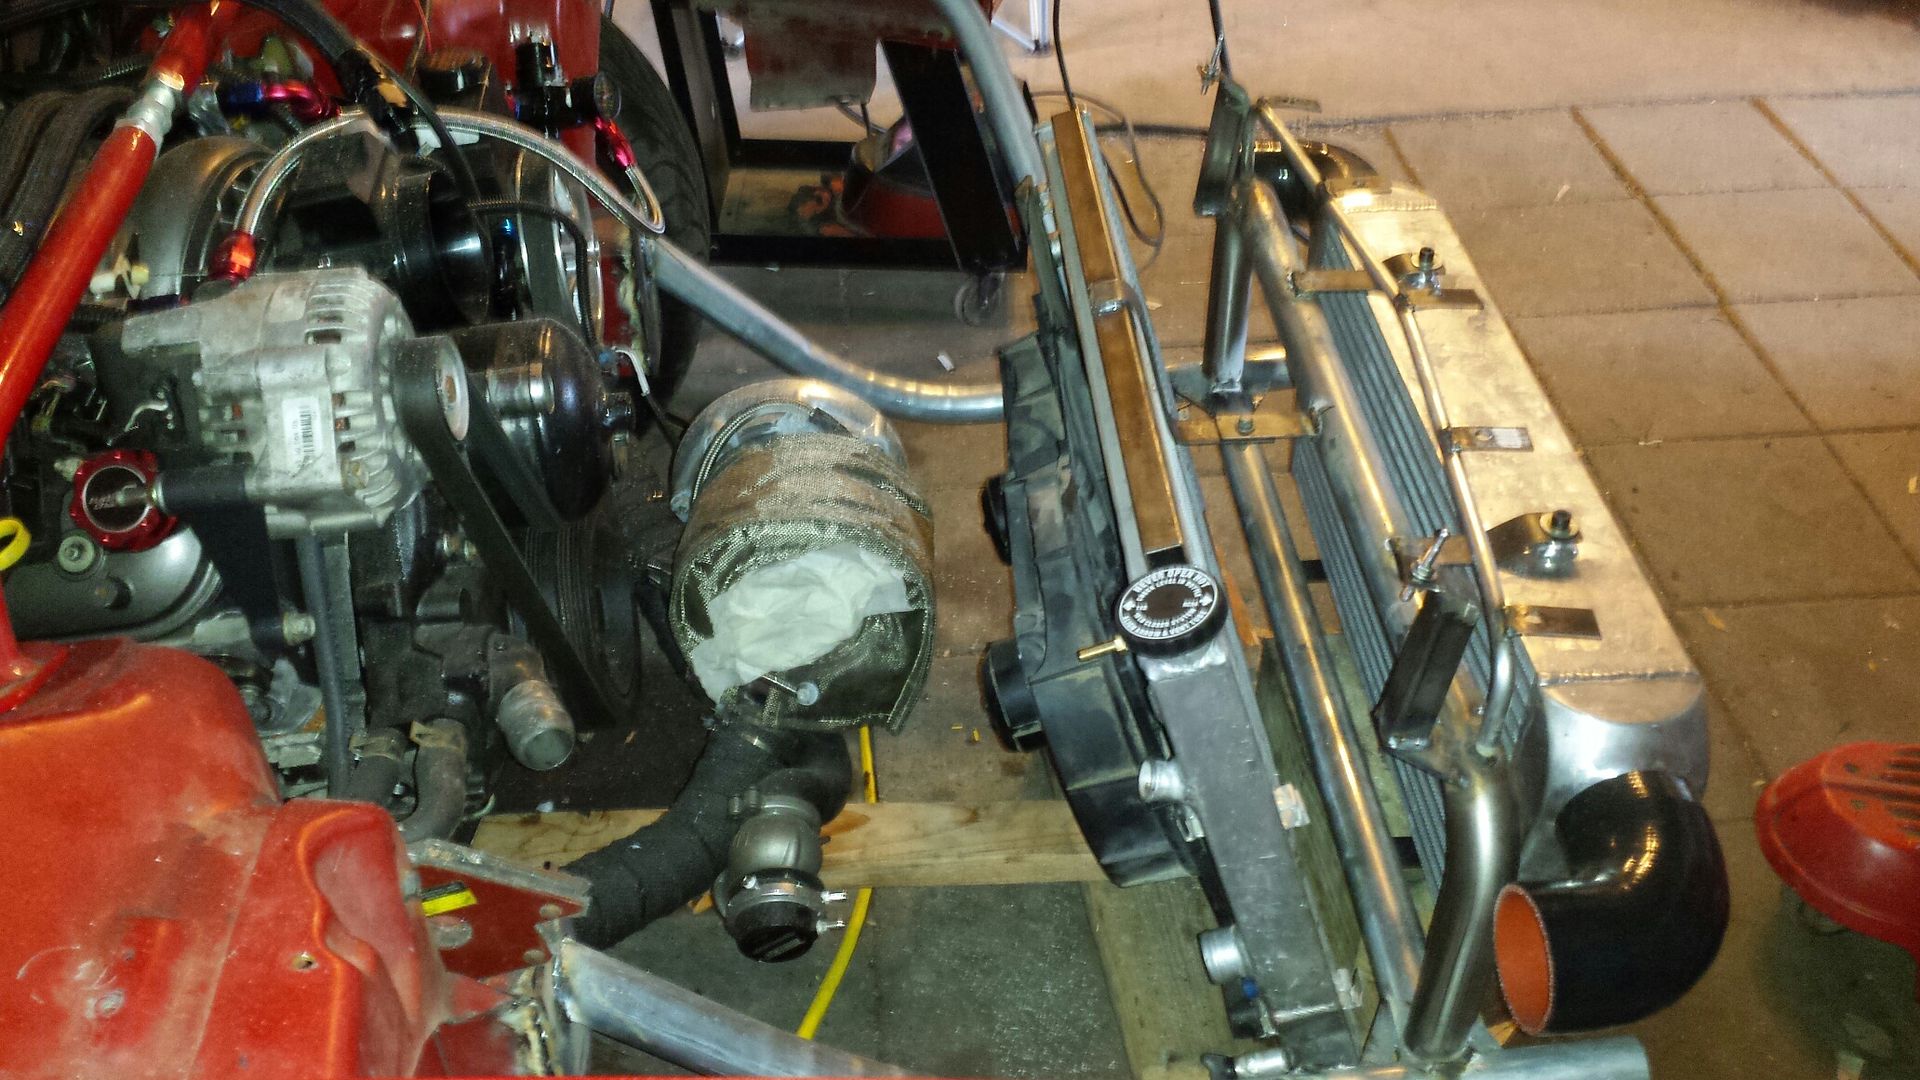
Homemade lower radiator support. I am using the passenger side rubber donut but otherwise the radiator will be sitting on the square tubing. The metal on the top and bottom of the radiator is fairly thick and by distributing the load over the entire area should not have any rubbing issues.
Here's the radiator sitting on the lower support. Im keeping it as close to straight up as possible for turbo clearance. Here I'm checking hood clearance. Zip ties are your "little helper".
Upper radiator bracket made and fans mounted and back on the rear as they were stock. One bolt and the entire radiator comes out, yeeeah. Again, square tube up top and across to distribute load.
Another look.
And Im done for the weekend. This is way more work then I originally thought. I "hope" my next update will be a road trip and a roll cage on a trailer. We shall see.

Got the main hoop made and some simple flat bar brackets welded on to hold the intercooler. The 90 degree bends here are stainless and were found on ebay for 20 bucks. No way I could have made a bend that nice so I decided it was ok to buy/use these.

The intercooler has been flipped where the outlets are up top. With 90 degree elbows they just clear the main hoop, and are just under the headlights. I also made an extension on the main hoop to hold 5 tabs that support the bumper and have holes for the pushpins.

Hood latches, and the biggest tap Ive ever owned.

I cringed a little drilling through the hood. Not a lot but a little.

Some simple square tube and flat bar brackets for the hood latches. This was the first attempt. I realized the angle needed altered. These are welded on the main hoop.

Homemade lower radiator support. I am using the passenger side rubber donut but otherwise the radiator will be sitting on the square tubing. The metal on the top and bottom of the radiator is fairly thick and by distributing the load over the entire area should not have any rubbing issues.

Here's the radiator sitting on the lower support. Im keeping it as close to straight up as possible for turbo clearance. Here I'm checking hood clearance. Zip ties are your "little helper".

Upper radiator bracket made and fans mounted and back on the rear as they were stock. One bolt and the entire radiator comes out, yeeeah. Again, square tube up top and across to distribute load.

Another look.

And Im done for the weekend. This is way more work then I originally thought. I "hope" my next update will be a road trip and a roll cage on a trailer. We shall see.
#135
06-02-2018, 08:26 AM
Quick update: Hood safety release handle is reinstalled, fenders/bumper are braced, headlight mounts are done, catch can and radiator over flow have mounts. Everything was test fit before disassembly. Radiator and fans have been cleaned and painted. I tried out some Rustoleum brush on paint. I may go back and do this red, haven't decided. I got the call, roll cage and wheel tubs pick up on Tuesday.......so that means, road trip finally!!


#136
06-07-2018, 07:30 AM
Long trip to Ft Worth and back. Dallas traffic is crazy......
The tubs appear different sizes due to the car body being non-symmetrical. They will look the same once installed.
If you ever stop at Bucee's or see this in the store its highly recommended. Cool place, first time I'd been to one.
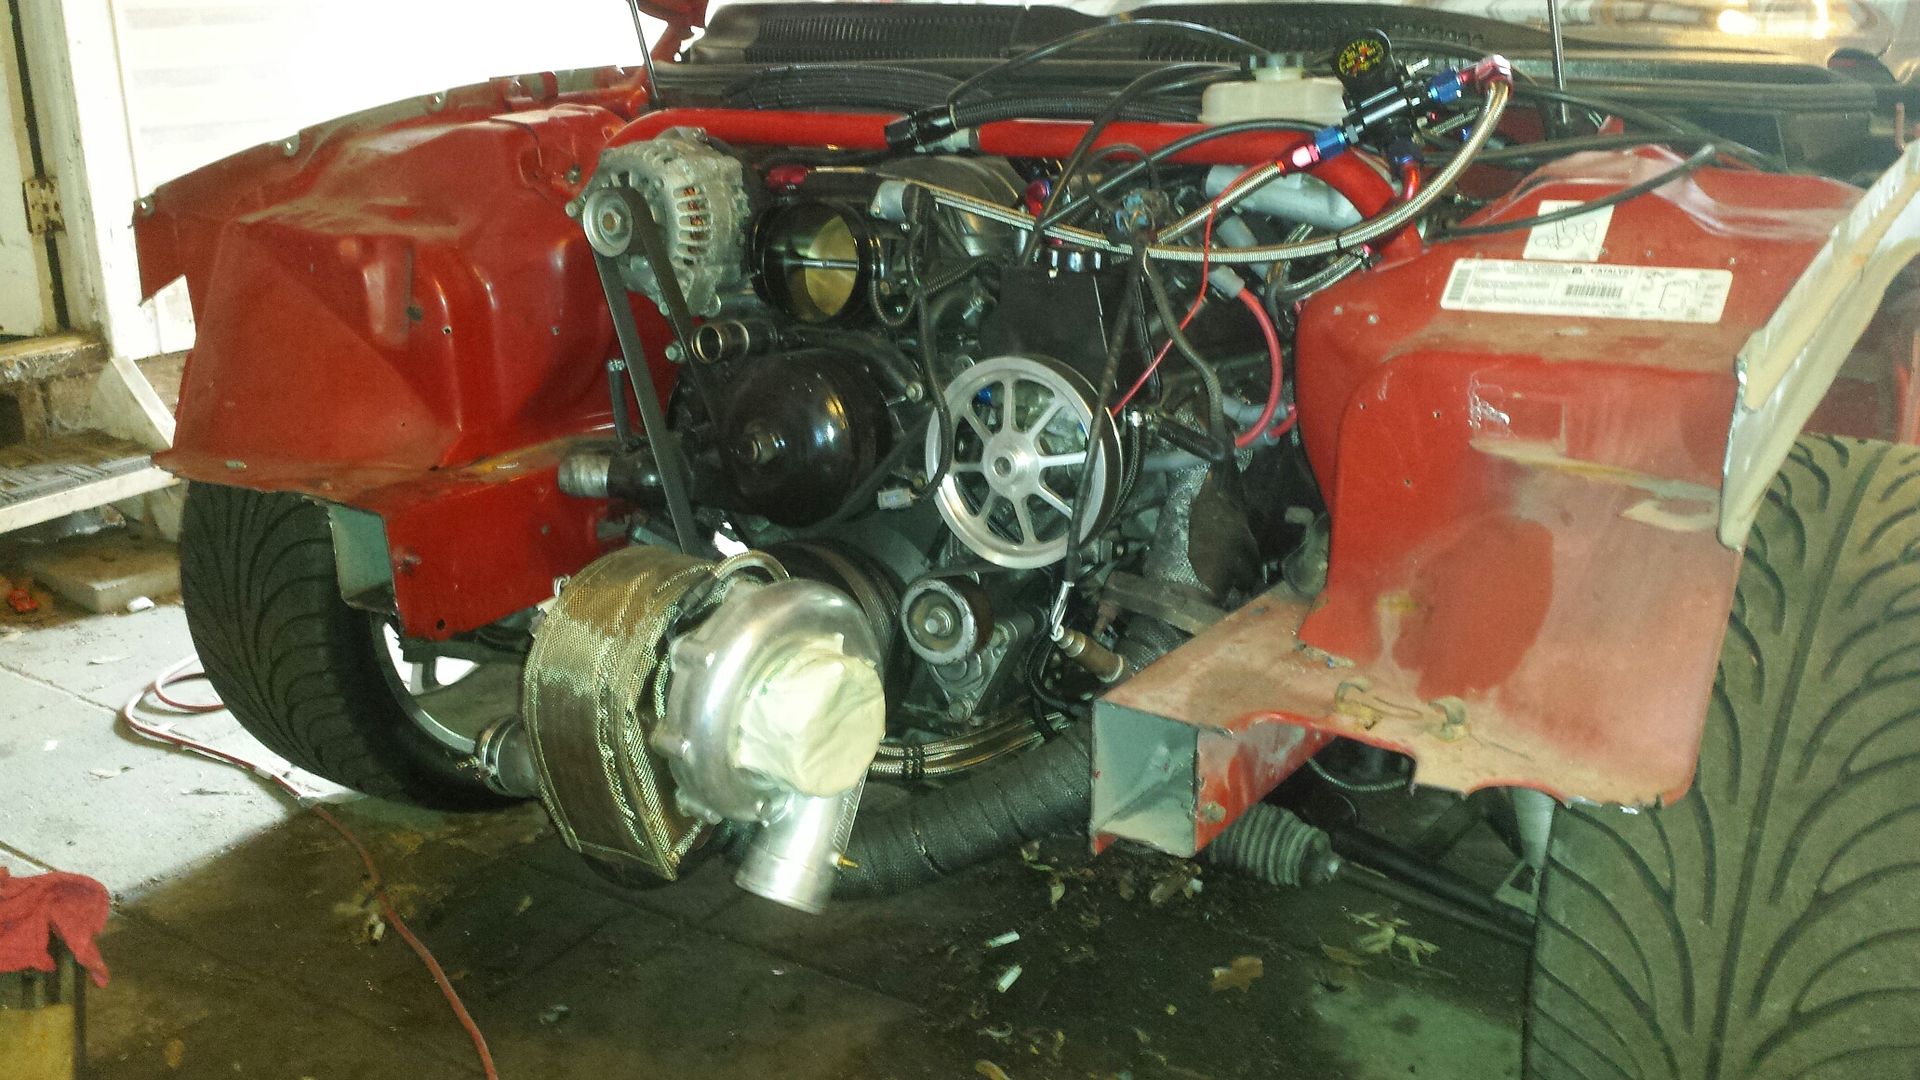
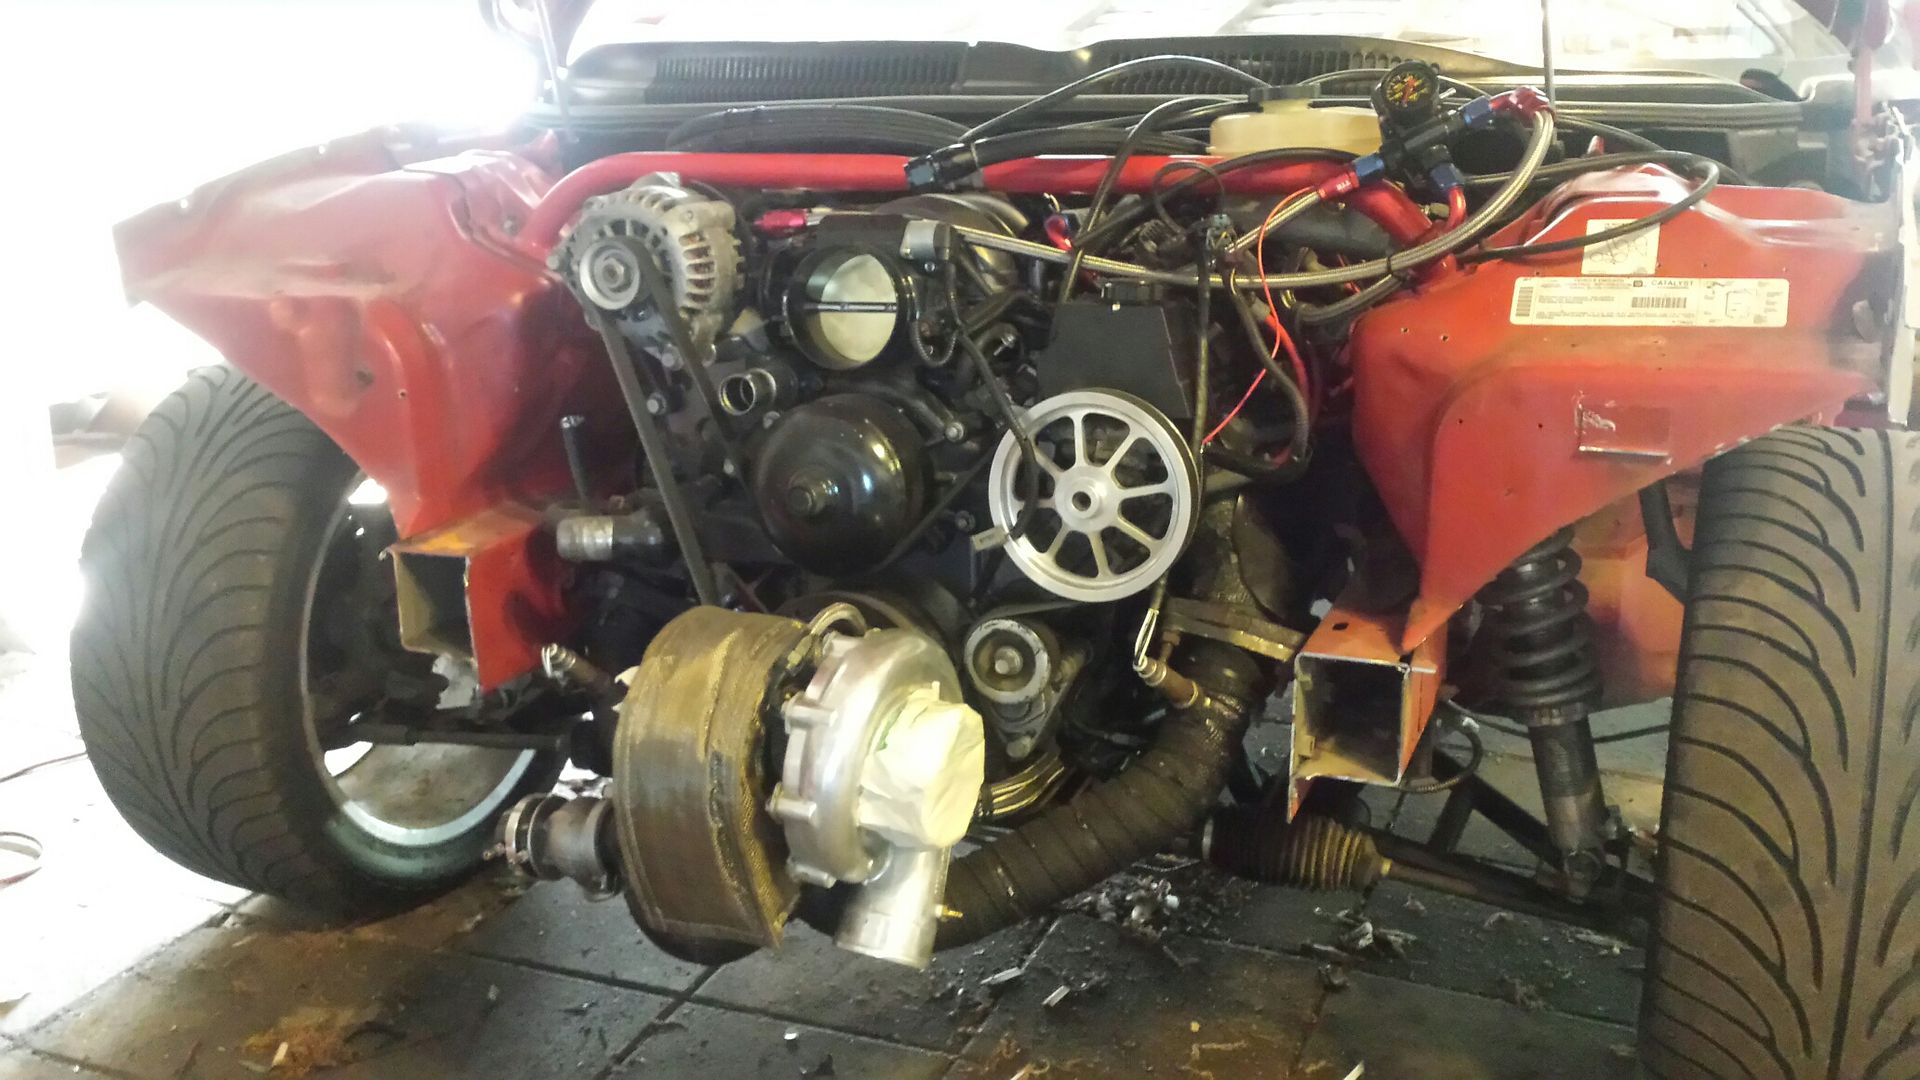
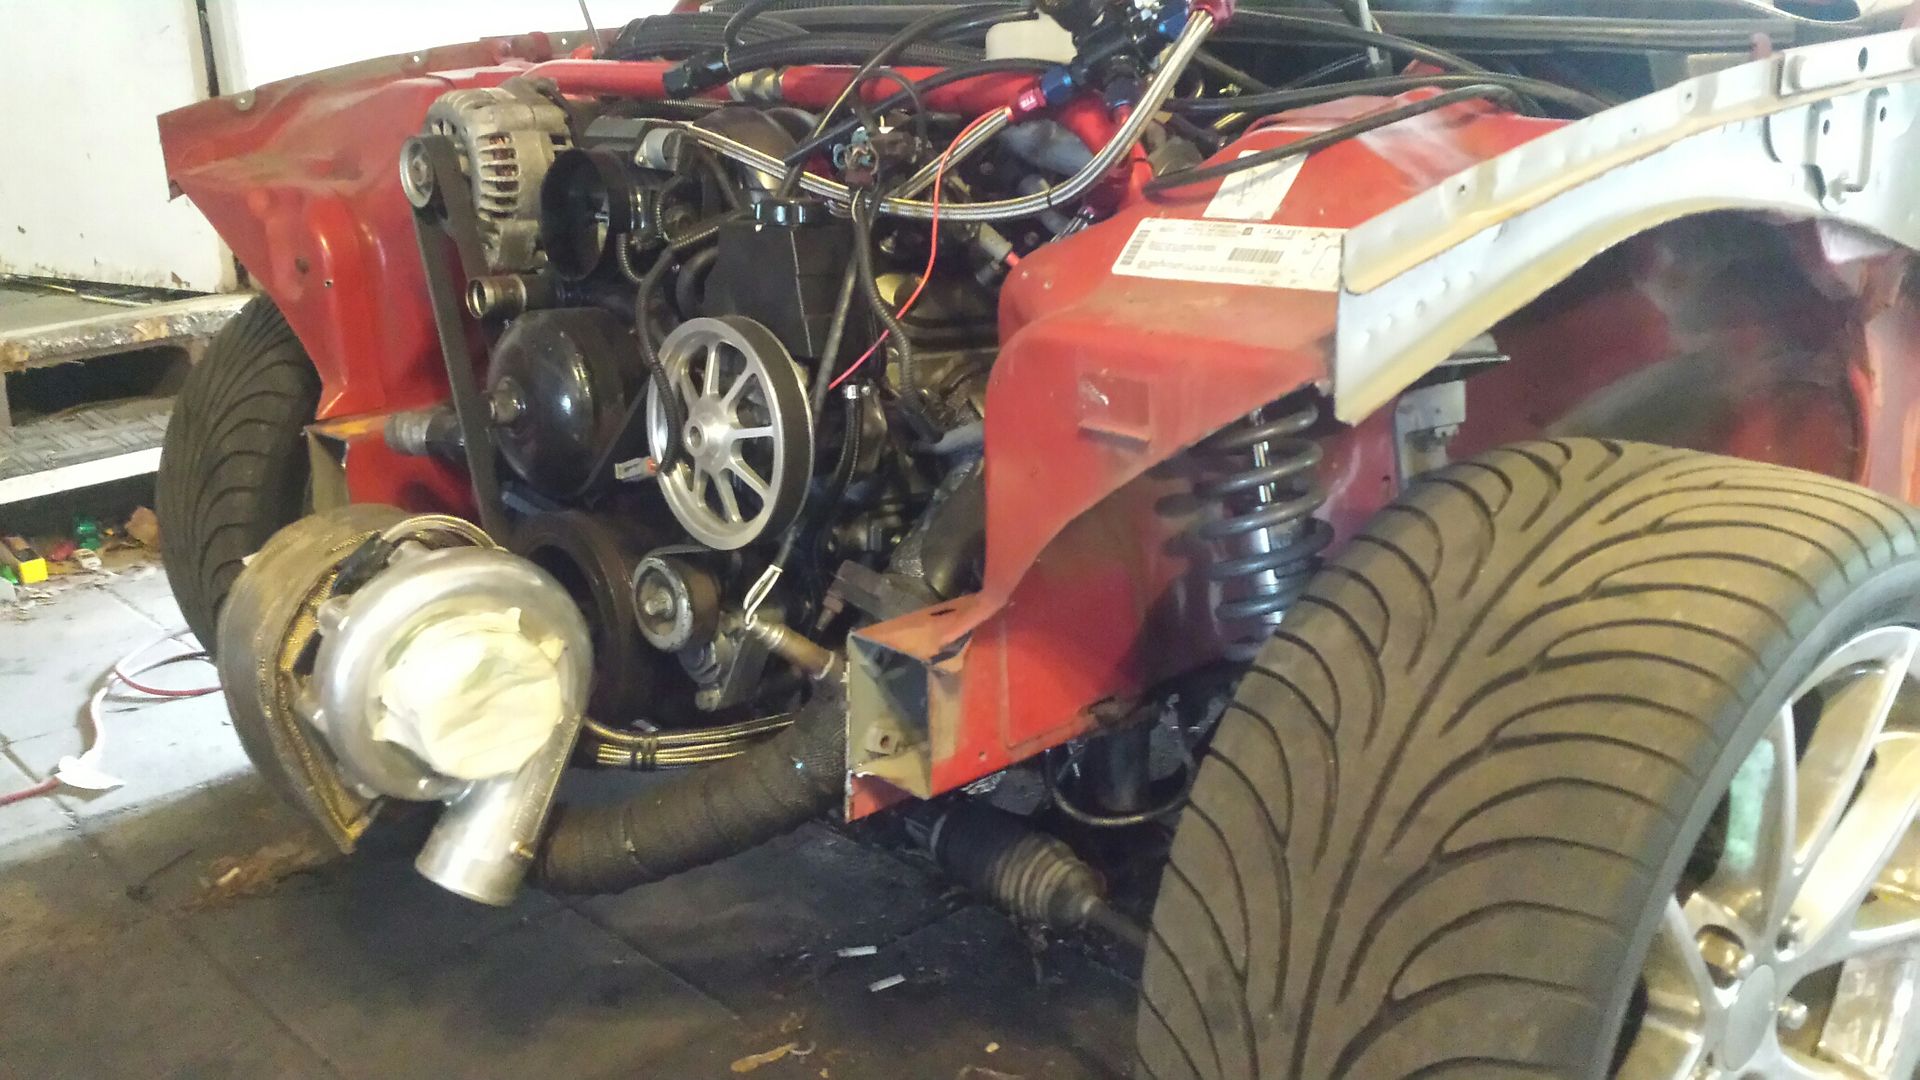
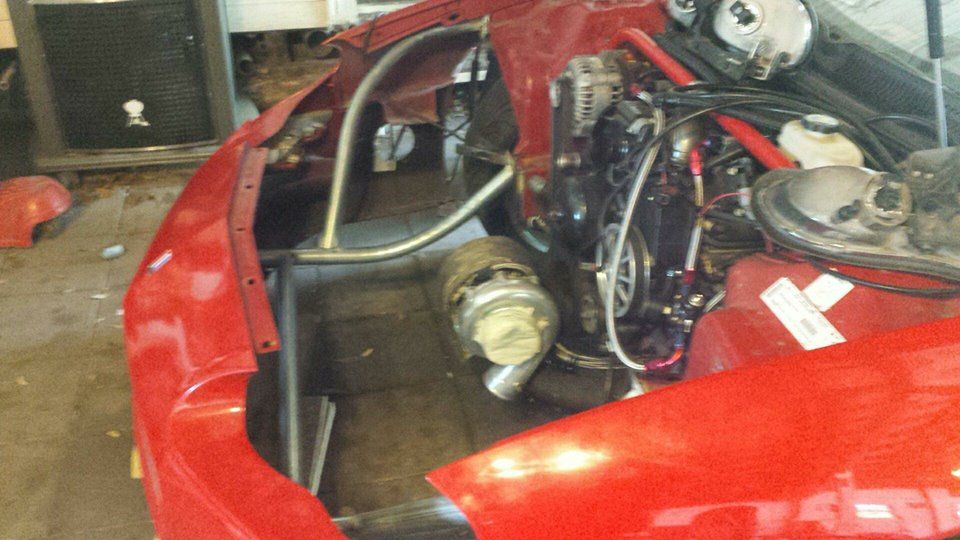
Turbo and turbo kit is gone. On to bigger and better things.

The tubs appear different sizes due to the car body being non-symmetrical. They will look the same once installed.

If you ever stop at Bucee's or see this in the store its highly recommended. Cool place, first time I'd been to one.

Turbo and turbo kit is gone. On to bigger and better things.

#137
06-11-2018, 07:47 AM
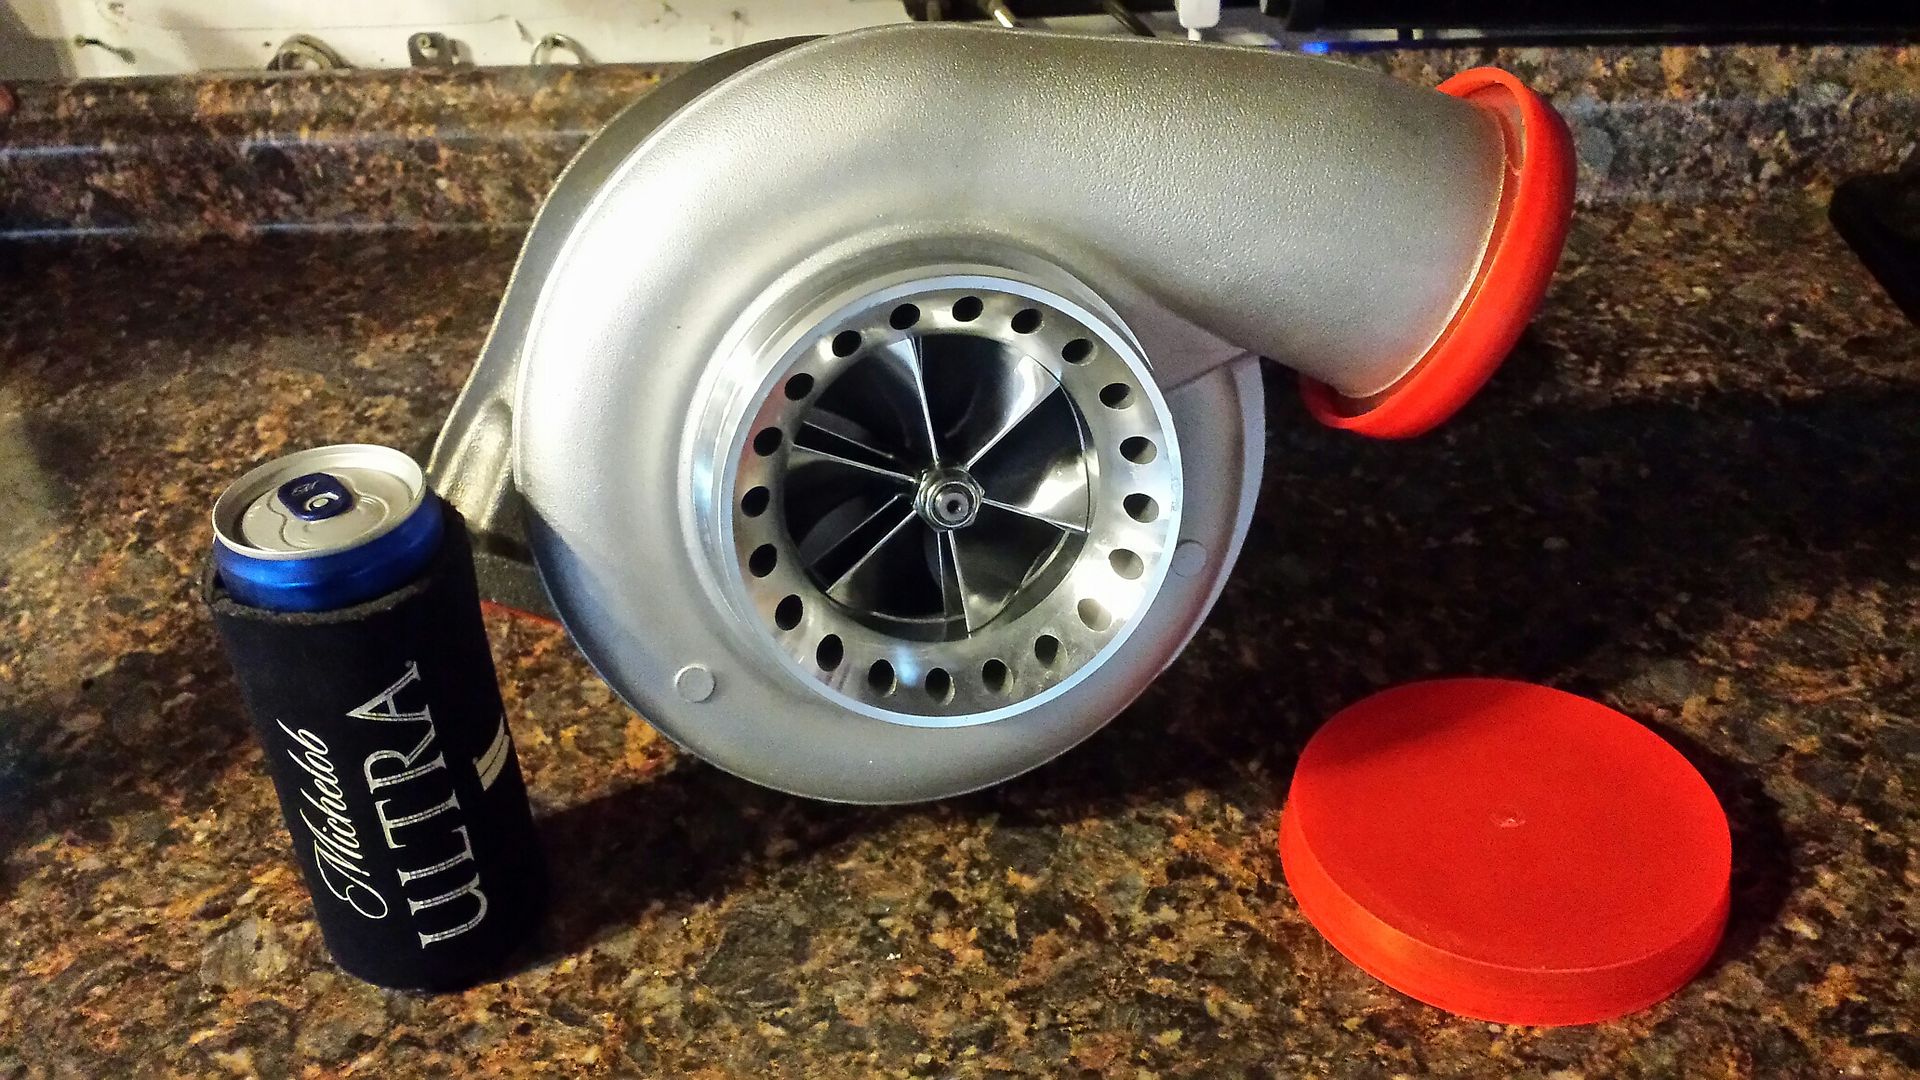
The bigger and better things I was talking about. VSR 88mm.
Tried to make some progress on the tubs. Made an initial cut
After a lot of profanity and sparks flying the drivers side is basically fit in place. At this point its ready to be welded in and sealed up.

Tried to make some progress on the tubs. Made an initial cut


After a lot of profanity and sparks flying the drivers side is basically fit in place. At this point its ready to be welded in and sealed up.

#138
06-21-2018, 08:07 AM
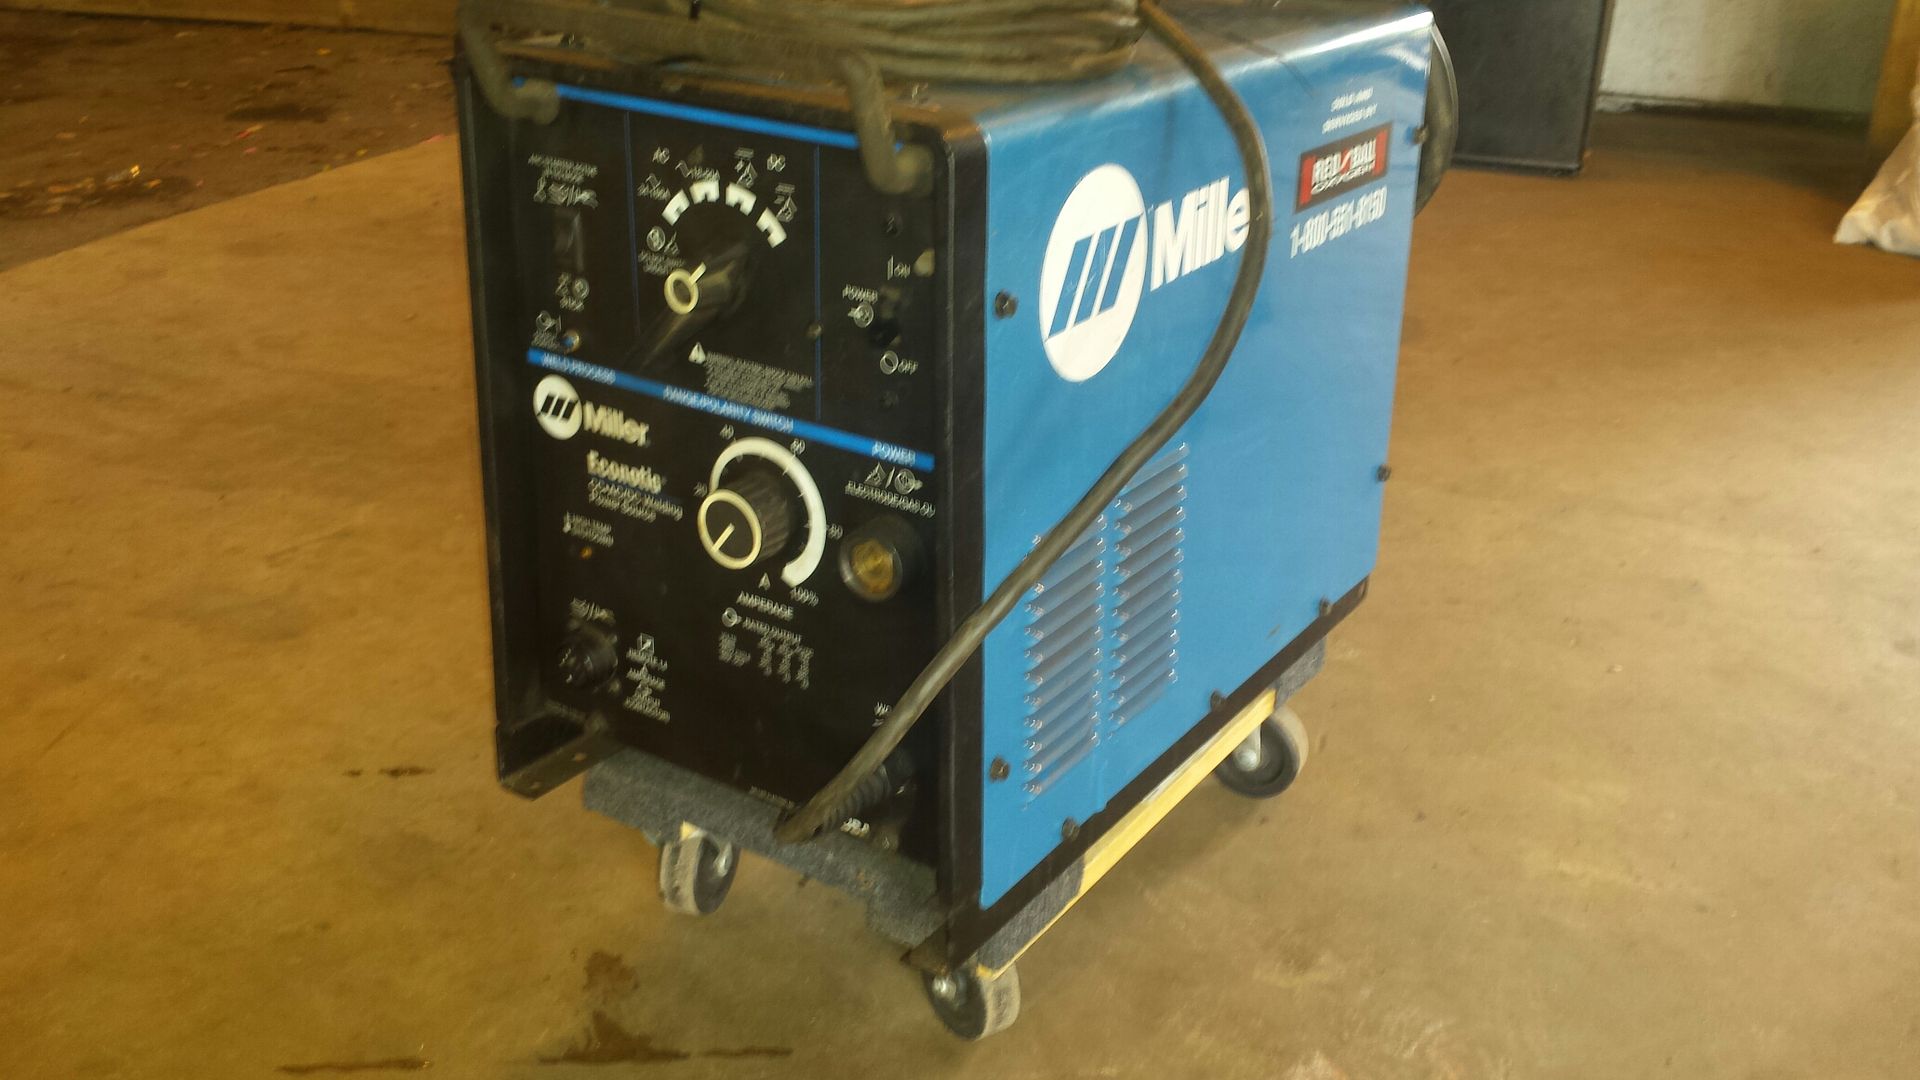
Progress has been slow due to work but i picked up a new toy!!! Gonna need it to weld the chromoly cage in. I wasn't in the market for a new machine but when an older one came around for pretty cheap i decided to jump on it.
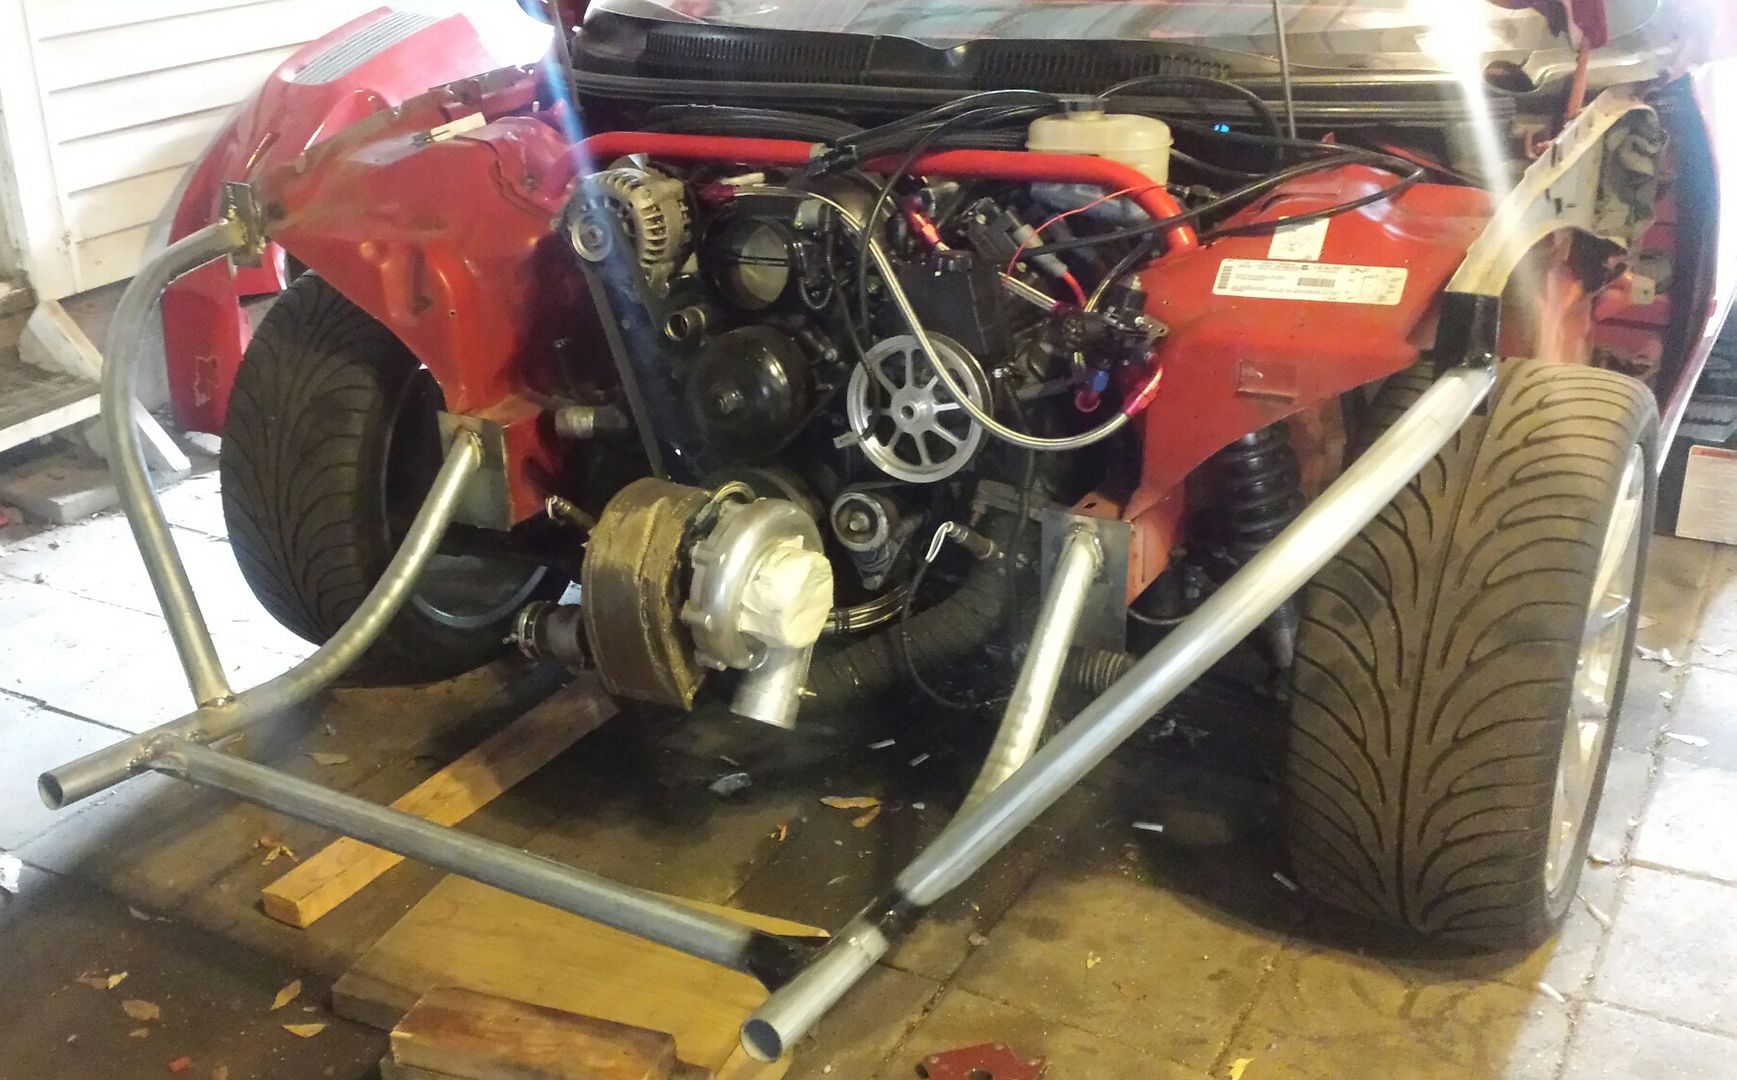
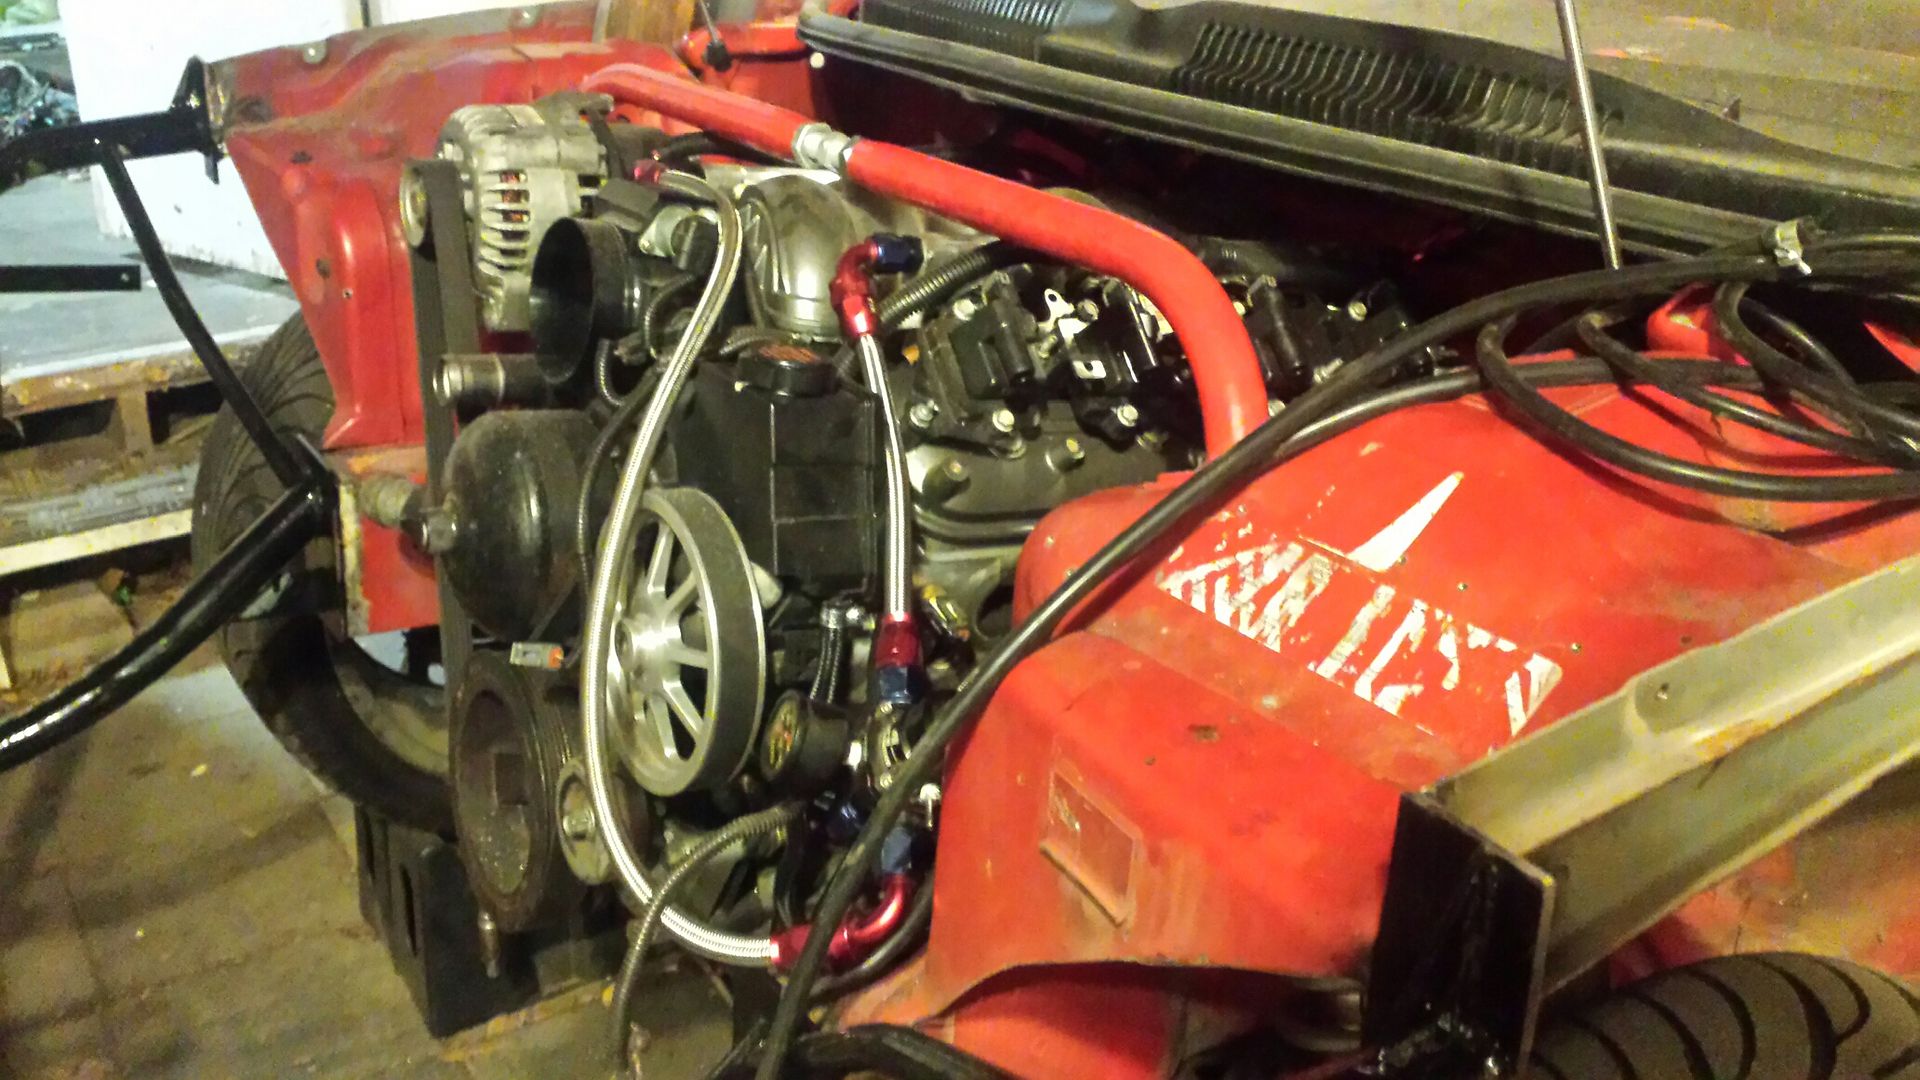
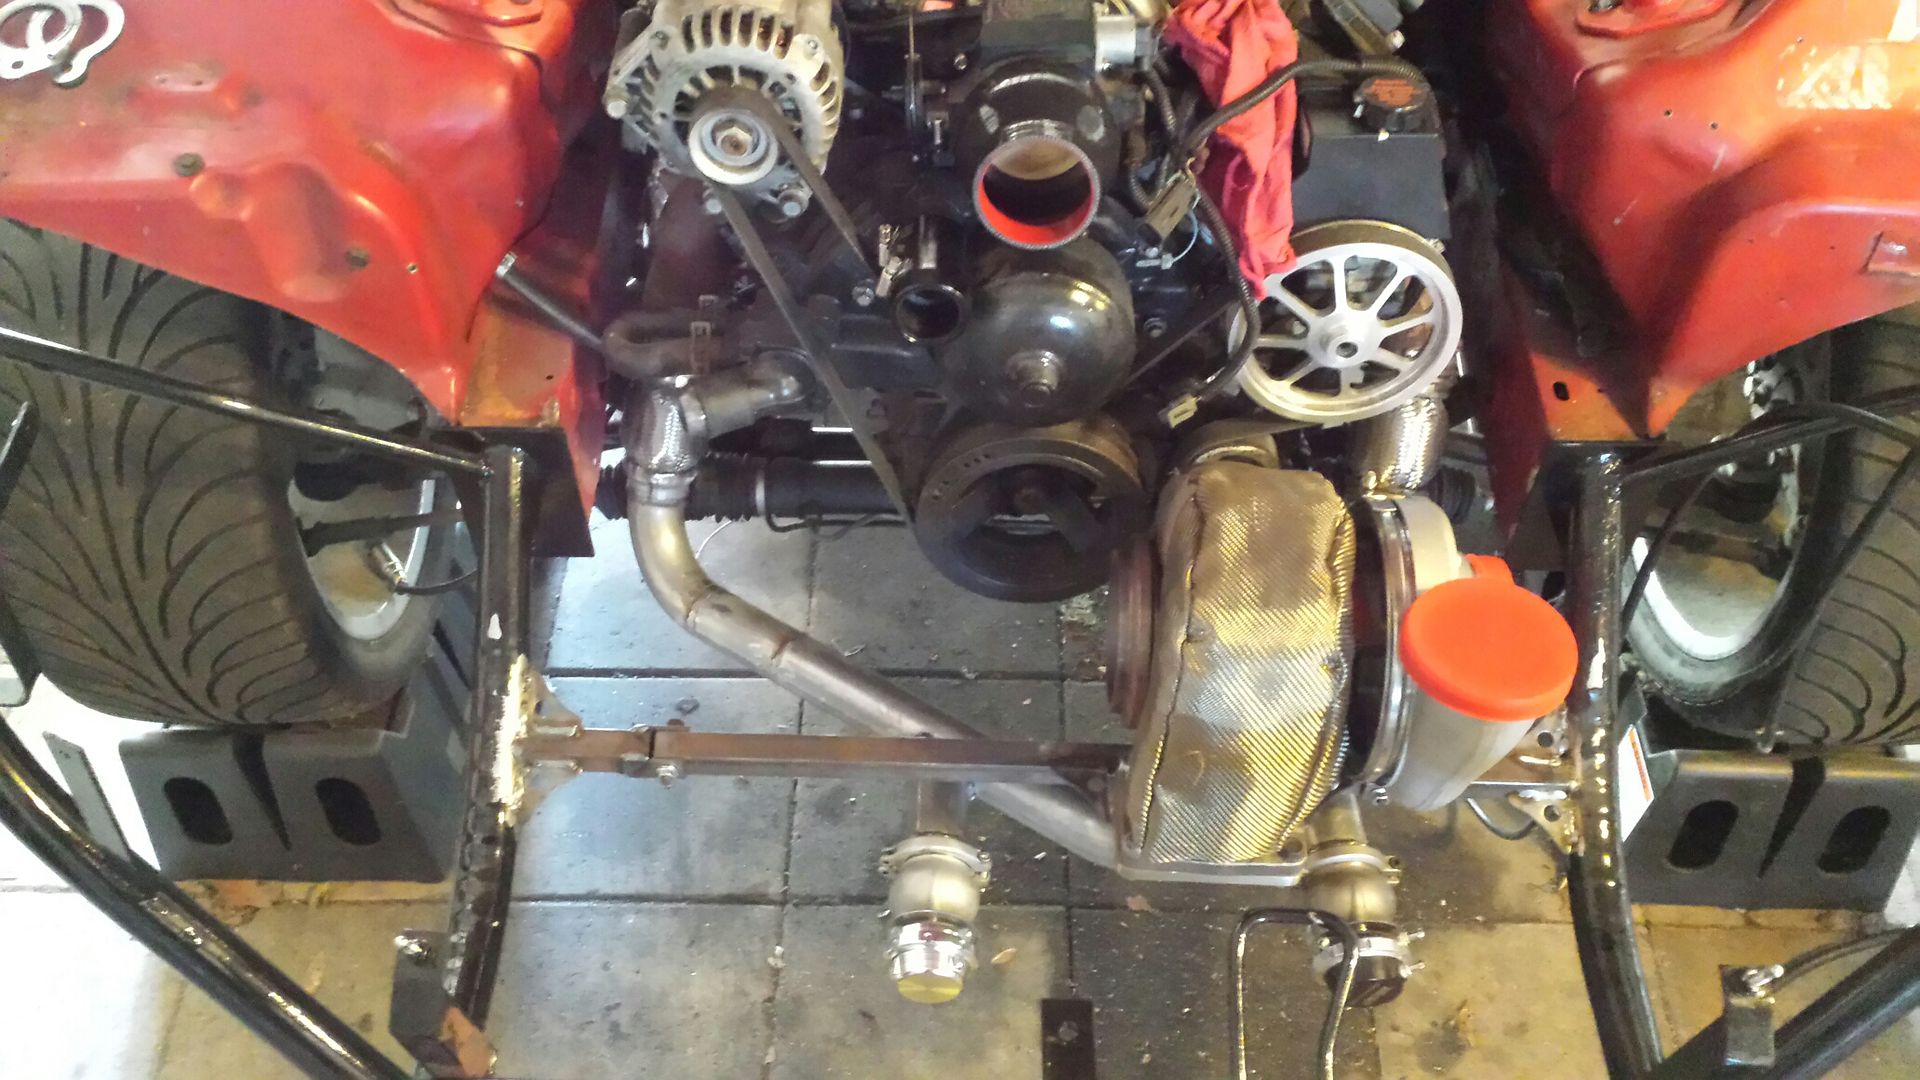
I'm mentally avoiding finishing the wheeltubs at this point, I'm semi-aggravated so I figured let's shift focus. So we know we can't hang a 40+ pound turbo off the manifolds cause when they get hot they will likely crack. So the first thing was making a bolt in brace for this beast. It is attached to the front tubing, which we know is thin, so I've used roll cage gussets in the corners to distribute load. Where the t6 flange is welded to the square bar it has a gusset on each side as well.
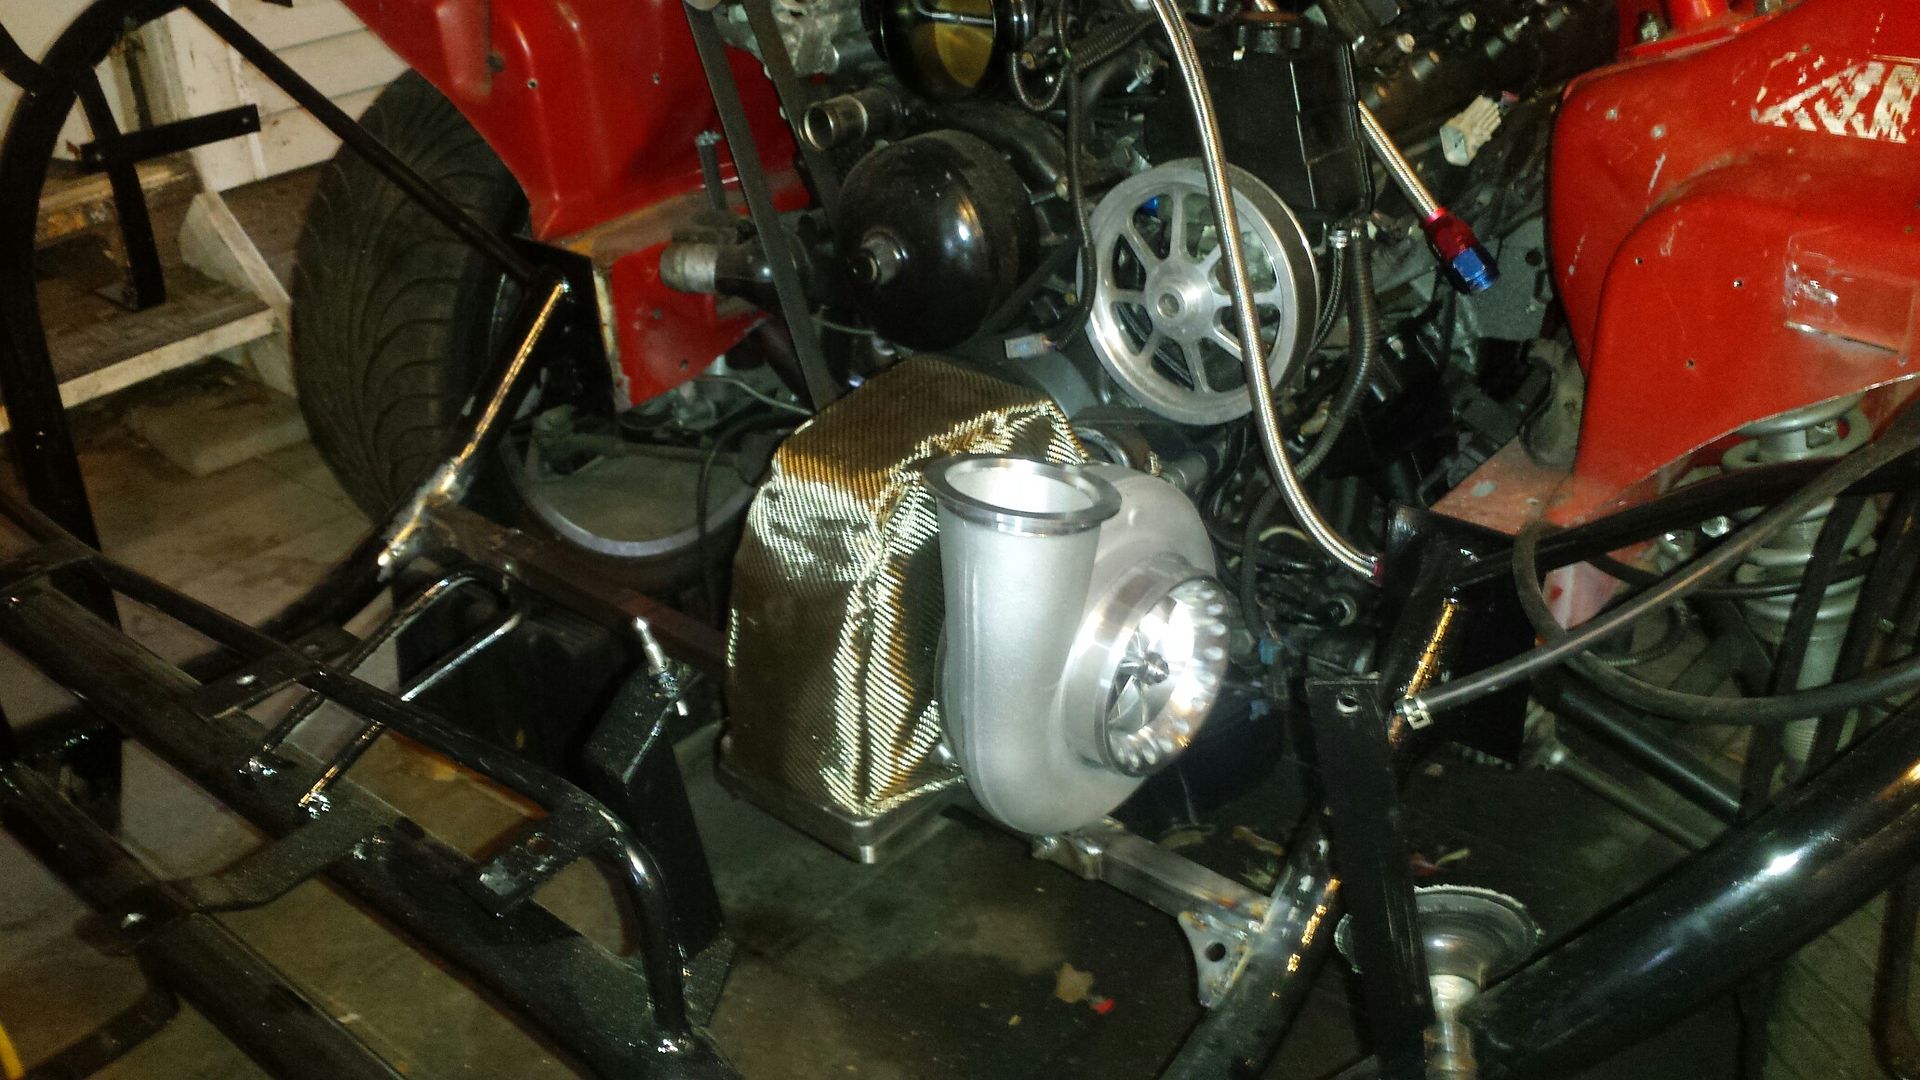
Tossed the radiator in to look at clearance. I set the turbo about as close to the motor as i wanted it, so as long as the radiator clears we are running it.
Closer pic of turbo to fan clearance. In the next two pictures you can see the upper fan shroud has about 2 inches trimmed off. I was able to do some trading and have a new stock shroud to replace that during final assembly.
I bought a LJMS s400 exhaust flange adapter which takes the funky "4.5 beveled vband down to a straight "4 inch pipe connection. I happen to still have some 4 inch laying around so I decided I'd do a short run before I called it a day. This is a rough idea, it still needs to be curved back some and sent out the hole in the bumper, but this gives me an idea for radiator hose clearance etc.

I'm mentally avoiding finishing the wheeltubs at this point, I'm semi-aggravated so I figured let's shift focus. So we know we can't hang a 40+ pound turbo off the manifolds cause when they get hot they will likely crack. So the first thing was making a bolt in brace for this beast. It is attached to the front tubing, which we know is thin, so I've used roll cage gussets in the corners to distribute load. Where the t6 flange is welded to the square bar it has a gusset on each side as well.


Tossed the radiator in to look at clearance. I set the turbo about as close to the motor as i wanted it, so as long as the radiator clears we are running it.

Closer pic of turbo to fan clearance. In the next two pictures you can see the upper fan shroud has about 2 inches trimmed off. I was able to do some trading and have a new stock shroud to replace that during final assembly.

I bought a LJMS s400 exhaust flange adapter which takes the funky "4.5 beveled vband down to a straight "4 inch pipe connection. I happen to still have some 4 inch laying around so I decided I'd do a short run before I called it a day. This is a rough idea, it still needs to be curved back some and sent out the hole in the bumper, but this gives me an idea for radiator hose clearance etc.

#139
06-25-2018, 08:02 AM
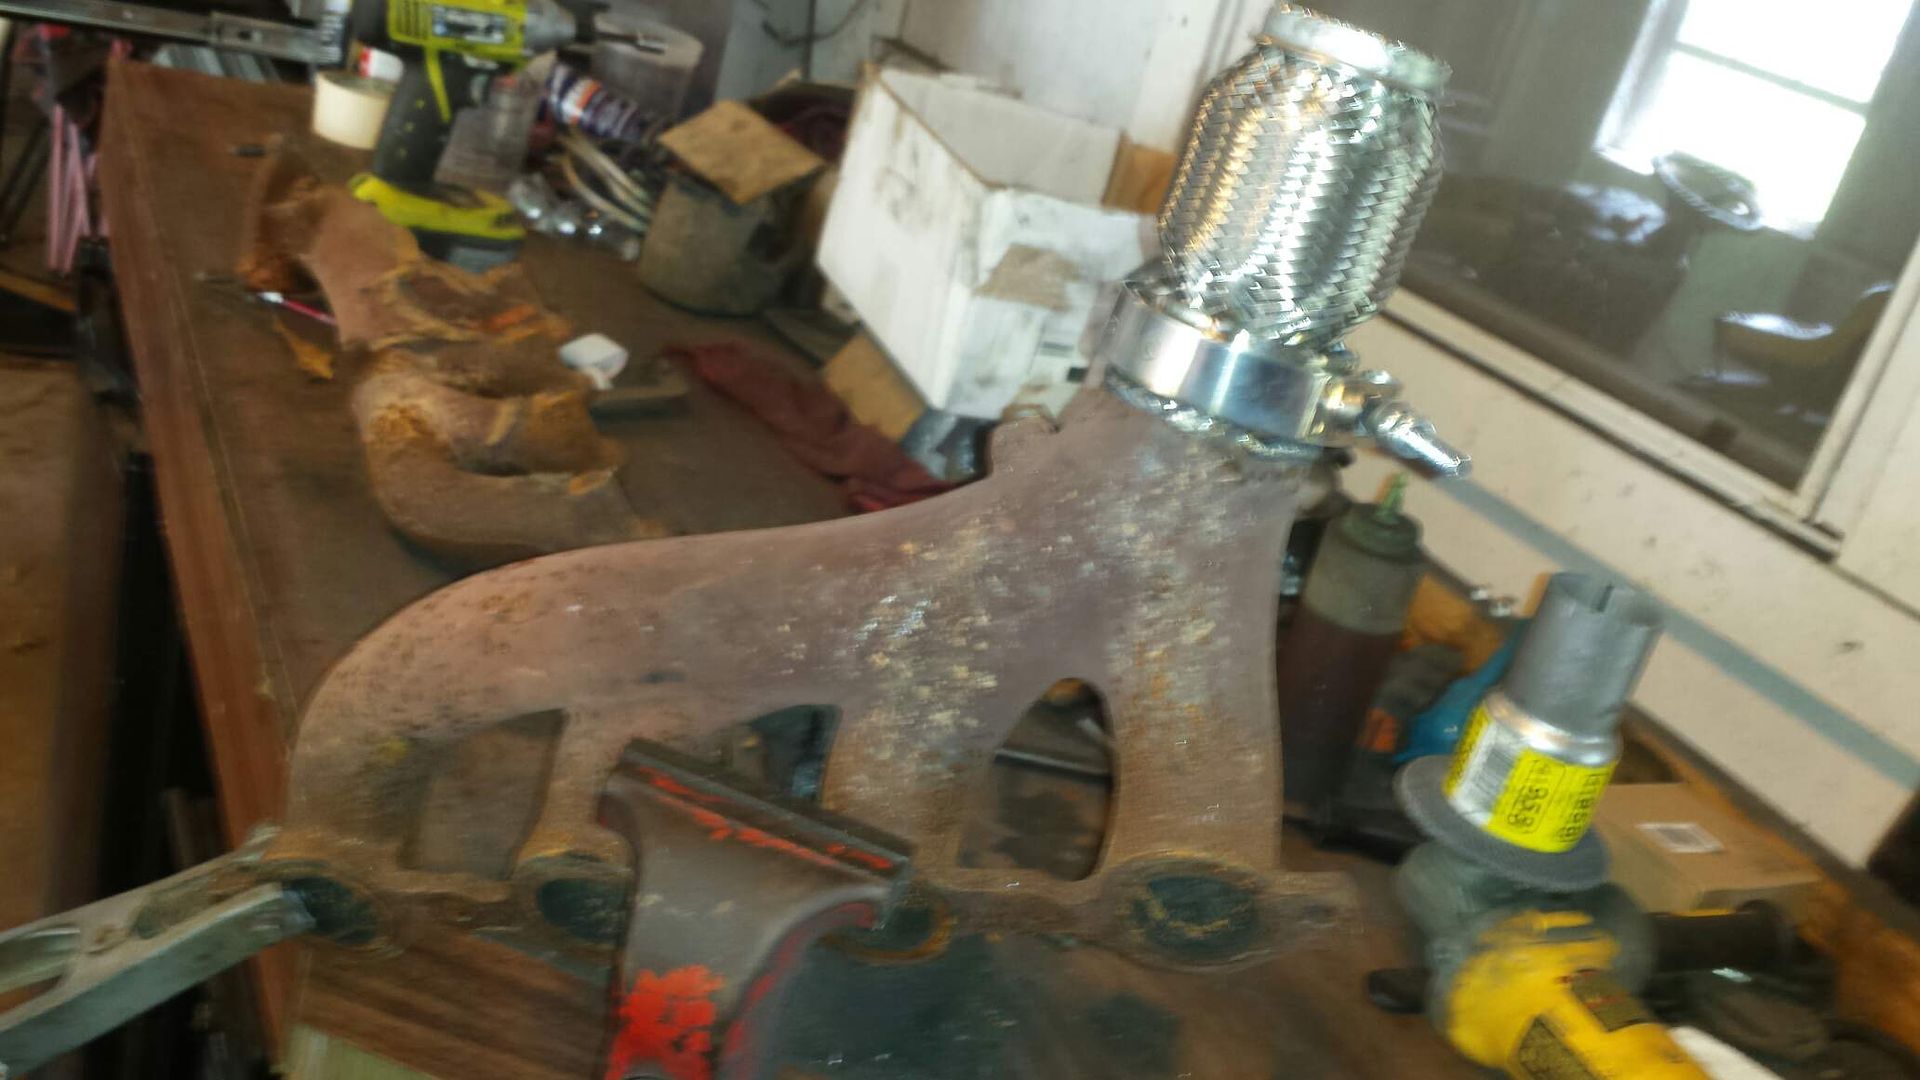
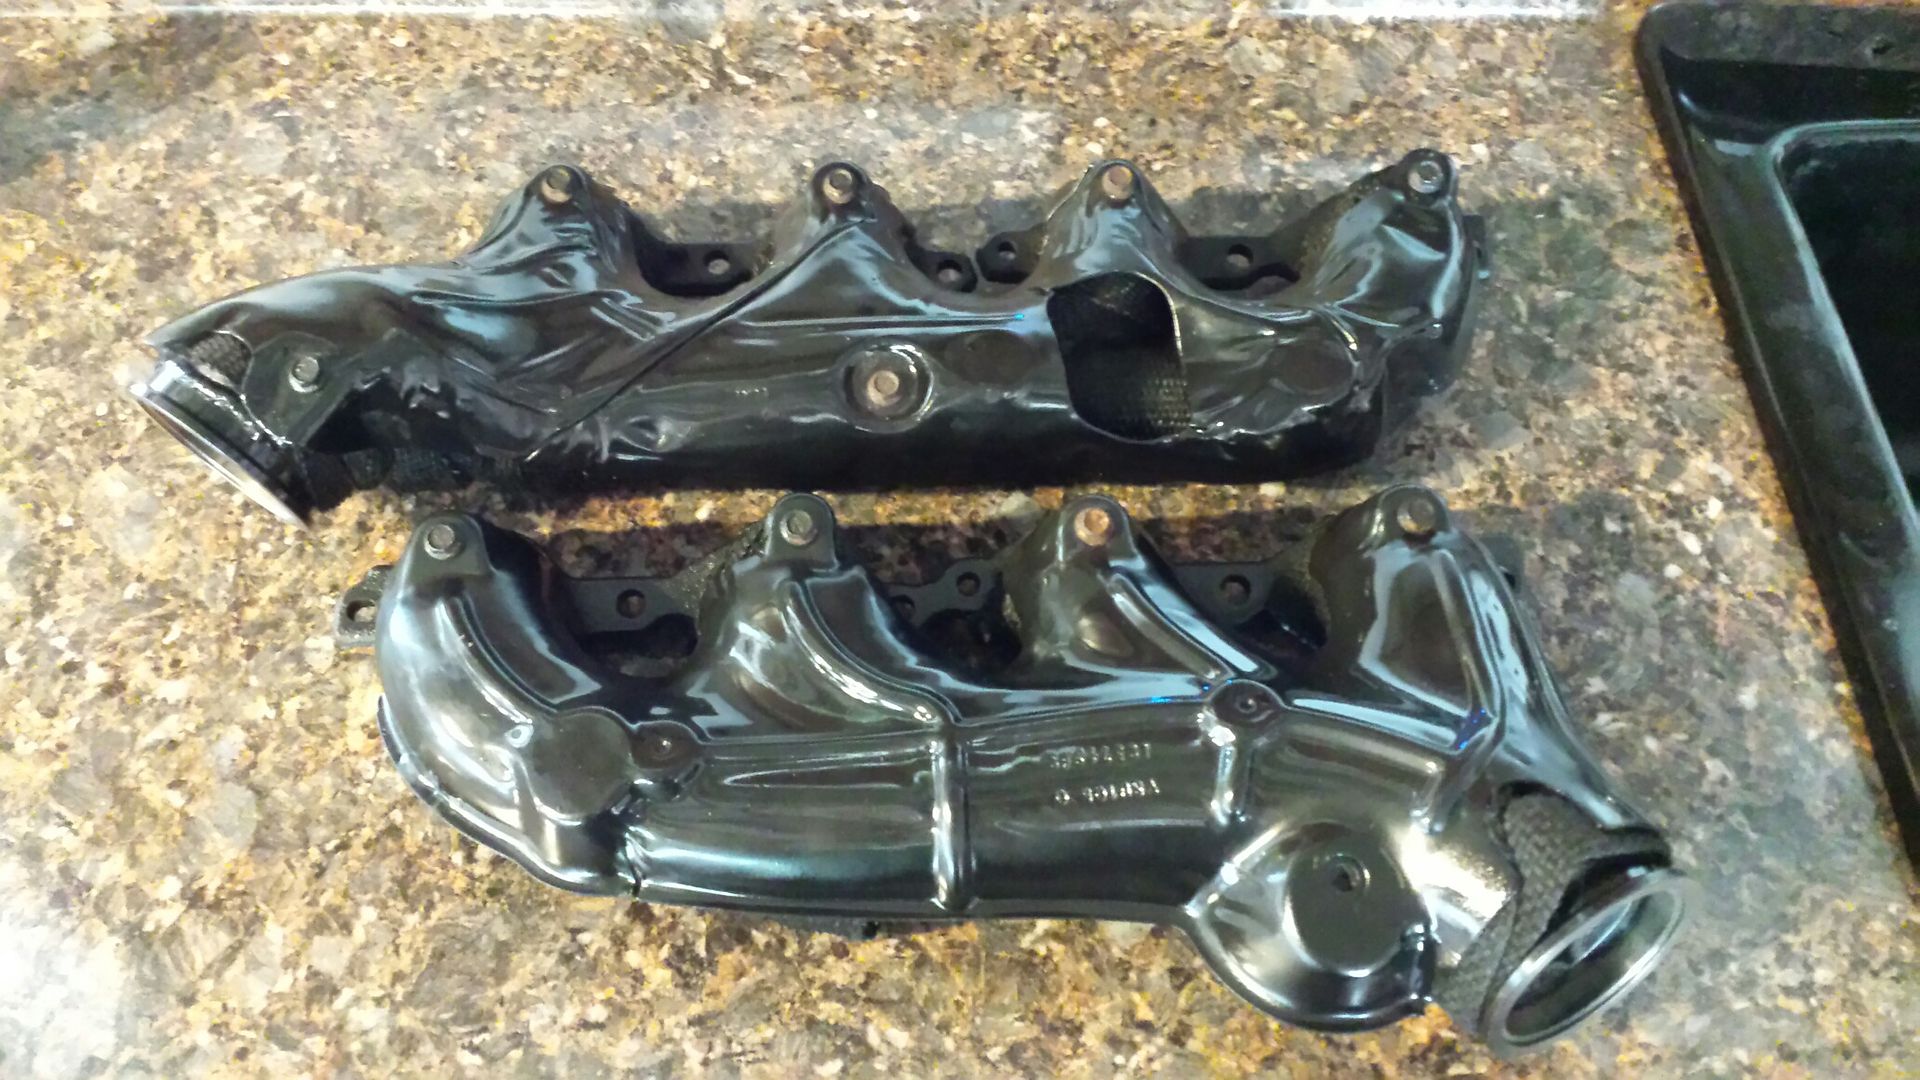
I'm still mentally avoiding the wheeltubs so I decided lets make a hotside today. Got a pile of truck manifolds behind the shop so I grabbed a pair to get started. They have a flange with studs, so we will cut that off and install vbands. You can see the vband, flex coupler, and reducer in this pic.
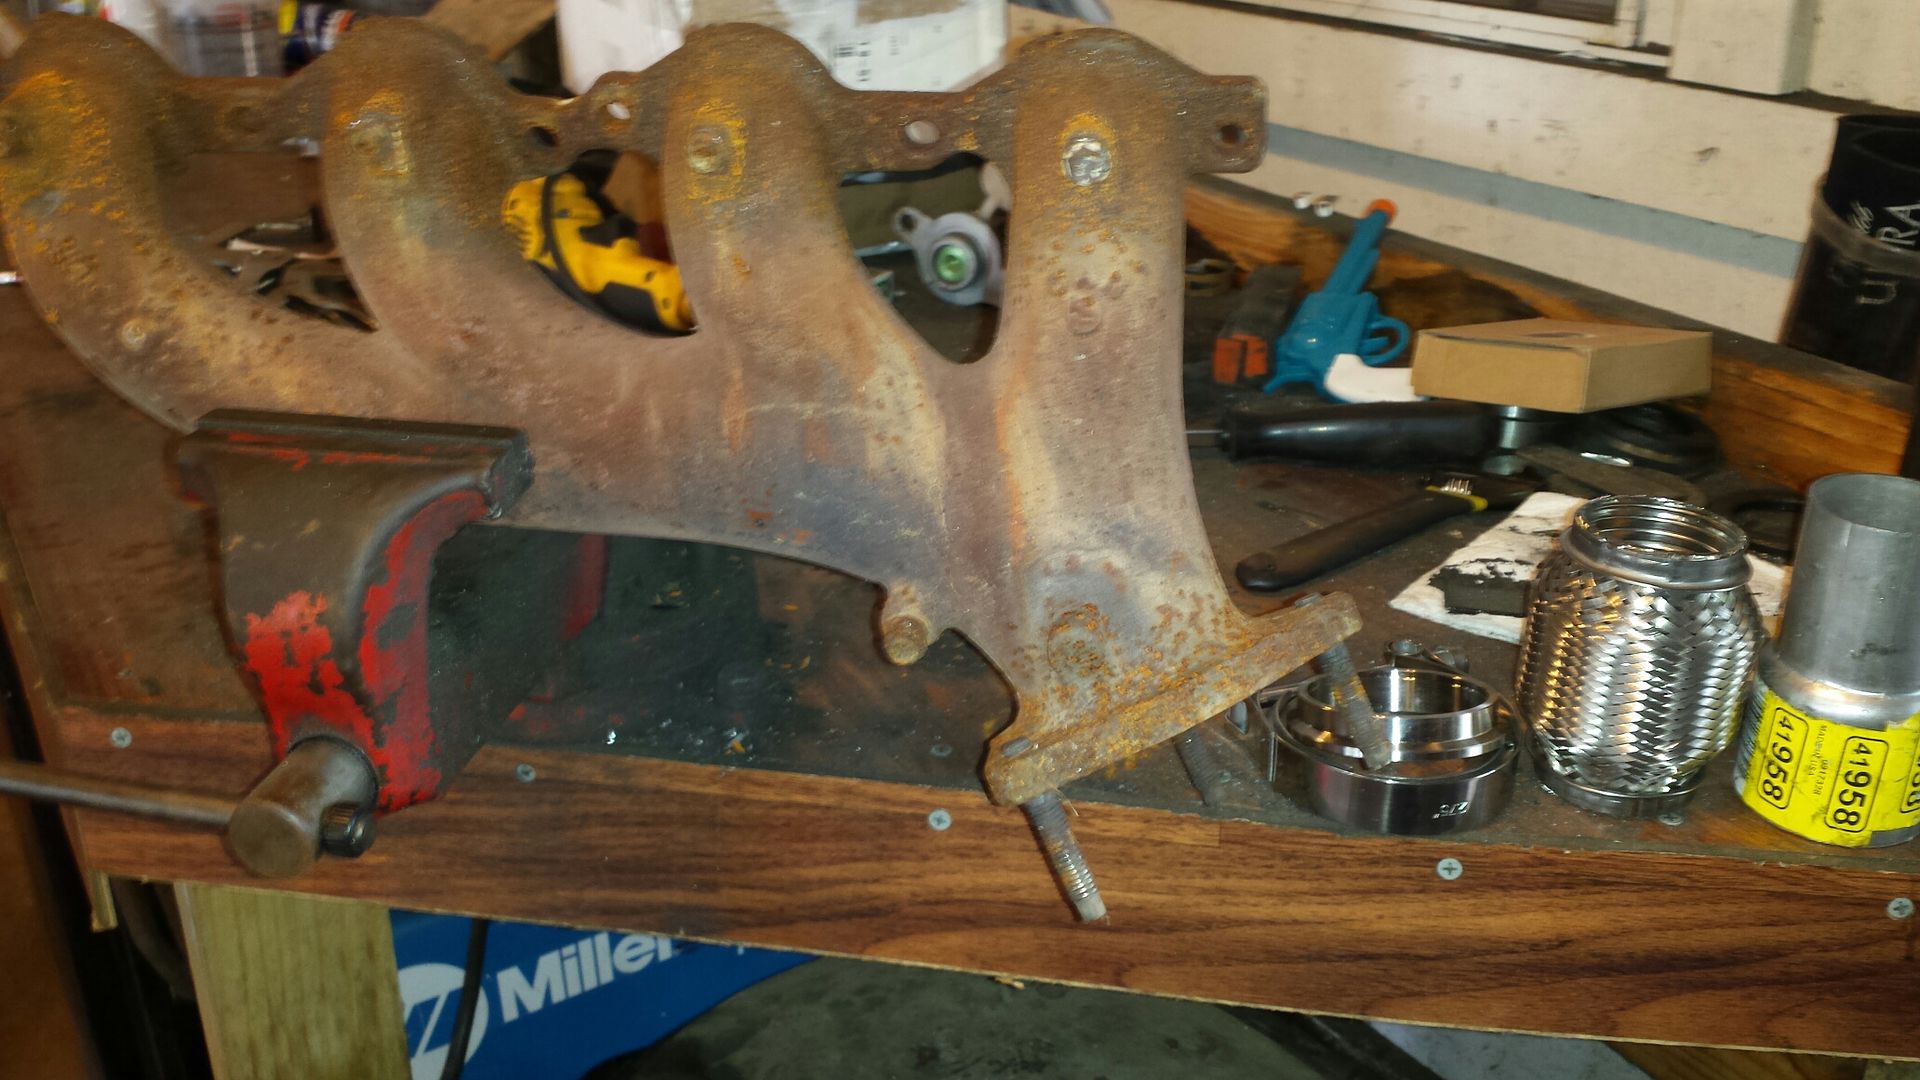
The manifold fits very nicely on a 2.5 inch vband, however I dont want pipes that big so we will step down to 2 inch with a reducer. And because the turbo is hard mounted and the engine can move, we need a flex coupler on each side. Make sure you select the kind with the solid metal core for turbo applications. I standard flex coupler will destroy itself rather quickly and possibly take out your turbo from debris.
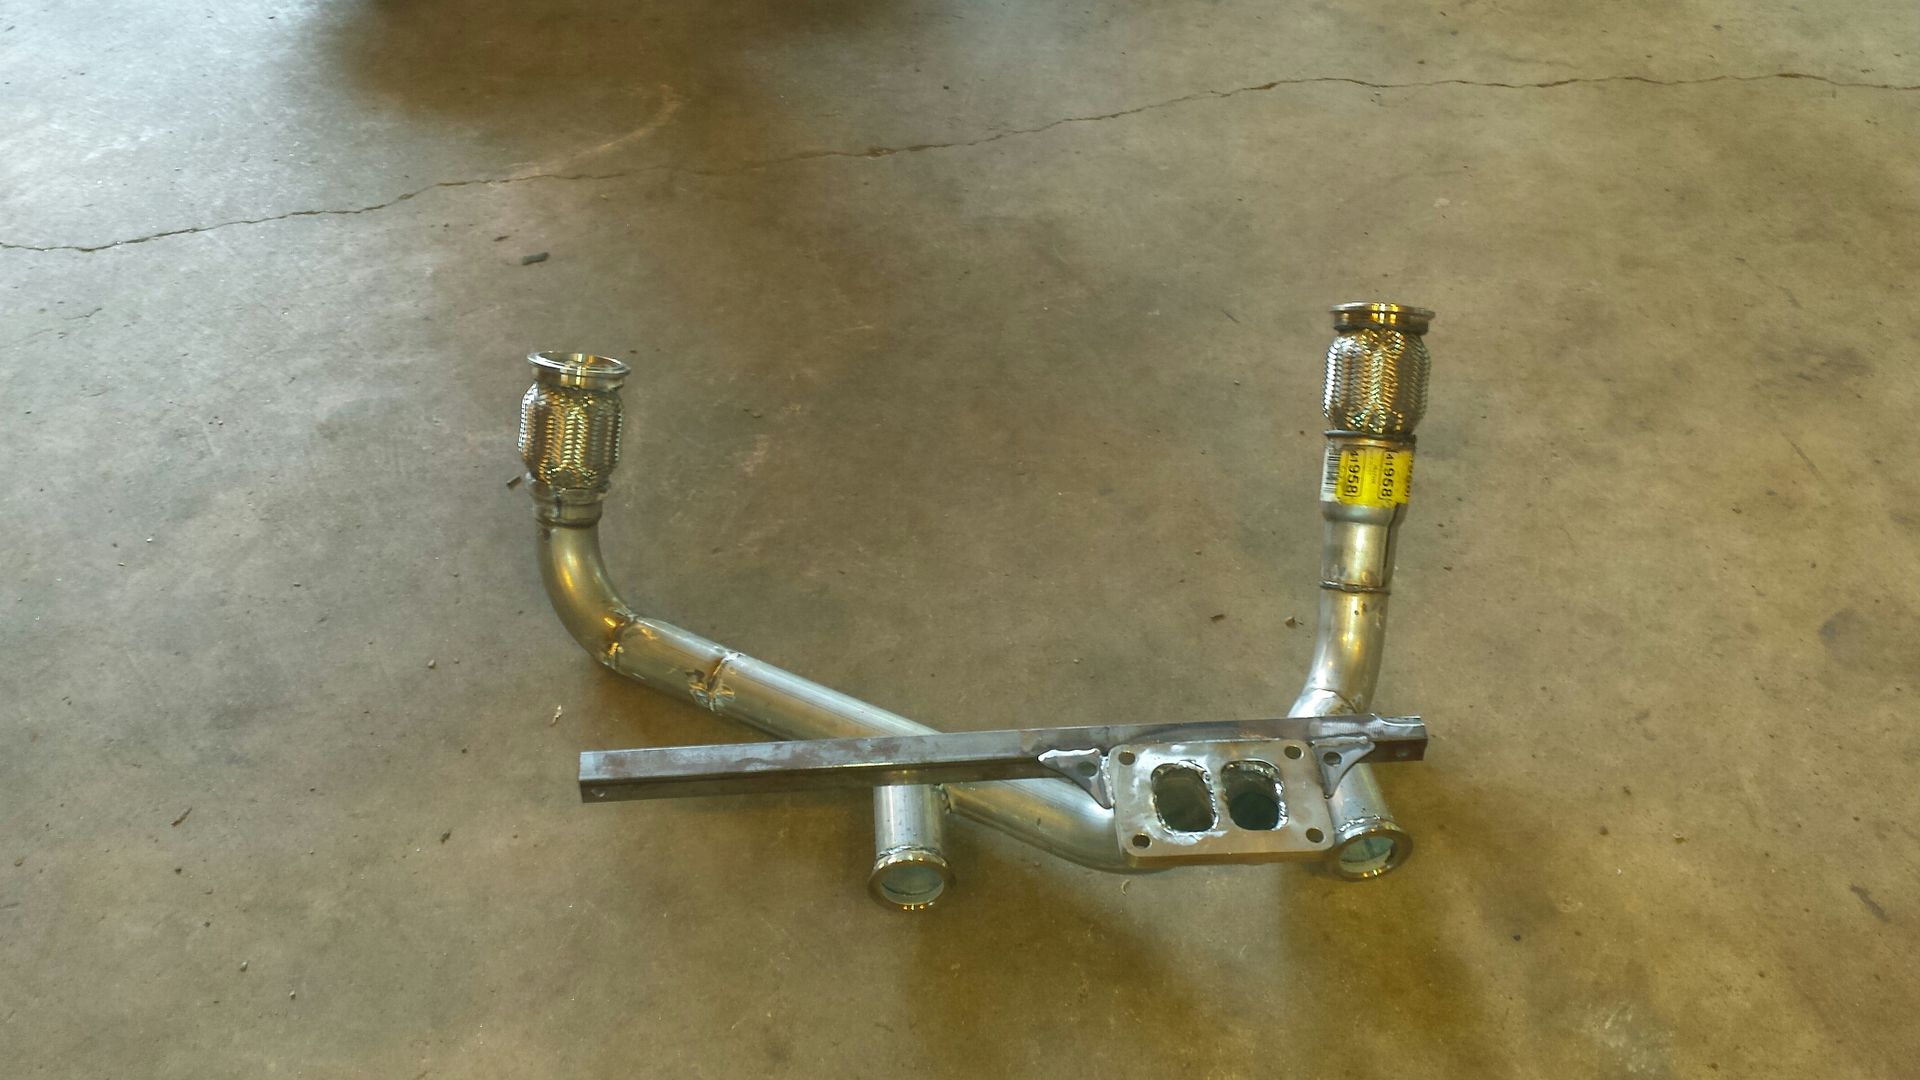
And through the magic of the internet we now have a hotside. I used a little less then 2 180 degree bends from summit. Bc this is a divided turbo/flange, I've opted for dual 44mm wastegates as you can see their position here.
Quick mock up to check final fitment.
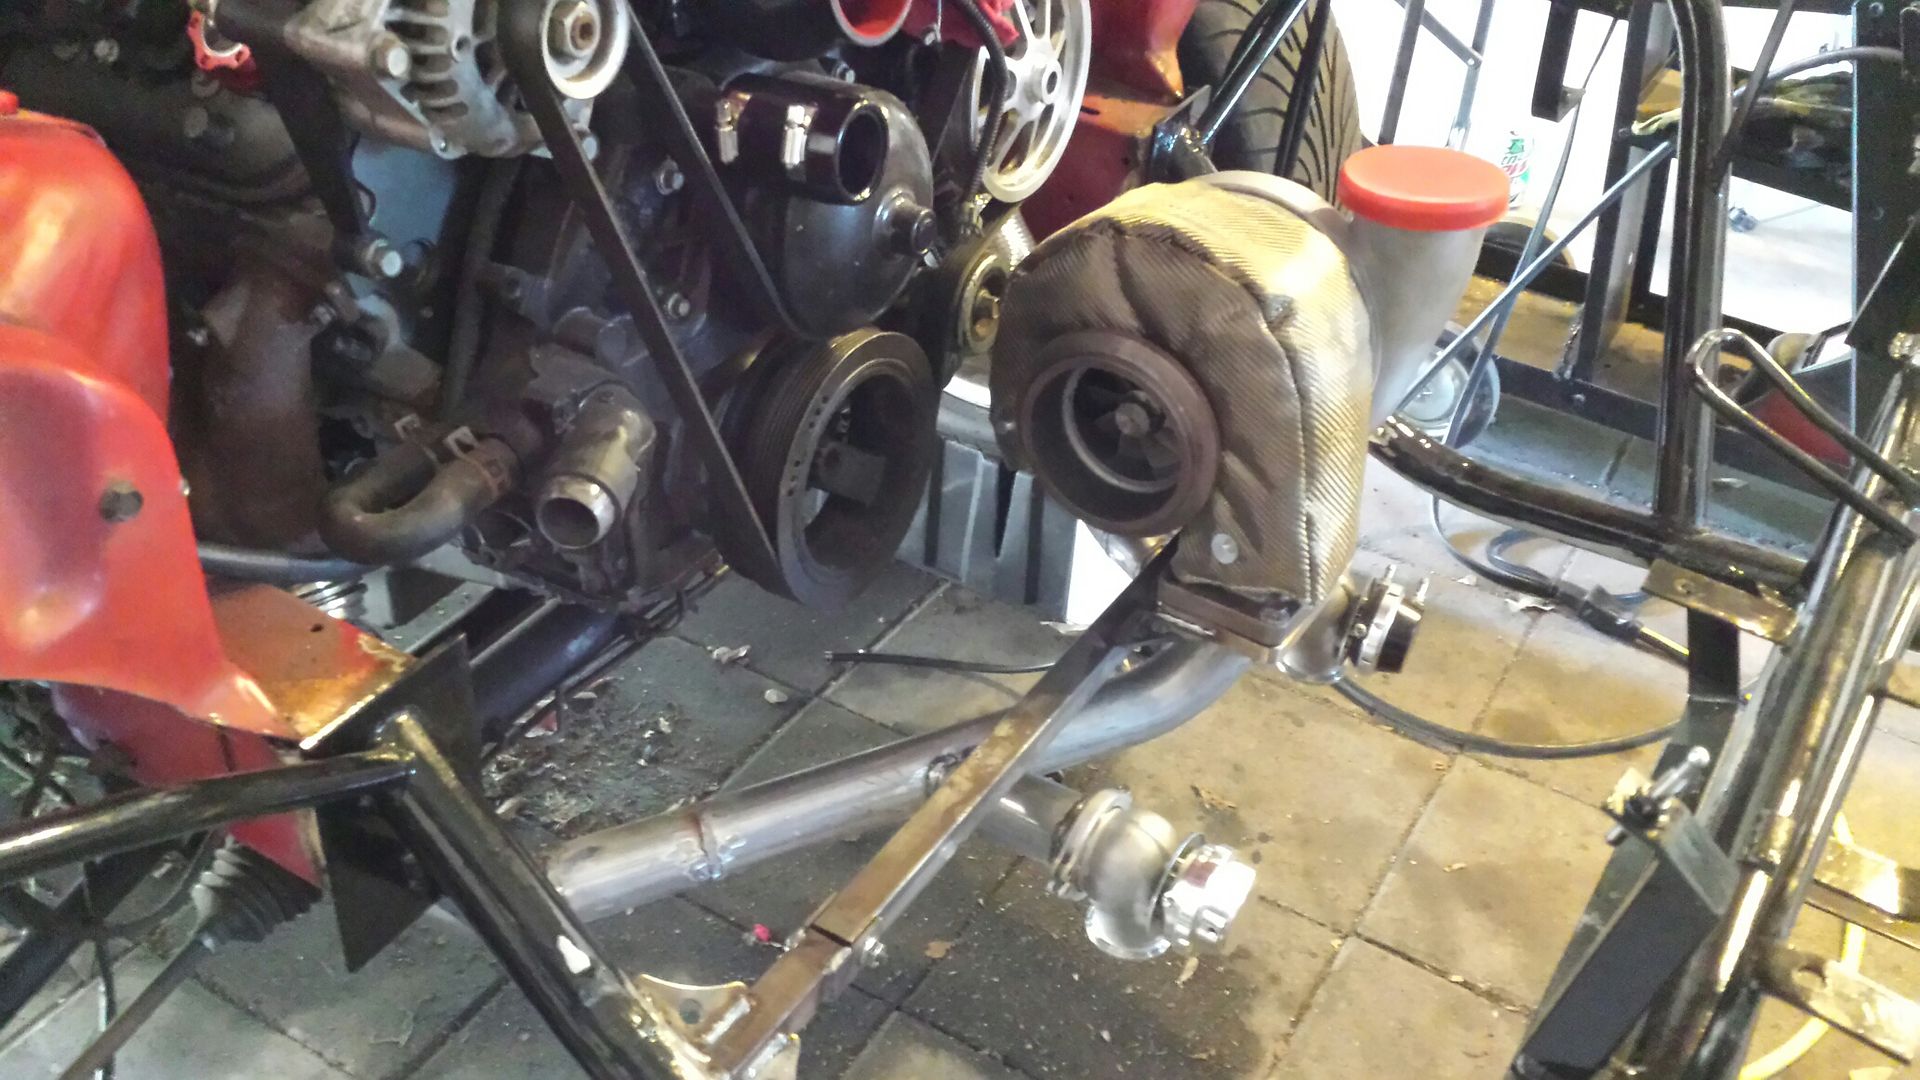
Pulled it all back apart and got the manfolds cleaned, painted, and wrapped in fiberglass wrap. Got them reinstalled/torqued and the spark plugs back in. I dont have the 02 bungs for the new piping so thats gotta wait for the time being. Once i get them put in I will wrap the entire hotside.

The manifold fits very nicely on a 2.5 inch vband, however I dont want pipes that big so we will step down to 2 inch with a reducer. And because the turbo is hard mounted and the engine can move, we need a flex coupler on each side. Make sure you select the kind with the solid metal core for turbo applications. I standard flex coupler will destroy itself rather quickly and possibly take out your turbo from debris.

And through the magic of the internet we now have a hotside. I used a little less then 2 180 degree bends from summit. Bc this is a divided turbo/flange, I've opted for dual 44mm wastegates as you can see their position here.

Quick mock up to check final fitment.


Pulled it all back apart and got the manfolds cleaned, painted, and wrapped in fiberglass wrap. Got them reinstalled/torqued and the spark plugs back in. I dont have the 02 bungs for the new piping so thats gotta wait for the time being. Once i get them put in I will wrap the entire hotside.

#140
06-30-2018, 07:42 AM
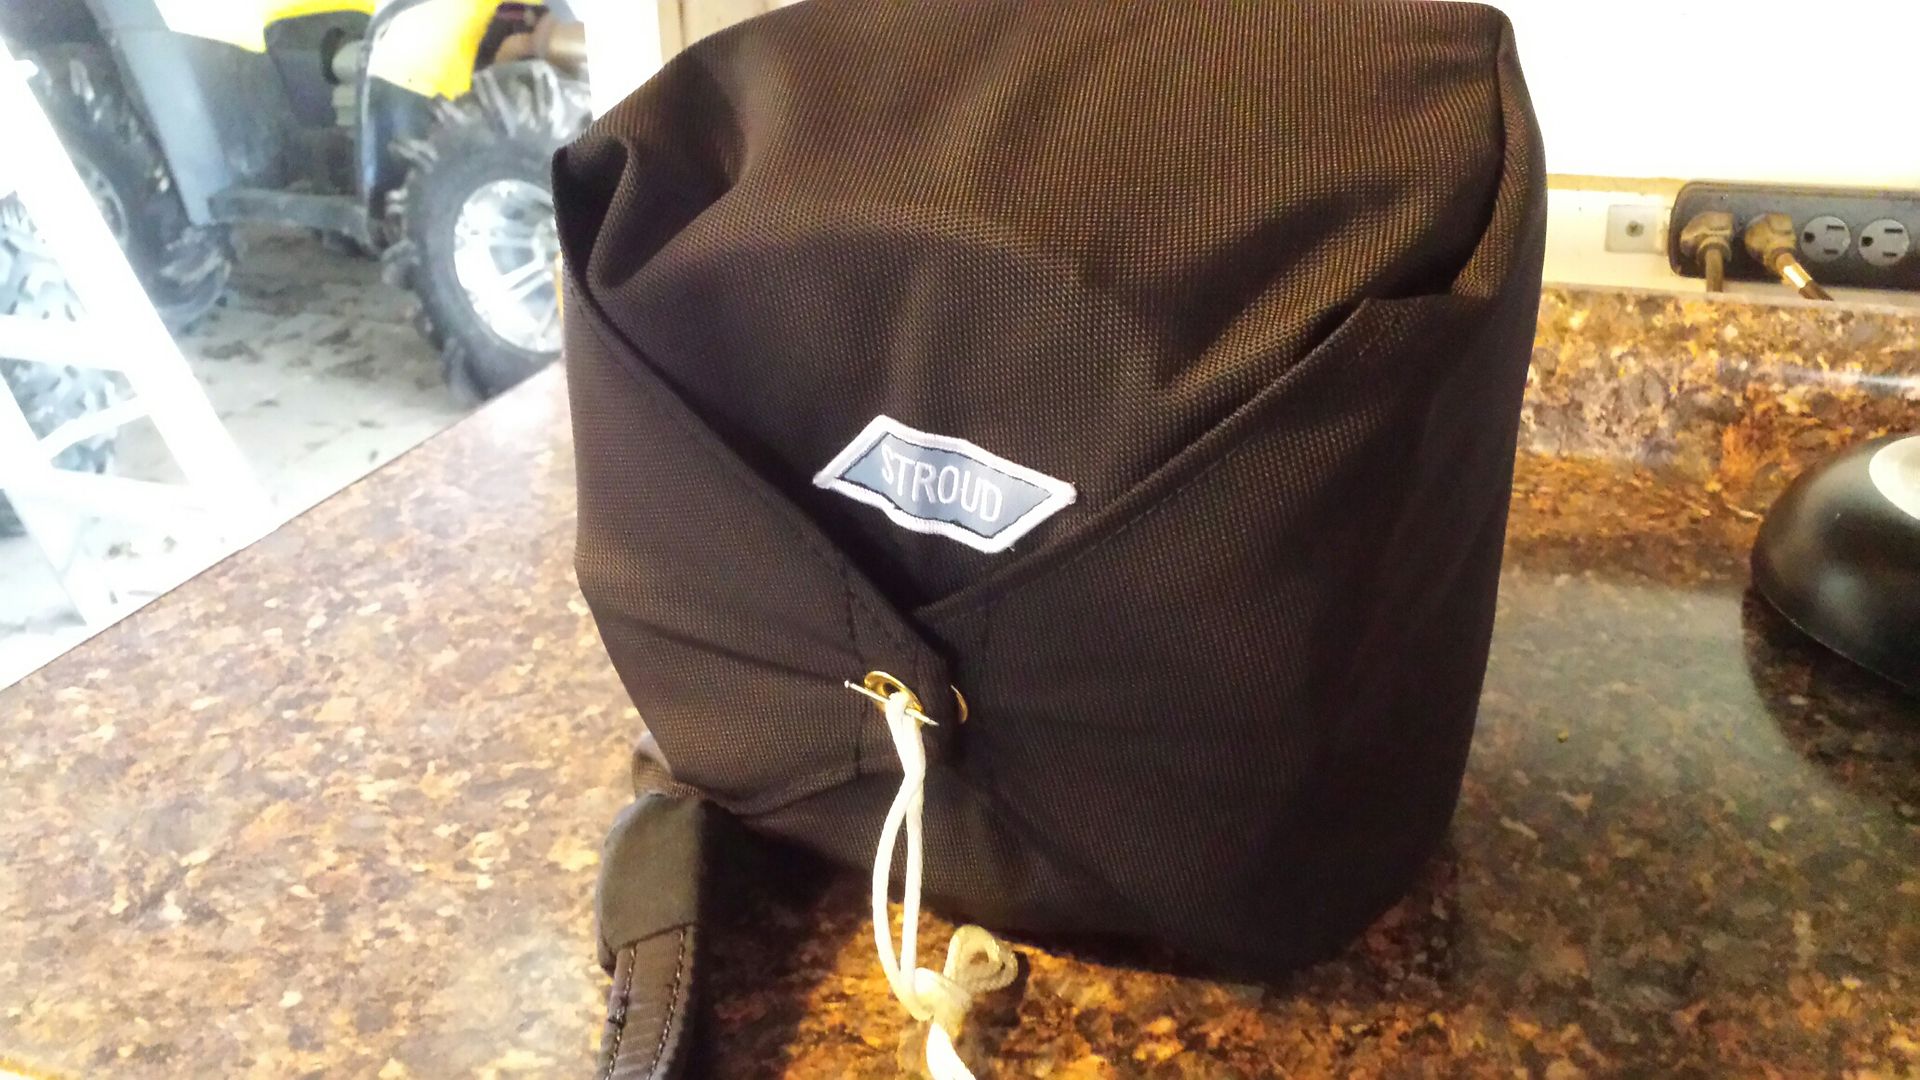
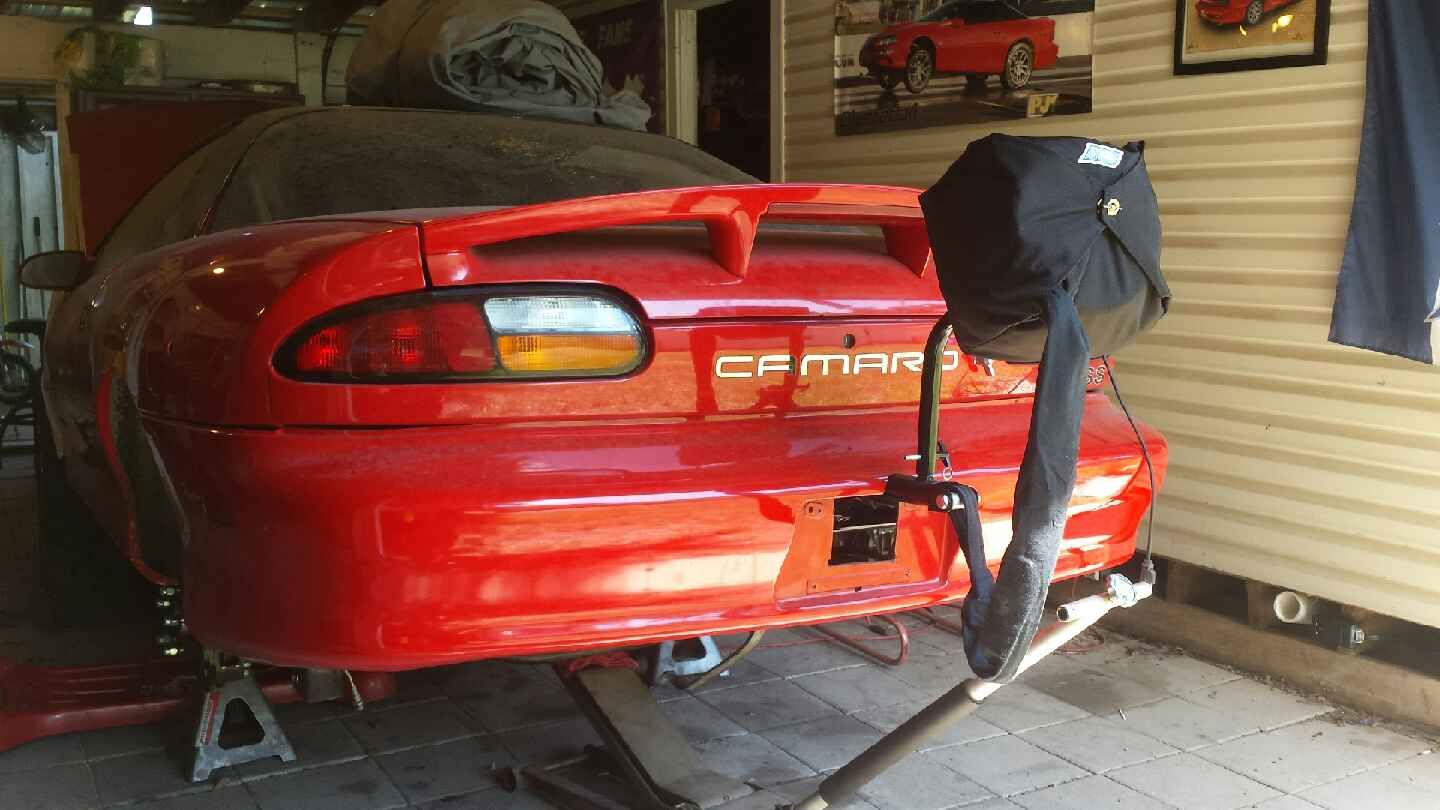
Stroud 420, in red of course. Their youtube video is very helpful if you've never packed one of these things.
In the middle of wheeltubs but I had to test fit and see how she looks. Excuse how dirty it is.
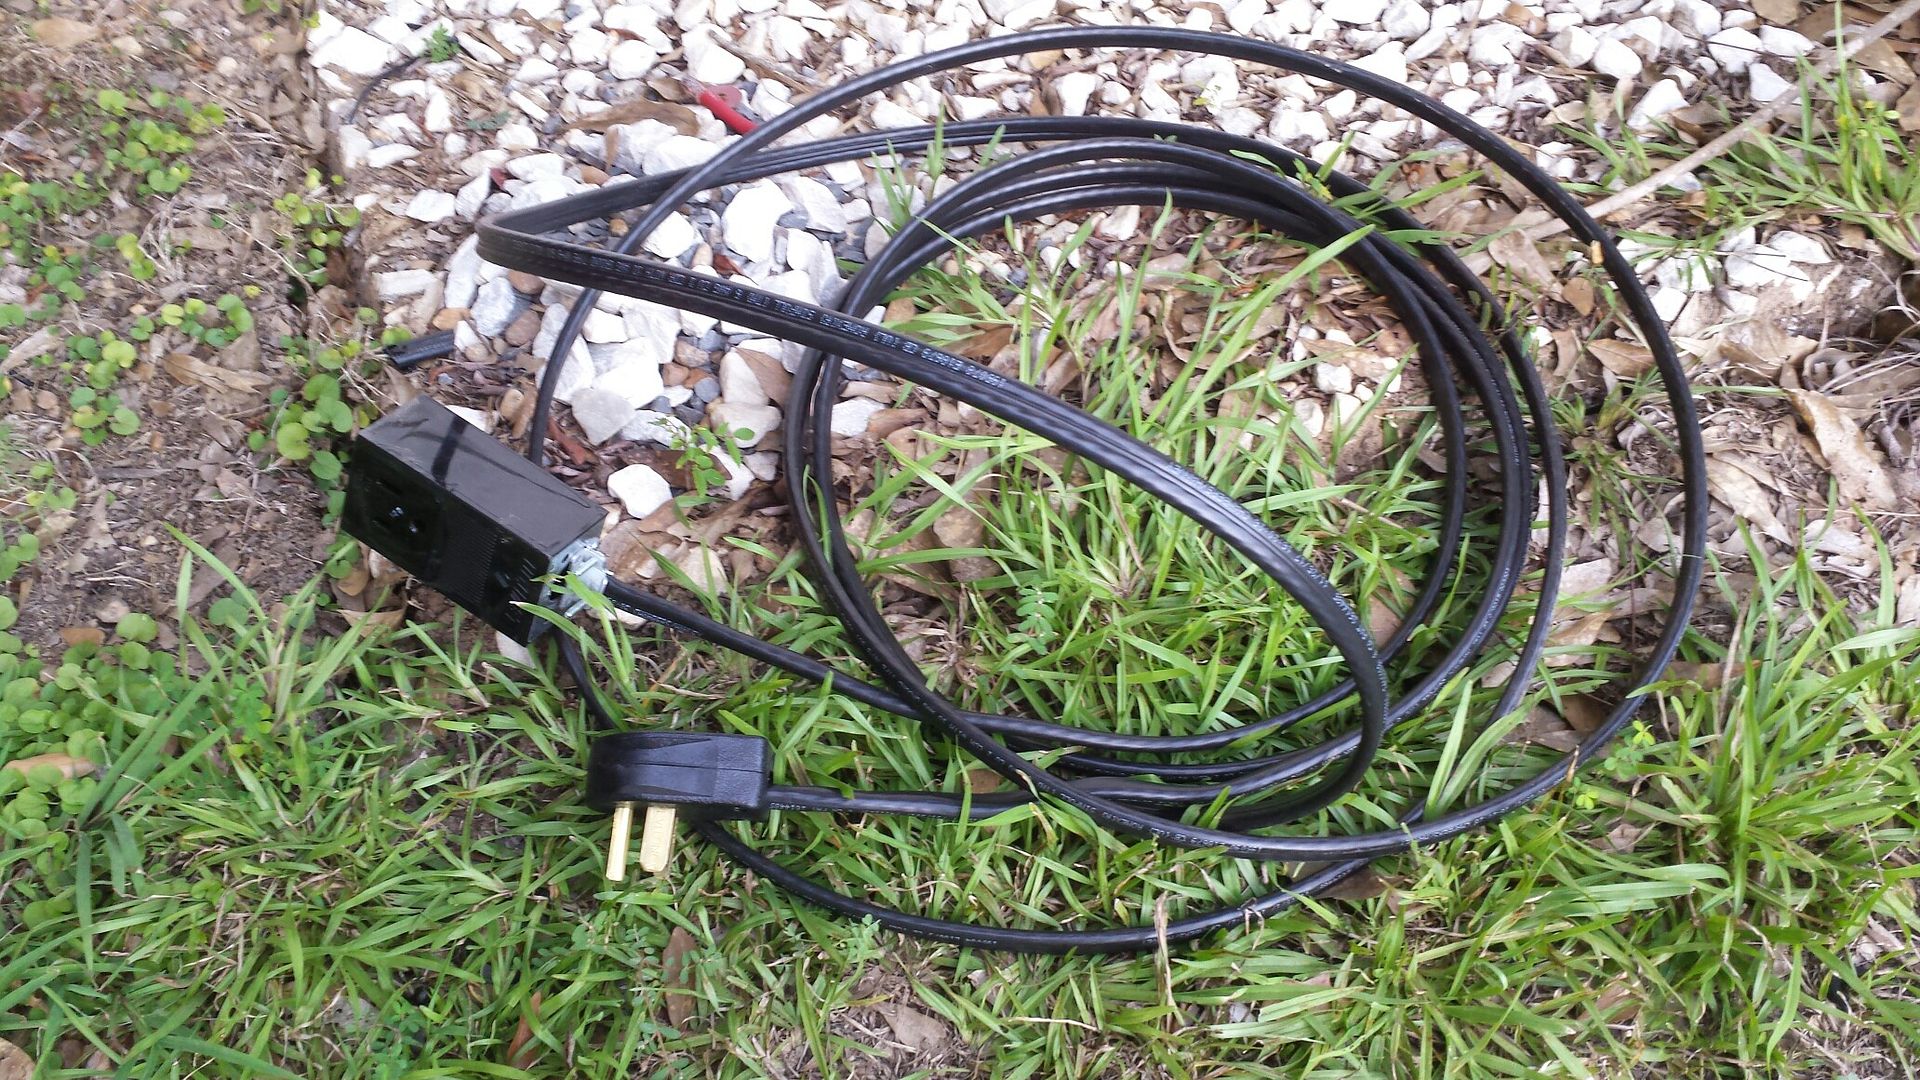
So I had 3 days off and 3 things to do. 1. Get the 6-50 220v plug installed for the Miller Tig welder. And 2. finish one tub per day so we can start on the cage next week. I bought about 50ft of 6/2 wire, the outlet only used 15-20ft, so now i have a sweet 30ft extension cord so i can weld anywhere in the garage.
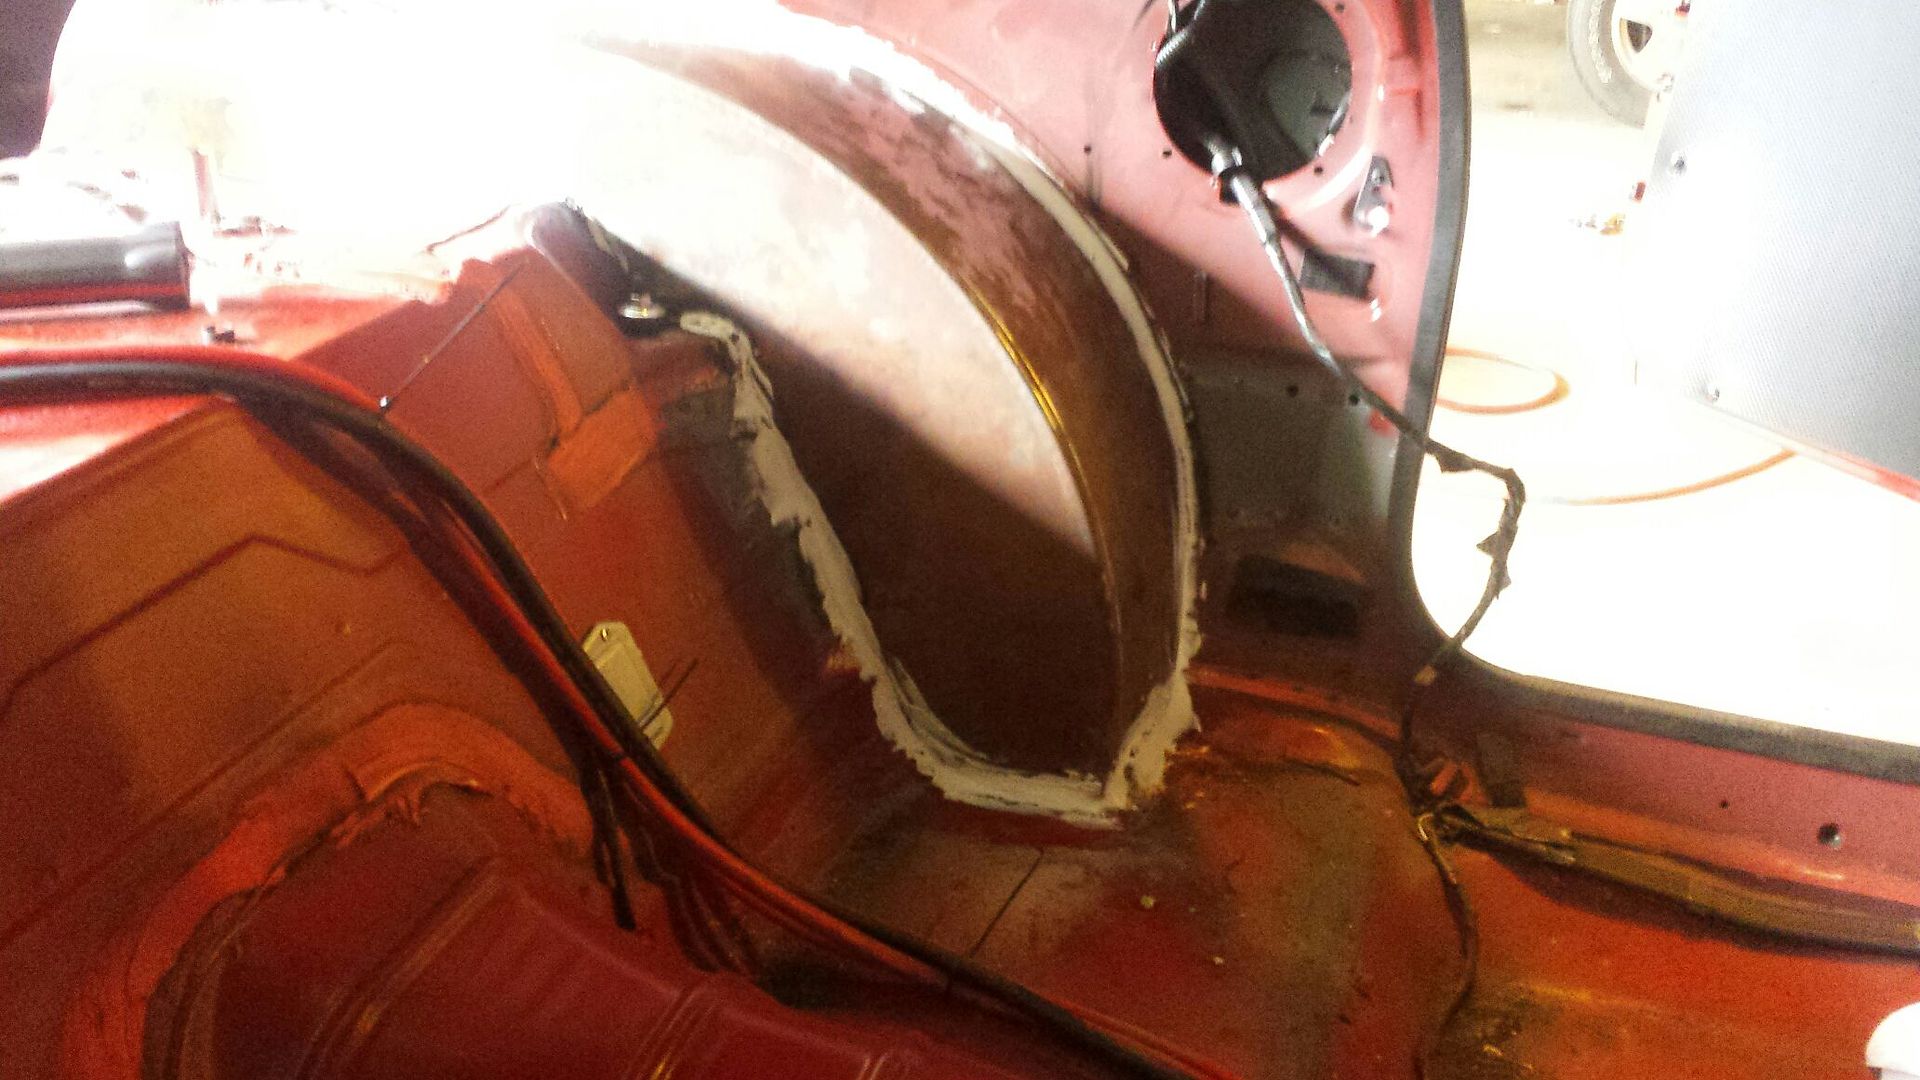
Finished fitting the driver's side, welded it, sealed it. Its surprisingly stiff once it's in place...........That's what she said.
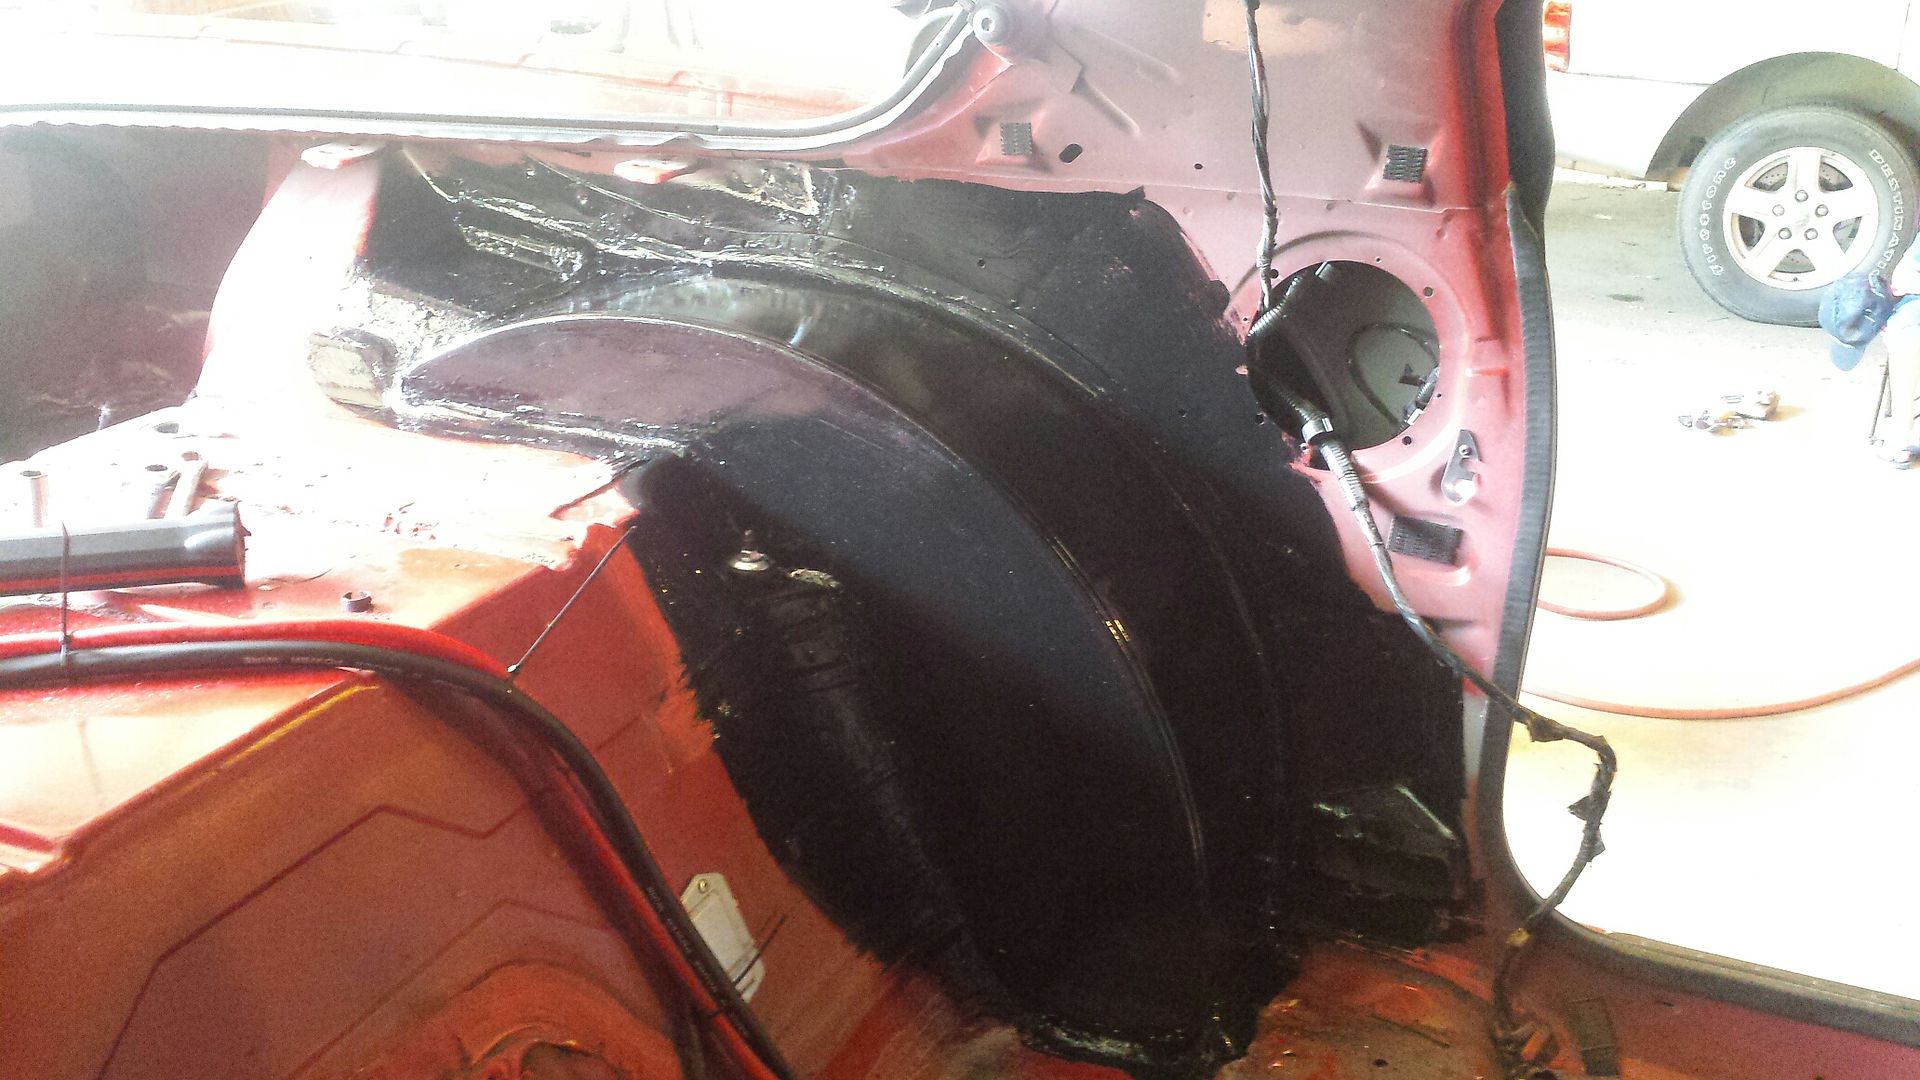
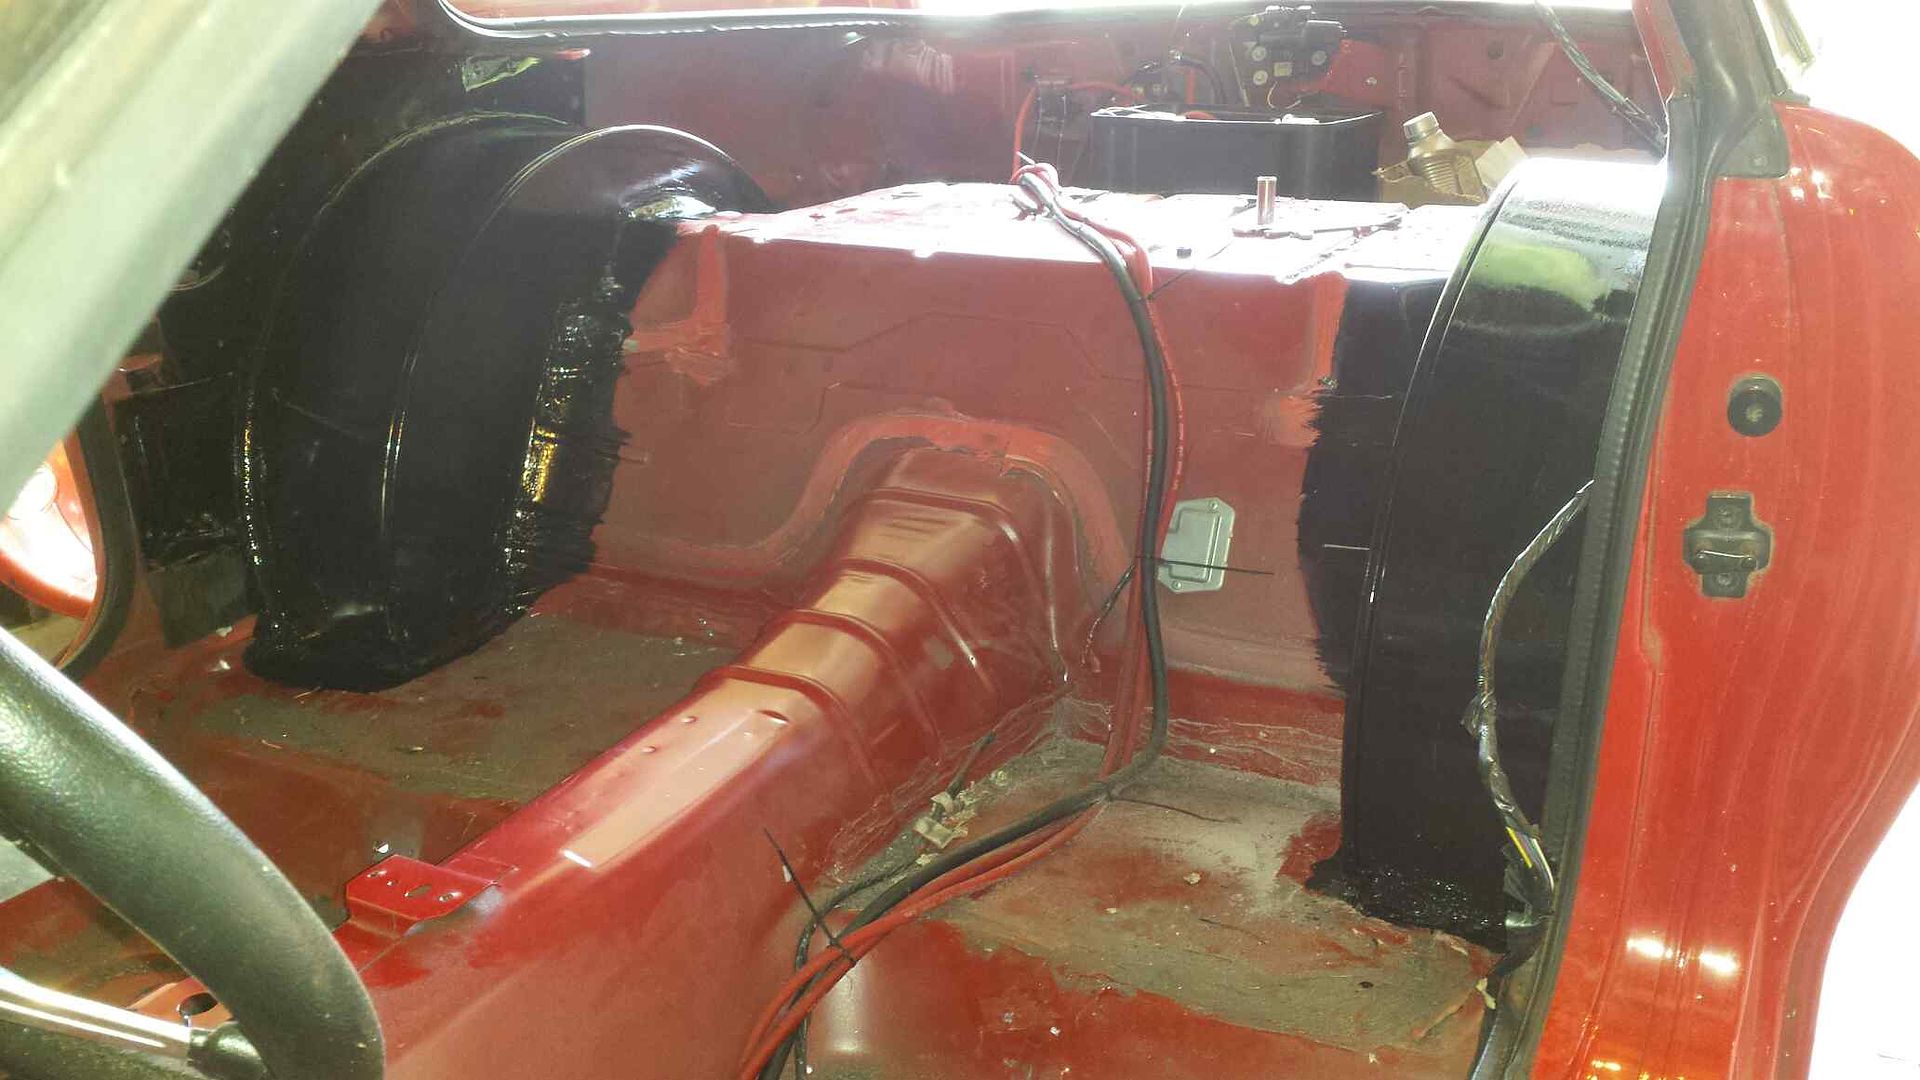
Next afternoon did the same to the passenger side. The black paint is gonna end up going all the way to the roof bc I do not think Im reinstalling the headliner so I'd like it painted. Not sure how much of the rest of the floor Im gonna paint. Car is getting carpet and interior panels back in.
