1993-1996 LED Interior Swap ***How to***
#141
 02-25-2015, 04:08 PM


For all you early 4th generation Camaro owners, this is how you would convert your interior lights to LED. I hope everyone enjoys my write up. Hopefully this thread will be worthy of a sticky
Tools that you will need:
Philips Screwdriver
Flathead Screwdriver
Ratchet
7mm Socket
7mm Wrench (not required but make the job easier)
T15 Torque Bit
Needle Nose Pliers
Soldering Iron (not required, but recommended)
LED list:
Qty | Product / Options | Price/ea |
================================================== ==========
2 | 74-x: Wedge Base LED bulb | $ 1.19 |
74-W: Cool White
------------------------------------------------------------
1 | NEOx-xHP: NEOx High Power LED Instrument bulb| $ 2.29 |
NEO3-WHP: 3mm NEO3-xHP Cool White
------------------------------------------------------------
2 | 4410-x9: 9 LED Festoon bulb | $ 4.74 |
4410-CW9: Cool White
------------------------------------------------------------
7 | WLED-x5: 5 LED Wide Angle Wedge Base Bulb| $ 3.94 |
WLED-CW5: Cool White
------------------------------------------------------------
1 | RL4410-xHP9 Rigid Loop Festoon bulb | $ 5.95 |
Cool White RL4410-CWHP9
Note: I ordered my LED�s from superbrightleds.com. Customer service was awesome and shipping was fast. Also had the lowest prices I could find for what I needed.
I tried my best to color code everything in the pictures below for ease.
Red: Philips Head Screw
Green: 7mm Bolt/Screw
Pink: Needs Disconnected
Yellow: Pry Point with Flathead Screwdriver
Aqua: Torque Head Screw
Maroon: Bulbs in cluster to be removed
Grey: Soldering Point
The teardown!
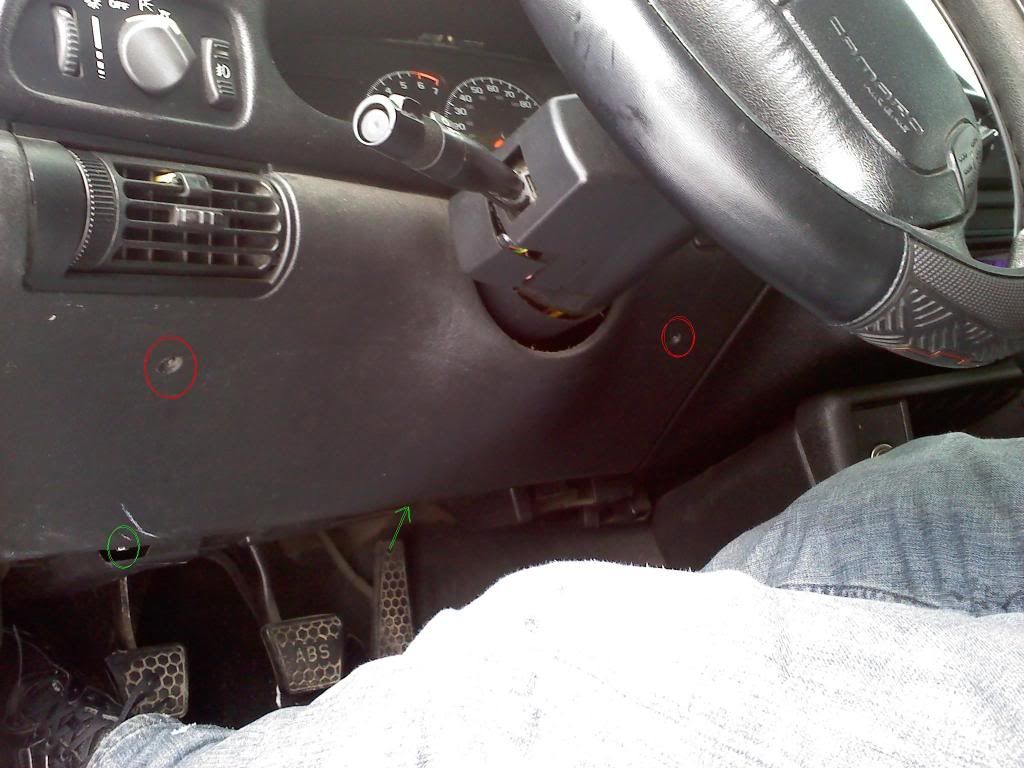
First thing you need to do is remove the panel directly below your steering wheel. It is held in by two Philips head screws and two 7mm bolts. Once it is loose it will pull straight out. There is a harness on the upper right hand corner for your rear defrost (if applicable) that will need to be disconnected to fully remove the panel. Here is a picture showing where all the screws and bolts are.
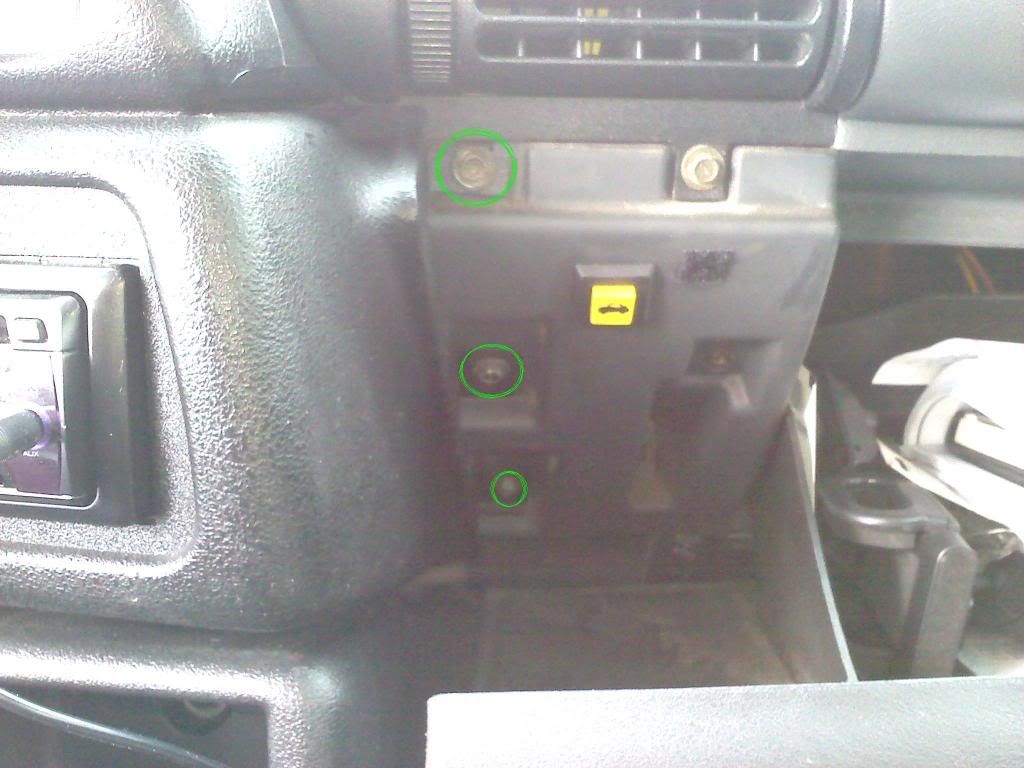
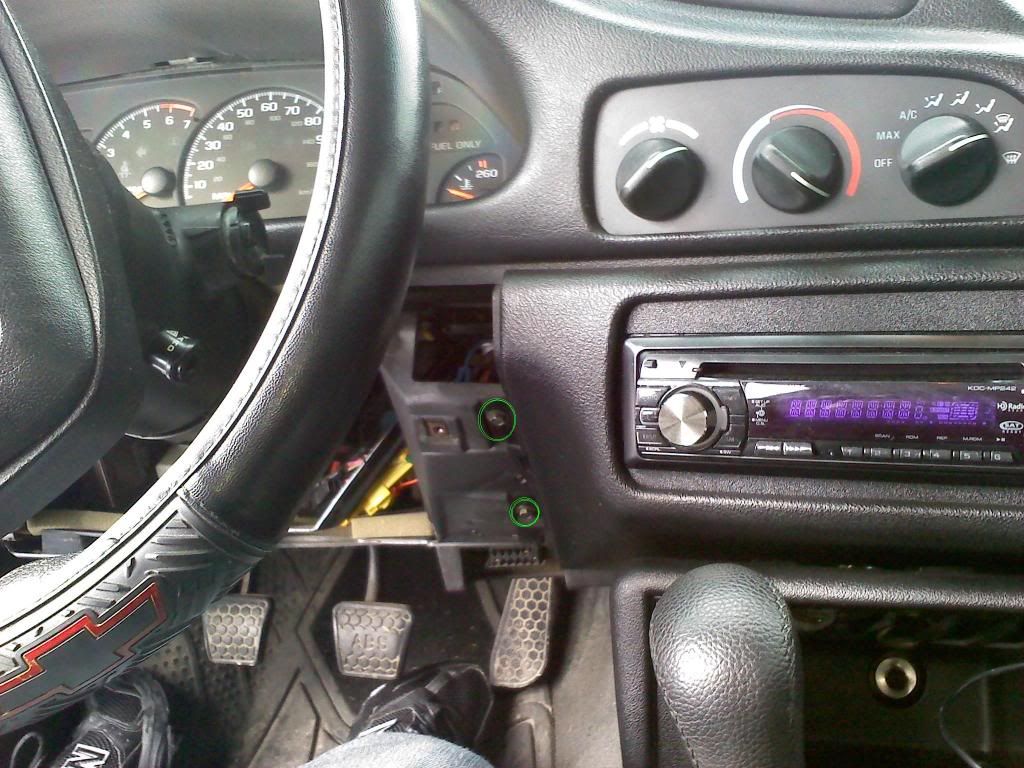
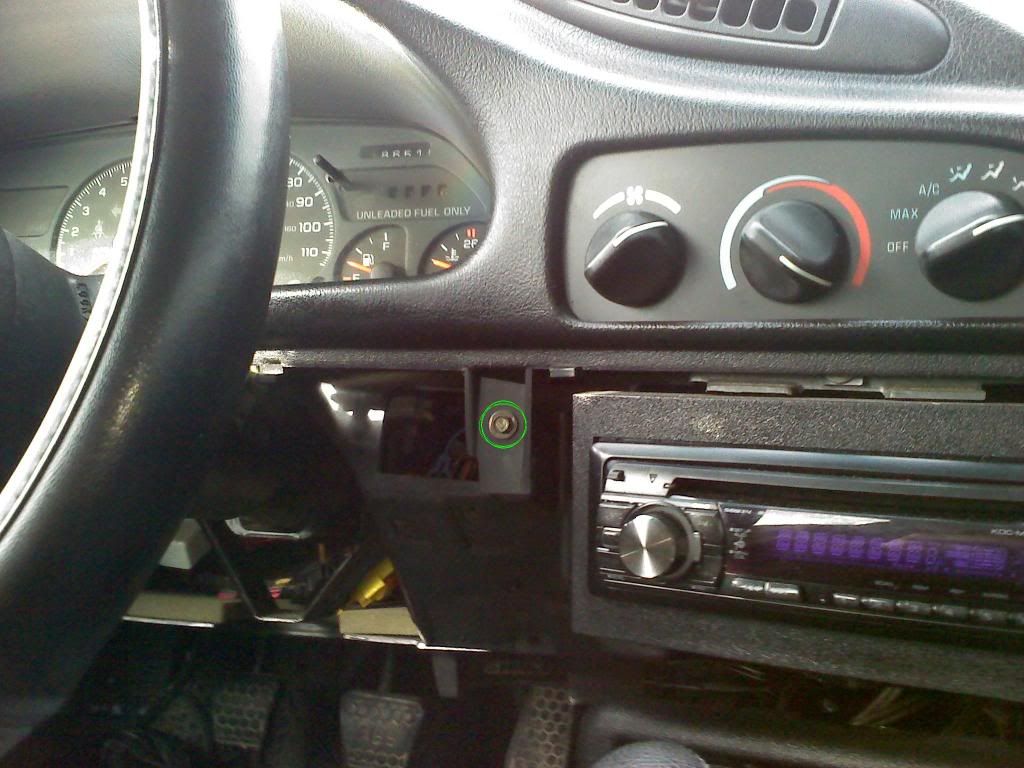
Next thing you need to do is remove the stereo trim. You can do so by accessing all of the 7mm screws in the glove-box and under the panel you just removed. Pics below show the 5 screws that need removed. After taking out the screws the trim will pull straight out.
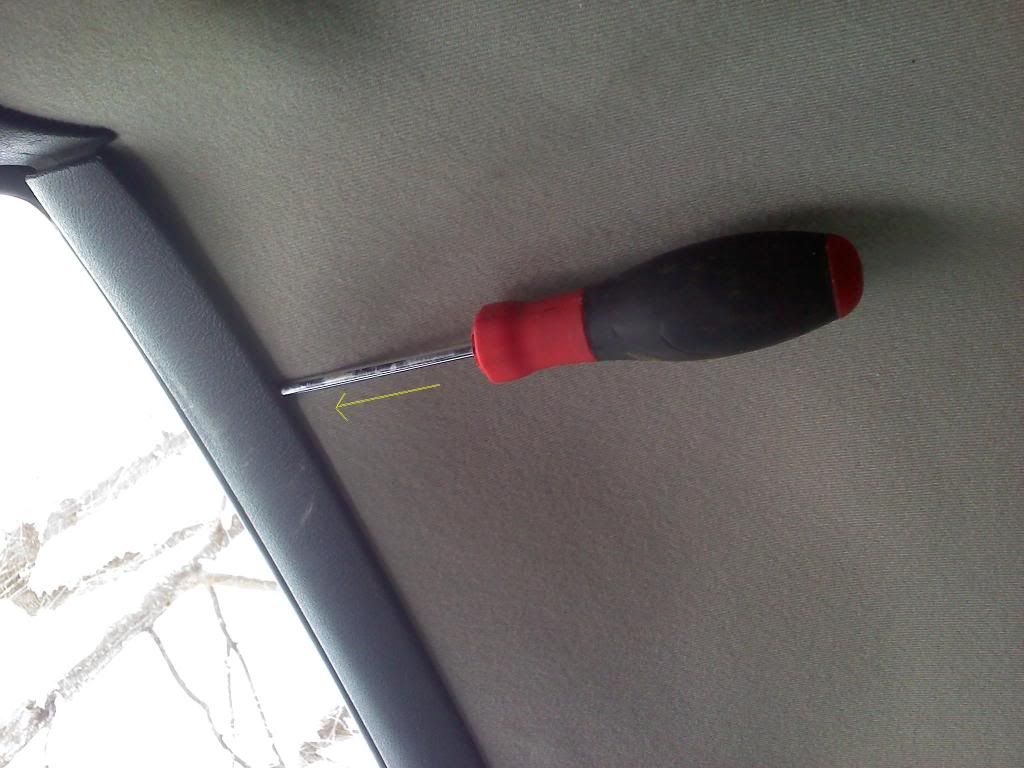
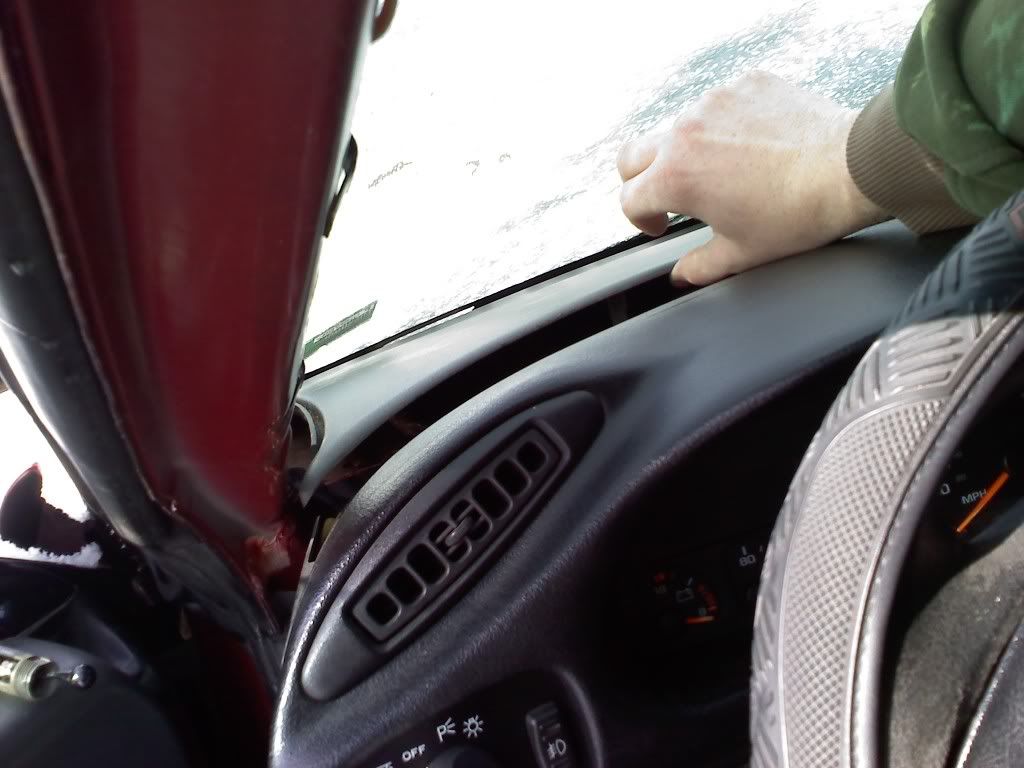
Next on the agenda is to remove the driver�s side A-pillar. Very easy and does not require the removal of any screws or bolts. You�ll want to start at the back of the pillar and work your way forward. The picture below is a great starting point. There are three metal clips that hold the top of it in place. You can pop it outward (while the door is OPEN) with a flat head screwdriver. After the top is loose, you can pop the bottom half out with your hands by pulling it toward your passenger�s side front seat.
After this is done you will be able to lift up the driver�s side of your dash pad. Many people say that in order to remove your gauge cluster, the dash pad has to come out of the car. That�s false. There are two 7mm screws under the very front of the dash pad that holds the gauge cluster trim on. This is where your 7mm wrench will come in handy. It�s easier to fit under the dash pad than a 7mm socket and ratchet. While pulling the driver�s side of the dash pad up, be VERY CAREFUL. They are very brittle and will crack with little to no force. Start on your left side and work your way over to the defrost vent. Here are a couple pics to help. My dash was already cracked so I was a little rough with it.
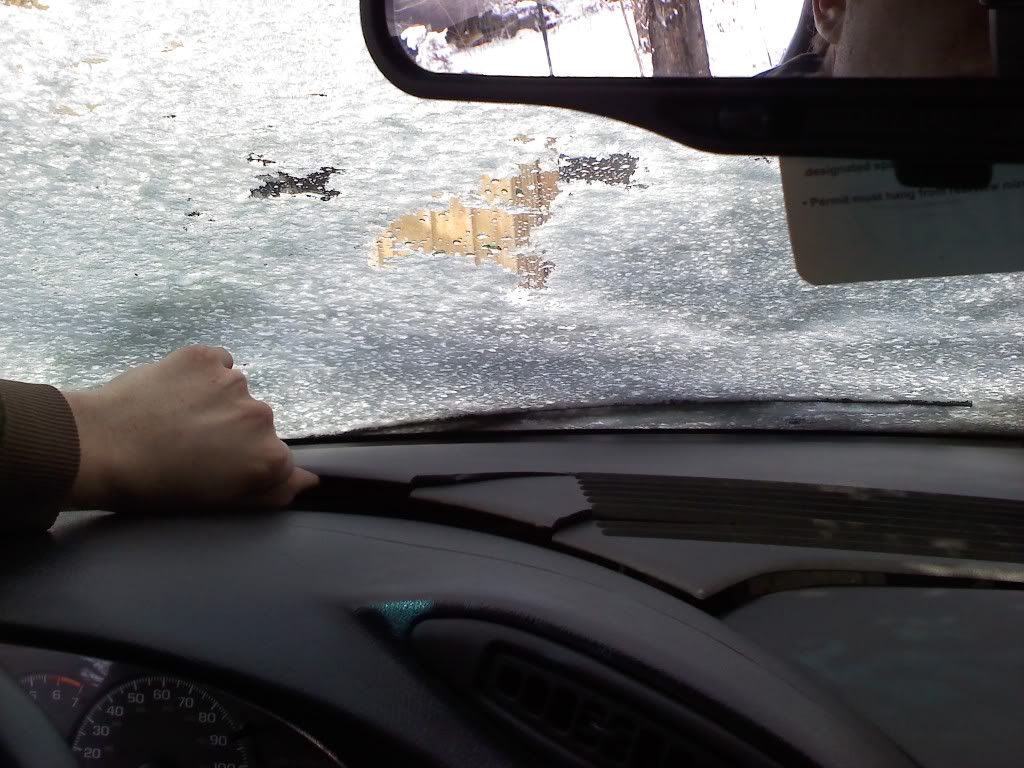
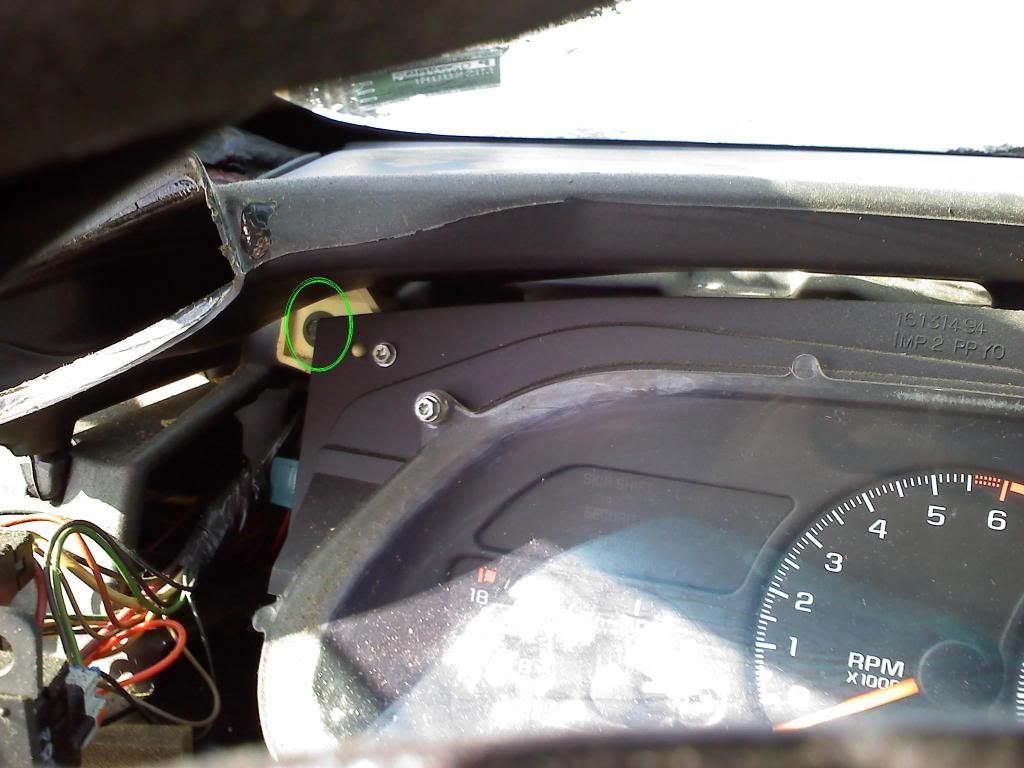
While the dash pad is up about an inch, you can access the two upper screws holding the gauge cluster trim panel in place. Here�s a pic of where the first screw is located.
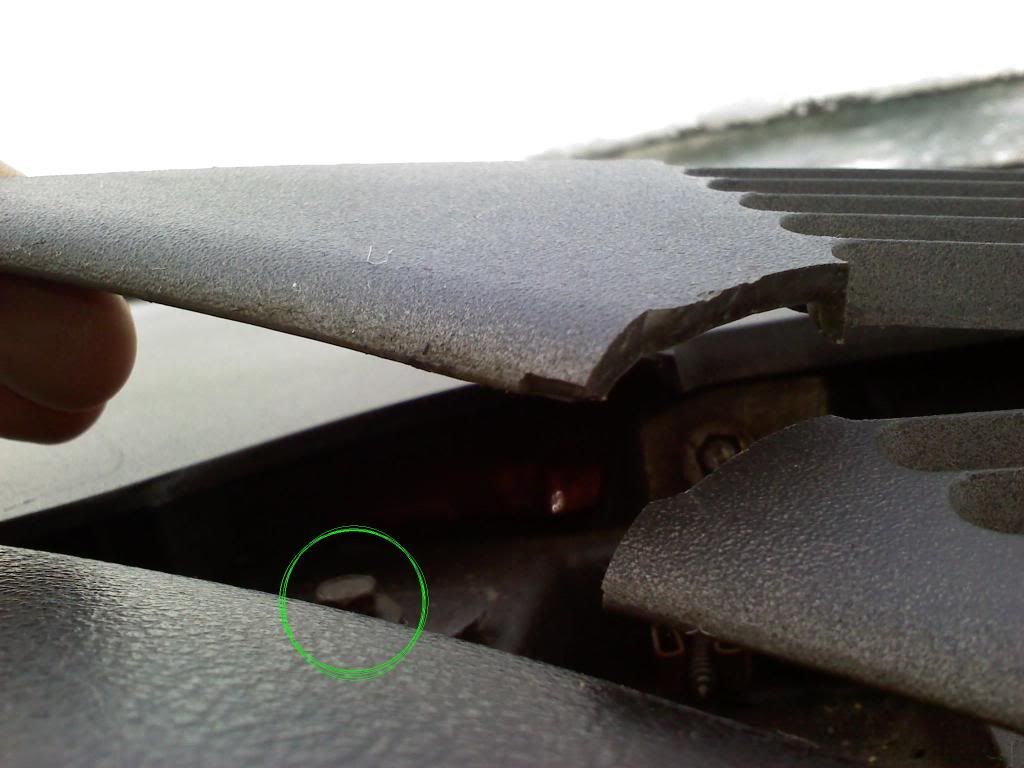
The other is located about three inches to the left of my thumb in this picture. I couldn�t maneuver my phone around to get a clean shot of the screw. This will give you an idea though
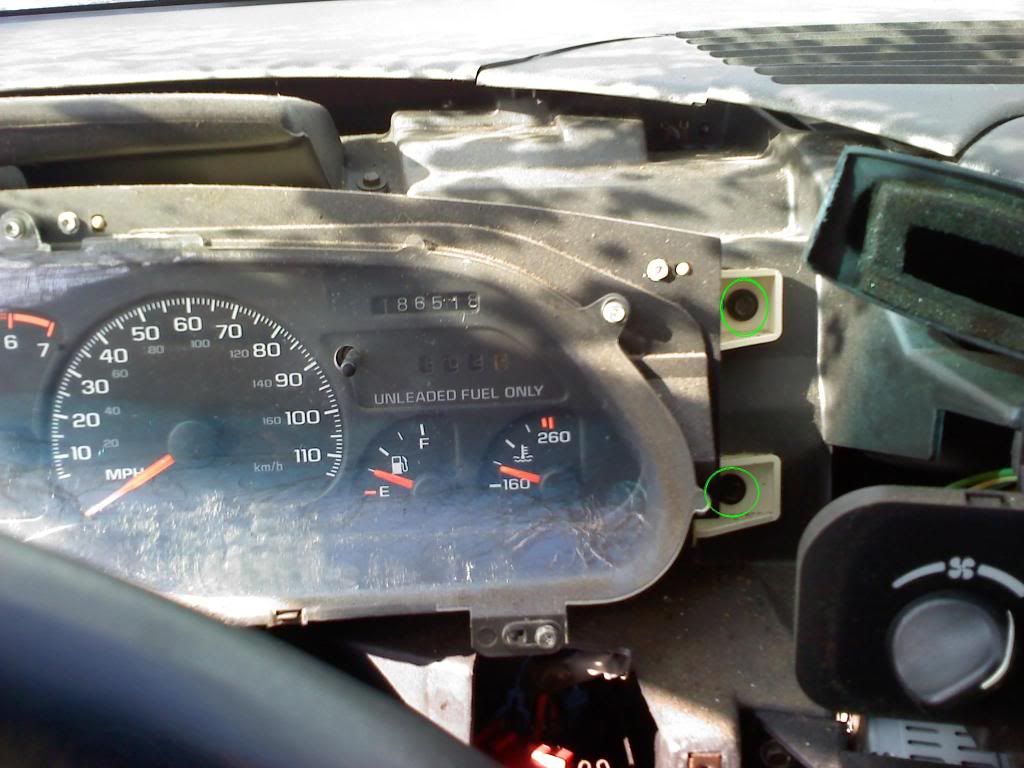
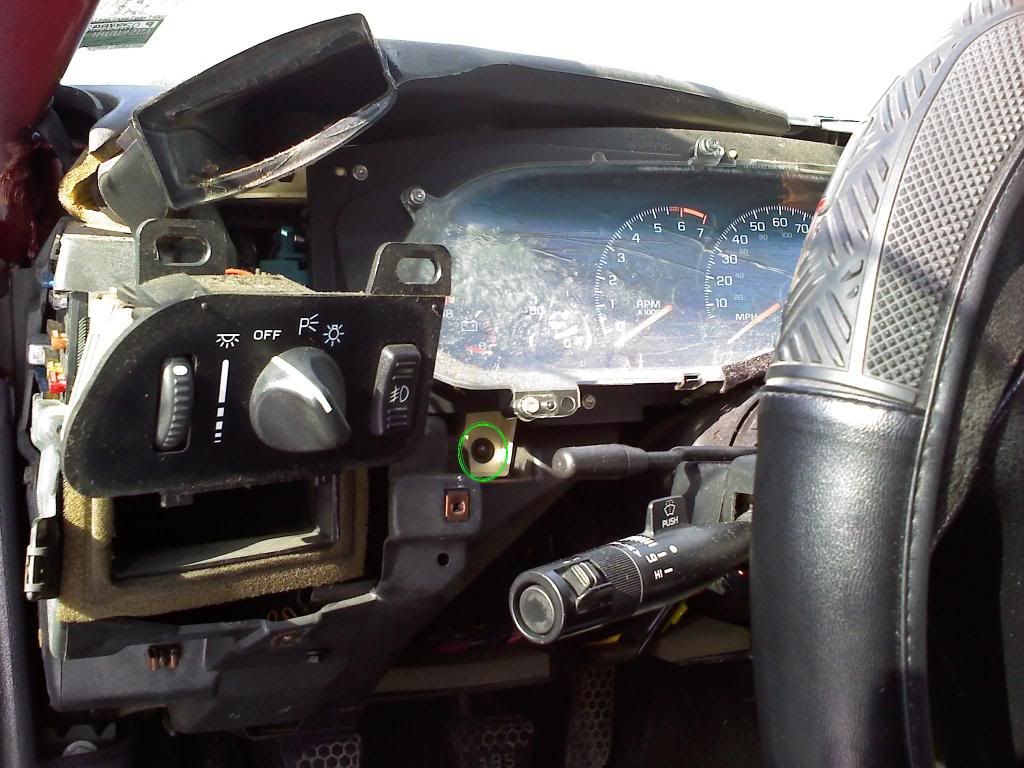
The other three screws that hold the gauge cluster trim panel in place are very easy accessible. Here are pictures showing where they are.
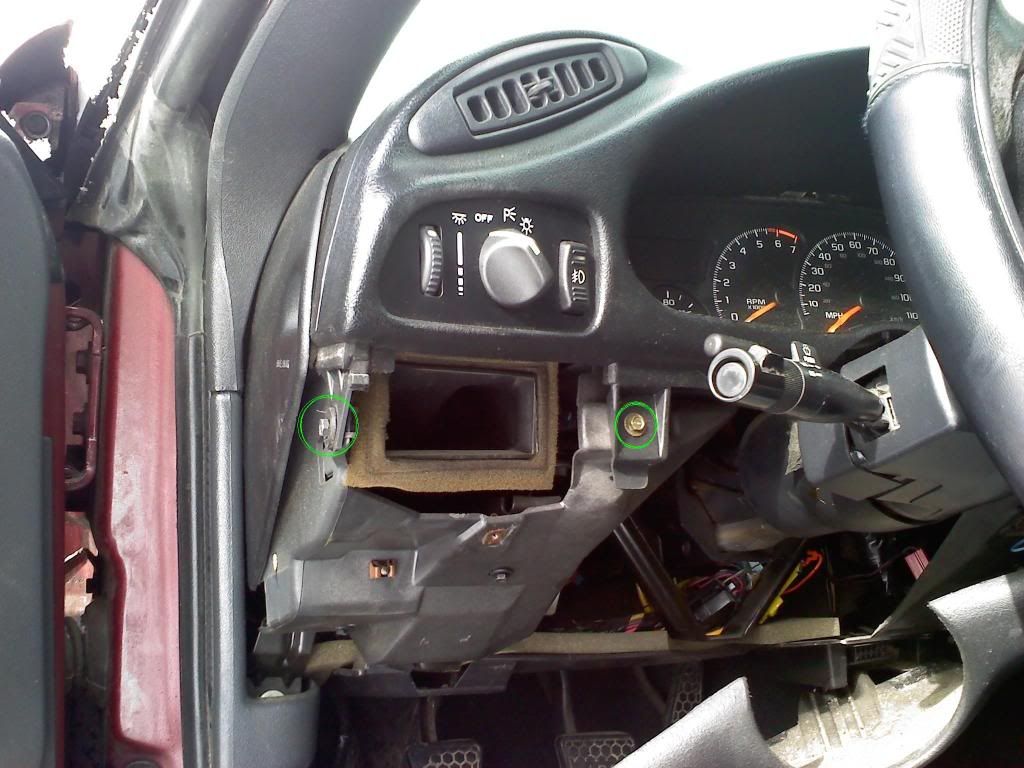
After these three screws are removed, you can then pull the trim piece straight out and up over the steering wheel. This is easily accomplished if the steering wheel is all the way down. Before pulling the trim panel all the way out you will have to dismantle the headlight switch from it. It is very easy and requires no tools. Basically just push in on the top half of it, firmly, and it will pop out the back of the trim panel.
Once the gauge cluster trim piece is out of the way, you will be able to access the four 7mm screws that hold in the gauge cluster. They are as follows:
Once you have these four screws out, you can begin pulling out the gauge cluster. The following picture shows the wiring harness on the side of the cluster. It must be disconnected before you can pull the cluster out all the way.

Once you have your cluster out, this is what you will see on the back of it.
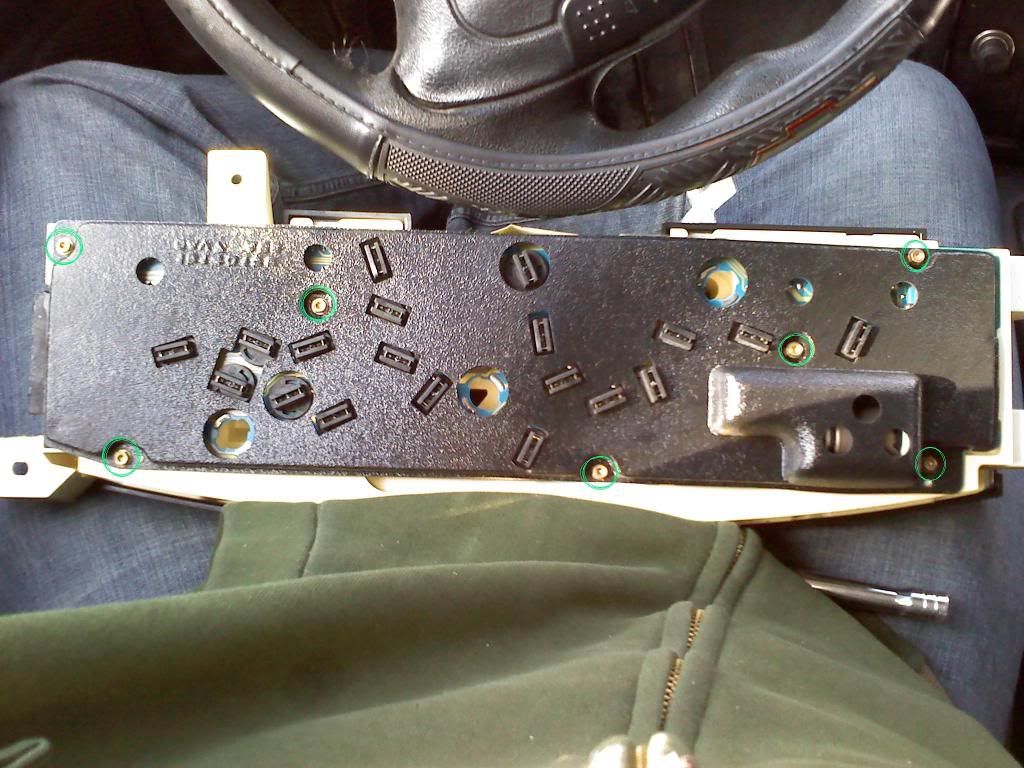
You will have to remove the black panel on the back in order to access the bulbs that need to be replaced. There are 7 T15 torque head screws holding it in place as follows:
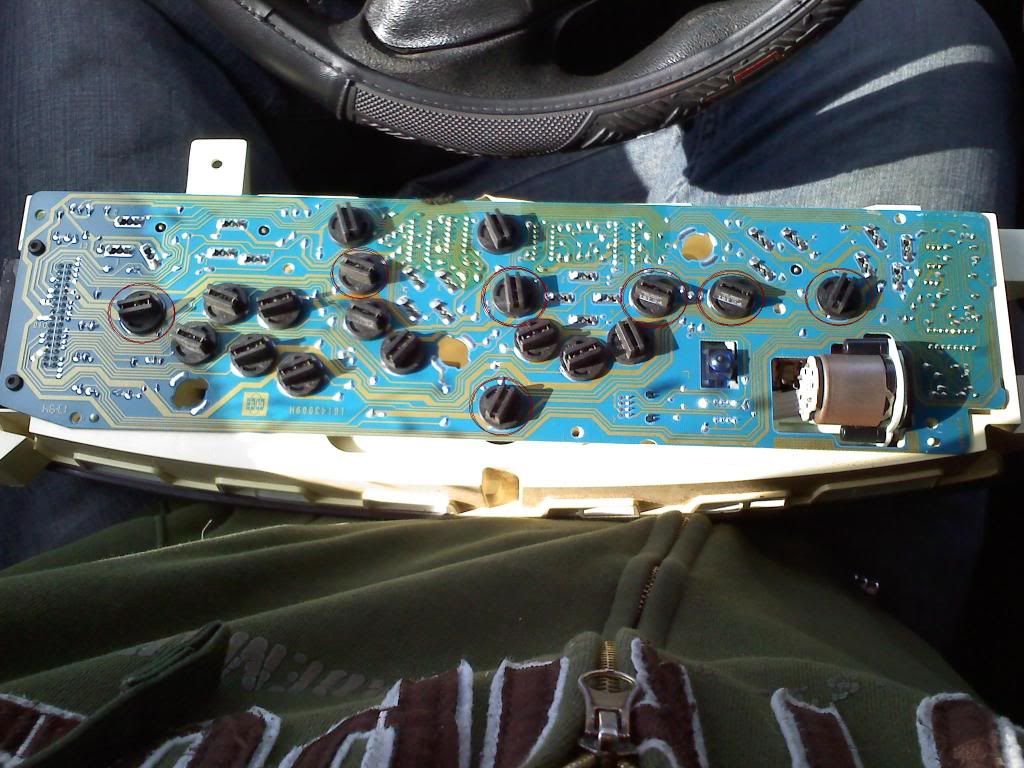
Once the back panel is removed you can then start removing the 7 bulbs that will need to be replaced with LED�s. They are as follows:
Here is a picture of one of the bulbs, once removed:
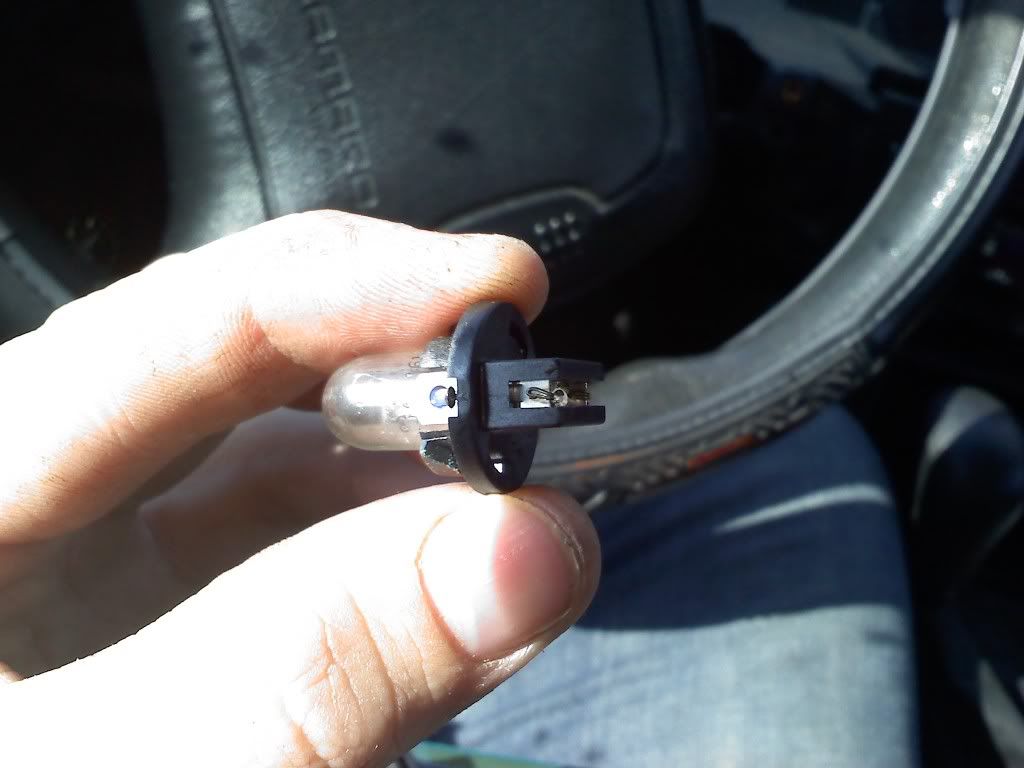
Here�s where people panic. Yes, you have to remove the bulb from the black socket on the back of it. This is where your new LED bulb will go (in the socket). You can push the old bulb out from the back with a flathead screwdriver. Be careful though. The bulbs are glass, not that they need to be saved. I just wouldn�t want anyone to get hurt while using this method. Once you have the old bulb out of the socket, you can fit the new LED bulb into place. Here is a picture of what it will look like:
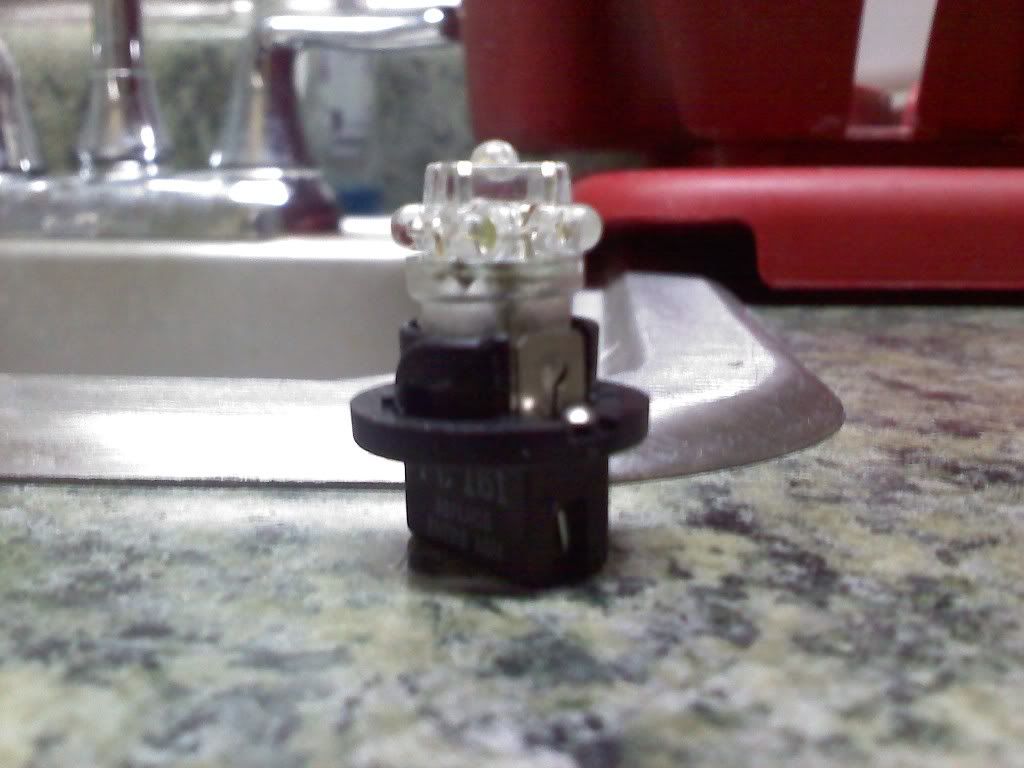
Now here�s a catch. You have to bend the little metal wires coming out of the back of the LED bulb over the metal sides of the socket. Here is the best picture I could find of that. If you make good contact between the wires and the socket, you will NOT need to solder anything.
However just to be safe, I soldered all of my bulbs into the sockets.
As you can see in the picture I circled the soldering point in the sockets. That will also be where your LED bulb wires will be setting. Just solder the suckers into place so they don�t jiggle loose when chirping 3rd gear around all the Honda�s

Once you have all of your old bulbs out of the sockets and replaced with the new shiny LED bulbs, you can put them back in the cluster.
Note: BEFORE putting your dash back together, make sure all of the lights work!!!!!! Otherwise you will be a very unhappy person having to take all of the dash apart again! The main reasoning for the LED�s not working is that they are a one-way bulb. If one or two of them don�t light up when you reconnect the wiring harness for the cluster, take out the socket and bulb from the cluster and flip it around. Kind of like a +/- on a battery. You have to have it the right way for it to work.
Tools that you will need:
Philips Screwdriver
Flathead Screwdriver
Ratchet
7mm Socket
7mm Wrench (not required but make the job easier)
T15 Torque Bit
Needle Nose Pliers
Soldering Iron (not required, but recommended)
LED list:
Qty | Product / Options | Price/ea |
================================================== ==========
2 | 74-x: Wedge Base LED bulb | $ 1.19 |
74-W: Cool White
------------------------------------------------------------
1 | NEOx-xHP: NEOx High Power LED Instrument bulb| $ 2.29 |
NEO3-WHP: 3mm NEO3-xHP Cool White
------------------------------------------------------------
2 | 4410-x9: 9 LED Festoon bulb | $ 4.74 |
4410-CW9: Cool White
------------------------------------------------------------
7 | WLED-x5: 5 LED Wide Angle Wedge Base Bulb| $ 3.94 |
WLED-CW5: Cool White
------------------------------------------------------------
1 | RL4410-xHP9 Rigid Loop Festoon bulb | $ 5.95 |
Cool White RL4410-CWHP9
Note: I ordered my LED�s from superbrightleds.com. Customer service was awesome and shipping was fast. Also had the lowest prices I could find for what I needed.
I tried my best to color code everything in the pictures below for ease.
Red: Philips Head Screw
Green: 7mm Bolt/Screw
Pink: Needs Disconnected
Yellow: Pry Point with Flathead Screwdriver
Aqua: Torque Head Screw
Maroon: Bulbs in cluster to be removed
Grey: Soldering Point
The teardown!
First thing you need to do is remove the panel directly below your steering wheel. It is held in by two Philips head screws and two 7mm bolts. Once it is loose it will pull straight out. There is a harness on the upper right hand corner for your rear defrost (if applicable) that will need to be disconnected to fully remove the panel. Here is a picture showing where all the screws and bolts are.
Next thing you need to do is remove the stereo trim. You can do so by accessing all of the 7mm screws in the glove-box and under the panel you just removed. Pics below show the 5 screws that need removed. After taking out the screws the trim will pull straight out.
Next on the agenda is to remove the driver�s side A-pillar. Very easy and does not require the removal of any screws or bolts. You�ll want to start at the back of the pillar and work your way forward. The picture below is a great starting point. There are three metal clips that hold the top of it in place. You can pop it outward (while the door is OPEN) with a flat head screwdriver. After the top is loose, you can pop the bottom half out with your hands by pulling it toward your passenger�s side front seat.
After this is done you will be able to lift up the driver�s side of your dash pad. Many people say that in order to remove your gauge cluster, the dash pad has to come out of the car. That�s false. There are two 7mm screws under the very front of the dash pad that holds the gauge cluster trim on. This is where your 7mm wrench will come in handy. It�s easier to fit under the dash pad than a 7mm socket and ratchet. While pulling the driver�s side of the dash pad up, be VERY CAREFUL. They are very brittle and will crack with little to no force. Start on your left side and work your way over to the defrost vent. Here are a couple pics to help. My dash was already cracked so I was a little rough with it.
While the dash pad is up about an inch, you can access the two upper screws holding the gauge cluster trim panel in place. Here�s a pic of where the first screw is located.
The other is located about three inches to the left of my thumb in this picture. I couldn�t maneuver my phone around to get a clean shot of the screw. This will give you an idea though
The other three screws that hold the gauge cluster trim panel in place are very easy accessible. Here are pictures showing where they are.
After these three screws are removed, you can then pull the trim piece straight out and up over the steering wheel. This is easily accomplished if the steering wheel is all the way down. Before pulling the trim panel all the way out you will have to dismantle the headlight switch from it. It is very easy and requires no tools. Basically just push in on the top half of it, firmly, and it will pop out the back of the trim panel.
Once the gauge cluster trim piece is out of the way, you will be able to access the four 7mm screws that hold in the gauge cluster. They are as follows:
Once you have these four screws out, you can begin pulling out the gauge cluster. The following picture shows the wiring harness on the side of the cluster. It must be disconnected before you can pull the cluster out all the way.
Once you have your cluster out, this is what you will see on the back of it.
You will have to remove the black panel on the back in order to access the bulbs that need to be replaced. There are 7 T15 torque head screws holding it in place as follows:
Once the back panel is removed you can then start removing the 7 bulbs that will need to be replaced with LED�s. They are as follows:
Here is a picture of one of the bulbs, once removed:
Here�s where people panic. Yes, you have to remove the bulb from the black socket on the back of it. This is where your new LED bulb will go (in the socket). You can push the old bulb out from the back with a flathead screwdriver. Be careful though. The bulbs are glass, not that they need to be saved. I just wouldn�t want anyone to get hurt while using this method. Once you have the old bulb out of the socket, you can fit the new LED bulb into place. Here is a picture of what it will look like:
Now here�s a catch. You have to bend the little metal wires coming out of the back of the LED bulb over the metal sides of the socket. Here is the best picture I could find of that. If you make good contact between the wires and the socket, you will NOT need to solder anything.
However just to be safe, I soldered all of my bulbs into the sockets.
As you can see in the picture I circled the soldering point in the sockets. That will also be where your LED bulb wires will be setting. Just solder the suckers into place so they don�t jiggle loose when chirping 3rd gear around all the Honda�s
Once you have all of your old bulbs out of the sockets and replaced with the new shiny LED bulbs, you can put them back in the cluster.
Note: BEFORE putting your dash back together, make sure all of the lights work!!!!!! Otherwise you will be a very unhappy person having to take all of the dash apart again! The main reasoning for the LED�s not working is that they are a one-way bulb. If one or two of them don�t light up when you reconnect the wiring harness for the cluster, take out the socket and bulb from the cluster and flip it around. Kind of like a +/- on a battery. You have to have it the right way for it to work.


Thread
Thread Starter
Forum
Replies
Last Post