How To Replace Burnt Out Lightbulbs Behind Your Dash
#1
 12-21-2010, 07:28 AM


I recommend using a 7mm nut driver. There's some screws that are hard to reach, but a nut driver works great for them. Start by unscrewing the 2 screws that holds the outer most bezel around the cluster. It's only 2 screws, behind it there are plastic pegs with metal clips that holds the bottom in place. Just pull it forward and tilt the top out first. I put my steering wheel all the way down to give a little more room. There's a bunch of screws all around the cluster which is where the nut driver comes in handy. They should all be 7mm. I can never seem to get the whole cluster out at once, so I unclip the clear plastic bezel while the cluster is still plugged in. Takes a little finessing, but it's possible. If you can get all of it out together, then more power to you. Finally, pull the cluster out. It's just a single plug in the back, pull straight out. Then figure out which bulbs are out and replace them (194 bulbs). I use a pair of pliers to gently twist the bulbs out (they're in little holders, you can tell as soon as you see them). Assembly is the same in reverse. Just make sure you plug the cluster in and test the bulbs before fully reassembling everything.
Here's a few photos of what it should look like. Not the greatest pics, but I circled in pink some of the key things I pointed out.
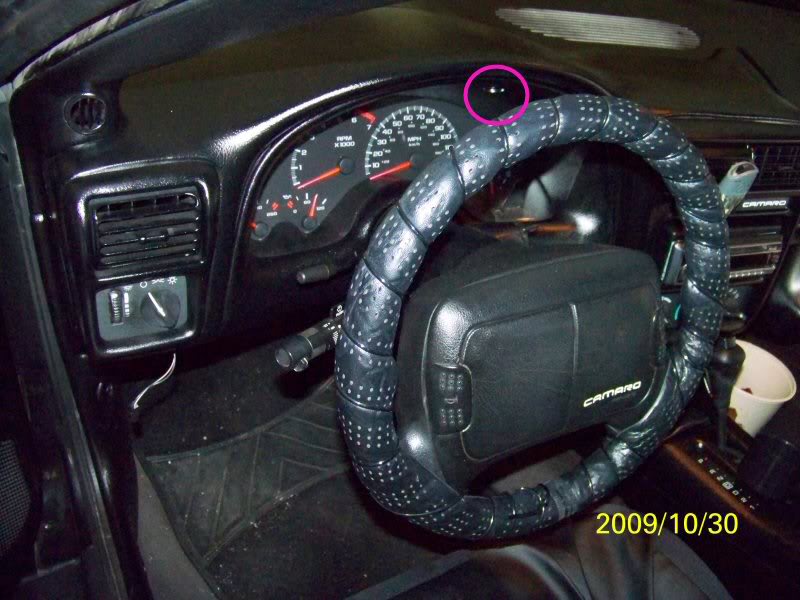
One of the two screws is circled that needs to come out first.
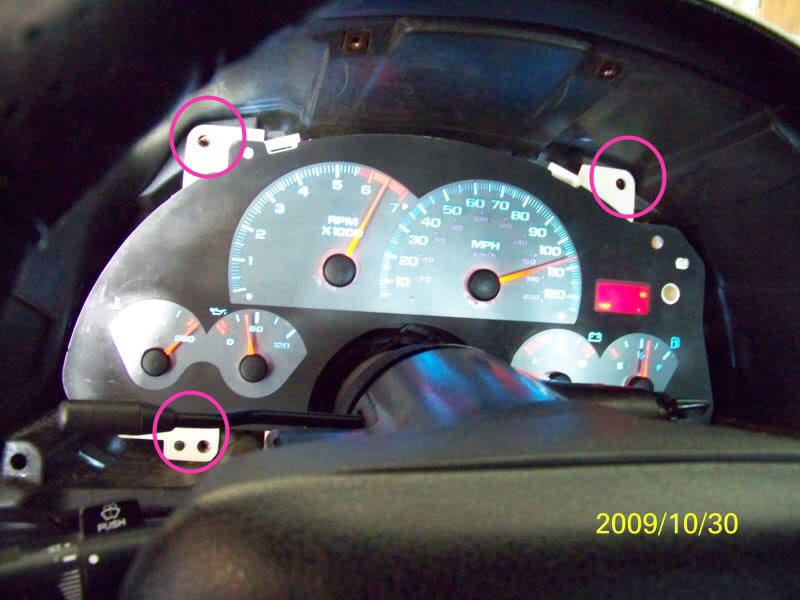
The screws around the cluster itself
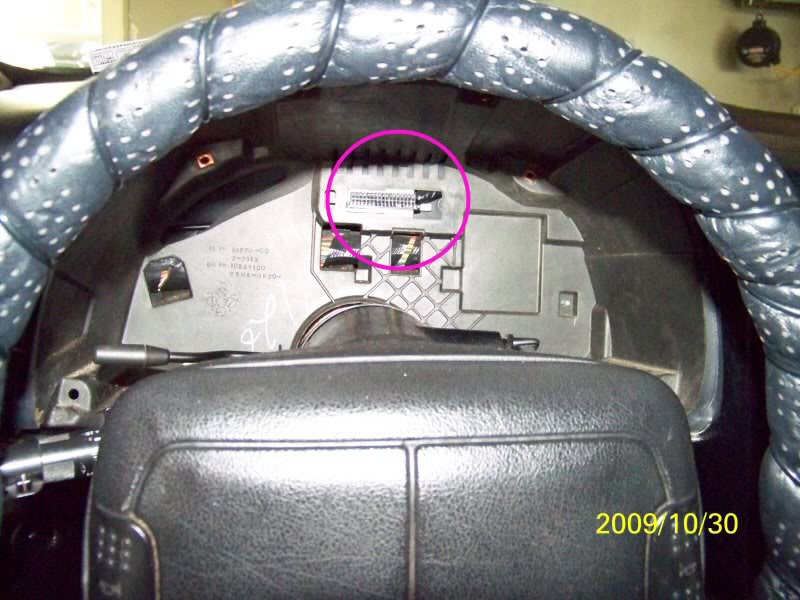
The plug
Here's a few photos of what it should look like. Not the greatest pics, but I circled in pink some of the key things I pointed out.
One of the two screws is circled that needs to come out first.
The screws around the cluster itself
The plug
#2
01-04-2012, 02:51 AM

(So i decided to replace a bunch of my burnt out light bulbs behind my dashboard, and make a detailed/helpful how-to guide with pictures...for people to use in the future. Feel free to sticky this!)
1. Buy a few new #194 bulbs from your local auto parts store

2. Take a picture of your dashboard to see what bulbs are burnt out and where, and then disconnect your battery.
3. Tilt steering wheel column down all the way
4. Using a 7mm socket, undo the two bolts under the top center part of the black plastic dash surround, once these are done, you’ll be able to remove the entire plastic surround to get access to the dash/gauge cluster (it may help to remove the small cover right below the tilt adjustment lever…it helps to remove the surround by taking it out from the passenger side/right side of the wheel)
5. Now using that 7mm socket, you’ll see two bolts on the upper part of the clear plastic gauge cluster cover, one on the left side by the 3,000 on the tach and the other on the right above where your security light or trip oil reset is

6. Grab a cold beer and take a drink

7. Now if you look towards the lower edge of either side of the dashboard clear cover, you’ll see a bolt on both sides of the wheel. Use the 7mm to undo these. I think it helps to tilt the steering wheel all the way up or if you have to remove the lower dashboard/knee panel with a few Phillips screws


8. Before you pull the dash out, make sure you have a total of six 6 7mm bolts
9. I found the best way to take the dash out, is to push the top part forward towards the front of the car, use your arms to hold the steering wheel tilted down as low as it can go, and then grab the bottom of the gauge cluster, and pull it out of the dash (just be very careful when you have out of the car not to drop it)


10. When you have the gauge cluster out, maybe take the chance to wipe up the dirt and dust that lay in the black plastic hole in your dashboard, if you need to install whiteface gauges, just pop out a few clips on the clear plastic cover and you’re good to go.


11. To replace the burnt out bulbs, you’ll see eight black covers, use a pliers to gently twist out the burn out bulb and replace it with a new #194 bulb


12. If you want to upgrade to LED bulbs, just put those new ones in, in place of the regular bulbs
13. Once all the bulbs are changed, put the gauge cluster back into the dashboard slot, and make sure it plugs into the white plug that you see in the empty slot

14. Reconnect your battery, and turn on your lights to see that the replaced bulbs are lit properly…once you’ve got everything lit up, go ahead and do the reverse of steps 7-3....get this all done AND:

You’re good to go! Now go grab another cold one
If you have any questions or need help, shoot me a DM
~Robby
1. Buy a few new #194 bulbs from your local auto parts store
2. Take a picture of your dashboard to see what bulbs are burnt out and where, and then disconnect your battery.
3. Tilt steering wheel column down all the way
4. Using a 7mm socket, undo the two bolts under the top center part of the black plastic dash surround, once these are done, you’ll be able to remove the entire plastic surround to get access to the dash/gauge cluster (it may help to remove the small cover right below the tilt adjustment lever…it helps to remove the surround by taking it out from the passenger side/right side of the wheel)
5. Now using that 7mm socket, you’ll see two bolts on the upper part of the clear plastic gauge cluster cover, one on the left side by the 3,000 on the tach and the other on the right above where your security light or trip oil reset is
6. Grab a cold beer and take a drink
7. Now if you look towards the lower edge of either side of the dashboard clear cover, you’ll see a bolt on both sides of the wheel. Use the 7mm to undo these. I think it helps to tilt the steering wheel all the way up or if you have to remove the lower dashboard/knee panel with a few Phillips screws
8. Before you pull the dash out, make sure you have a total of six 6 7mm bolts
9. I found the best way to take the dash out, is to push the top part forward towards the front of the car, use your arms to hold the steering wheel tilted down as low as it can go, and then grab the bottom of the gauge cluster, and pull it out of the dash (just be very careful when you have out of the car not to drop it)
10. When you have the gauge cluster out, maybe take the chance to wipe up the dirt and dust that lay in the black plastic hole in your dashboard, if you need to install whiteface gauges, just pop out a few clips on the clear plastic cover and you’re good to go.
11. To replace the burnt out bulbs, you’ll see eight black covers, use a pliers to gently twist out the burn out bulb and replace it with a new #194 bulb
12. If you want to upgrade to LED bulbs, just put those new ones in, in place of the regular bulbs
13. Once all the bulbs are changed, put the gauge cluster back into the dashboard slot, and make sure it plugs into the white plug that you see in the empty slot
14. Reconnect your battery, and turn on your lights to see that the replaced bulbs are lit properly…once you’ve got everything lit up, go ahead and do the reverse of steps 7-3....get this all done AND:
You’re good to go! Now go grab another cold one
If you have any questions or need help, shoot me a DM
~Robby
#3
01-04-2012, 04:08 AM

does replacing these bulbs also take care of the other lights that come on on the dash panel? (check engine, abs inop, airbag, etc).
and this might sound a little dumb, but what is the point of disconnecting the battery? thanks.
and this might sound a little dumb, but what is the point of disconnecting the battery? thanks.
#4
01-04-2012, 10:29 AM


Join Date: Oct 2007
Location: The 'Burbs of Chicago
Posts: 18,306
Nice write up RPD, and thanks for the many pictures. Instead of cluttering with a lot of stickies, we have a how-to section for links to threads like this. I put a link to this one in the second post: https://camaroforums.com/forum/4th-g...rt-here-38462/
One suggestion, since the bulbs are relatively cheap, I would recommend replacing them all while the cluster is out and in your lap nice and handy, whether they're burned out or not. Once one bulb goes, the others could be soon to follow.
One suggestion, since the bulbs are relatively cheap, I would recommend replacing them all while the cluster is out and in your lap nice and handy, whether they're burned out or not. Once one bulb goes, the others could be soon to follow.
#5
01-04-2012, 11:51 AM

im liking the details with all the pictures!
if i use LED bulbs, would it mess with voltage or the dimmer? my dash is so dim.. i think its a bad ground though could be tired bulbs
only thing i woulda add woulda been a before pic
if i use LED bulbs, would it mess with voltage or the dimmer? my dash is so dim..
i think its a bad ground though could be tired bulbsonly thing i woulda add woulda been a before pic
#6
01-04-2012, 12:34 PM

you always disconnect the battery before u do anything that has anything to do with electrical. just do it! don't ask why! just do it! haha just kidding, its just a safety precaution so that nothing gets fried or something quirky happens and somehow the airbag goes off in your face. nothing like having one go off while your face is inches from it.
